


 本文深入探讨了PyTorch中LSTM模型的输出层与隐藏层在单层和多层网络中的差异,并通过实例展示了batch_first参数对输出的影响。在单层网络中,输出层和隐藏层的效果相同,但在多层网络中,隐藏层包含了更多信息。此外,设置batch_first=True或False主要影响输出层的维度排列,但不影响隐藏层。建议使用隐藏层进行全连接,以利用其更多信息的优势。
还记得寒假,我也纠结过这个问题,当时好像弄清楚了,感觉没什么问题,然后最近上手又感觉有点懵逼,赶紧记下来,免得以后忘记。
网上搜了很多,但是好像没有简单易懂的例子。
输出层or隐藏层?
首先,pytorch中LSTM的输出一般用到的是输出层和隐藏层这两个,另一个细胞状态,我没咋用过,就不讲了。
一般两种用法,要么将输出层全连接然后得出结果,要么用隐藏层全连接,然后得出结果,有学长说用隐藏层效果会好一点。两种用法应该都可以。如果网络只有一层的时候,用输出层和隐藏层是没有任何区别的,当网络层数大于1时,才会有区别。
举个例子就懂了:
# coding: utf-8
import torch
import torch.nn as nn
import torchvision.transforms as transforms
import torchvision.datasets as datasets
import matplotlib.pyplot as plt

input_dim = 28  # 输入维度
hidden_dim = 100  # 隐层的维度
layer_dim = 1  # 1层LSTM
output_dim = 10  # 输出维度
BATCH_SIZE = 32  # 每批读取的
EPOCHS = 10  # 训练10轮


trainsets = datasets.MNIST(root="./data", train=True, download=True, transform=transforms.ToTensor())
testsets = datasets.MNIST(root="./data", train=False, transform=transforms.ToTensor())

train_loader = torch.utils.data.DataLoader(dataset=trainsets, batch_size=BATCH_SIZE, shuffle=True)
test_loader = torch.utils.data.DataLoader(dataset=testsets, batch_size=BATCH_SIZE, shuffle=True)


class LSTM_Model(nn.Module):
    def __init__(self, input_dim, hidden_dim, layer_dim, output_dim):
        super(LSTM_Model, self).__init__()
        self.hidden_dim = hidden_dim
        self.layer_dim = layer_dim
        self.lstm = nn.LSTM(input_dim, hidden_dim, layer_dim, batch_first=True)
        # 全连接层
        self.fc = nn.Linear(hidden_dim, output_dim)

    def forward(self, x):
        # layer_dim, batch_size, hidden_dim
        h0 = torch.zeros(self.layer_dim, x.size(0), self.hidden_dim).requires_grad_().to(device)
        # 初始化cell, state
        c0 = torch.zeros(self.layer_dim, x.size(0), self.hidden_dim).requires_grad_().to(device)
        # 分离隐藏状态,避免梯度爆炸
        lstm_out, (h_n, cn) = self.lstm(x, (h0.detach(), c0.detach()))
        print("-" * 10)
        print("lstm_out.shape", lstm_out.shape)
        print("lstm_out[:, -1].shape", lstm_out[:, -1].shape)
        print("-" * 10)
        print("h_n.shape", h_n.shape)
        print("-" * 10)
        feature_map = torch.cat([h_n[i, :, :] for i in range(h_n.shape[0])], dim=-1)
        print("feature_map.shape", feature_map.shape)
        print("-" * 10)
        print("lstm_out[:, -1]", lstm_out[:, -1])
        print("-" * 10)
        print("feature_map", feature_map)
        print("-" * 10)
        out = self.fc(feature_map)
        print("out", out.shape)
        return out

model = LSTM_Model(input_dim, hidden_dim, layer_dim, output_dim)

device = torch.device("cuda:0" if torch.cuda.is_available() else 'cpu')

# 损失函数
criterion = nn.CrossEntropyLoss()

# 优化器
learning_rate = 0.01
optimizer = torch.optim.SGD(model.parameters(), lr=learning_rate)

# 模型训练
sequence_dim = 28  # 序列长度
loss_list = []
accuracy_list = []
iteration_list = []  # 迭代次数

iter = 0
for epoch in range(EPOCHS):
    for i, (images, labels) in enumerate(train_loader):
        model.train()
        images = images.view(-1, sequence_dim, input_dim).requires_grad_().to(device)
        labels = labels.to(device)
        optimizer.zero_grad()
        # 前向传播
        outputs = model(images)
        # 计算损失
        loss = criterion(outputs, labels)
        # 反向传播
        loss.backward()
        # 更新参数
        optimizer.step()
        # 计数器加1
        iter += 1
        # 模型验证
        if iter % 500 == 0:
            model.eval()  # 声明
            # 计算验证的accuracy
            correct = 0.0
            total = 0.0
            # 迭代测试集,获取数据、预测
            for images, labels in test_loader:
                images = images.view(-1, sequence_dim, input_dim).to(device)
                # 模型预测
                outputs = model(images)
                # 获取预测概率最大值的下标
                predict = torch.max(outputs.data, 1)[1]
                # 统计测试集的大小
                total += labels.size(0)
                # 统计判断预测正确的数量
                if torch.cuda.is_available():
                    correct += (predict.gpu() == labels.gpu()).sum()
                else:
                    correct += (predict == labels).sum()

                    # 计算accuracy
            accuracy = correct / total * 100
            loss_list.append(loss.data)
            accuracy_list.append(accuracy)
            iteration_list.append(iter)
            # 打印信息
            print("loos:{}, Loss:{}, Accuracy:{}".format(iter, loss.item(), accuracy))

plt.plot(iteration_list, loss_list)
plt.xlabel("Number of Iteration")
plt.ylabel("Loss")
plt.title("LSTM")
plt.show()


plt.plot(iteration_list, accuracy_list, color='r')
plt.xlabel("Number of iteration")
plt.ylabel("Accuracy")
plt.title("LSTM")
plt.show()
分析:
input_dim = 28 # 输入步长(seq_len)
hidden_dim = 100 # 隐层的维度(hidden_size)
layer_dim = 1 # 1层LSTM(num_layers)
output_dim = 10 # 输出维度
BATCH_SIZE = 32 # 每批读取的(batch_size)
lstm_out:【batch_size, seq_len, hidden_size * num_directions】
lstm_hn:【num_directions * num_layers, batch_size, hidden_size】
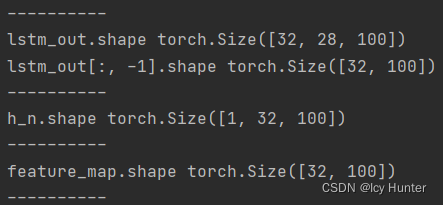
此时我们看到,输出层的最后一步的shape和拼接后的隐藏层的shape是一样的,我们可以打印出具体的数值。
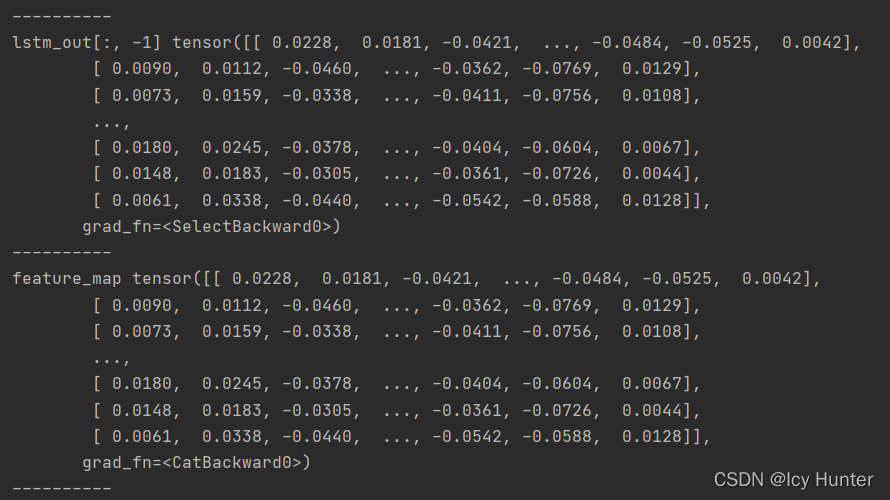
可以看到,这两层的值是一样的,因此当网络为1层的时候输出层和隐藏层的结果没有任何区别。
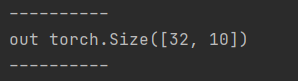
最终输出是【batch_size, num_classes】,应该没什么疑问,因为是十分类任务。
但是当网络超过一层时,可以把上面的代码将层数直接改为2,不出意外应该会报错。
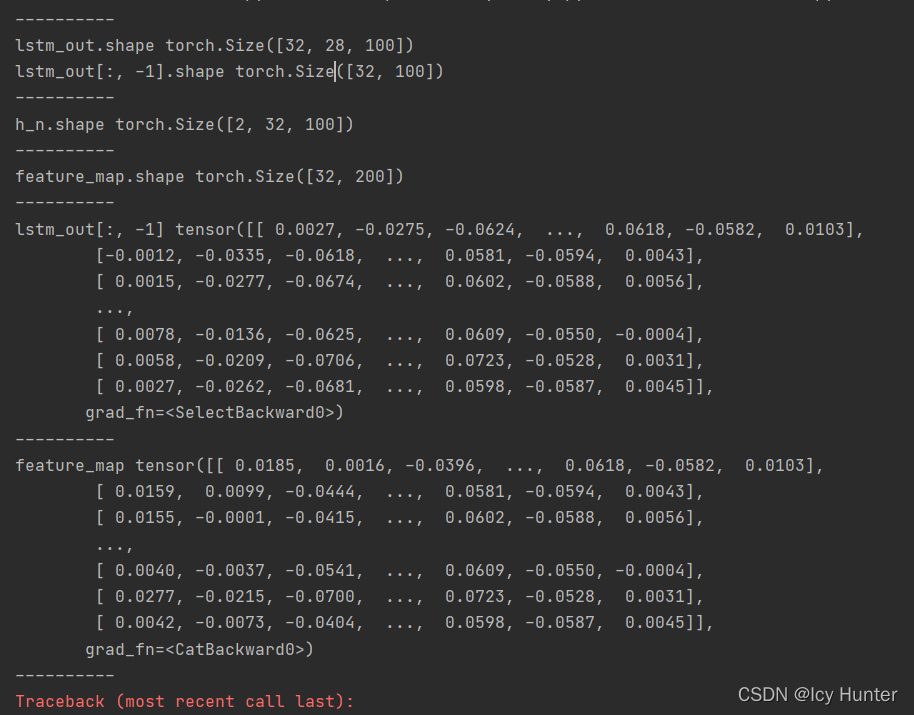
分析结果可以发现,隐藏层的结果比输出层的结果多了一层,同时观察打印出来的结果,可以发现,隐藏层不仅有输出层的信息,还有前一层隐藏层的信息,即隐藏层最终的信息是大于输出层的,因此,说隐藏层效果会好一点也很容易解释,因为包含的信息更多了。
batch_first=True or False输出有什么区别?
首先,LSTM默认batch_first=False,即默认batch_size这个维度是在数据维度的中间的那个维度,即喂入的数据为【seq_len, batch_size, hidden_size】这样的格式。此时
lstm_out:【seq_len, batch_size, hidden_size * num_directions】
lstm_hn:【num_directions * num_layers, batch_size, hidden_size】
当设置batch_first=True时,喂入的数据就为【batch_size, seq_len, hidden_size】这样的格式。此时
lstm_out:【 batch_size, seq_len, hidden_size * num_directions】
lstm_hn:【num_directions * num_layers, batch_size, hidden_size】
举个例子就懂了
batch_first=False的情况:
import torch
import torch.nn as nn


class my_config():
    max_length = 20
    batch_size = 64
    embedding_size = 256
    hidden_size = 128
    num_layers = 2
    dropout = 0.5
    output_size = 2
    lr = 0.001
    epoch = 5


class myLSTM(nn.Module):
    def __init__(self, vocab_size, config: my_config):
        super(myLSTM, self).__init__()
        self.vocab_size = vocab_size
        self.config = config

        self.embeddings = nn.Embedding(vocab_size, self.config.embedding_size)
        self.lstm = nn.LSTM(
            input_size=self.config.embedding_size,
            hidden_size=self.config.hidden_size,
            num_layers=self.config.num_layers,
            dropout=self.config.dropout,
            bidirectional=True
        )

        self.dropout = nn.Dropout(self.config.dropout)
        self.fc = nn.Linear(
            self.config.num_layers * self.config.hidden_size * 2,
            self.config.output_size
        )

        self.softmax = nn.Softmax(dim=-1)

    def forward(self, x):
        embedded = self.embeddings(x)
        lstm_out, (h_n, c_n) = self.lstm(embedded)
        print("-" * 10)
        print("lstm_out.shape", lstm_out.shape)
        print("lstm_out[-1].shape", lstm_out[-1].shape)
        print("-" * 10)
        print("h_n.shape", h_n.shape)
        print("-" * 10)
        feature = self.dropout(h_n)
        print("feature.shape", feature.shape)
        print("-" * 10)
        feature_map = torch.cat([feature[i, :, :] for i in range(feature.shape[0])], dim=-1)
        print("feature_map.shape", feature_map.shape)
        print("-" * 10)
        out = self.fc(feature_map)
        return self.softmax(out)


if __name__ == '__main__':
    config = my_config()
    model = myLSTM(300, config)
    x = torch.randint(0, 100, [20, 64])
    out = model(x)
    print("out.shape", out.shape)
lstm_out:【seq_len, batch_size, hidden_size * num_directions】
lstm_hn:【num_directions * num_layers, batch_size, hidden_size】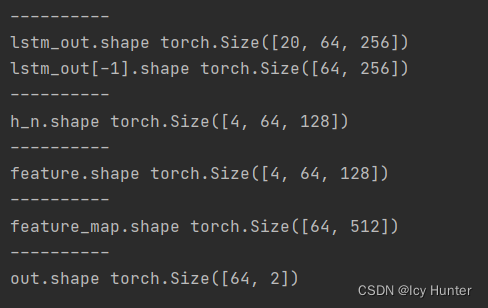
batch_first=True的情况:
import torch
import torch.nn as nn


class my_config():
    max_length = 20
    batch_size = 64
    embedding_size = 256
    hidden_size = 128
    num_layers = 2
    dropout = 0.5
    output_size = 2
    lr = 0.001
    epoch = 5


class myLSTM(nn.Module):
    def __init__(self, vocab_size, config: my_config):
        super(myLSTM, self).__init__()
        self.vocab_size = vocab_size
        self.config = config

        self.embeddings = nn.Embedding(vocab_size, self.config.embedding_size)
        self.lstm = nn.LSTM(
            batch_first=True,
            input_size=self.config.embedding_size,
            hidden_size=self.config.hidden_size,
            num_layers=self.config.num_layers,
            dropout=self.config.dropout,
            bidirectional=True
        )

        self.dropout = nn.Dropout(self.config.dropout)
        self.fc = nn.Linear(
            self.config.num_layers * self.config.hidden_size * 2,
            self.config.output_size
        )

        self.softmax = nn.Softmax(dim=-1)

    def forward(self, x):
        embedded = self.embeddings(x)
        lstm_out, (h_n, c_n) = self.lstm(embedded)
        print("-" * 10)
        print("lstm_out.shape", lstm_out.shape)
        print("lstm_out[:, -1].shape", lstm_out[:, -1].shape)
        print("-" * 10)
        print("h_n.shape", h_n.shape)
        print("-" * 10)
        feature = self.dropout(h_n)
        print("feature.shape", feature.shape)
        print("-" * 10)
        feature_map = torch.cat([feature[i, :, :] for i in range(feature.shape[0])], dim=-1)
        print("feature_map.shape", feature_map.shape)
        print("-" * 10)
        out = self.fc(feature_map)
        return self.softmax(out)


if __name__ == '__main__':
    config = my_config()
    model = myLSTM(300, config)
    x = torch.randint(0, 100, [64, 20])
    out = model(x)
    print("out.shape", out.shape)
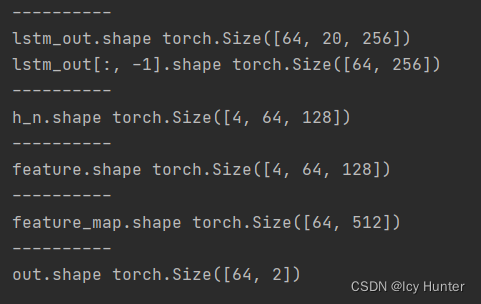
lstm_out:【 batch_size, seq_len, hidden_size * num_directions】
lstm_hn:【num_directions * num_layers, batch_size, hidden_size】
结论
通过上述实例可以发现,用隐藏层代替输出层进入全连接层理论上应该会有更好的效果,且模型batch_first=True or False只对输出层有影响,而对隐藏层的输出是没有影响的,因此,以后都用隐藏层来全连接比好,也不容易搞错。


 3万+
3万+

 被折叠的 条评论
为什么被折叠?
被折叠的 条评论
为什么被折叠?
 到【灌水乐园】发言


