


实验序号及名称:实验 一 安装Hadoop 实验时间∶ 2022年5 月8 日
| 预习内容 |
| 一、实验目的和要求∶ 在虚拟机上安装并熟悉Hadoop |
| 二、实验任务∶ 请各位同学完成如下3个实验中的1个,并提交实验报告:
|
| 三、实验准备方案,包括以下内容: (硬件类实验:实验原理、实验线路、设计方案等) (软件类实验:所采用的系统、组件、工具、核心方法、框架或流程图、程序清单等) 操作系统:CentOS 7 工具:VMWare WorkstationPro |
| 实验内容 |
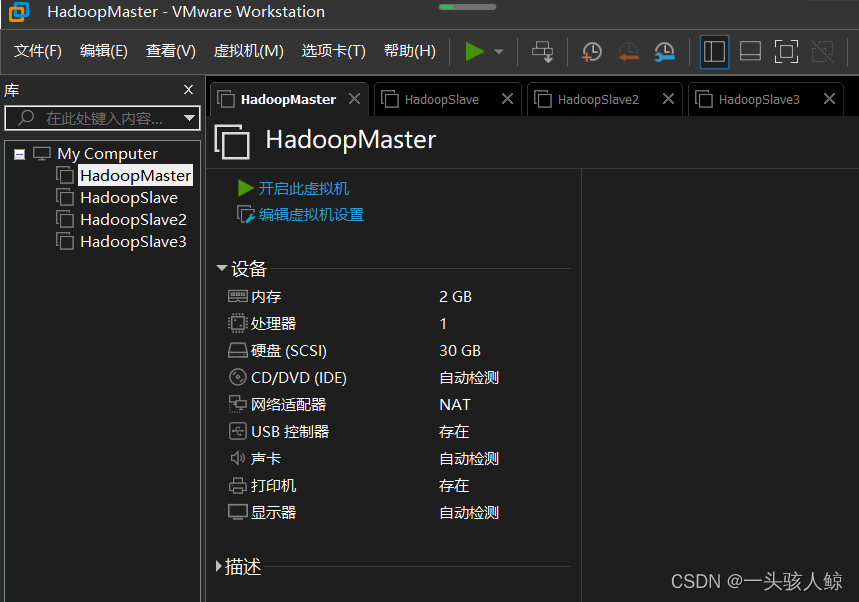
| 一、实验用仪器、设备: 宿主机(个人笔记本2020年联想拯救者R7000): 操作系统:Windows10; 虚拟机(VMWare Workstation): 操作系统:CentOS 7 |
| 二、实验内容与步骤(过程及数据记录): (1) 资源准备下载Hadoop安装包,并因为Hadoop运行需要java支持,所以还要安装jdk;具体下载渠道可以访问官网或者百度云资源,这里使用老师预准备好的资源。 (2) 进行Linux系统配置 分别打开之前安装复制好的虚拟机:HadoopMaster和HadoopSlave并分别对它们做如下操作: [hfut@localhost ~]$ su root
配置时钟同步(HadoopMaster、HadoopSlave、HadoopSlave2、HadoopSlave3) 1.配置自动时钟同步 使用Linux命令配置 [root@localhost hfut]# crontab -e // 编辑crontab服务 键入下面的一行代码,输入i,进入插入模式(星号之间和前后都有空格) 0 1 * * * /usr/sbin/ntpdate cn.pool.ntp.org //分 小时 日 月 每周的第几天 命令 2. 修改时区 [root@localhost hfut]# vi /etc/sysconfig/clock 输入如下内容: ZONE="Asia/Shanghai" 连接到上海时区文件 [root@localhost hfut]# rm /etc/localtime [root@localhost hfut]# ln -sf /usr/share/zoneinfo/Asia/Shanghai /etc/localtime [root@localhost hfut]# reboot 3.手动同步时间 直接在Terminal运行下面的命令: [root@localhost hfut]# /usr/sbin/ntpdate cn.pool.ntp.org 配置用户 1. HadoopMaster 使用vi编辑主机名 [root@localhost hfut]# vi /etc/sysconfig/network 配置信息如下,将HadoopMaster节点的主机名改为master,即下面代码的第2行所示。 NETWORKING=yes HOSTNAME=master 确认修改生效命令 [root@localhost hfut]# hostname master 检测主机名是否修改成功命令如下,在操作之前需要关闭当前终端,重新打开一个终端: [root@localhost hfut]# hostname 执行完命令,会看到下图的打印输出:
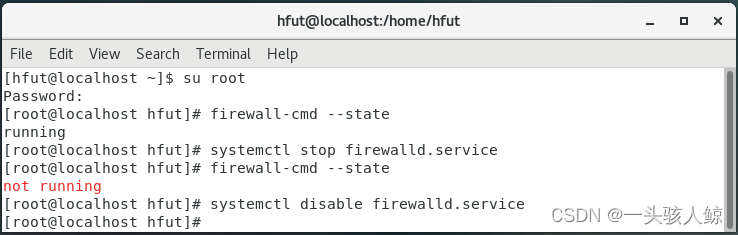
2.HadoopSlave、HadoopSlave2、HadoopSlave3节点 使用vi编辑主机名。 [root@localhost hfut]# vi /etc/sysconfig/network 配置信息如下,将HadoopMaster节点的主机名改为slave,即下面代码的第2行所示。 NETWORKING=yes HOSTNAME=slave HadoopSlave2、HadoopSlave3改成对应的salve2、slave3 确认修改生效命令 [root@localhost hfut]# hostname slave 检测主机名是否修改成功命令如下,在操作之前需要关闭当前终端,重新打开一个终端: [root@localhost hfut]# hostname 执行完命令,会看到下图的打印输出: 关闭防火墙(HadoopMaster、HadoopSlave、HadoopSlave2、HadoopSlave3) 查看防火墙状态 [root@localhost hfut]# firewall-cmd --state 关闭防火墙 [root@localhost hfut]# systemctl stop firewalld.service 禁止firewall开机启动 [root@localhost hfut]# systemctl disable firewalld.service
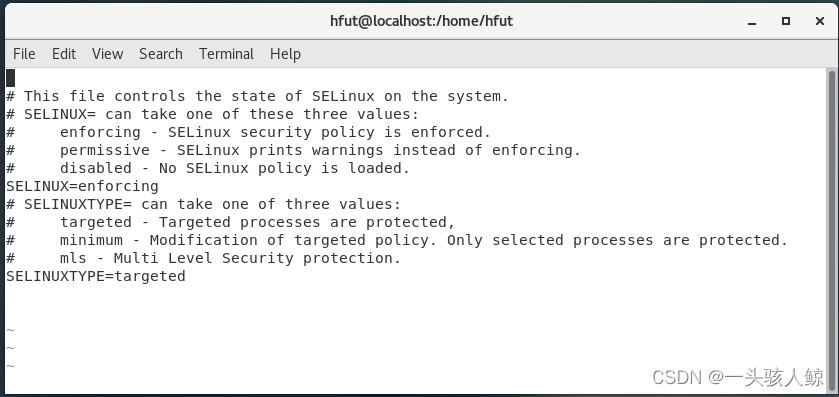
永久关闭SELinux(HadoopMaster、HadoopSlave、HadoopSlave2、HadoopSlave3) [root@localhost hfut]# vi /etc/sysconfig/selinux
找到行SELINUX=enforcing,替换为SELINUX=disabled保存退出,reboot [root@localhost hfut]# reboot 重启后运行命令sestatus [root@localhost hfut]# sestatus
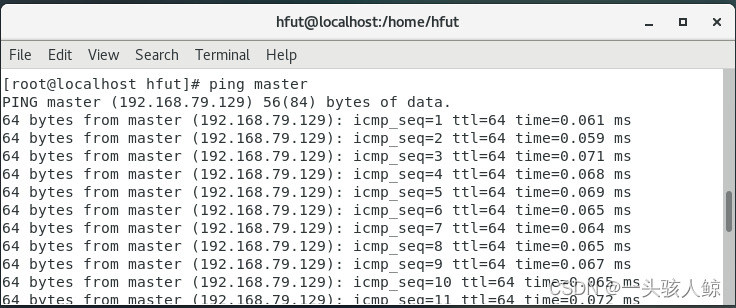
SELinux status: disabled,永久关闭selinux成功 配置hosts表(HadoopMaster、HadoopSlave、HadoopSlave2、HadoopSlave3) 需要在root用户下(使用su命令),编辑主机名列表的命令: [root@master hfut]# vi /etc/hosts 将下面两行添加到/etc/hosts文件中: 192.168.79.129 master 192.168.79.130 slave 192.168.79.131 slave2 192.168.79.132 slave3 验证是否配置成功的命令是: [root@master hfut]# ping master [root@master hfut]# ping slave [root@master hfut]# ping slave2 [root@master hfut]# ping slave3 如果出现下图的信息表示配置成功:
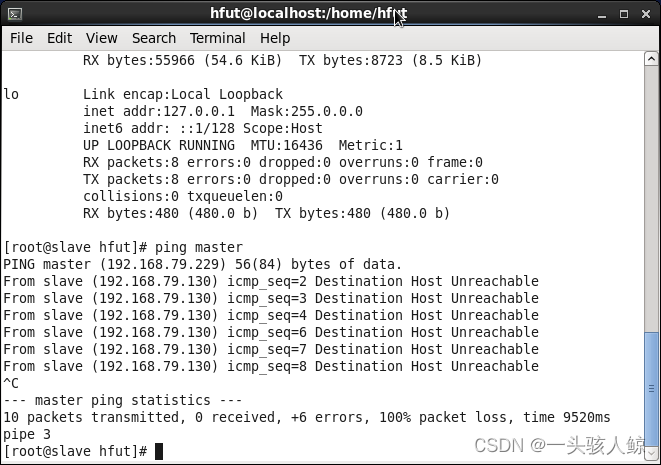
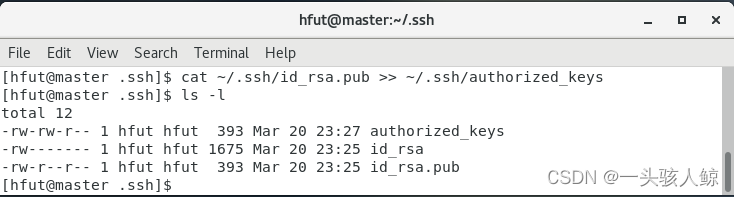
如果出现下图的内容,表示配置失败: (3) ssh免密登录HadoopMaster节点 在终端生成密匙,命令如下(一路点击回车生成密匙) [hfut@master ~]$ ssh-keygen -t rsa 生成的密匙在.ssh目录下,如下所示: [hfut@master ~]$ cd .ssh [hfut@master .ssh]$ ls -l [root@localhost /]# ssh-keygen Generating public/private rsa key pair. Enter file in which to save the key (/root/.ssh/id_rsa): Created directory '/root/.ssh'. Enter passphrase (empty for no passphrase): Enter same passphrase again: Your identification has been saved in /root/.ssh/id_rsa. Your public key has been saved in /root/.ssh/id_rsa.pub. The key fingerprint is: SHA256:fcU+vjmSU5FisDwhtMiFiUjjREZ/jNedKMA9rxzgwCE root@localhost The key's randomart image is: +---[RSA 2048]----+ |E=O+.o +o | | =+o+==+.+o. . | | .oo.Bo+oo+ o. | | .o....+ ooo | | . oS .o..o. | | o . ... | | o. | | + .o | | oo. | +----[SHA256]-----+ 将公钥追加到授权列表 [hfut@master .ssh]$ cat ~/.ssh/id_rsa.pub >> ~/.ssh/authorized_keys 执行ls -l命令后会看到下图的文件列表:
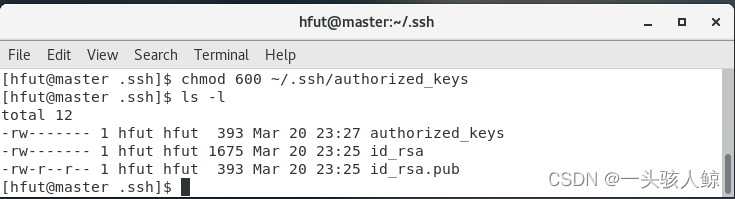
修改authorized_keys文件的权限,命令如下: [hfut@master .ssh]$ chmod 600 ~/.ssh/authorized_keys 修改完权限后,文件列表情况如下:
HadoopSlave、HadoopSlave2、HadoopSlave3节点 创建~/.ssh目录 [hfut@slave ~]$ mkdir ~/.ssh HadoopMaster节点 将authorized_keys文件复制到slave节点,命令如下: [hfut@master .ssh]$ scp ~/.ssh/authorized_keys hfut@slave:~/.ssh
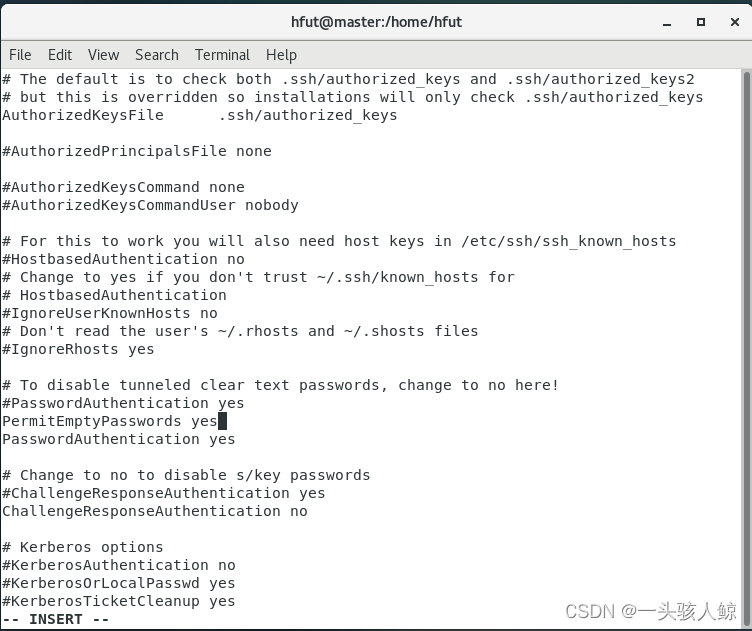
修改HadoopMaster节点的SSH配置 [hfut@master .ssh]$ su root [root@master hfut]# vi /etc/ssh/sshd_config 设置PermitEmptyPasswords配置为 PermitEmptyPasswords yes
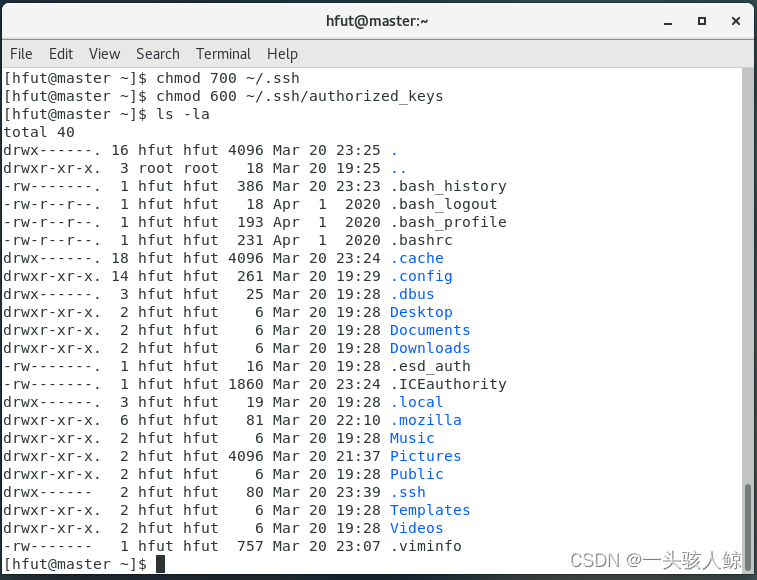
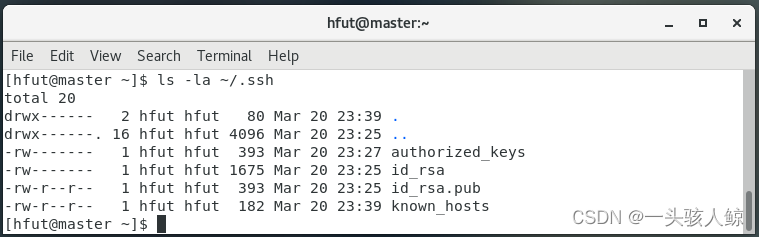
使配置生效 [root@master hfut]# service sshd restart 修改HadoopSlave节点的SSHD配置 [hfut@slave ~]$ su root [root@slave hfut]# vi /etc/ssh/sshd_config 设置PermitEmptyPasswords配置为PermitEmptyPasswords yes 使配置生效 [root@slave hfut]# service sshd restart 修改HadoopMaster节点的~/.ssh目录和.ssh/authorized_keys文件的权限 [root@master .ssh]# su hfut [root@master ~]$ chmod 700 ~/.ssh [root@master ~]$ chmod 600 ~/.ssh/authorized_keys 用ls -la命令查看~/.ssh目录和.ssh/authorized_keys文件的权限是否正确修改 [root@master ~]$ ls -la
[root@master ~]$ ls -la ~/.ssh
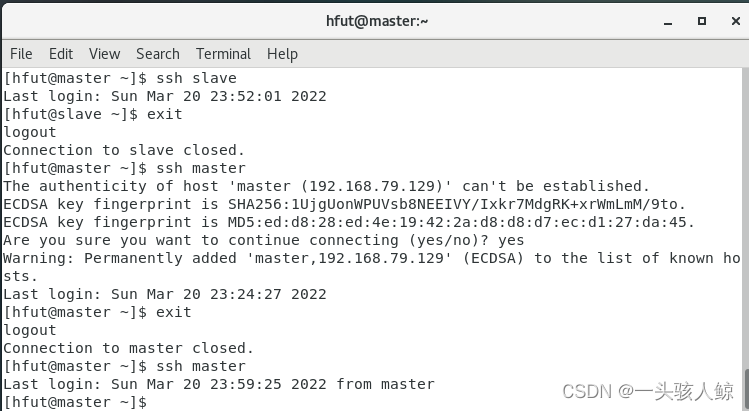
修改HadoopSlave、HadoopSlave2、HadoopSlave3节点的~/.ssh目录和.ssh/authorized_keys文件的权限 [root@slave .ssh]# su hfut [hfut@slave ~]$ chmod 700 ~/.ssh [hfut@slave ~]$ chmod 600 ~/.ssh/authorized_keys 验证免密匙登录 验证master节点ssh免密登录slave节点,在HadoopMaster机器上执行下面的命令: [hfut@master ~]$ ssh slave 如果出现下图的内容表示免密匙配置成功:
在终端从已登录slave节点退回master节点,在HadoopMaster机器上执行下面的命令: [hfut@slave ~]$ exit 验证master节点ssh免密登录master节点,在HadoopMaster机器上执行下面的命令,第一次登录需要输入yes [hfut@slave ~]$ ssh master 验证master节点ssh免密登录master节点,在HadoopMaster机器上执行下面的命令,再次登录不需要输入 [hfut@slave ~]$ ssh master 以下是上述命令执行结果的截图:
(4) 安装JDK在HadoopMaster和HadoopSlave、HadoopSlave2、HadoopSlave3中做同样的操作: 将/home/hfut/5-resources目录中的JDK文件解压,放在/usr/java目录下 [hfut@master ~]# su root [root@master hfut]# mkdir /usr/java [root@master hfut]# cp /home/hfut/5-resources/jdk-8u301-linux-x64.tar.gz /usr/java [root@master hfut]# cd /usr/java [root@master java]# tar -zxvf jdk-8u301-linux-x64.tar.gz [root@master java]# rm jdk-8u301-linux-x64.tar.gz 使用gedit配置环境变量 [root@master hfut]# su hfut [hfut@master java]$ gedit /home/hfut/.bash_profile 复制粘贴以下内容添加到.bash_profile export JAVA_HOME=/usr/java/jdk1.8.0_301/ export PATH=$JAVA_HOME/bin:$PATH 使改动生效命令 [hfut@mater java]$ source /home/hfut/.bash_profile 测试配置: [hfut@mater java]$ java -version 如果出现下图的信息,表示JDK安装成功:
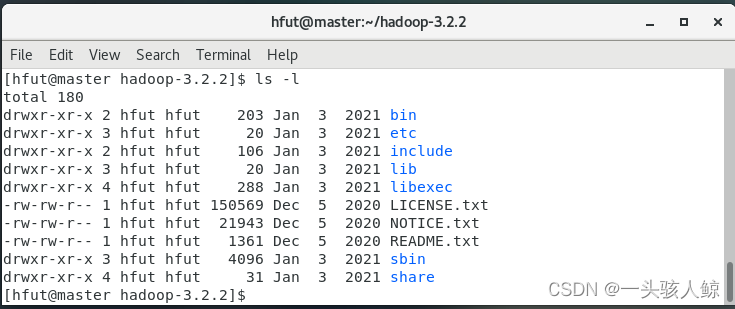
(5) Hadoop的安装与配置Hadoop安装包解压 复制并解压Hadoop软件包,命令如下: [hfut@master ~]$ cp ~/5-resources/hadoop-3.2.2.tar.gz ~/ [hfut@master ~]$ tar -zxvf hadoop-3.2.2.tar.gz [hfut@master ~]$ rm hadoop-3.2.2.tar.gz [hfut@master ~]$ cd hadoop-3.2.2 ls -l看到如下图的内容,表示解压成功:
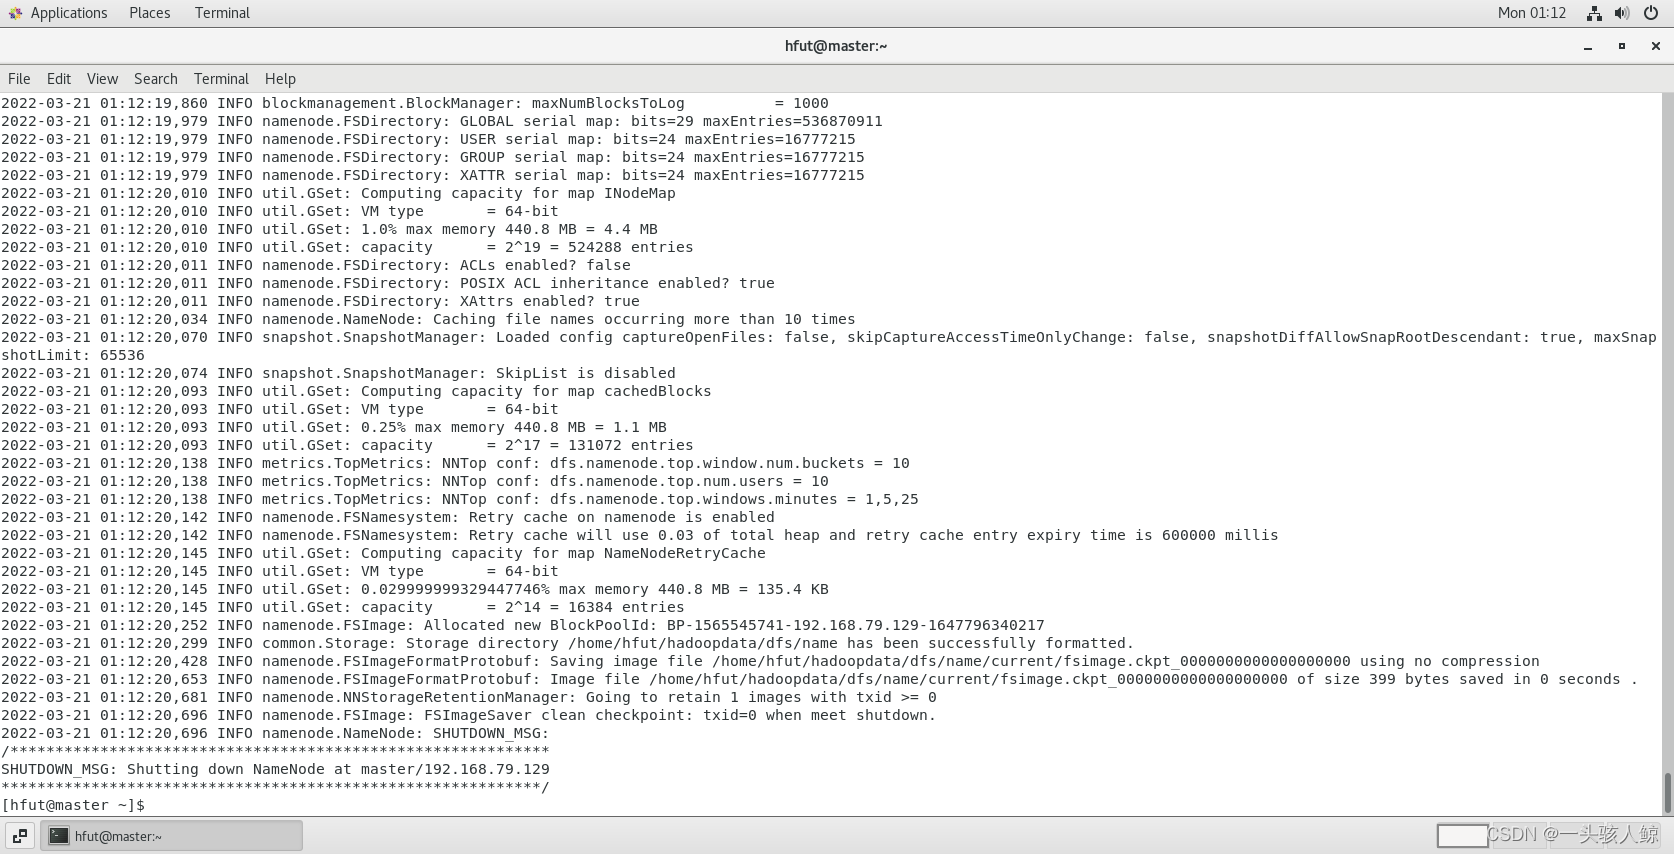
配置 1. 配置环境变量hadoop-env.sh 环境变量文件中,只需要配置JDK的路径。 [hfut@master Hadoop-3.2.2]$ gedit ~/hadoop-3.2.2/etc/hadoop/hadoop-env.sh 在文件中找到下面的一行代码: #export JAVA_HOME = 将这行代码修改为下面的代码: export JAVA_HOME=/usr/java/jdk1.8.0_301/ 在文件中找到下面的一行代码: #export HADOOP_HOME = 将这行代码修改为下面的代码: export HADOOP_HOME=/home/hfut/hadoop-3.2.2/ 然后保存文件。 2.配置核心组件core-site.xml 使用gedit编辑: [hfut@master Hadoop-3.2.2]$ gedit ~/hadoop-3.2.2/etc/hadoop/core-site.xml 用下面的代码替换core-site.xml中的内容: <?xml version="1.0" encoding="UTF-8"?> <?xml-stylesheet type="text/xsl" href="configuration.xsl"?> <!-- Licensed under the Apache License, Version 2.0 (the "License"); you may not use this file except in compliance with the License. You may obtain a copy of the License at http://www.apache.org/licenses/LICENSE-2.0 Unless required by applicable law or agreed to in writing, software distributed under the License is distributed on an "AS IS" BASIS, WITHOUT WARRANTIES OR CONDITIONS OF ANY KIND, either express or implied. See the License for the specific language governing permissions and limitations under the License. See accompanying LICENSE file. --> <!-- Put site-specific property overrides in this file. --> <configuration> <property> <name>fs.defaultFS</name> <value>hdfs://master:9000</value> </property> <property> <name>hadoop.tmp.dir</name> <value>/home/hfut/hadoopdata</value> </property> </configuration> 3. 配置文件系统hdfs-site.xml 使用gedit编辑: [hfut@master Hadoop-3.2.2]$ gedit ~/hadoop-3.2.2/etc/hadoop/hdfs-site.xml 用下面的代码替换hdfs-site.xml中的内容: <?xml version="1.0" encoding="UTF-8"?> <?xml-stylesheet type="text/xsl" href="configuration.xsl"?> <!-- Licensed under the Apache License, Version 2.0 (the "License"); you may not use this file except in compliance with the License. You may obtain a copy of the License at http://www.apache.org/licenses/LICENSE-2.0 Unless required by applicable law or agreed to in writing, software distributed under the License is distributed on an "AS IS" BASIS, WITHOUT WARRANTIES OR CONDITIONS OF ANY KIND, either express or implied. See the License for the specific language governing permissions and limitations under the License. See accompanying LICENSE file. --> <!-- Put site-specific property overrides in this file. --> <configuration> <property> <name>dfs.replication</name> <value>1</value> </property> </configuration> 4. 配置文件系统yarn-site.xml 使用gedit编辑: [hfut@master Hadoop-3.2.2]$ gedit ~/hadoop-3.2.2/etc/hadoop/yarn-site.xml 用下面的代码替换yarn-site.xml中的内容: <?xml version="1.0"?> <!-- Licensed under the Apache License, Version 2.0 (the "License"); you may not use this file except in compliance with the License. You may obtain a copy of the License at http://www.apache.org/licenses/LICENSE-2.0 Unless required by applicable law or agreed to in writing, software distributed under the License is distributed on an "AS IS" BASIS, WITHOUT WARRANTIES OR CONDITIONS OF ANY KIND, either express or implied. See the License for the specific language governing permissions and limitations under the License. See accompanying LICENSE file. --> <configuration> <property> <name>yarn.resourcemanager.hostname</name> <value>master</value> </property> <property> <name>yarn.nodemanager.aux-services</name> <value>mapreduce_shuffle</value> </property> </configuration> 5. 配置计算框架mapred-site.xml 使用gedit编辑: [hfut@master Hadoop-3.2.2]$ gedit ~/hadoop-3.2.2/etc/hadoop/mapred-site.xml 用下面的代码替换mapred-site.xml中的内容: <?xml version="1.0"?> <?xml-stylesheet type="text/xsl" href="configuration.xsl"?> <!-- Licensed under the Apache License, Version 2.0 (the "License"); you may not use this file except in compliance with the License. You may obtain a copy of the License at http://www.apache.org/licenses/LICENSE-2.0 Unless required by applicable law or agreed to in writing, software distributed under the License is distributed on an "AS IS" BASIS, WITHOUT WARRANTIES OR CONDITIONS OF ANY KIND, either express or implied. See the License for the specific language governing permissions and limitations under the License. See accompanying LICENSE file. --> <!-- Put site-specific property overrides in this file. --> <configuration> <property> <name>mapreduce.framework.name</name> <value>yarn</value> </property> <property> <name>mapreduce.jobhistory.address</name> <value>master:10020</value> </property> <property> <name>mapreduce.jobhistory.webapp.address</name> <value>master:19888</value> </property> <property> <name>yarn.app.mapreduce.am.env</name> <value>HADOOP_MAPRED_HOME=/home/hfut/hadoop-3.2.2</value> </property> <property> <name>mapreduce.map.env</name> <value>HADOOP_MAPRED_HOME=/home/hfut/hadoop-3.2.2</value> </property> <property> <name>mapreduce.reduce.env</name> <value>HADOOP_MAPRED_HOME=/home/hfut/hadoop-3.2.2</value> </property> </configuration> 6. 在master节点配置slaves文件 使用gedit编辑: [hfut@master Hadoop-3.2.2]$ gedit ~/hadoop-3.2.2/etc/hadoop/workers 用下面的代码替换slaves中的内容: slave slave2 slave3 复制到从节点 使用下面的命令将已经配置完成的Hadoop复制到从节点HadoopSlave上: [hfut@master Hadoop-3.2.2]$ cd [hfut@master ~]$ scp -r ~/hadoop-3.2.2/ hfut@slave:~/ 启动Hadoop集群 1. 配置Hadoop启动的系统环境变量 该节的配置需要同时在四个节点(HadoopMaster、HadoopSlave、HadoopSlave2、HadoopSlave3)上进行操作,操作命令如下: [hfut@master Hadoop-3.2.2]$ cd [hfut@master ~]$ gedit ~/.bash_profile 将下面的代码追加到.bash_profile末尾: #HADOOP export HADOOP_HOME=/home/hfut/hadoop-3.2.2 export PATH=$HADOOP_HOME/bin:$HADOOP_HOME/sbin:$PATH 然后执行命令: [hfut@master ~]$ source ~/.bash_profile 2. 创建数据目录(HadoopMaster、HadoopSlave、HadoopSlave2、HadoopSlave3) 在hfut的用户主目录下,创建数据目录,命令如下: [hfut@master ~]$ mkdir /home/hfut/hadoopdata 3. 启动Hadoop集群 ① 格式化文件系统 格式化命令如下,该操作需要在HadoopMaster节点上执行: [hfut@master ~]$ hdfs namenode -format 看到下图的打印信息表示格式化成功,如果出现Exception/Error,则表示出现问题。
② 启动Hadoop 使用start-all.sh启动Hadoop集群,首先进入Hadoop安装主目录,然后执行启动命令: [hfut@master ~]$ start-all.sh 执行命令后,提示输入yes/no时,输入yes。 |


 成功验证master节点可以ssh免密登录slave节点和master节点。
| 三、实验结果分析、思考题解答∶
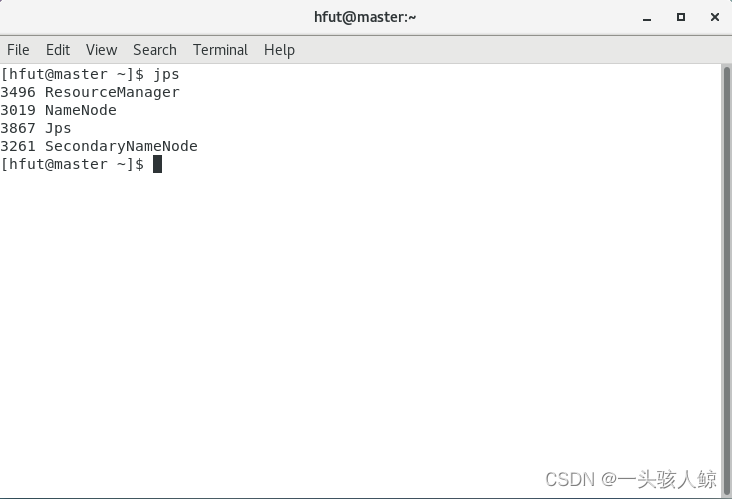
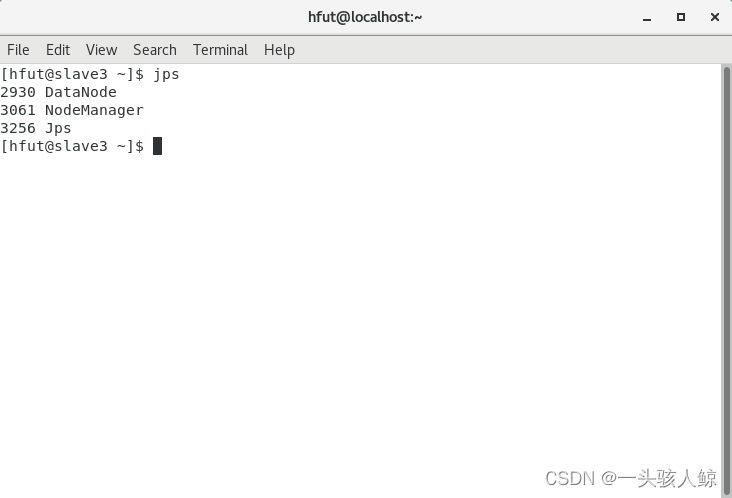
命令验证,输入jps后显示 HadoopMaster:
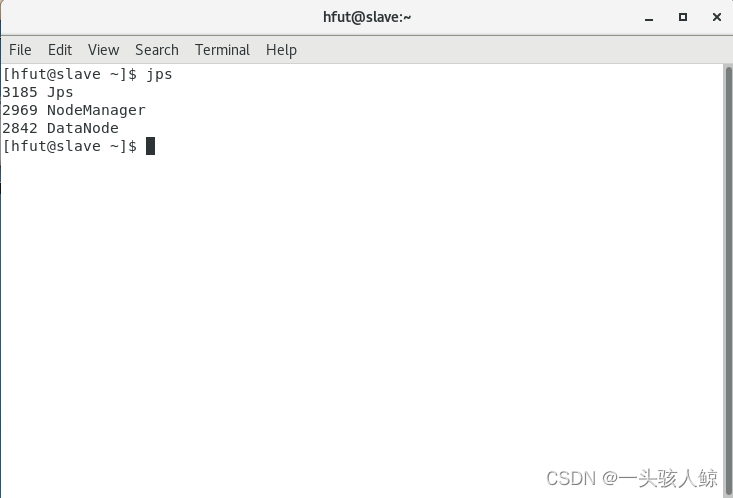
HadoopSlave:
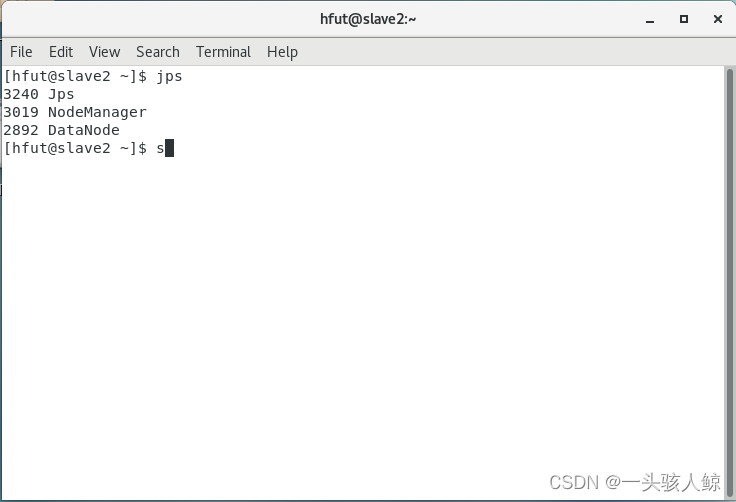
HadoopSlave2:
HadoopSlave3:
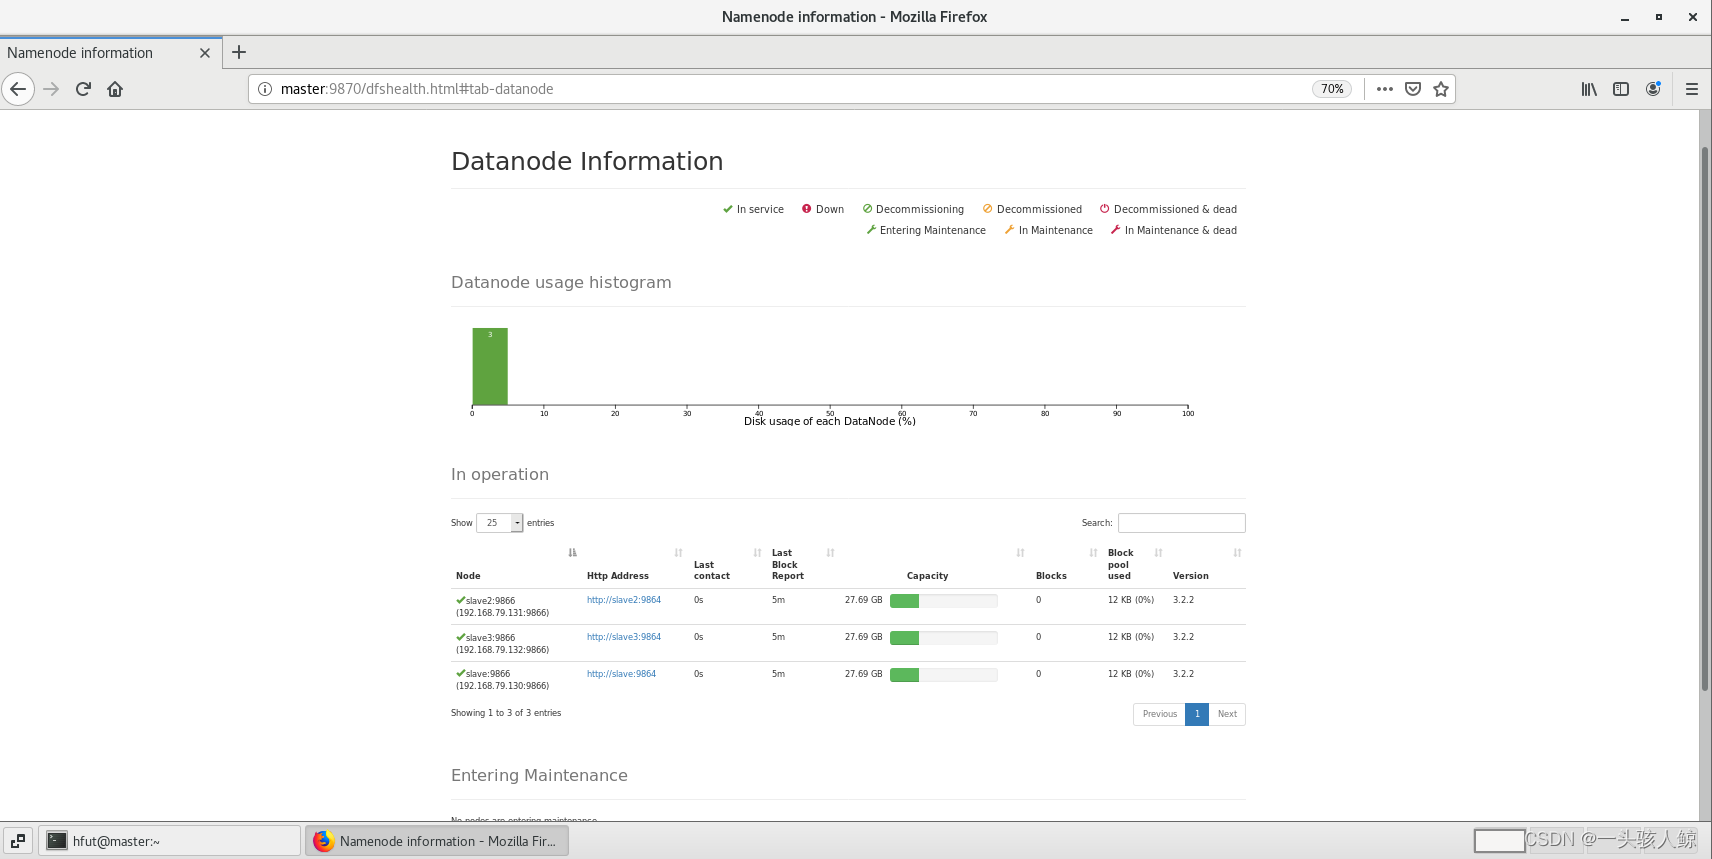
Web UI查看集群是否成功启动 在HadoopMaster上启动Firefox浏览器,在浏览器地址栏中输入http://master:9870/,检查namenode和datanode是否正常。UI页面如下图所示。
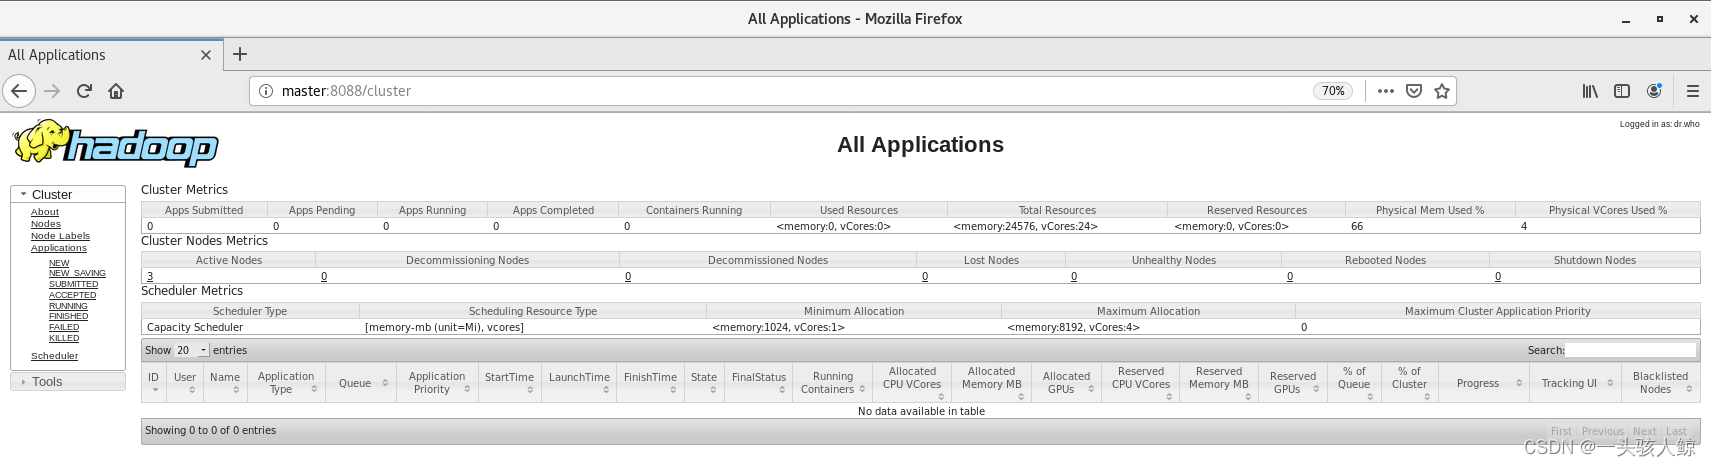
在HadoopMaster上启动Firefox浏览器,在浏览器地址栏中输入http://master:8088/,检查Yarn是否正常。页面如下图所示。
除此之外,还可以运行PI实例检查Hadoop集群是否搭建成功: 在HadoopMaster节点上,进入hadoop安装主目录,分别执行下面的命令: [hfut@master ~]$ cd ~/hadoop-3.2.2/share/hadoop/mapreduce/ [hfut@master mapreduce]$ hadoop jar ~/hadoop-3.2.2/share/hadoop/mapreduce/hadoop-mapreduce-examples-3.2.2.jar pi 10 10 最后输出: Estimated value of Pi is 3.20000000000000000000 经验证,集群可以正常启动,Hadoop安装完毕。 |
| 四、感想、体会、建议∶ 本次实验学习搭建了一个有着1 master,3 slave实例的hadoop集群,过程虽然很繁琐,也遇到各种错误,不过最终靠着老师完备的实验指导书与查阅资料成功解决,也为后面的hadoop学习奠定了一个基础,我感到收获很多。 遇到问题及解决办法:(主要是linux文件系统权限问题与我的粗心导致的) 1.安装JDK这一步,解压文件后: 一开始遇到这个问题: Loaded plugins: fastestmirror You need to be root to perform this command. 切换到root权限,再次安装成功。 [hfut@master ~]# su root [root@master hfut]# mkdir /usr/java [root@master hfut]# cp /home/hfut/5-resources/jdk-8u301-linux-x64.tar.gz /usr/java [root@master hfut]# cd /usr/java [root@master java]# tar -zxvf jdk-8u301-linux-x64.tar.gz [root@master java]# rm jdk-8u301-linux-x64.tar.gz 2.ssh时免密登录失败: 通过检查之前的步骤并与老师的指导书做对比发现
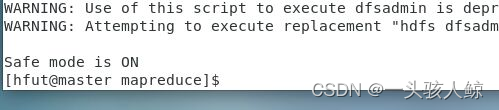
我没有去掉PermitEmptyPasswords前的“#”,导致该句变成了注释,无效果,去掉后ssh成功! 3.处于安全模式
上网查询后,分析原因有两种:一是防火墙没有关闭;二是namenode格式化太多次。确认我已经关闭防火墙的前提下,我根据第二点原因进行修改:删除master节点和其他slave节点已有的hadoopdata文件,重新建立并在master节点上进行格式化,最后成功! |


 1万+
1万+


 被折叠的 条评论
为什么被折叠?
被折叠的 条评论
为什么被折叠?
 到【灌水乐园】发言


