


Spring基础
1、Spring概念
Spring是分层的全栈式轻量级开发框架,以IOC和AOP为核心
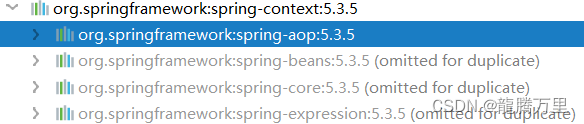
1.1、Spring核心的四个依赖
- spring-context:上下文,容器
- spring-beans:创建对象
- spring-core:核心jar
- spring-expression:表达式jar
实际开发中,只需要导入
spring-context依赖就行,因为spring-context依赖引用了其他依赖。
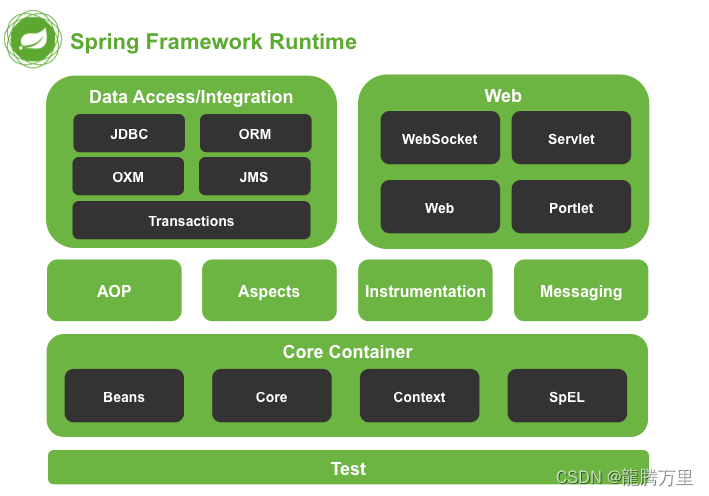
1.2、Spring体系结构
2、Spring IOC
2.1、IOC概念
IOC(Inversion of Control):控制反转
简单来说,就是把Java创建对象的权力交给Spring容器,由Spring容器控制对象的创建。
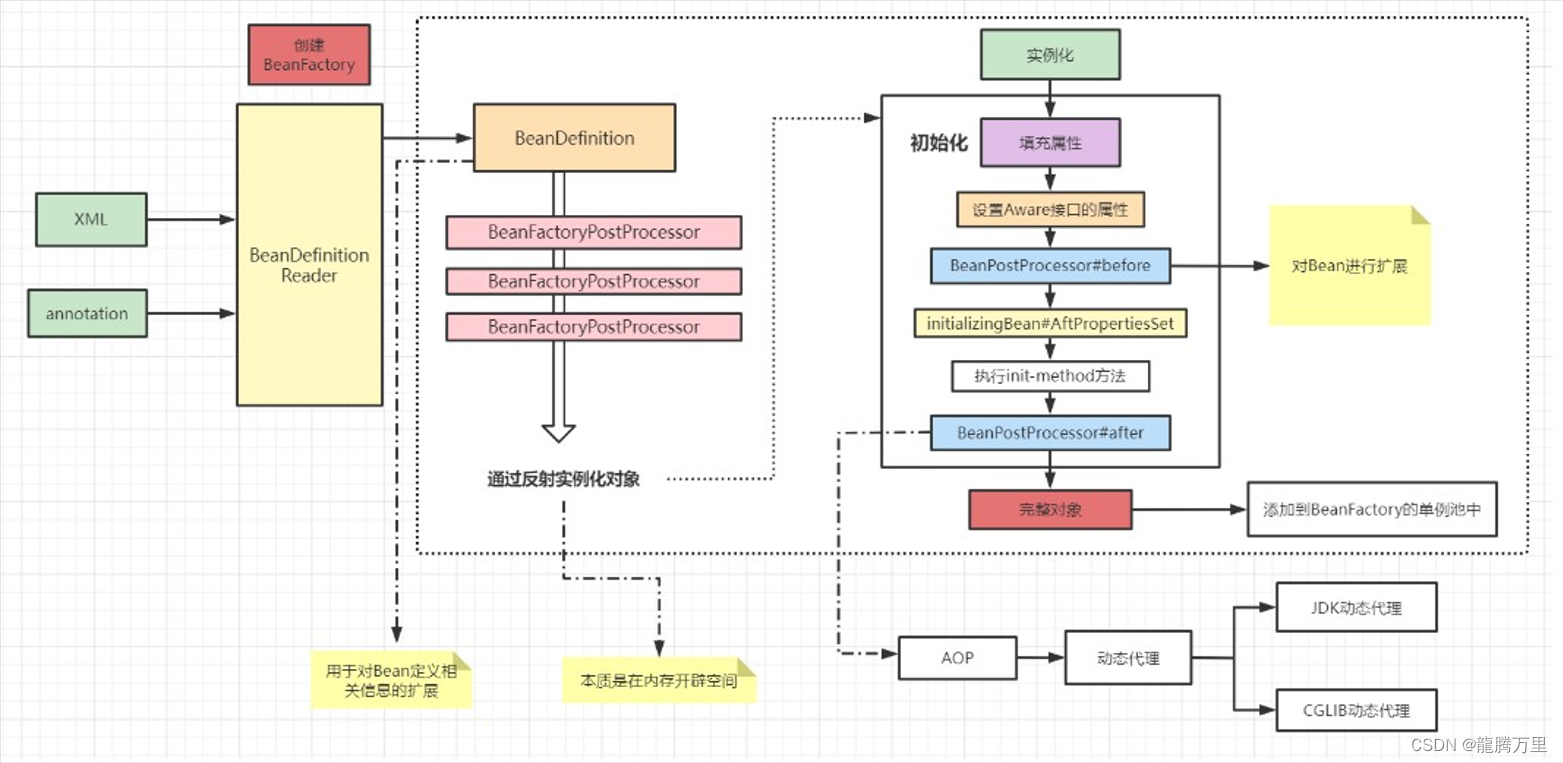
2.2、IOC原理
- 通过xml解析,读取xml配置文件。(或通过注解解析,读取注解相关信息)
- 通过反射实例化对象,放入Map容器中,key为xml配置中 的 id值,value为对应的对象
- 通过工厂模式的getBean方法,返回bean对象
3、通过XML配置和注解方式实现DI(依赖注入)
3.1、XML实现DI
bean标签简介
<bean id="user" class="com.cl.bean.User"
      lazy-init="false" scope="prototype">
<bean>
class: 类的全路径名
lazy-init: 是否开启懒加载(调用getBean的时候再去实例化对象)
scope:
1、singleton(容器中存放一个共享的bean实例,即单例)
2、prototype(每一次获取bean对象就会new一个新的bean)
3、request(针对每一次bean都会产生新的bean,同时该bean只对当前Http request有效)
4、session(针对每一次bean都会产生新的bean,同时该bean只对当前Http session有效)
3.1.1、通过set方法
property标签:是使用set方法进行依赖注入
<bean id="user" class="com.cl.bean.User">
    <property name="id" value="1"></property>
    <property name="name" value="张三"></property>
    <property name="pwd" value="123456"></property>
</bean>
3.1.2、通过构造器注入
constructor-arg标签:使用构造器实现依赖注入
<!-- 通过参数名(name)注入 -->
<bean id="user" class="com.cl.bean.User">
    <constructor-arg name="id" value="2"></constructor-arg>
    <constructor-arg name="name" value="李四 "></constructor-arg>
    <constructor-arg name="pwd" value="123"></constructor-arg>
</bean>
<!-- 通过参数索引(index)注入 -->
<bean id="user3" class="com.cl.bean.User">
    <constructor-arg index="0"  value="3"></constructor-arg>
    <constructor-arg index="1"  value="王五"></constructor-arg>
    <constructor-arg index="2"  value="321"></constructor-arg>
</bean>
3.1.3、通过p空间和c空间给对象赋值
首先添加约束:
<?xml version="1.0" encoding="UTF-8"?>
<beans xmlns="http://www.springframework.org/schema/beans"
       xmlns:xsi="http://www.w3.org/2001/XMLSchema-instance"
       xmlns:p="http://www.springframework.org/schema/p"
       xmlns:c="http://www.springframework.org/schema/c"
       xsi:schemaLocation="http://www.springframework.org/schema/beans
       http://www.springframework.org/schema/beans/spring-beans.xsd">
p空间类似property:通过set方法注入
<!--p名称空间,就是对property的简化处理-->
<bean id="user" class="com.cl.bean.User" p:id="4" p:name="赵六" p:pwd="111" ></bean>
c空间类似constructor-arg:通过构造器注入
 <!--c名称空间,就是对constructor-arg的简化-->
 <bean id="user" class="com.cl.bean.User" c:id="5" c:name="王七" c:pwd="222" ></bean>
3.1.4、注入空值和特殊符号
注入空值:
 <property name="id">
      <null></null>
 </property>
注入转义字符:
< :<
> :>
& :&
<property name="username" value="&张三<>"></property>
注入特殊字符:
<![CDATA[内容]]><property name="pwd">
<value><![CDATA[&<123456>]]></value>
</property>
通过ref引用外部bean:
<bean id="date" class="java.util.Date"></bean>

<bean id="user" class="com.cl.bean.User">
    <property name="name" value="李四"></property>
    <!--bean引用引用外部bean-->
    <property name="birthdate" ref="date"></property>
</bean>
集合注入:
<beans xmlns="http://www.springframework.org/schema/beans"
       xmlns:xsi="http://www.w3.org/2001/XMLSchema-instance"
       xmlns:util="http://www.springframework.org/schema/util"
       xsi:schemaLocation="
       http://www.springframework.org/schema/beans
       http://www.springframework.org/schema/beans/spring-beans.xsd
       http://www.springframework.org/schema/util
       http://www.springframework.org/schema/util/spring-util.xsd
">

  <bean id="student" class="com.cl.bean.Student">
        <!--数组属性注入-->
        <property name="bookArray">
            <array>
                <value>JAVA</value>
                <value>MySQL</value>
                <value>Spring</value>
            </array>
        </property>
        <!--set集合注入-->
        <property name="bookSet">
            <set>
                <value>JAVA</value>
                <value>MySQL</value>
                <value>Spring</value>
            </set>
        </property>
        <!--list集合注入-->
        <property name="bookList">
            <list>
                <value>JAVA</value>
                <value>MySQL</value>
                <value>Spring</value>
            </list>
        </property>
        <!--map集合注入-->
        <property name="bookMap">
            <map>
                <entry key="JAVA" value="java"></entry>
                <entry key="Go" value="go"></entry>
                <entry key="JVM" value="jvm"></entry>
            </map>
        </property>
        <!--List对象集合注入-->
        <property name="bookObjectList" ref="b1"></property>
    </bean>

	<bean id="b1" class="com.cl.bean.Book" p:bname="JAVA" p:author="cl"></bean>
</bean>
3.2、注解方式实现DI
3.2.1、类上依赖注入
@Component:告诉Spring当前类需要实例化至容器中
@Component有三大子注解:
- @Controller:注解Controller控制层Bean
- @Service:注解Service服务层Bean
- @Repository:注解Repository持久层Bean
3.2.2、属性上依赖注入
@Autowired 根据属性数据类型自动装配
@Qualifier 根据属性名称注入依赖
@Resources 可以根据类型,也可以根据名称注入
@Value 注入普通数据类型(8+String)
4、Bean的生命周期
4.1、Spring循环依赖问题
循环依赖产生:

4.2、Spring三级缓存解决循环依赖
具体请看视频讲解:循环依赖
ClassA:
@Component
public class ClassA {

    @Autowired
    private ClassB classB;

    @Autowired
    private ClassC classC;

    public void testA(){
        System.out.println("testA ");
    }

}
ClassB:
@Component
public class ClassB {

    @Autowired
    private ClassA classA;

    public void testB(){
        System.out.println("testB");
    }
}
ClassC:
@Component
public class ClassC {

    @Autowired
    private ClassA classA;

    public void testC(){
        System.out.println("testC");
    }
}
特殊情况:ClassA出现循环依赖时 ⇒ 对ClassA提前AOP产生代理对象
classA正在创建中(说明出现循环依赖):creatingSet集合存放正在创建的对象名。
classA的生命周期
利用creatingSet.add(“classA”)
-
实例化 ⇒ ClassA不完整对象 ⇒ 放入第三级缓存<“classA”, classA原始对象、beanName、beanDefinition>
-
填充classB属性 ⇒ 从单例池中(singletonObjects)找classB ⇒ 找不到 ⇒ 创建ClassB
classB的生命周期
- 实例化 ⇒ ClassB对象 ⇒ 放入二级缓存池中
- 填充classA属性 ⇒ 从单例池中(singletonObjects)找classA ⇒ 找不到 ⇒ classA正在创建中(说明出现循环依赖) ⇒ 从二级缓存中找 【找不到的话 ⇒ 特殊情况提前AOP ⇒ 第三级缓存 ⇒ 执行lambda表达式,判断要不要AOP产生ClassA代理对象(此时不完整,不能放入单例池中) ⇒ 放入二级缓存中】
- 填充其他属性
- 做其他事
- 放入单例池
classC的生命周期
- 实例化 ⇒ ClassC对象 ⇒ 放入二级缓存池中
- 填充classA属性 ⇒ 从单例池中(singletonObjects)找classA ⇒ 找不到 ⇒ classA正在创建中(说明出现循环依赖) ⇒ 从二级缓存中找 【找不到的话 ⇒ 特殊情况提前AOP ⇒ 第三级缓存 ⇒ 执行lambda表达式,判断要不要AOP产生ClassA代理对象(此时不完整,不能放入单例池中) ⇒ 放入二级缓存中】
- 填充其他属性
- 做其他事
- 放入单例池
-
填充其他属性
-
做其他事 ⇒ AOP ⇒ ClassA代理对象
4.1 从二级缓存中取代理对象 -
放入单例池
利用creatingSet.remove(“classA”)
第一级缓存:单例池 ⇒ singleObjects ConcurrentMap <beanName, bean完整对象>
第二级缓存(解决多例问题,保证bean不完整对象单例): earlySingleObjects ConcurrentHashMap <beanName, 唯一的bean不完整对象>
第三级缓存:singleObjects HahMap <beanName, ObjectFactory<?>>
5、Bean的自动装配
- autowire:属性控制自动将容器中的对象注入到当前对象的属性上
- byType:根据类型注入,要保证当前bean在容器中只有一个实例。
- byName:根据id和属性名称注入,要保证id和属性名称一致。
6、外部属性配置文件的使用
- xml方式:通过context命名空间读取属性配置文件
(并且通过${},引用配置文件的内容)
- jdbc.properties
jdbc_username=root
jdbc_password=root
jdbc_url=jdbc:mysql://127.0.0.1:3306/test_db&useSSL=false&useUnicode=true&characterEncoding=UTF-8&serverTimezone=Asia/Shanghai
jdbc_driver=com.mysql.cj.jdbc.driver
- application.xml
<context:property-placeholder location="classpath:jdbc.properties" />
<bean id="dataSource" class="com.alibaba.druid.pool.DruidDataSource">
   <property name="username" value="${jdbc_username}"></property>
   <property name="password" value="${jdbc_password}"></property>
   <property name="url" value="${jdbc_url}"></property>
   <property name="driverClassName" value="${jdbc_driver}"></property>
</bean>
- 通过注解方式引入
@Configuration // 配置类标志
@ComponentScan(basePackages = "com.cl") // 注解扫描
@PropertySource("classpath:jdbc.properties") // 导入配置文件
@EnableTransactionManagement // 开启事务注解
public class SpringConfig {

   @Value("${jdbc_username}")
   private String username;

   @Value("${jdbc_password}")
   private String password;

   @Value("${jdbc_url}")
   private String url;

   @Value("${jdbc_driver}")
   private String driver;

   @Bean
   public DruidDataSource getDruidDataSource(){
       DruidDataSource dataSource = new DruidDataSource();
       dataSource.setUsername(username);
       dataSource.setPassword(password);
       dataSource.setUrl(url);
       dataSource.setDriverClassName(driver);
       return dataSource;
   }

   @Bean
   public JdbcTemplate getJdbcTemplate(DruidDataSource dataSource){
       JdbcTemplate jdbcTemplate = new JdbcTemplate();
       jdbcTemplate.setDataSource(dataSource);
       return jdbcTemplate;
   }

   @Bean
   public DataSourceTransactionManager getDataSourceTransactionManager(DruidDataSource dataSource){
       DataSourceTransactionManager transactionManager = new DataSourceTransactionManager();
       transactionManager.setDataSource(dataSource);
       return transactionManager;
   }

}
7、JDK动态代理(面向接口)
通过代理对象访问控制目标对象。
JDK动态代理模式特点:
1、生成的代理对象只能转成接口类,因为无法确认被代理类具体是哪个
2、不能增强接口类中不存在的方法,实现类独有的方法是无法增强的
3、代理对象只能获取接口方法上的注解,不能获取实现类方法上的注解
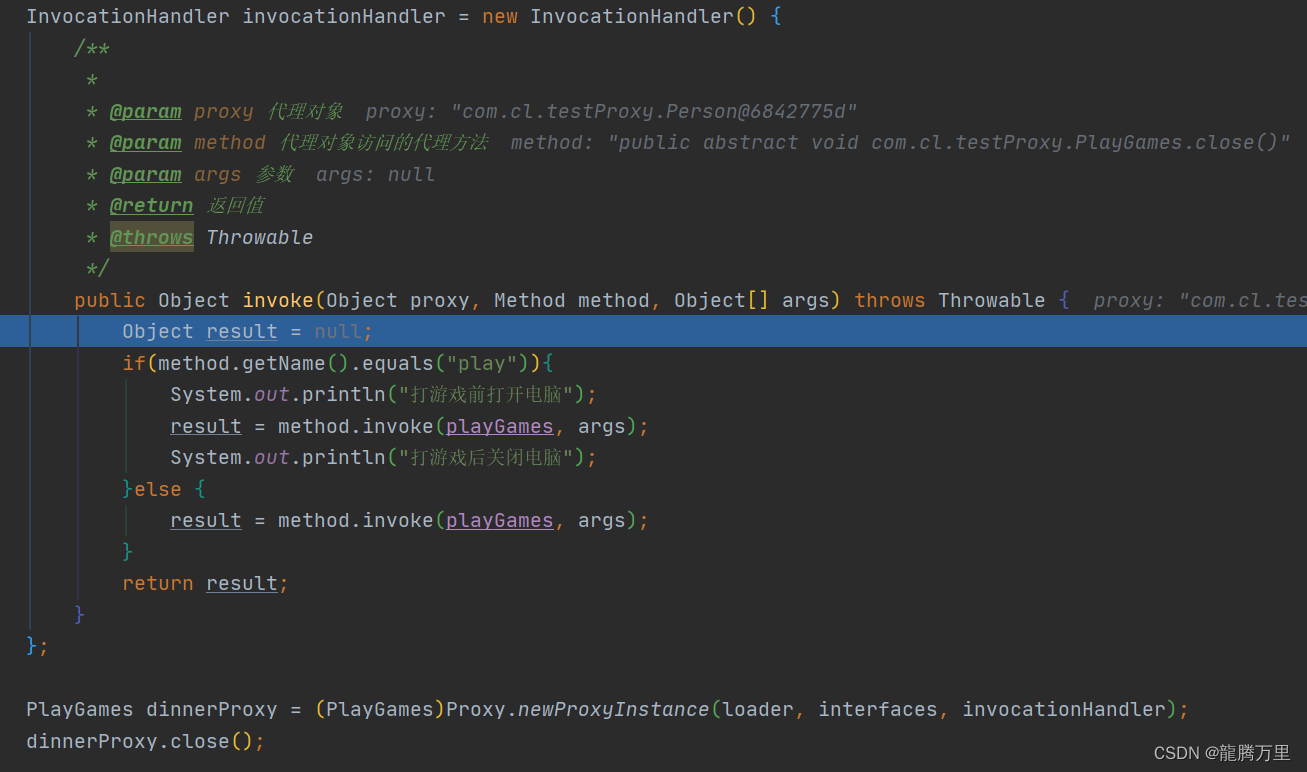
public class ProxyTest {

    public static void main(String[] args) {
        final PlayGames playGames = new Person();
//        通过Proxy动态代理获得Dinner代理对象的类加载器,并对Dinner接口方法进行加强
        ClassLoader loader = playGames.getClass().getClassLoader();
//        获取被代理对象的所有实现接口
        Class<?>[] interfaces = playGames.getClass().getInterfaces();
//        InvocationHandler 执行处理器对象,专门用于定义增强的规则
          InvocationHandler invocationHandler = new InvocationHandler() {
            /**
             *
             * @param proxy 代理对象
             * @param method 代理对象访问的代理方法
             * @param args 参数
             * @return 返回值
             * @throws Throwable
             */
            public Object invoke(Object proxy, Method method, Object[] args) throws Throwable {
                Object result = null;
                if(method.getName().equals("play")){
                    System.out.println("打游戏前打开电脑");
                    result = method.invoke(playGames, args);
                    System.out.println("打游戏后关闭电脑");
                }else {
                    result = method.invoke(playGames, args);
                }
                return result;
            }
        };

        PlayGames dinnerProxy = (PlayGames)Proxy.newProxyInstance(loader, interfaces, invocationHandler);
        dinnerProxy.close();
    }

}


interface PlayGames{
    void play();
    void close();
}

class Person implements PlayGames{

    public void play() {
        System.out.println("张三正在打游戏");
    }

    public void close() {
        System.out.println("张三关闭电脑");
    }

}

class Student implements PlayGames{

    public void play() {
        System.out.println("学生正在打游戏");
    }

    public void close() {
        System.out.println("学生关闭电脑");
    }

}
事件处理器:在代理对象调用代理方法时,才会走invoke。
此时,调用了dinnerProxy.close();
proxy:代理对象,Person
method:PlayGames类中close的Method对象
args:传参为空
返回值为空
8、CGLIB动态代理(面向父类)
CGLIB动态代理特点:
1、和接口没有直接关系
2、不仅可增强接口的方法,还可以增强类中的其他方法
3、可读取父类中的所有注解
public class CGlibTest {

    public static void main(String[] args) {
        Person person = new Person();
        // 1、获取Enhancer对象
        Enhancer enhancer = new Enhancer();
        // 2、设置父类字节码
        enhancer.setSuperclass(person.getClass());
        // 3、获取MethodIntercept对象,用于增强规则
        MethodInterceptor methodInterceptor = new MethodInterceptor() {
            public Object intercept(Object o, Method method, Object[] objects, MethodProxy methodProxy) throws Throwable {
                Object result = null;
                if(method.getName().equals("play")){
                    System.out.println("打游戏前打开电脑");
                    result = methodProxy.invokeSuper(o, objects);
                    System.out.println("打游戏后关闭电脑");
                }else{
                    result = methodProxy.invokeSuper(o, objects);

                }
                return result;
            }
        };
        // 4、设置methodIntercept
        enhancer.setCallback(methodInterceptor);
        // 5、获取代理对象
        Person personProxy = (Person) enhancer.create();
        // 6、使用代理对象完成功能
        personProxy.play();
    }

}

class Person{
    public Person(){

    }

    public void play(){
        System.out.println("张三正在打游戏");
    }

}
9、AOP(面向切面编程)
AOP实现原理:动态代理
(有接口用JDK,没有用CGLIB)
9.1、功能
- 日志处理
- 权限控制
- 性能检测
- 事务控制
9.2、AOP术语
- JointPoint(连接点):类中可以被增强的方法。
- Pointcut(切入点):实际被增强的方法。
- Advice(通知):实际增强的功能(实际上添加的增强代码逻辑)。
- Target(目标对象):被代理的对象。
- Aspect(切面):一个java类,其中包括许多advice方法。
- Weaving(织入):创建代理对象并实现增强功能的声明并运行的过程。
9.3、AOP实现
导入依赖:
 <!--spring切面包-->
 <dependency>
     <groupId>org.springframework</groupId>
     <artifactId>spring-aspects</artifactId>
     <version>5.3.5</version>
 </dependency>
 <!--织入包  spring-aspects 已经导入该包,这里可以不导入-->
 <!--<dependency>
     <groupId>org.aspectj</groupId>
     <artifactId>aspectjweaver</artifactId>
     <version>1.9.6</version>
 </dependency>-->
 <!--aop联盟包-->
 <dependency>
     <groupId>aopalliance</groupId>
     <artifactId>aopalliance</artifactId>
     <version>1.0</version>
 </dependency>
9.3.1、基于xml实现(了解)
9.3.1.1、application.xml
<?xml version="1.0" encoding="UTF-8"?>
<beans xmlns="http://www.springframework.org/schema/beans"
       xmlns:xsi="http://www.w3.org/2001/XMLSchema-instance"
       xmlns:context="http://www.springframework.org/schema/context"
       xmlns:aop="http://www.springframework.org/schema/aop"
       xsi:schemaLocation="
       http://www.springframework.org/schema/beans
       http://www.springframework.org/schema/beans/spring-beans.xsd
       http://www.springframework.org/schema/context
       http://www.springframework.org/schema/context/spring-context.xsd
       http://www.springframework.org/schema/aop
       http://www.springframework.org/schema/aop/spring-aop.xsd
">

    <context:component-scan base-package="com.cl"></context:component-scan>
<!--    aop autoProxy自动生成代理对象-->
    <aop:aspectj-autoproxy/>

<!--    配置文件配置aop增强功能-->
    <aop:config>
<!--        配置切入点-->
        <aop:pointcut id="pointCut" expression="execution(* com.cl.dao.UserDao.addUser(..))"></aop:pointcut>
        <aop:aspect ref="daoAspect">
            <aop:before method="before" pointcut-ref="pointCut"></aop:before>
            <aop:after method="after" pointcut-ref="pointCut"></aop:after>
            <aop:after-returning method="afterReturning" pointcut-ref="pointCut" returning="res"></aop:after-returning>
            <aop:after-throwing method="afterThrowing" pointcut-ref="pointCut" throwing="ex"></aop:after-throwing>
            <aop:around method="around" pointcut-ref="pointCut"></aop:around>
        </aop:aspect>
    </aop:config>
</beans>
9.3.1.2、daoAspect
@Aspect
@Component
//@Order(2)
public class DaoAspect {

//    @Pointcut("execution(* com.cl.dao.UserDao.addUser(..))")
    public void pointCut(){}

//    @Before("pointCut()")
    public void before(JoinPoint joinPoint){
        System.out.println("before");
        Object[] args = joinPoint.getArgs();
        System.out.println(Arrays.toString(args));
    }

//    @AfterThrowing(value = "pointCut()", throwing = "ex")
    public void afterThrowing(JoinPoint joinPoint, Exception ex){
        System.out.println("afterThrowing");
    }

//    @AfterReturning(value = "pointCut()", returning = "res")
    public void afterReturning(JoinPoint joinPoint, Object res){
        System.out.println("afterReturning");
        System.out.println(res.toString());
    }

//    @After(value = "pointCut()")
    public void after(JoinPoint joinPoint){
        System.out.println("after");
    }

//    @Around(value = "pointCut()")
    public Object around(ProceedingJoinPoint proceedingJoinPoint) throws Throwable {
        System.out.println("aroundA");
        Object proceed = proceedingJoinPoint.proceed();
        System.out.println("aroundB");
        return proceed;
    }

}
9.3.1.3、运行结果

9.4.1、基于注解实现,以某个或某些方法为切入点(掌握)
9.4.1.1、切入点表达式和语法结构
Pointcut(切入点)表达式: 通过表达式来确定AOP要增强的是哪个或者哪些方法
语法结构: execution([权限修饰符][返回值类型][类的全路径名][方法名](参数 列表) )
例子:
- @Pointcut(execution(* com.msb.dao.UserDaoImpl.add(…))) // 指定切点为UserDaoImpl.add方法
- @Pointcut(execution(* com.msb.dao.UserDaoImpl.*(…))) // 指定切点为UserDaoImpl.所有的方法
- @Pointcut(execution(* com.msb.dao.*(…))) // 指定切点为dao包下所有的类中的所有的方法
- @Pointcut(execution(* com.msb.dao.*.add(…))) // 指定切点为dao包下所有的类中的add的方法
- @Pointcut(execution(* com.msb.dao.add*(…))) // 指定切点为dao包下所有的类中的add开头的方法
9.4.1.2、通知
- @Before:前置通知
例子:@Before(“pointCut()”)
- @After:后置通知
例子:@After(value = “pointCut()”)
- @AfterReturning:返回通知
例子:@AfterReturning(value = “pointCut()”, returning = “res”),无异常,才走此通知。
res参数:返回值
- @AfterThrowing:异常通知
例子:@AfterThrowing(value = “pointCut()”, throwing = “ex”),有异常,才走此通知
ex参数:异常
- @Around:环绕通知
例子:@Around(value = “pointCut()”)
执行顺序:
@Around、 @Before、(无异常执行@AfterReturning、有异常执行@AfterThrowing)、@After、@Around
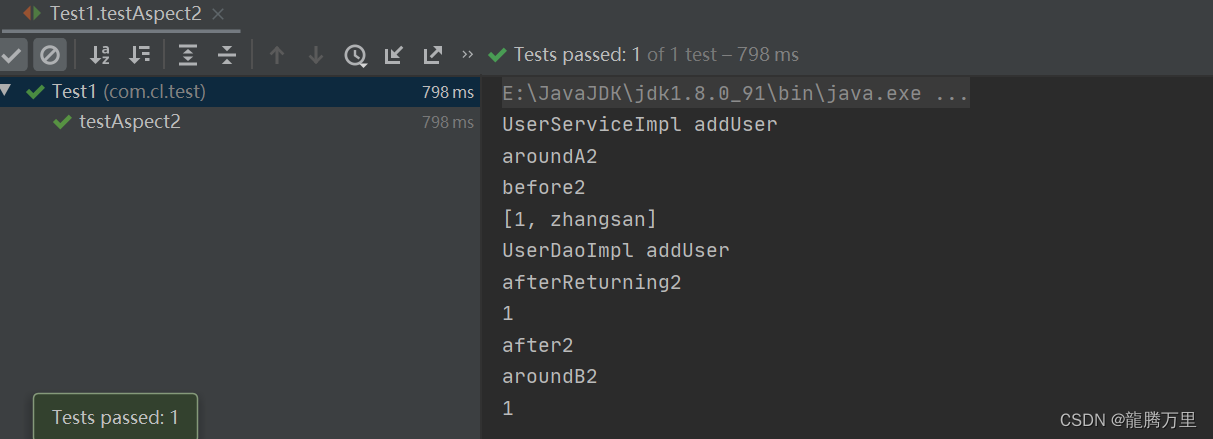
9.4.1.3、DaoAspect2
@Aspect
@Component
//@Order(1)
public class DaoAspect2 {

    @Pointcut("execution(* com.cl.dao.UserDao.addUser(..))")
    public void pointCut(){}

    @Before("pointCut()")
    public void before(JoinPoint joinPoint){
        System.out.println("before2");
        Object[] args = joinPoint.getArgs();
        System.out.println(Arrays.toString(args));
    }

    @AfterThrowing(value = "pointCut()", throwing = "ex")
    public void afterThrowing(JoinPoint joinPoint, Exception ex){
        System.out.println("afterThrowing2");
    }

    @AfterReturning(value = "pointCut()", returning = "res")
    public void afterReturning(JoinPoint joinPoint, Object res){
        System.out.println("afterReturning2");
        System.out.println(res.toString());
    }

    @After(value = "pointCut()")
    public void after(JoinPoint joinPoint){
        System.out.println("after2");
    }

    @Around(value = "pointCut()")
    public Object around(ProceedingJoinPoint proceedingJoinPoint) throws Throwable {
        System.out.println("aroundA2");
        Object proceed = proceedingJoinPoint.proceed();
        System.out.println("aroundB2");
        return proceed;
    }

}
9.4.1.4、运行结果
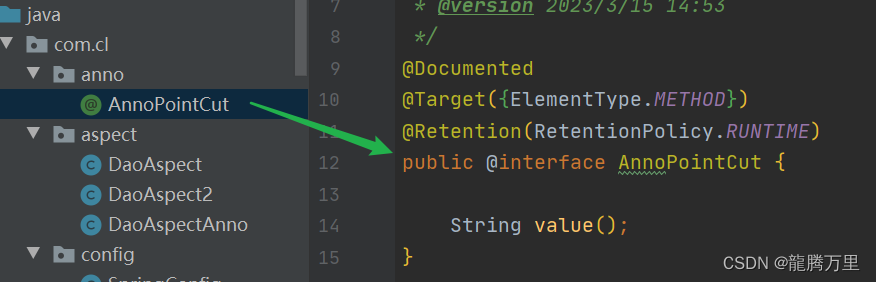
9.4.2、基于注解实现,以自定义注解切入点(掌握)
自定义注解:
- @Documented:生成javadoc文档时保留此注解
- @Target({ElementType.METHOD}):可以注解在哪些上面(这里可注解到方法中,具体可看ElementType这个枚举类)
- @Retention(RetentionPolicy.RUNTIME):保留原则(这里是JVM运行时保留此注解)
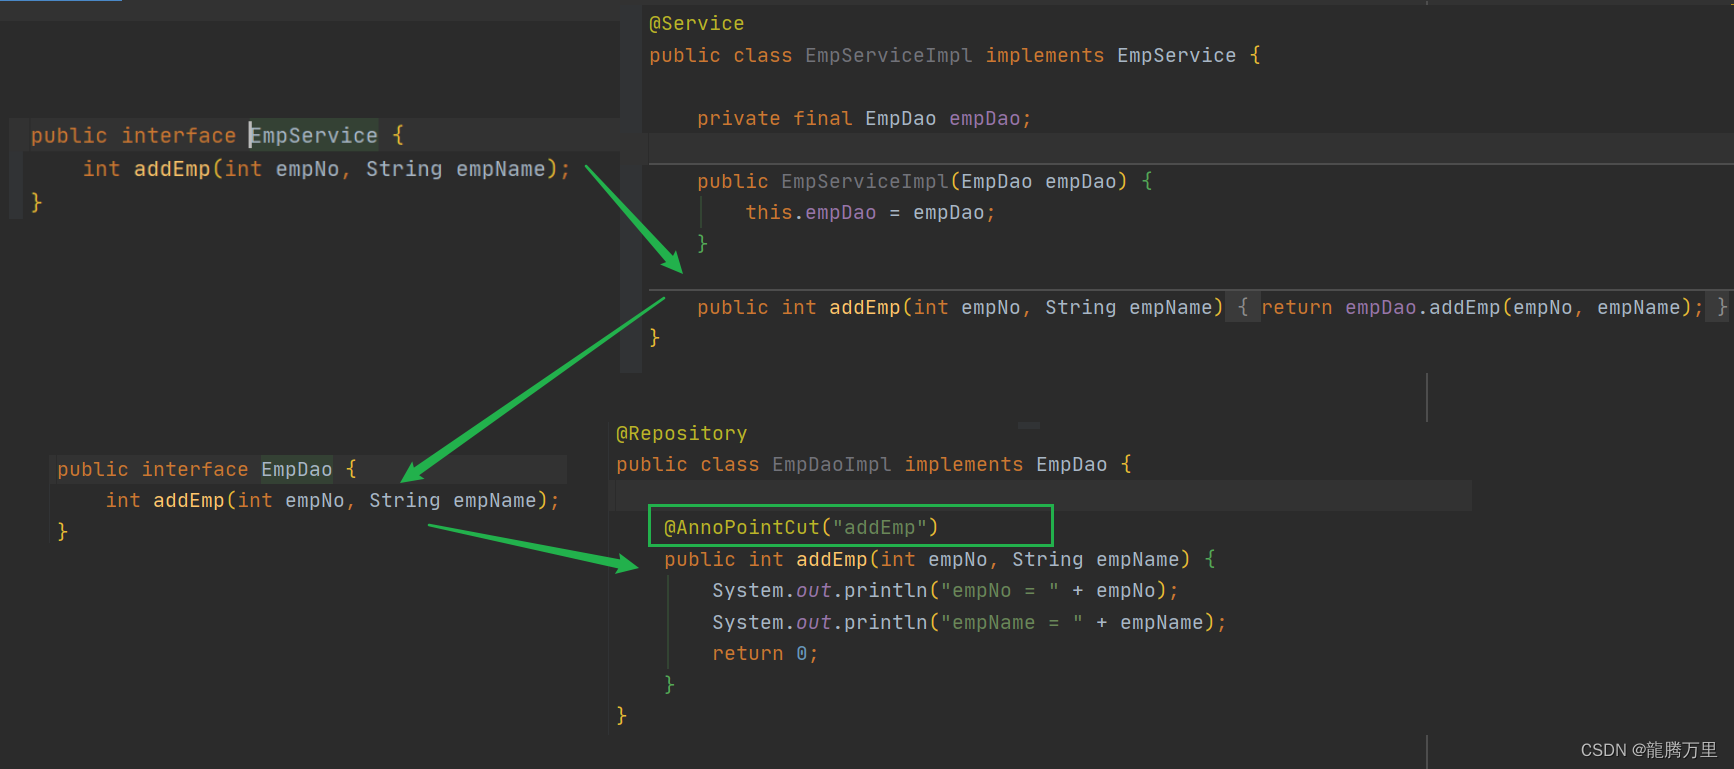
9.4.2.1、DaoAspectAnno
@Aspect
@Component
public class DaoAspectAnno {

    @Pointcut("@annotation(com.cl.anno.AnnoPointCut)")
    public void pointCut(){}

    @Before("pointCut()")
    public void before(JoinPoint joinPoint){
        System.out.println("annotation-before");
        Object[] args = joinPoint.getArgs();
        System.out.println(Arrays.toString(args));
    }

    @AfterThrowing(value = "pointCut()", throwing = "ex")
    public void afterThrowing(JoinPoint joinPoint, Exception ex){
        System.out.println("annotation-afterThrowing");
    }

    @AfterReturning(value = "pointCut()", returning = "res")
    public void afterReturning(JoinPoint joinPoint, Object res){
        System.out.println("annotation-afterReturning");
        System.out.println("返回结果:" + res.toString());
    }

    @After(value = "pointCut()")
    public void after(JoinPoint joinPoint){
        System.out.println("annotation-after");
    }

    @Around(value = "pointCut()")
    public Object around(ProceedingJoinPoint proceedingJoinPoint) throws Throwable {
        System.out.println("annotation-aroundA");
        Object proceed = proceedingJoinPoint.proceed();
        System.out.println("annotation-aroundB");
        return proceed;
    }

}
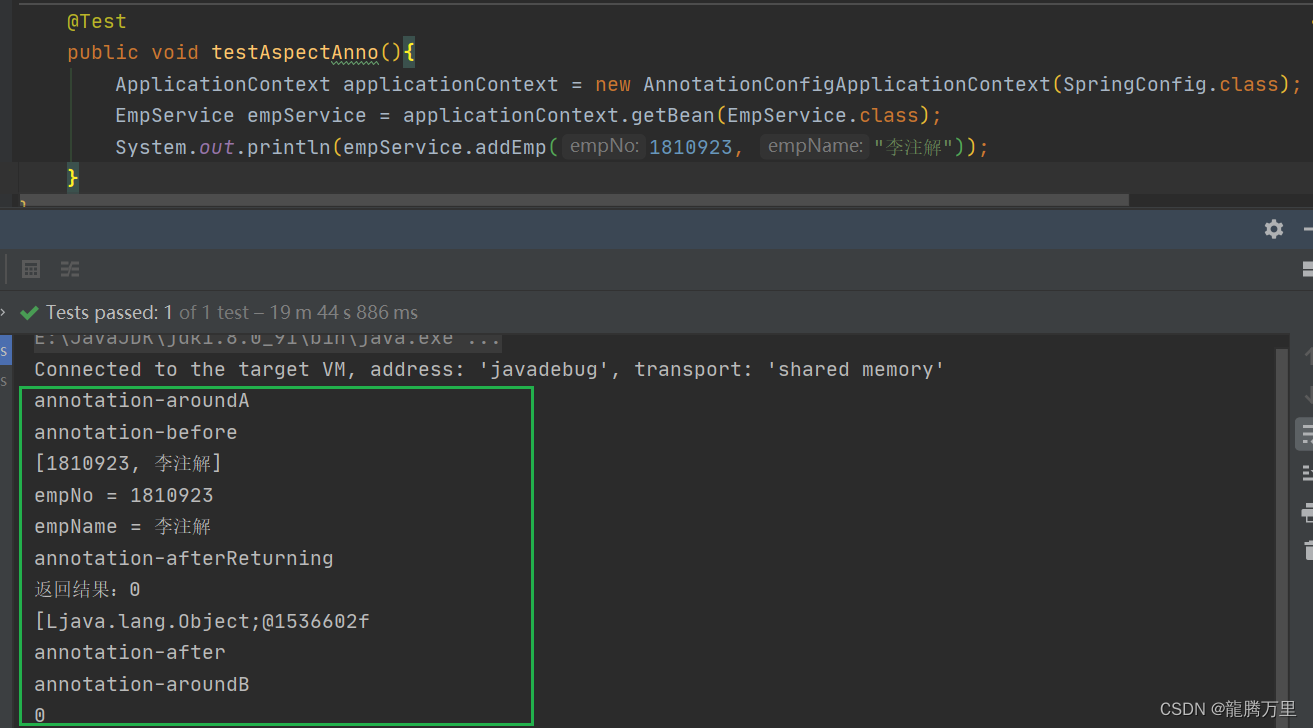
9.4.2.2、测试代码和效果
测试代码:
@Test
public void testAspectAnno(){
    ApplicationContext applicationContext = new AnnotationConfigApplicationContext(SpringConfig.class);
    EmpService empService = applicationContext.getBean(EmpService.class);
    System.out.println(empService.addEmp(1810923, "李注解"));
}
empService.addEmp调用链:
测试效果:
10、事务
10.1、事务的概念
事务是一个操作序列:要么全都操作,要么全不操作。
10.2、事务的特性
- 原子性:事务是最小执行单位,不可再分。
- 一致性:事务从一致的状态变为另一个一致的状态。
- 隔离性:事务之间互不影响。
- 持久性:事务一旦提交,对数据的任何操作,可持久存储到硬盘中(持久化存储)。
10.3、事务的并发问题
- 脏读: 一个事务读取到另一个事务已修改单未提交的数据。
- 不可重复读: 一个事务多次读取同一数据,在此期间另一事务修改了数据,导致多次读取的结果不一致。
- 幻读: 一个事务多次读取多行数据,在此期间另一事务增加或删除了数据,导致数据会突然增多或减少,像出现幻觉一样。
10.4、事务并发问题的解决:事务隔离级别
事务的隔离级别从低到高依次: READ UNCOMMITTED、READ COMMITTED、REPEATABLE READ以及SERIALIZABLE
(注意:隔离级别越低,越能支持高并发的数据库操作。)
| 隔离级别 | 脏读 | 不可重复读 | 幻读 |
|---|---|---|---|
| READ UNCOMMITTED(读未提交) | 存在 | 存在 | 存在 |
| READ COMMITTED(读已提交) | 不存在 | 存在 | 存在 |
| REPEATABLE READ(可重复度) | 不存在 | 不存在 | 存在 |
| SERIALIZABLE(串行化) | 不存在 | 不存在 | 不存在 |
10.5、注解方式控制事务
Spring声明式事务的实现方式,底层就是AOP,AOP的底层就是动态代理。
10.5.1、@Transactional
注解在类上,表示类中所有方法都加了事务控制。
注解在方法上,表示仅对当前方法加了事务控制。
10.5.1.1、@Transactional参数——propagation
propagation:事务传播级别
| 事务的传播级别 | 说明 |
|---|---|
| PROPAGATION_REQUIRED | 如果当前事务不存在,则新建事务,否则加入当前事务 |
| PROPAGATION_REQUIRES_NEW | 新建当前事务,如果当前事务存在,则将当前事务挂起 |
| PROPAGATION_MANDATORY | 使用当前事务,如果不存在,则抛出异常 |
| PROPAGATION_SUPPORT | 支持当前事务,如果当前事务不存在,则以非事务方式执行 |
| PROPAGATION_NOT_SUPPORT | 以非事务方式执行,如果当前事务存在,则将当前事务挂起 |
| PROPAGATION_NEVER | 以非事务方式执行,如果当前事务存在,则抛出异常 |
| PROPAGATION_NESTED | 如果当前事务存在,则嵌套事务中执行。否则执行与PROPAGATION_REQUIRED类似的操作 |
10.5.1.2、@Transactional参数——isolation
| 隔离级别 | 说明 |
|---|---|
| DEFAULT(默认) | 使用数据库默认的隔离级别,MySQL默认是REPEATABLE_READ,Oracle默认是READ_COMMITTED |
| READ_UNCOMMITTED(读未提交 ) | 允许一个事务读取另一个事务已修改但未提交的数据 |
| READ_COMMITTED(读已提交) | 保证一个事务只能读取到事务已提交的数据 |
| READ_UNCOMMITTED(可重复读) | 除了保证一个事务只能读取已提交的数据,也保证了可重复读 |
| SERIALIZABLE(串行化) | 事务最高隔离级别,保证事务处理是顺序执行的,避免了脏读、不可重复读和幻读,同时也是效率最低的 |
10.5.1.3、@Transactional参数——timeout
如果事务提交超出该时间,则回滚。
10.5.1.4、@Transactional参数——readOnly
事务是否只能读取数据,如果true,表示不能增删改。
10.5.1.5、@Transactional参数——rollbackFor
指定发生什么异常才回滚事务。
10.5.1.6、@Transactional参数——noRollbackFor
指定发生什么异常,事务不会回滚。
10.5.2、xml方式控制事务
<?xml version="1.0" encoding="UTF-8"?>
<beans xmlns="http://www.springframework.org/schema/beans"
       xmlns:xsi="http://www.w3.org/2001/XMLSchema-instance"
       xmlns:context="http://www.springframework.org/schema/context"
       xmlns:tx="http://www.springframework.org/schema/tx"
       xsi:schemaLocation="
       http://www.springframework.org/schema/beans
       http://www.springframework.org/schema/beans/spring-beans.xsd
       http://www.springframework.org/schema/context
       http://www.springframework.org/schema/context/spring-context.xsd
       http://www.springframework.org/schema/tx
       http://www.springframework.org/schema/tx/spring-tx.xsd
">
<!--    注解扫描-->
    <context:component-scan base-package="com.cl"></context:component-scan>
<!--    导入properties配置文件-->
    <context:property-placeholder location="jdbc.properties"></context:property-placeholder>
<!--    配置druid(德鲁伊)数据源-->
    <bean id="dataSource" class="com.alibaba.druid.pool.DruidDataSource">
        <property name="username" value="${jdbc_username}"></property>
        <property name="password" value="${jdbc_password}"></property>
        <property name="url" value="${jdbc_url}"></property>
        <property name="driverClassName" value="${jdbc_driver}"></property>
    </bean>
<!--    配置jdbcTemplate,并注入DataSource数据源-->
    <bean id="jdbcTemplate" class="org.springframework.jdbc.core.JdbcTemplate">
        <property name="dataSource" ref="dataSource"></property>
    </bean>
<!--    配置事务管理器器-->
    <bean id="transactionManager" class="org.springframework.jdbc.datasource.DataSourceTransactionManager">
        <property name="dataSource" ref="dataSource"></property>
    </bean>
<!--    开启事务注解驱动-->
    <tx:annotation-driven/>
</beans>
10.5.3、全注解方式控制事务
@Configuration // 配置类标志
@ComponentScan(basePackages = "com.cl") // 注解扫描
@PropertySource("classpath:jdbc.properties") // 导入配置文件
@EnableTransactionManagement // 开启事务注解
public class SpringConfig {

    @Value("${jdbc_username}")
    private String username;

    @Value("${jdbc_password}")
    private String password;

    @Value("${jdbc_url}")
    private String url;

    @Value("${jdbc_driver}")
    private String driver;

    @Bean
    public DruidDataSource getDruidDataSource(){
        DruidDataSource dataSource = new DruidDataSource();
        dataSource.setUsername(username);
        dataSource.setPassword(password);
        dataSource.setUrl(url);
        dataSource.setDriverClassName(driver);
        return dataSource;
    }

    @Bean
    public JdbcTemplate getJdbcTemplate(DruidDataSource dataSource){
        JdbcTemplate jdbcTemplate = new JdbcTemplate();
        jdbcTemplate.setDataSource(dataSource);
        return jdbcTemplate;
    }

    @Bean
    public DataSourceTransactionManager getDataSourceTransactionManager(DruidDataSource dataSource){
        DataSourceTransactionManager transactionManager = new DataSourceTransactionManager();
        transactionManager.setDataSource(dataSource);
        return transactionManager;
    }

}
10.6、Spring的日志框架和测试
Spring5日志框架,官方建议使用log4j2
Spring5测试支持,支持junit4、整合了junit5


 3457
3457


 被折叠的 条评论
为什么被折叠?
被折叠的 条评论
为什么被折叠?
 到【灌水乐园】发言


