


HTML5CORE02
目录
前言
HTML5CORE02学习开始
一、复习
- 跨域
- 浏览器的
同源策略导致- 在网页中, 通过
AJAX发送网络请求时, 默认只能向同源的服务器请求- 同源: 协议 端口号 域名 三者都相同
- 产生跨域的原因: 目前流行
前后端分离开发模式- 由于
静态网页服务器和接口服务器非同源, 所以产生跨域问题- 解决方案:
- CORS: 最佳的解决方案
- 在服务器利用
cors模块解决即可- 原理: 接口服务器告知浏览器, 允许其他来源的访问
- PROXY: 代理模式 -- 适合
临时解决
- 服务器无法添加cors 的场景
- 采用
express-http-proxy模块 转发请求- JSONP
- 利用 script 的 src 获取数据没有跨域限定
- 需要 服务器 和 前端配合, 共同解决跨域问题
- 文件上传
- 服务器端
- 使用
multer模块实现const upload = multer({ storage: multer.diskStorage({ desctination: 'upload', // 存放上传文件的目录 filename(req, file, cb){ // 根据上传的文件信息, 提供存储时 对应的文件名 } }) })
- 前端
- Form表单模式
- 由于功能过于单一, 使用较少
- DOM模式
- 通过DOM操作, 手动制作 FormData 对象
- 验证数据大小
- 验证数据的格式
- 利用 AJAX 实现文件上传
- 监听上传进度, 来实现进度条
二、拖拽
<!DOCTYPE html>
<html lang="en">

<head>
  <meta charset="UTF-8">
  <meta http-equiv="X-UA-Compatible" content="IE=edge">
  <meta name="viewport" content="width=device-width, initial-scale=1.0">
  <title>拖拽操作 09:15</title>

  <style>
    #box {
      background-color: #bbb;
      width: 500px;
      height: 300px;
    }
  </style>
</head>

<body>
  <!-- HTML5中 新增了拖拽操作 -->
  <!-- 默认 图片 和 超链接 均支持拖拽, 其他标签不支持 -->
  <img id="img1" src="./imgs/smallskin-1.jpg" width="100" alt="">
  <a id="a1" href="http://www.baidu.com">百度一下</a>
  <!-- draggable: 控制是否可以拖拽 -->
  <p draggable="true" id="p1">Hello P!</p>

  <div id="box"></div>

  <script>
    const a1 = document.getElementById('a1')
    a1.ondragstart = function (e) {
      e.dataTransfer.setData('text', 'a1')
    }

    const img1 = document.getElementById('img1')
    img1.ondragstart = function (e) {
      e.dataTransfer.setData('text', 'img1')
    }


    const p = document.querySelector('p')
    // 在用户开始拖拽元素时触发
    p.ondragstart = function (e) {
      console.log('p被拖拽 ondragstart', e)
      // dataTransfer: 数据传输者 -- 用于在事件中保存一些信息
      // setData: 用于设置数据
      // 参数1: 固定的值,  'text' 代表文本类型的信息
      // 参数2: 自定义的值, 此处 p1 是拖拽的元素的id
      e.dataTransfer.setData('text', 'p1')
    }
    // 处于拖拽状态时, 每隔 350毫秒, 0.35秒 触发一次
    p.ondrag = function (e) {
      // console.log('p被拖动 ondrag', e);
    }
    // 拖动结束时
    p.ondragend = function (e) {
      console.log('拖动结束 ondragend');
    }

    //
    // 盒子
    const box = document.getElementById('box')

    box.ondragenter = function () {
      console.log('拖拽元素进入盒子范围 ondragenter');
    }
    // 每隔350ms 触发一次
    box.ondragover = function (e) {
      // console.log('拖拽元素在盒子范围内 ondragover');
      // 默认事件操作: 不允许元素被放下到盒子里
      // 阻止事件的默认行为, 盒子不会排斥拖拽的元素
      e.preventDefault()
    }

    box.ondragleave = function () {
      console.log('拖拽元素离开盒子范围 ondragleave');
    }

    // 检测到有元素被放置到盒子中
    box.ondrop = function (e) {
      // 问题: 如何区分被放下的元素是什么?
      console.log('有元素被放下 ondrop:', e)

      // 读取数据传输者中 存放的信息
      var el_id = e.dataTransfer.getData('text')
      // 通过id 读取被放下的元素
      var el = document.getElementById(el_id)
      // 添加到盒子里
      box.appendChild(el)
    }
  </script>
</body>

</html>
- 文件拖拽
<!DOCTYPE html>
<html lang="en">

<head>
  <meta charset="UTF-8">
  <meta http-equiv="X-UA-Compatible" content="IE=edge">
  <meta name="viewport" content="width=device-width, initial-scale=1.0">
  <title>文件拖拽 10:21</title>

  <style>
    #box {
      background-color: #aaa;
      width: 300px;
      height: 300px;
    }
  </style>
</head>

<body>
  <button>上传</button>
  <div id="box"></div>

  <script>
    const box = document.getElementById('box')

    // 阻止路过自身上方的元素的默认行为
    box.ondragover = function (e) {
      e.preventDefault()
    }

    box.ondrop = function (e) {
      e.preventDefault()

      console.log('被放下的元素', e);
      console.log(e.dataTransfer.files);

      var file = e.dataTransfer.files[0]
      this.innerHTML = file.name
    }
  </script>
</body>

</html>
三、上传服务器
- 1.制作文件夹:
upload-server- 2.初始化命令:
npm init -y- 3.安装模块:
npm i express uuid multer cors- 4.制作 app.js 文件, 完成基本服务器的启动代码, 端口3000
- 5.制作静态文件夹
public
- app.js 中, 指定 public 为静态托管文件夹
- 在 public 下创建
index.html, 书写 h1 标签, 显示 欢迎 文字- 把 jquery.min.js 引入到 public 目录中
- 6.在 app.js 中添加 multer 模块, 完成单文件的一系列操作
- 指定 upload 目录保存上传文件
- 个性化 配置上传文件的名字
- 添加 post方式的 /upload 接口, 用于接收单文件
const express = require('express');
const cors = require('cors');
const uuid = require('uuid');
const multer = require('multer');

const app = express()
app.listen(3000, () => {
  console.log('服务器启动');
})

app.use(express.static('public'))

app.use(cors())

const upload = multer({
  storage: multer.diskStorage({
    destination: 'upload',
    filename(req, file, cb) {
      var dian_index = file.originalname.lastIndexOf('.')
      var ext = file.originalname.substr(dian_index)

      cb(null, uuid.v4() + ext)
    }
  })
})

// 单文件
app.post('/upload', upload.single('avatar'), (req, res) => {
  res.send(req.file)
})

// 多文件
// 变化1: upload.array  代表收到的文件是多个
// 变化2: req.files 代表多个文件的信息
app.post('/uploads', upload.array('avatars'), (req, res) => {
  res.send(req.files)
})
- 单文件
<!DOCTYPE html>
<html lang="en">

<head>
  <meta charset="UTF-8">
  <meta http-equiv="X-UA-Compatible" content="IE=edge">
  <meta name="viewport" content="width=device-width, initial-scale=1.0">
  <title>首页</title>
  <style>
    #box {
      background-color: #aaa;
      height: 200px;
      padding: 10px;
    }
  </style>
</head>

<body>
  <h1>欢迎使用文件上传</h1>
  <!-- 不要使用live server, 会导致上传后 自动刷新 -->
  <div id="box"></div>
  <button>上传</button>

  <script src="./jquery-3.6.1.min.js"></script>
  <script>
    let files = null //用于存放拖拽的文件信息

    $('#box')
      .on('dragover', function (e) {
        e.preventDefault()
      })
      .on('drop', function (e) {
        // jQuery触发的事件参数 e  是经过封装的, 并非原生的事件参数
        // 其中的 originalEvent 存储了原生的事件参数
        e.preventDefault()
        console.log('drop', e);
        // 存放到全局的 files 属性
        files = e.originalEvent.dataTransfer.files
        console.log('files', files);

        $('#box').empty() //清空
        for (const file of files) {
          $('#box').append(`<div>${file.name}</div>`)
        }
      })

    // 单文件上传
    $('button').click(function () {
      // FormData
      var fd = new FormData()
      fd.append('avatar', files[0])

      $.ajax({
        type: 'post',
        data: fd,
        contentType: false,
        processData: false,
        url: 'http://localhost:3000/upload',
        success(res) {
          console.log(res);
        }
      })
    })
  </script>
</body>

</html>
- 多文件
<!DOCTYPE html>
<html lang="en">

<head>
  <meta charset="UTF-8">
  <meta http-equiv="X-UA-Compatible" content="IE=edge">
  <meta name="viewport" content="width=device-width, initial-scale=1.0">
  <title>首页</title>
  <style>
    #box {
      background-color: #aaa;
      height: 200px;
      padding: 10px;
    }
  </style>
</head>

<body>
  <h1>欢迎使用文件上传</h1>
  <!-- 不要使用live server, 会导致上传后 自动刷新 -->
  <div id="box"></div>
  <button>上传</button>

  <script src="./jquery-3.6.1.min.js"></script>
  <script>
    let files = null //用于存放拖拽的文件信息

    $('#box')
      .on('dragover', function (e) {
        e.preventDefault()
      })
      .on('drop', function (e) {
        // jQuery触发的事件参数 e  是经过封装的, 并非原生的事件参数
        // 其中的 originalEvent 存储了原生的事件参数
        e.preventDefault()
        console.log('drop', e);
        // 存放到全局的 files 属性
        files = e.originalEvent.dataTransfer.files
        console.log('files', files);

        $('#box').empty() //清空
        for (const file of files) {
          $('#box').append(`<div>${file.name}</div>`)
        }
      })

    // 单文件上传
    $('button').click(function () {
      // FormData
      var fd = new FormData()
      // 多文件, 用变量进行数据的添加
      for (const file of files) {
        fd.append('avatars', file)
      }

      $.ajax({
        type: 'post',
        data: fd,
        contentType: false,
        processData: false,
        url: 'http://localhost:3000/uploads',
        success(res) {
          console.log(res);
        }
      })
    })
  </script>
</body>

</html>
四、Canvas
- 入门
<!DOCTYPE html>
<html lang="en">

<head>
  <meta charset="UTF-8">
  <meta http-equiv="X-UA-Compatible" content="IE=edge">
  <meta name="viewport" content="width=device-width, initial-scale=1.0">
  <title>canvas 14:01</title>
  <style>
    /* 图片具有两种宽高: 1.原始宽高  2.显示宽高 */
    /* canvas上设置的 width 和 height 是图片的原本宽高 */
    /* css 上设置的是 图片显示的宽高 */
    #c1 {
      /* 显示时, 宽高与原图不同, 则会拉伸 或 压缩 */
      width: 400px;
      /* height: 800px; */
    }
  </style>
</head>

<body>
  <!-- canvas : 画布;  来自HTML5 新增的标签, 赋予了 HTML 画图能力 -->
  <!-- 可以利用 JS 代码来 实时绘制图片 -->
  <!-- 场景: 地图, 图表, 网页游戏... -->
  <!-- 实时根据数据, 绘制不规则的 样式丰富的 图形 -->

  <!-- width: 设置画布的宽度 -->
  <!-- height: 设置画布的高度 -->
  <canvas id="c1" width="400" height="400" style="background-color: gray;"></canvas>

  <script>
    // 通过规范的注释, 告诉vscode 变量c1 的类型是画布, 才能得到提示
    /** @type {HTMLCanvasElement} */
    var c1 = document.getElementById('c1')
    console.dir(c1)

    // 1.找到 画布中提供的 绘制工具
    // 使用说明: https://www.runoob.com/tags/ref-canvas.html
    var ctx = c1.getContext('2d') //绘制2d图形的工具箱
    console.log(ctx)

    ctx.strokeStyle = 'green' //笔触的颜色
    ctx.lineWidth = 5  // 默认单位 px
    // 左上角的坐标x,y ;   宽和高
    ctx.strokeRect(50, 50, 150, 150)

    // 在 60,60  坐标,  绘制 120, 120 宽高的 填充矩形, 填充红色red
    ctx.fillStyle = 'red'
    ctx.fillRect(60, 60, 120, 120)

    // 画一条线: 把画笔移动到起始点 -- 60,60
    // 线段颜色 blue
    // 移动到 180, 180 坐标
    // 开始画线
    ctx.beginPath() // 开始绘制路径
    ctx.moveTo(60, 60) // 从60,60坐标开始
    ctx.lineTo(180, 180) // 画线到指定坐标
    ctx.strokeStyle = 'blue'  //线的颜色
    ctx.stroke() // 绘制
  </script>
</body>

</html>
- 柱状图
<!DOCTYPE html>
<html lang="en">

<head>
  <meta charset="UTF-8">
  <meta http-equiv="X-UA-Compatible" content="IE=edge">
  <meta name="viewport" content="width=device-width, initial-scale=1.0">
  <title>练习 15:16</title>
</head>

<body>
  <canvas id="c1" width="800" height="300" style="background-color: #bbb;"></canvas>

  <script>
    var data = [
      { value: 146, color: 'pink' },
      { value: 72, color: 'black' },
      { value: 60, color: 'orange' },
      { value: 102, color: 'blue' },
      { value: 75, color: '#ff68b5' },
      { value: 43, color: '#fea600' },
      { value: 120, color: '#ce8540' },
    ]

    /** @type {HTMLCanvasElement} */
    var c1 = document.getElementById('c1')

    var ctx = c1.getContext('2d')

    // 坐标轴的竖线
    ctx.beginPath()
    ctx.moveTo(20, 20)
    ctx.lineTo(20, 280)
    ctx.lineTo(780, 280)
    ctx.stroke()

    // 竖着
    data.forEach((item, index) => {
      const { value, color } = item

      var h = 20
      var space = 10 //距离
      var x = 21
      var w = value
      var y = 280 - (index + 1) * (h + space)

      ctx.fillStyle = color
      ctx.fillRect(x, y, w, h)
    })

    // 横着
    // data.forEach((item, index) => {
    //   const { value, color } = item

    //   // 矩形左上角的 y
    //   var y = 280 - value
    //   var w = 50 //宽度
    //   var space = 20 //间距
    //   var h = value //高
    //   var x = (index + 1) * space + index * w + 20

    //   ctx.fillStyle = color
    //   ctx.fillRect(x, y, w, h)
    // })
  </script>
</body>

</html>
- 文本绘制
<!DOCTYPE html>
<html lang="en">

<head>
  <meta charset="UTF-8">
  <meta http-equiv="X-UA-Compatible" content="IE=edge">
  <meta name="viewport" content="width=device-width, initial-scale=1.0">
  <title>绘制文本 16:16</title>
</head>

<body>
  <canvas id="c1" width="500" height="500" style="background-color: #ccc;"></canvas>

  <script>
    /** @type {HTMLCanvasElement} */
    var c1 = document.getElementById('c1')

    var ctx = c1.getContext('2d')

    // 渐变色:
    var co = ctx.createLinearGradient(0, 0, 250, 50)
    co.addColorStop(0, 'blue') // 开头的颜色
    co.addColorStop(0.5, 'purple') // 一半的颜色
    co.addColorStop(1, 'brown') // 最后的颜色

    ctx.fillStyle = co

    ctx.font = '50px 微软雅黑'
    // 参数2 和 参数3: 代表文本的左下角坐标
    ctx.fillText("填充的文本", 10, 50)

    ctx.font = '50px 微软雅黑'
    ctx.strokeText('描边文本', 10, 120)
  </script>
</body>

</html>
五、地图
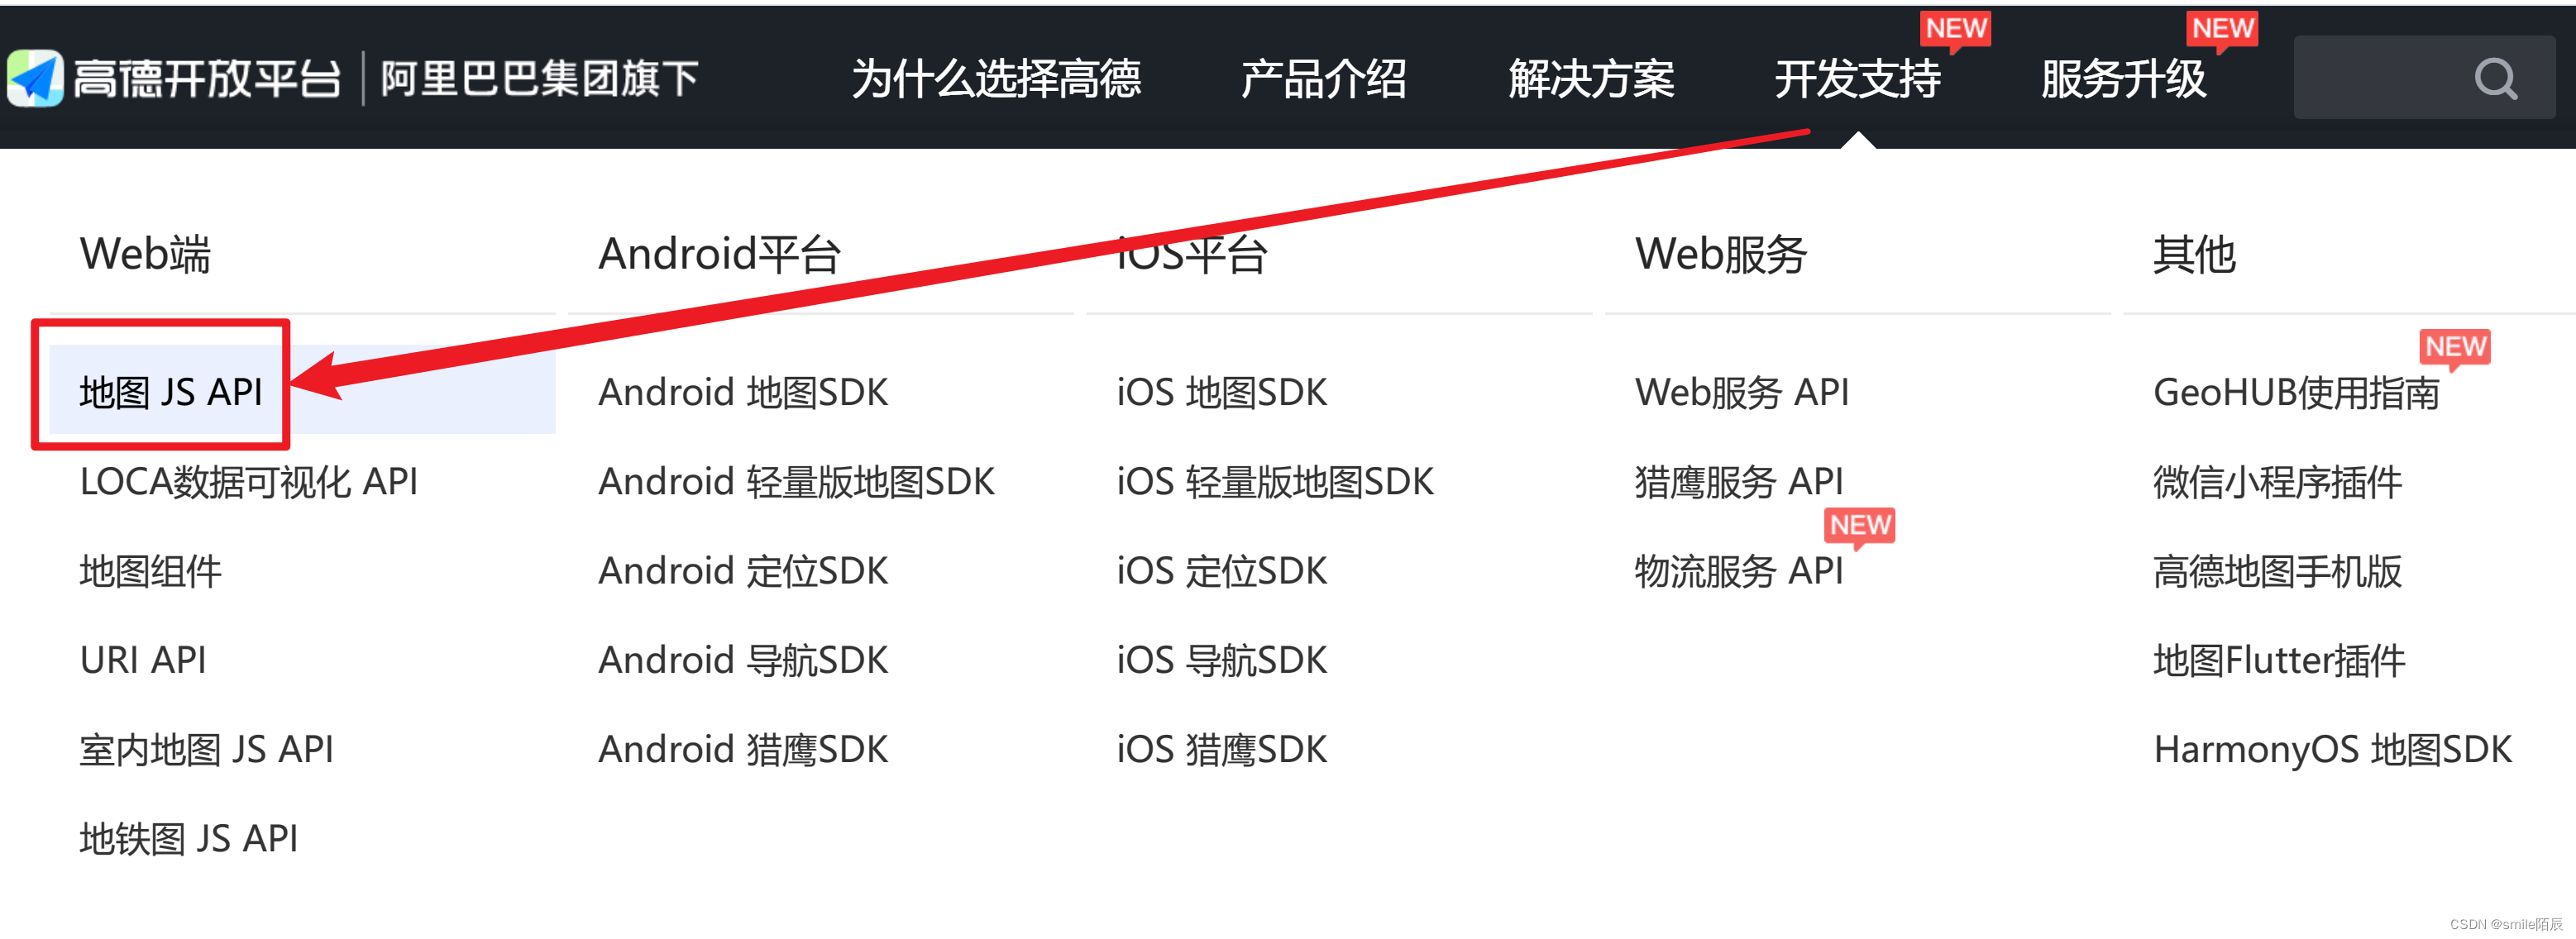
- 文档地址:高德开放平台 | 高德地图API
- 按照
教程的准备进行操作
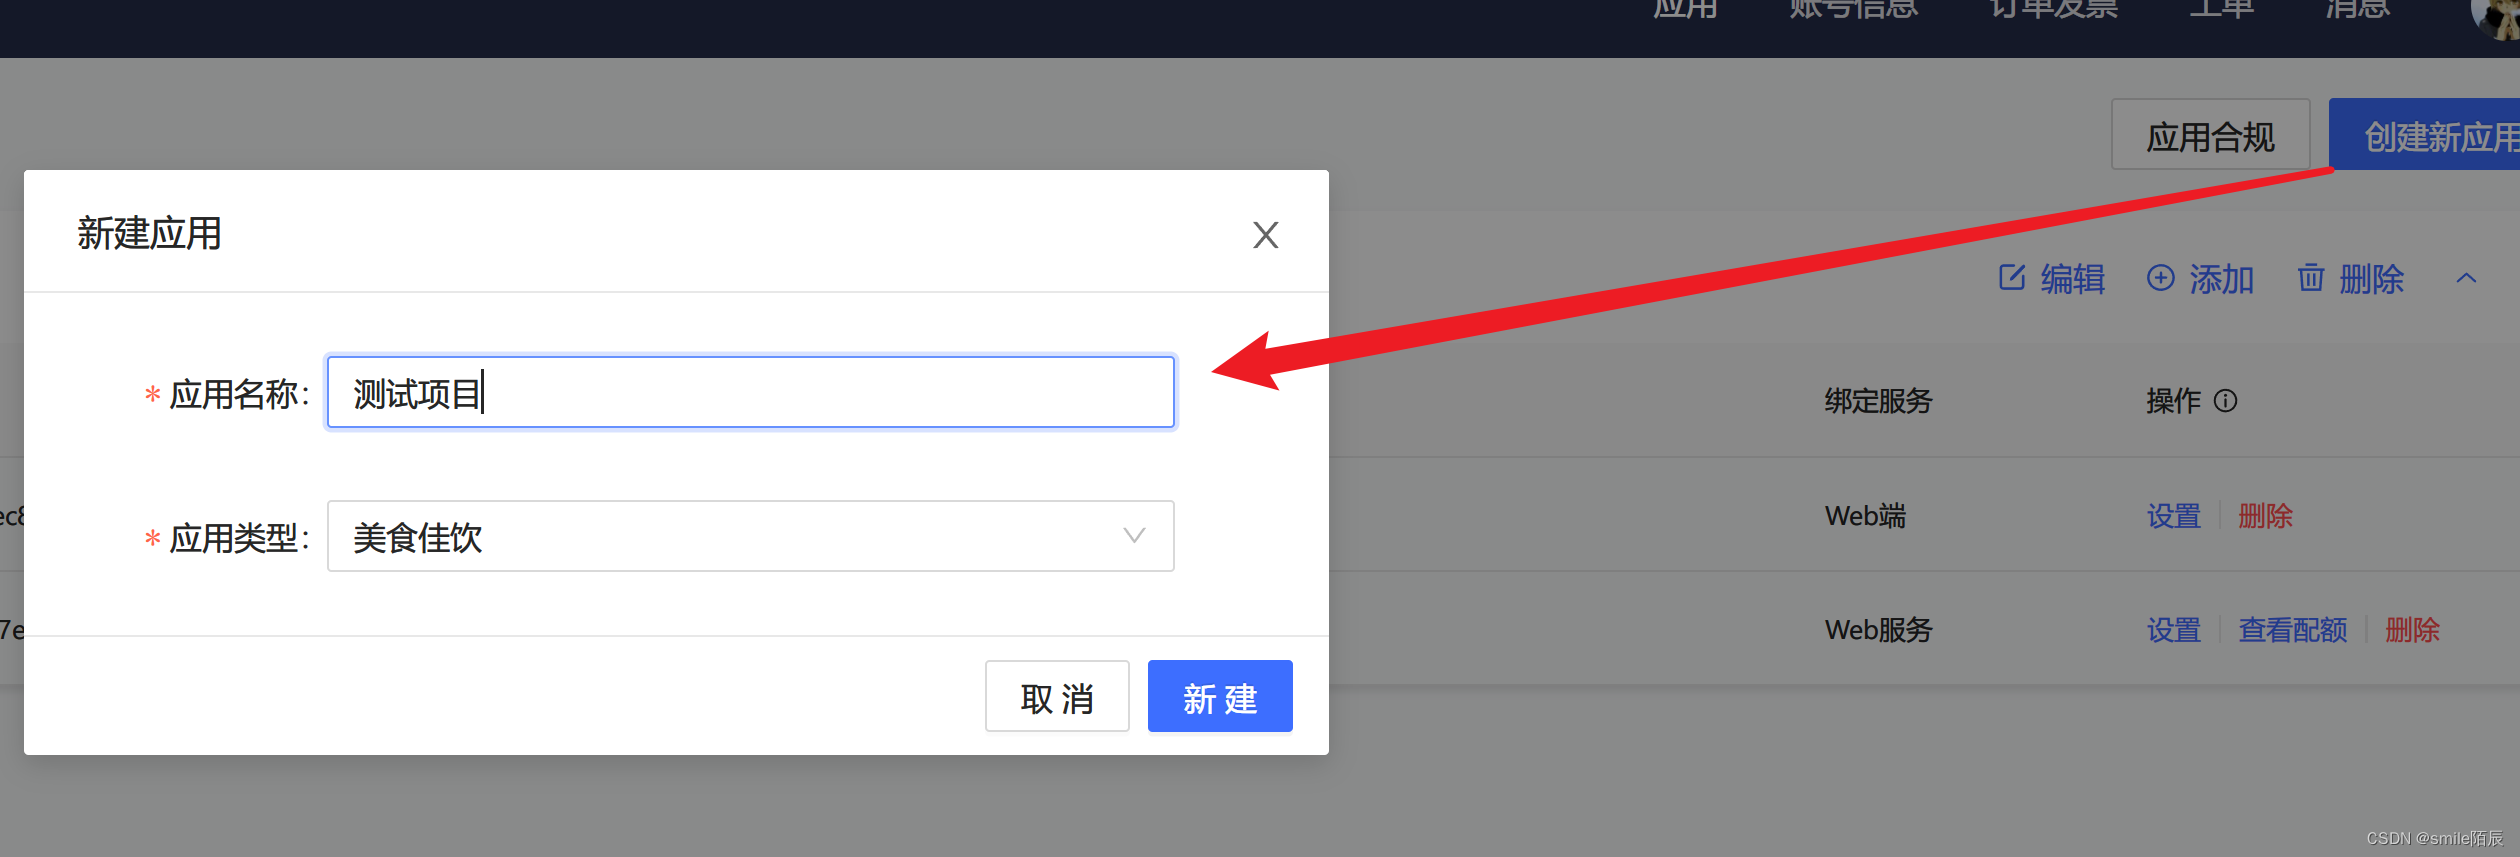
- 登录账号以后, 在
控制台中创建新应用- 名称和类型 根据实际情况填写, 可以随便写
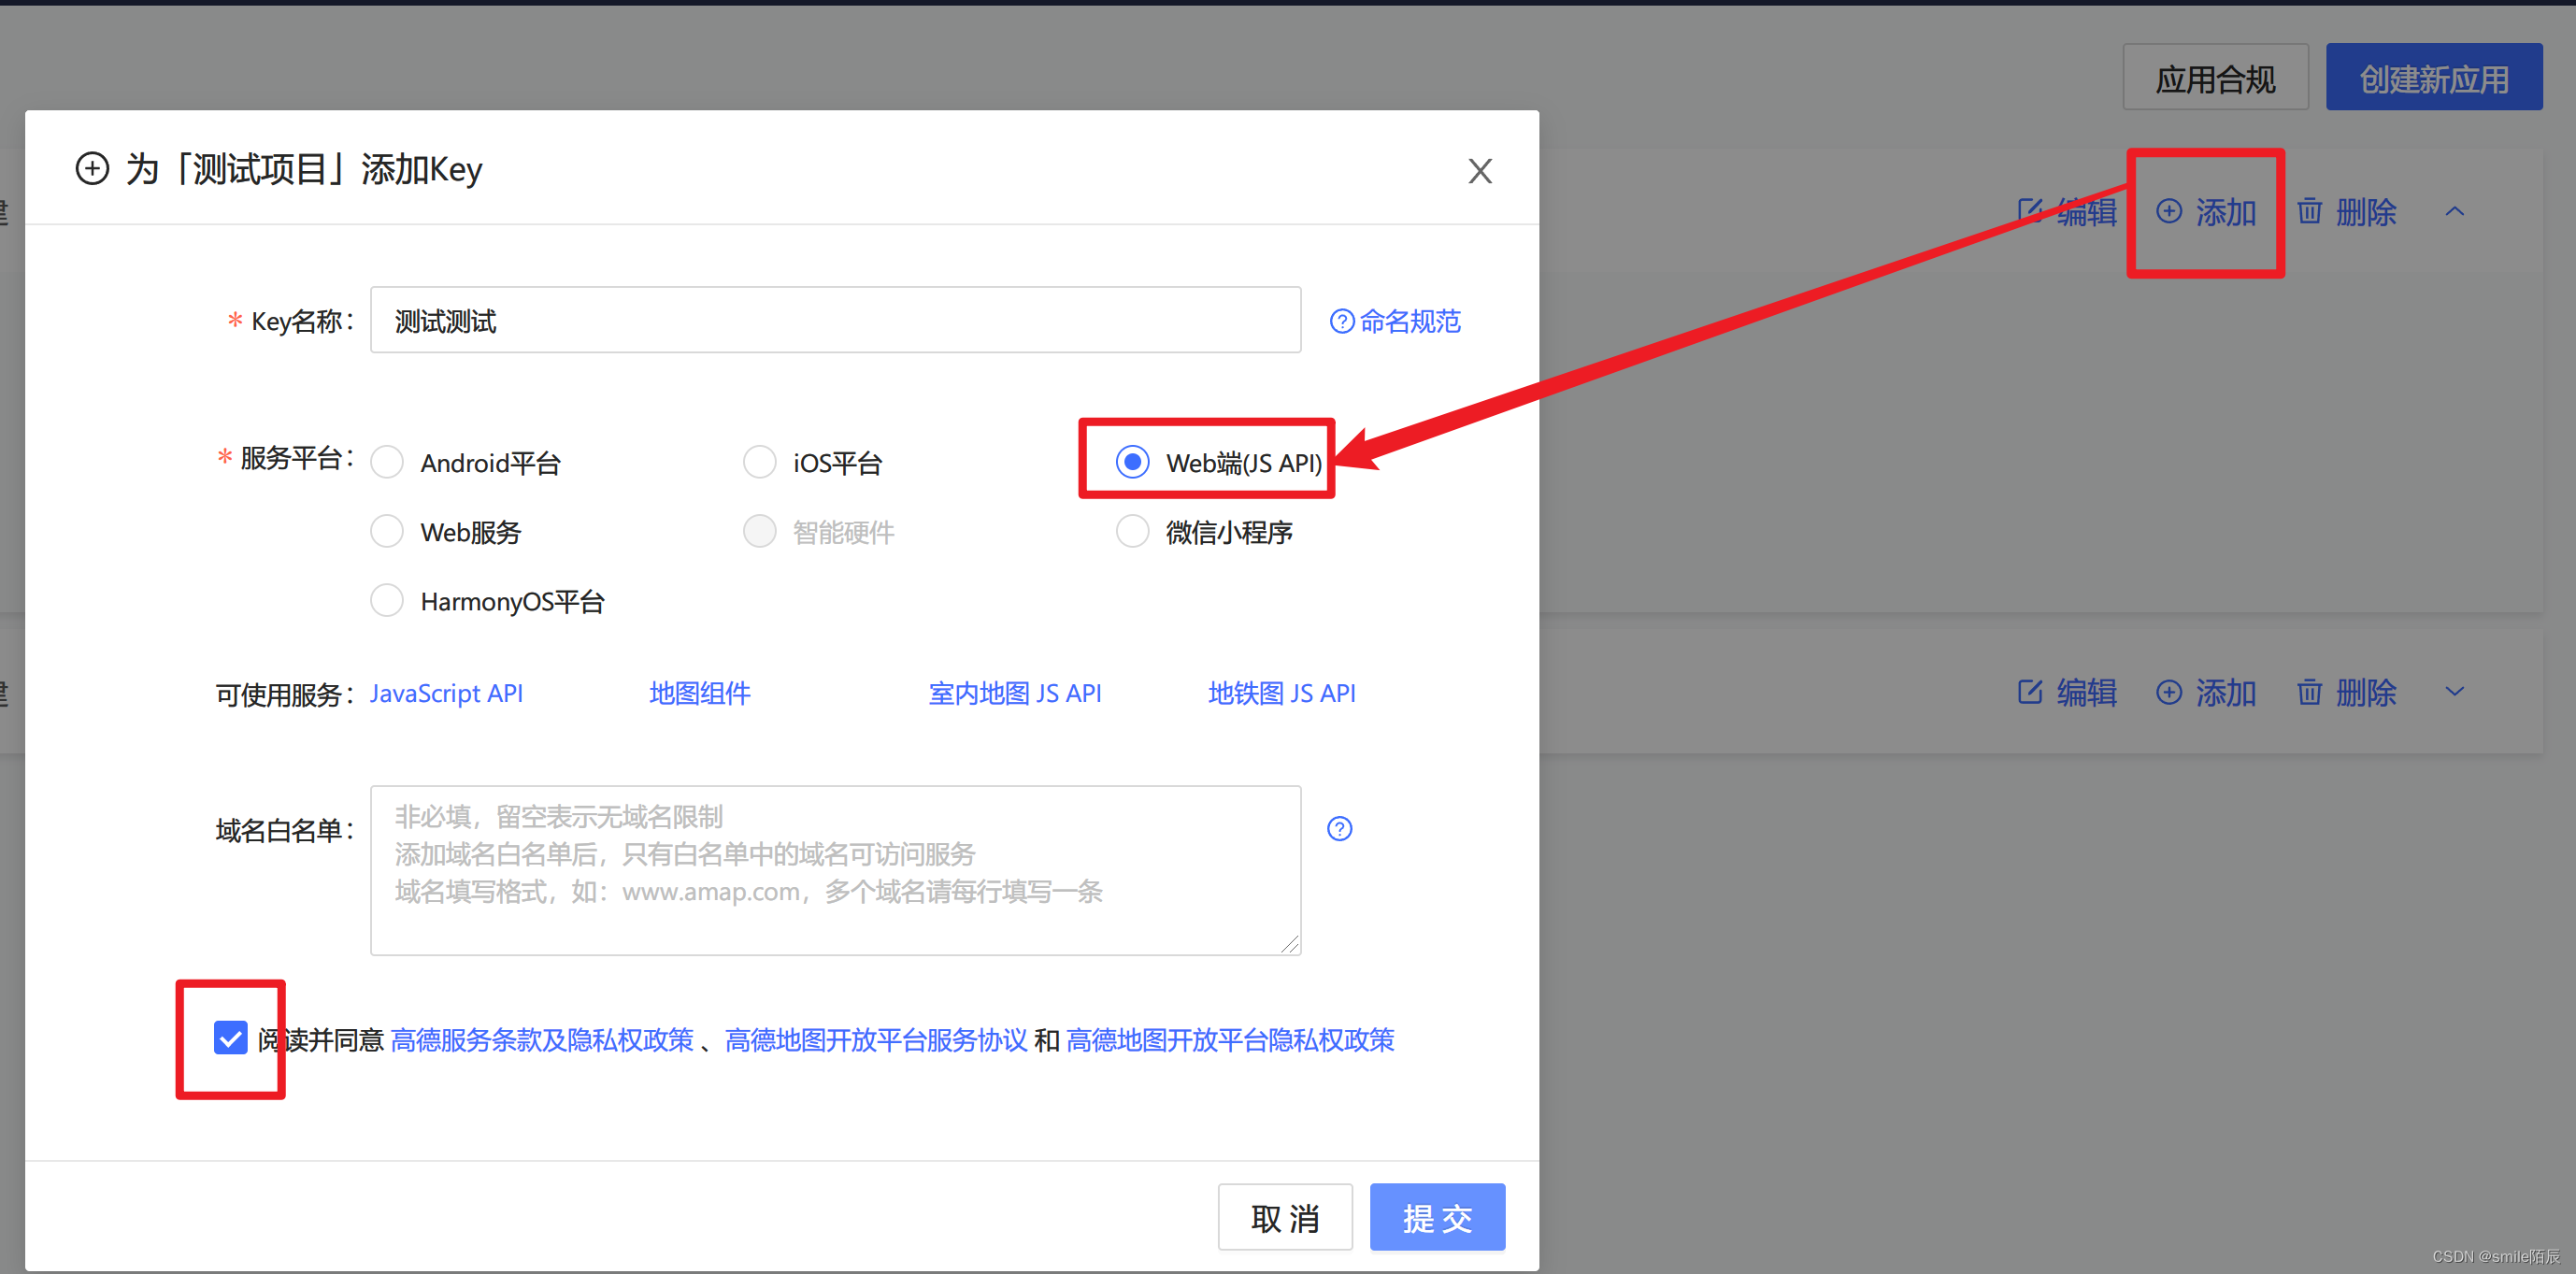
- 添加一个
key:类似玩游戏时 要先新建角色
<!DOCTYPE html>
<html lang="en">

<head>
  <meta charset="UTF-8">
  <meta http-equiv="X-UA-Compatible" content="IE=edge">
  <meta name="viewport" content="width=device-width, initial-scale=1.0">
  <title>map 16:32</title>

  <style>
    #container {
      width: 500px;
      height: 500px;
    }

    .home {
      list-style: none;
      margin: 0;
      background-color: #eee;
      border-radius: 4px;
      padding: 4px;
    }
  </style>
</head>

<body>
  <!-- 地图: 百度地图, 腾讯, 谷歌, 高德... -->
  <!-- 这些厂商 开发了一些地图的API 可以使用 -->
  <!-- 高德地图开放平台: https://lbs.amap.com/ -->

  <div id="container"></div>

  <script type="text/javascript">
    window._AMapSecurityConfig = {
      securityJsCode: '1c93d9f935422a937e3e4352acd10b6a',
    }
  </script>
  <script type="text/javascript" src="https://webapi.amap.com/maps?v=2.0&key=6f7aeb74b1f6e28d7d820dbc7eb9f315"></script>

  <script>
    // 快速上手
    // 把 #container 初始化为地图
    // 参数1: 把 指定id的元素, 转换成地图
    // 参数2: 各种配置
    var map = new AMap.Map('container', {
      zoom: 11, //缩放级别
      // 坐标拾取器, 可以获取地址的经纬度
      // https://lbs.amap.com/tools/picker
      center: [116.39, 39.9], //中心点坐标
      viewMode: '3D', // 使用功能 3D 视图
      layers: [//使用多个图层
        new AMap.TileLayer.Satellite(),
        new AMap.TileLayer.RoadNet()
      ],
    });

    //实时路况图层
    var trafficLayer = new AMap.TileLayer.Traffic({
      zIndex: 10
    });
    map.add(trafficLayer);//添加图层到地图

    // 标记点
    var marker = new AMap.Marker({
      position: [116.39, 39.9]//位置
    })
    map.add(marker);//添加到地图

    // 标记点 点击弹窗
    var infoWindow = new AMap.InfoWindow({ //创建信息窗体
      isCustom: true,  //使用自定义窗体
      content: `<ul class="home">
        <li>亮亮的小屋</li>
        <li>营业时间  09:00 - 22:00</li>
        <li>联系方式: 18811718888</li>
        </ul>`, //信息窗体的内容可以是任意html片段
      offset: new AMap.Pixel(16, -45)
    });
    var onMarkerClick = function (e) {
      infoWindow.open(map, e.target.getPosition());//打开信息窗体
      //e.target就是被点击的Marker
    }
    var marker = new AMap.Marker({
      position: [116.481181, 39.989792]
    })
    map.add(marker);
    marker.on('click', onMarkerClick);//绑定click事件

    // 插件的使用:
    AMap.plugin('AMap.ToolBar', function () {//异步加载插件
      var toolbar = new AMap.ToolBar();
      map.addControl(toolbar);
    });

    AMap.plugin(['AMap.ToolBar', 'AMap.MapType', 'AMap.Scale', 'AMap.HawkEye', 'AMap.Geolocation'], function () {//异步同时加载多个插件
      var toolbar = new AMap.ToolBar();
      map.addControl(toolbar);

      var maptype = new AMap.MapType()
      map.addControl(maptype)

      var scale = new AMap.Scale()
      map.addControl(scale)

      var hawkeye = new AMap.HawkEye({ position: 'LT' })
      map.addControl(hawkeye)

      var geolocation = new AMap.Geolocation()
      map.addControl(geolocation)
    });


    //加载天气查询插件
    AMap.plugin('AMap.Weather', function () {
      //创建天气查询实例
      var weather = new AMap.Weather();

      //执行实时天气信息查询
      weather.getLive('北京市', function (err, data) {
        console.log(err, data);
      });
    });
  </script>
</body>

</html>
总结
HTML5CORE02学习结束


 1480
1480


 被折叠的 条评论
为什么被折叠?
被折叠的 条评论
为什么被折叠?
 到【灌水乐园】发言


