


三 . 五个java文件
制作要求
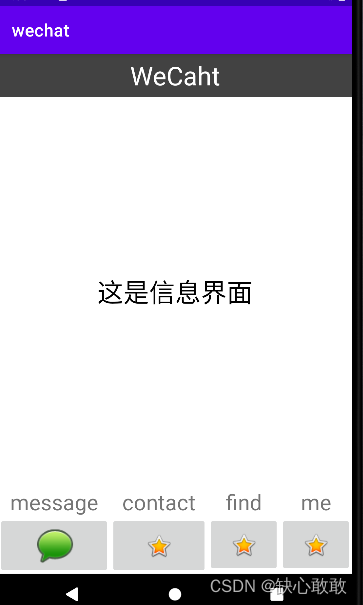
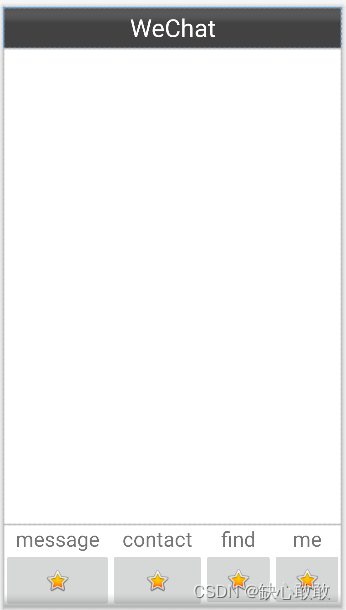
要求要有微信底部的四个按钮,点击后出现对应内容(如下图展示)
一、top,buttom页面制作
1.top页面
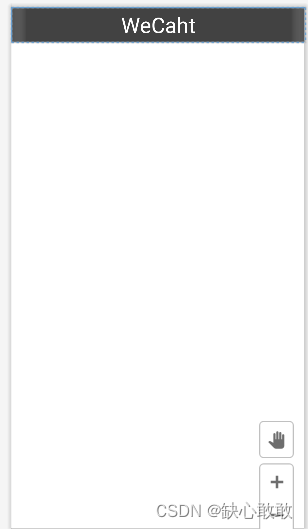
首先在该文件下的layout创建一个top.xml文件,在放入一个linearlayout容器和一个textview控件,通过改变TextView的gravity属性为center ,将文本放置中间,在改变背景颜色,即可(下图为成品)
代码如下:
<?xml version="1.0" encoding="utf-8"?>
<LinearLayout xmlns:android="http://schemas.android.com/apk/res/android"
    android:layout_width="match_parent"
    android:layout_height="50dp"
    android:background="@color/cardview_dark_background">

    <TextView
        android:id="@+id/title"
        android:layout_width="0dp"
        android:layout_height="match_parent"
        android:layout_weight="1"
        android:gravity="center"
        android:text="WeChat"
        android:textColor="@color/white"
        android:textSize="30sp" />

</LinearLayout>
2.buttom页面
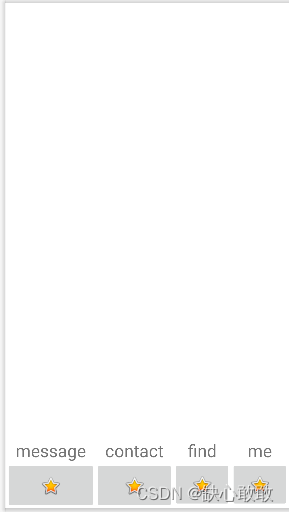
在该文件下的layout创建一个buttom.xml文件,先放入一个linearlayout的容器,再放入四个linearlayout,并调整其大小,和gravity属性,放在底部。在这四个小容器中,分别放入一个TextView和一个imagebotton(下图展示,本人没有调好比例)
代码如下:
<?xml version="1.0" encoding="utf-8"?>
<LinearLayout xmlns:android="http://schemas.android.com/apk/res/android"
    xmlns:app="http://schemas.android.com/apk/res-auto"
    android:layout_width="match_parent"
    android:layout_height="100dp"
    android:layout_gravity="bottom"
    android:baselineAligned="false">


    <LinearLayout
        android:id="@+id/linearLayout1"
        android:layout_width="wrap_content"
        android:layout_height="match_parent"
        android:layout_weight="1"
        android:orientation="vertical">

        <TextView
            android:id="@+id/message"
            android:layout_width="match_parent"
            android:layout_height="wrap_content"
            android:gravity="center"
            android:text="message"
            android:textSize="25sp" />

        <ImageButton
            android:id="@+id/imageButton"
            android:layout_width="match_parent"
            android:layout_height="68dp"
            app:srcCompat="@android:drawable/btn_star_big_on" />

    </LinearLayout>

    <LinearLayout
        android:id="@+id/linearLayout2"
        android:layout_width="wrap_content"
        android:layout_height="match_parent"
        android:layout_weight="1"
        android:orientation="vertical">

        <TextView
            android:id="@+id/contact"
            android:layout_width="match_parent"
            android:layout_height="wrap_content"
            android:gravity="center"
            android:text="contact"
            android:textSize="25sp" />

        <ImageButton
            android:id="@+id/con"
            android:layout_width="match_parent"
            android:layout_height="68dp"
            app:srcCompat="@android:drawable/btn_star_big_on" />

    </LinearLayout>

    <LinearLayout
        android:id="@+id/linearLayout3"
        android:layout_width="wrap_content"
        android:layout_height="match_parent"
        android:layout_weight="1"
        android:orientation="vertical">

        <TextView
            android:id="@+id/find"
            android:layout_width="match_parent"
            android:layout_height="wrap_content"
            android:gravity="center"
            android:text="find"
            android:textSize="25sp" />

        <ImageButton
            android:id="@+id/fi"
            android:layout_width="match_parent"
            android:layout_height="66dp"
            app:srcCompat="@android:drawable/btn_star_big_on" />

    </LinearLayout>

    <LinearLayout
        android:id="@+id/linearLayout4"
        android:layout_width="wrap_content"
        android:layout_height="match_parent"
        android:layout_weight="1"
        android:orientation="vertical">

        <TextView
            android:id="@+id/config"
            android:layout_width="match_parent"
            android:layout_height="wrap_content"
            android:gravity="center"
            android:text="me"
            android:textSize="25sp" />

        <ImageButton
            android:id="@+id/me"
            android:layout_width="match_parent"
            android:layout_height="66dp"
            app:srcCompat="@android:drawable/btn_star_big_on" />

    </LinearLayout>
</LinearLayout>
二、四个tab页面和activity_main页面制作
1.四个tab页面
这四个页面为按下相应按钮后出现的页面,在此我只详细讲其中一个(比较简单),其它在代码仓库中,各位自己观看。
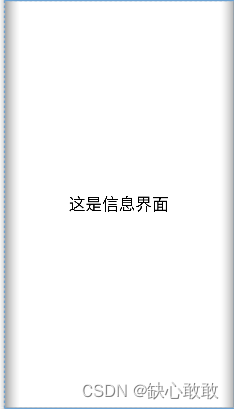
在该文件下的layout创建一个tab01.xml文件,在其中放入一个textview文件,改变其文本内容,修改gravity为center即可
代码:
<?xml version="1.0" encoding="utf-8"?>
<LinearLayout xmlns:android="http://schemas.android.com/apk/res/android"
    android:layout_width="match_parent"
    android:layout_height="match_parent"
    android:layout_gravity="center"
    android:background="@color/white">

    <TextView
        android:id="@+id/title"
        android:layout_width="0dp"
        android:layout_height="match_parent"
        android:layout_weight="1"
        android:gravity="center"
        android:text="这是信息界面"
        android:textColor="@color/black"
        android:textSize="30sp" />

</LinearLayout>
2.activity_main页面
此页面将buttom和top页面连接即可
代码:
<?xml version="1.0" encoding="utf-8"?>
<LinearLayout xmlns:android="http://schemas.android.com/apk/res/android"
    android:layout_width="match_parent"
    android:layout_height="match_parent"
    android:orientation="vertical">

    <include layout="@layout/top" />

    <FrameLayout
        android:id="@+id/id_content"
        android:layout_width="match_parent"
        android:layout_height="0dp"
        android:layout_weight="1">

    </FrameLayout>

    <include layout="@layout/buttom"/>
</LinearLayout>
三,五个java文件
1.四个按钮都对应一个java文件,这里我同样只介绍一个。
代码:
package com.example.wechat;
import android.os.Bundle;
import android.view.LayoutInflater;
import android.view.View;
import android.view.ViewGroup;

import androidx.fragment.app.Fragment;
public class weixinFragment extends Fragment{
    private static final String ARG_PARAM1 = "param1";
    private static final String ARG_PARAM2 = "param2";

    // TODO: Rename and change types of parameters
    private String mParam1;
    private String mParam2;

    public weixinFragment() {
        // Required empty public constructor
    }


    public static weixinFragment newInstance(String param1, String param2) {
        weixinFragment fragment = new weixinFragment();
        Bundle args = new Bundle();
        args.putString(ARG_PARAM1, param1);
        args.putString(ARG_PARAM2, param2);
        fragment.setArguments(args);
        return fragment;
    }

    @Override
    public void onCreate(Bundle savedInstanceState) {
        super.onCreate(savedInstanceState);
        if (getArguments() != null) {
            mParam1 = getArguments().getString(ARG_PARAM1);
            mParam2 = getArguments().getString(ARG_PARAM2);
        }
    }

    @Override
    public View onCreateView(LayoutInflater inflater, ViewGroup container,
                             Bundle savedInstanceState) {
        // Inflate the layout for this fragment
        return inflater.inflate(R.layout.tab01, container, false);
    }
}
2.mainactivity.java文件制作
此界面是将其它四个界面连接起来
代码:
package com.example.wechat;
import androidx.appcompat.app.AppCompatActivity;
import androidx.fragment.app.Fragment;
import androidx.fragment.app.FragmentManager;
import androidx.fragment.app.FragmentTransaction;

import android.os.Bundle;
import android.view.View;
import android.view.Window;
import android.widget.ImageButton;

public class MainActivity extends AppCompatActivity implements View.OnClickListener  {

    private Fragment mTab01 = new weixinFragment();
    private Fragment mTab02 = new frdFragment();
    private Fragment mTab03 = new contactFragment();
    private Fragment mTab04 = new settingFragment();

    private ImageButton mImgMessage;
    private ImageButton mImgFriend;
    private ImageButton mImgAddress;
    private ImageButton mImgSetting;

    private FragmentManager fm;

    @Override
    protected void onCreate(Bundle savedInstanceState) {
        super.onCreate(savedInstanceState);
        requestWindowFeature(Window.FEATURE_NO_TITLE);
        setContentView(R.layout.activity_main);

        initView();
        initFragment();
        initEvent();
        setSelect(0);
    }

    private void setSelect(int i) {
        FragmentTransaction transaction = fm.beginTransaction();
        hideFragment(transaction);
        switch (i) {
            case 0:
                transaction.show(mTab01);
                mImgMessage.setImageResource(R.drawable.img);
                break;

            case 1:
                transaction.show(mTab02);
                mImgFriend.setImageResource(R.drawable.img_1);
                break;

            case 2:
                transaction.show(mTab03);
                mImgAddress.setImageResource(R.drawable.img_2);
                break;

            case 3:
                transaction.show(mTab04);
                mImgSetting.setImageResource(R.drawable.img_3);
                break;
            default:
                break;
        }
        transaction.commit();

    }

    private void hideFragment(FragmentTransaction transaction) {
        transaction.hide(mTab01);
        transaction.hide(mTab02);
        transaction.hide(mTab03);
        transaction.hide(mTab04);
    }

    private void initEvent() {
        mImgMessage.setOnClickListener(this);
        mImgFriend.setOnClickListener(this);
        mImgAddress.setOnClickListener(this);
        mImgSetting.setOnClickListener(this);
    }

    private void initFragment() {
        fm = getSupportFragmentManager();
        FragmentTransaction transaction = fm.beginTransaction();
        transaction.add(R.id.id_content,mTab01);
        transaction.add(R.id.id_content,mTab02);
        transaction.add(R.id.id_content,mTab03);
        transaction.add(R.id.id_content,mTab04);
        transaction.commit();
    }

    private void initView() {
        mImgMessage = findViewById(R.id.imageButton);
        mImgFriend = findViewById(R.id.con);
        mImgAddress = findViewById(R.id.fi);
        mImgSetting = findViewById(R.id.me);
    }
    public void onClick(View v){
        resetImg();
        switch (v.getId()){
            case R.id.imageButton:
                setSelect(0);
                break;
            case R.id.con:
                setSelect(1);
                break;
            case R.id.fi:
                setSelect(2);
                break;
            case R.id.me:
                setSelect(3);
                break;
            default:
                break;
        }
    }

    private void resetImg() {
        mImgMessage.setImageResource(R.drawable.img_4);
        mImgFriend.setImageResource(R.drawable.img_5);
        mImgAddress.setImageResource(R.drawable.img_6);
        mImgSetting.setImageResource(R.drawable.img_7);
    }

}
四,总结
我这个项目可能还有一些没有完善的地方,各位取长补短即可。完整的代码仓库地址:vs data: vs保存的code (gitee.com) 各位如有不明白的地方评论留言即可。


 2766
2766


 被折叠的 条评论
为什么被折叠?
被折叠的 条评论
为什么被折叠?
 到【灌水乐园】发言


