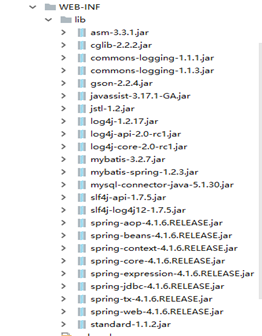
①导入的jar包:
②在src下创建并配置applicationcontext.xml文件
<?xml version="1.0" encoding="UTF-8"?>
<beans xmlns="http://www.springframework.org/schema/beans"
       xmlns:xsi="http://www.w3.org/2001/XMLSchema-instance"
       xsi:schemaLocation="http://www.springframework.org/schema/beans http://www.springframework.org/schema/beans/spring-beans.xsd">
    <!--配置DataSource的bean对象:存储数据库连接参数-->
    <bean id="datasource" class="org.springframework.jdbc.datasource.DriverManagerDataSource">
        <property name="url" value="jdbc:mysql://localhost:3306/spring4?characterEncoding=utf8"></property>
        <property name="driverClassName" value="com.mysql.jdbc.Driver"></property>
        <property name="username" value="root"></property>
        <property name="password" value="root"></property>
    </bean>
    <!--配置SQLSessionFactory的bean对象:生产SQLSession-->
    <bean id="factory" class="org.mybatis.spring.SqlSessionFactoryBean">
        <property name="dataSource" ref="datasource"></property>
    </bean>

    <!--配置Mapper扫描的bean对象:使用SQLSession扫描mapper包获取Mapper接口的实例化对象-->
    <bean id="a" class="org.mybatis.spring.mapper.MapperScannerConfigurer">
        <property name="sqlSessionFactory" ref="factory"></property>
        <property name="basePackage" value="com.java.mapper"></property>
    </bean>
    <!--配置service对象-->
    <bean id="us" class="com.java.service.UserServiceImpl">
        <property name="um" ref="userMapper"></property>
    </bean>
</beans>
③在web.xml文件中配置Spring容器对象的配置文件路径
<?xml version="1.0" encoding="UTF-8"?>
<web-app xmlns="http://java.sun.com/xml/ns/javaee"
         xmlns:xsi="http://www.w3.org/2001/XMLSchema-instance"
         xsi:schemaLocation="http://java.sun.com/xml/ns/javaee
        http://java.sun.com/xml/ns/javaee/web-app_3_0.xsd"
         version="3.0">
    <!--配置全局参数:被项目中所有servlet共享-->
    <context-param>
        <param-name>contextConfigLocation</param-name>
        <param-value>classpath:applicationcontext.xml</param-value>
    </context-param>
    <listener>
        <listener-class>
            org.springframework.web.context.ContextLoaderListener
        </listener-class>
    </listener>
</web-app>
④在Servlet的init方法中完成初始化资源的加载(从Spring容器对象中获取业务层对象)
package com.java.controller;

import com.java.pojo.User;
import com.java.service.UserService;
import org.springframework.context.ApplicationContext;
import org.springframework.context.support.ClassPathXmlApplicationContext;
import org.springframework.web.context.WebApplicationContext;
import org.springframework.web.context.request.async.WebAsyncUtils;
import org.springframework.web.context.support.WebApplicationContextUtils;

import javax.servlet.ServletException;
import javax.servlet.annotation.WebServlet;
import javax.servlet.http.HttpServlet;
import javax.servlet.http.HttpServletRequest;
import javax.servlet.http.HttpServletResponse;
import java.io.IOException;

@WebServlet(value = "/user", loadOnStartup = 1)
public class UserServlet extends HttpServlet {
    UserService userService;

    //在初始化方法中完成Spring容器资源的加载
    @Override
    public void init() throws ServletException {
        //获取spring容器对象
        ApplicationContext ac = WebApplicationContextUtils.getWebApplicationContext(this.getServletContext());
        //获取业务层对象
        userService = (UserService) ac.getBean("us");
    }

    @Override
    protected void service(HttpServletRequest req, HttpServletResponse resp) throws ServletException, IOException {
        req.setCharacterEncoding("utf-8");
        resp.setContentType("text/html;charset=utf-8");
        resp.setCharacterEncoding("utf-8");

        String uname = req.getParameter("uname");
        String pwd = req.getParameter("pwd");

        //处理请求
        //调用业务层方法
        User user = userService.userLoginService(uname, pwd);
        //响应结果
        //直接响应
        if (user != null) {
            resp.getWriter().write("登录成功");
        } else {
            resp.getWriter().write("登录失败");
        }

    }
}
⑤在业务层中声明mapper层的属性,并声明对应的get/set方法
package com.bjsxt.service;
import com.bjsxt.mapper.UserMapper;
import com.bjsxt.pojo.User;

public class UserServiceImpl implements UserService{
    private UserMapper um;
    public UserMapper getUm() {
        return um;
    }
    public void setUm(UserMapper um) {
        this.um = um;
    }
    @Override
    public User userLoginService(String uname, String pwd) {
        User user = um.userLoginMapper(uname, pwd);
        return user;
    }
}
⑥正常完成功能开发即可


 305
305


 被折叠的 条评论
为什么被折叠?
被折叠的 条评论
为什么被折叠?
 到【灌水乐园】发言


