


一、前言
七夕节是爱情的节日,是一个以“牛郎织女”民间传说为载体,以祈福、乞巧、爱情为主题,以女性为主体的综合性节日。
虽然说今年的七夕节还早,但身为程序员,怎么能不提前给女朋友送一个炫酷的祝福呢,又省钱还浪漫,下面为大家推荐一款大神写的Github的项目:
Github链接:繁星祝福
二、效果展示
1.第一部分

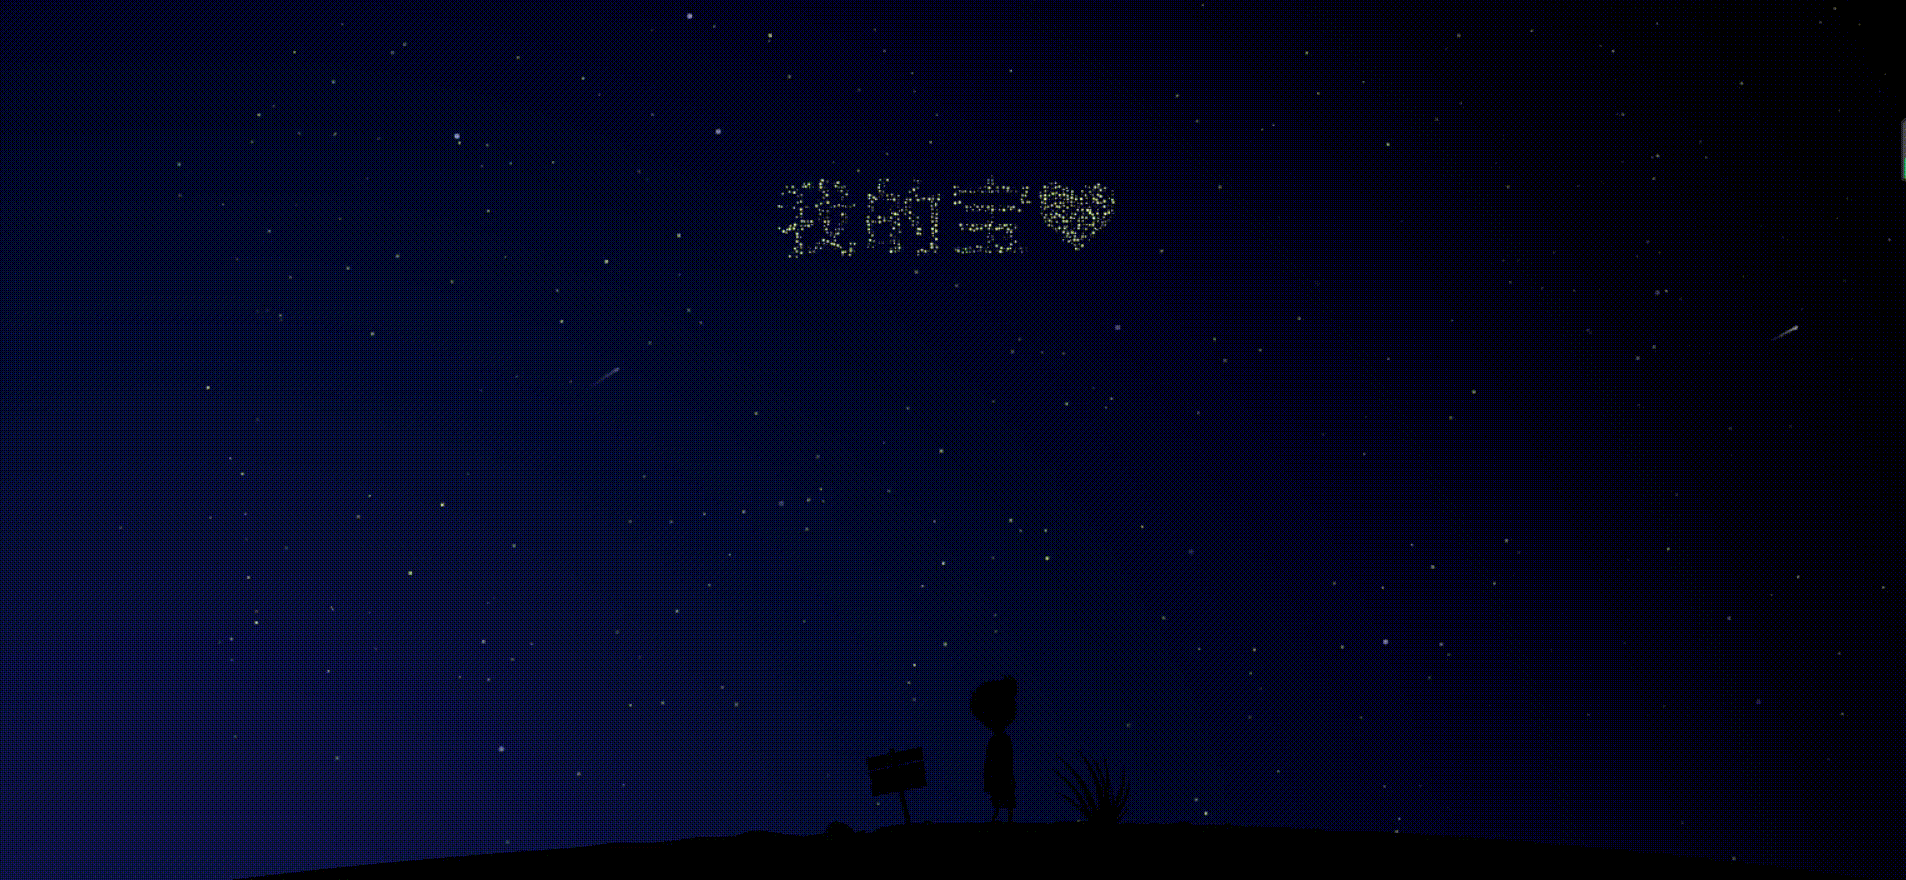
进入首页之后就会出现周边的星星逐渐汇聚,最后形成一个文字和爱心祝福,背景板是一个解析之后的动态图片,流星按照一定的轨迹和时间滑向天空。
2.第二部分

使用鼠标点击屏幕,触发事件,文字会随着代码提前编写好的文字逐渐显现出来。
3.第三部分

因为制作动态图文件过大,就分成了两部分,和上面的流程本质上差不多。
三、代码讲解
1.初始化
 const FRAME_RATE = 60
  const PARTICLE_NUM = 2000//粒子数量
  const RADIUS = Math.PI * 2//半径范围
  const CANVASWIDTH = 500//宽度
  const CANVASHEIGHT = 150//高度
  const CANVASID = 'canvas'//调用幕布初始化
  let texts = ['我的宝❤', '抬头看看', '星空', '对着', '流星', '许下', '永不分离的','心愿',
  '而你', '就是', '我生命中', '最亮的','星星', 'I LOVE YOU']//文本框,写下自己想要的祝福语
let canvas,//幕布初始化具体参数
    ctx,
    particles = [],
    quiver = true,
    text = texts[0],
    textIndex = 0,
    textSize = 70
2.星星运动
fadeIn () {//汇聚
      this.fadingIn = this.opacity > this.opacityTresh ? false : true
      if (this.fadingIn) {
        this.opacity += this.fadeInRate
      }else {
        this.opacity = 1
      }
    }
    fadeOut () {//逃离
      this.fadingOut = this.opacity < 0 ? false : true
      if (this.fadingOut) {
        this.opacity -= this.fadeOutRate
        if (this.opacity < 0) {
          this.opacity = 0
        }
      }else {
        this.opacity = 0
      }
    }
3.调用文字
class Particle {
    constructor (canvas) {
      let spread = canvas.height
      let size = Math.random() * 1.2
      // 速度
      this.delta = 0.06
      // 现在的位置
      this.x = 0
      this.y = 0
      // 上次的位置
      this.px = Math.random() * canvas.width
      this.py = (canvas.height * 0.5) + ((Math.random() - 0.5) * spread)
      // 记录点最初的位置
      this.mx = this.px
      this.my = this.py
      // 点的大小
      this.size = size
      // this.origSize = size
      // 是否用来显示字
      this.inText = false
      // 透明度相关
      this.opacity = 0
      this.fadeInRate = 0.005
      this.fadeOutRate = 0.03
      this.opacityTresh = 0.98
      this.fadingOut = true
      this.fadingIn = true
    }
4.开始绘制
 this.draw = function() {//绘制文字功能模块
    universe.beginPath();
    if (this.giant) {
      universe.fillStyle = 'rgba(' + giantColor + ',' + this.opacity + ')';
      universe.arc(this.x, this.y, 2, 0, 2 * Math.PI, false);
    } else if (this.comet) {
      universe.fillStyle = 'rgba(' + cometColor + ',' + this.opacity + ')';
      universe.arc(this.x, this.y, 1.5, 0, 2 * Math.PI, false);

      //for循环
      for (var i = 0; i < 30; i++) {
        universe.fillStyle = 'rgba(' + cometColor + ',' + (this.opacity - (this.opacity / 20) * i) + ')';
        universe.rect(this.x - this.dx / 4 * i, this.y - this.dy / 4 * i - 2, 2, 2);
        universe.fill();
      }
    } else {
      universe.fillStyle = 'rgba(' + starColor + ',' + this.opacity + ')';
      universe.rect(this.x, this.y, this.r, this.r);
    }

    universe.closePath();//关闭路径
    universe.fill();//填充
  };
5.CSS样式
body {//主题样式
    display: -webkit-box;
    display: -webkit-flex;
    display: -ms-flexbox;
    display: flex;
    -webkit-box-pack: center;
    -webkit-justify-content: center;
    -ms-flex-pack: center;
    justify-content: center;
    -webkit-box-align: center;
    -webkit-align-items: center;
    -ms-flex-align: center;
    align-items: center;
    -webkit-filter: contrast(120%);
    filter: contrast(120%);
    background-color: black;//背景颜色黑色
    position: relative;//位置
}
.container {
    width: 100%;
    height: 99.74%;
    background-image: radial-gradient(2000px at 10% 130%, rgba(33, 39, 80, 1) 10%, #020409 100%);//背景图片加载

}
.content {//100%显示
    width: 100% auto;
    height: 100% auto;
}
#scene {//场景
    height: 100%;
    position: absolute;
    left: 50%;
    margin-left: -768px;
}
.txt {//文本样式
    color: hsla(0, 0%, 0%, 0);//颜色
    text-shadow: #fff 0 0 10px;//文本展示
    transition: text-shadow 2s cubic-bezier(0, 1, 0, 1);
}
#canvas{//幕布
    margin: 0 auto;
}
四、Github Pages
 Github Pages为每一个账户提供了专属域名,可以把自己提交到仓库的项目生成一个可执行站点,获取这个项目的源码之后,部署到Github Pages,下面是具体步骤。
1.前往GitHub并创建一个名为username .github.io 的新公共存储库,其中username是你自己在Github的用户名称(用户名称一定要正确,否则会出错)。
2.利用Git客户端或者手动提交这个情人节项目的源文件,等待一段时间之后,就可以通过username .github.io这个网站访问页面了。


 2万+
2万+

 被折叠的 条评论
为什么被折叠?
被折叠的 条评论
为什么被折叠?
 到【灌水乐园】发言


