


flask实战系列
flask+前端基础知识完成注册登录
咱们主打能够直接运行
flask简介
直接点击 flask中文网:https://flask.github.net.cn/

快 、准、狠!
且全面!
当然你看完也可能会有一丢丢疑惑。
接着奏乐、接着看 |/
需求分析
现在我们想做一个可以登录(无账户可以直接注册)的微小系统,要求如下:
- 主页为登录页面
- 输入正确用户名和密码进入系统
- 新用户可注册,并将注册信息存入数据库
- 添加一个游客模式,即在不登陆的状态下你想展示的网页
注:(登录进入的系统界面为你主要展示的界面,与游客模式的界面不同,内容你自己确定)
前置知识
- python 编程基础
- HTML、CSS、JavaScript 的基础知识
- SQL语法以及数据库的基础知识
- HTTP的基础知识
- Ajax 用于前端页面不刷新直接请求资源,读者自己斟酌
开发平台
PyCharm: 一款pycharm使用者都在用的集成环境软件,不止能够运行Python…

开发过程
- 在PyCharm 集成开发环境中新建一个项目,并为此项目创建一个虚拟环境(也可用同类型项目的环境)
- 开始只要画框的三个文件,

- 需要知道的是:
“HTML” 类型的文件存档在templates文件夹里,图片、css等静态文件存放在static文件夹里,我是将CSS和Javascript代码一块儿写到HTML文件里了,所以只用来存图片等资源文件。 - 开发时一定要弄清楚路由的概念和关系 :
#1 @app.route( ‘这里就是路由’,“这里是HTTP的方法”)
#2 前端的请求是发送给路由的,前端页面之间也不会互相链接,而是由后端路由将前端的页面链接起来。
#3 并且HTML文件中的超链接写法与传统前端存在区别,具体自己查看flask文档。 - 适当问询AI智能助手,会有意想不到的收获。

源码
flask 主要代码 “app.py”
from flask import *
from flask import flash
import SqlLink
from SqlLink import getmessage ,inserDB
from flask import  url_for
import os
import shutil


app = Flask(__name__)
app.config['UPLOAD_FOLDER'] = 'upload'  # 请将此路径更改为你的上传文件夹路径
path2 = 'predect'

@app.route('/')
def index():  # put application's code here
    return render_template("index.html")

@app.route('/home', methods = ['GET','POST'] )
def home():
    if request.method == 'POST':
        name = request.form["username"]
        pwd  = request.form["password"]
        #传参成功后跳转
        if getmessage(name,pwd):
            return render_template("main.html")
        else:
            return "用户名或者密码错误!!!"
    else:
        return render_template("index.html")

@app.route('/register', methods = ['GET','POST'] )
def register():
    if request.method == 'POST':
        name = request.form["username"]
        pwd  = request.form["password"]
        if inserDB(name,pwd):
            print('注册成功,请登录!')
            return redirect(url_for('home'))  # 假设有一个名为 'login' 的登录页面路由
        else:
            print("注册失败!")
            return "注册失败,请重新注册!"
    else:
        return render_template("register.html")

@app.route('/welcom',methods = ['GET'])
def welcom():
    return render_template("welcom.html")

@app.route('/loguot')
def logout():
    # session.clear()
    return redirect(url_for('home'))

@app.route('/upload', methods=['POST'])
def upload_file():
    if 'file' not in request.files:
        return '没有文件'
    file = request.files['file']
    if file.filename == '':
        return '没有选择文件'
    # 删除文件夹中的旧文件
    for filename in os.listdir(app.config['UPLOAD_FOLDER']):
        os.remove(os.path.join(app.config['UPLOAD_FOLDER'], filename))
    file.save(os.path.join(app.config['UPLOAD_FOLDER'], file.filename))
    # 在这里添加你的数据处理代码
    return '文件上传成功'

@app.route('/get_file' ,methods=['GET'])
def get_file():
    filenames = os.listdir(app.config['UPLOAD_FOLDER'])
    if len(filenames) > 0:
        return send_from_directory(app.config['UPLOAD_FOLDER'], filenames[0])  # 返回第一个文件
    else:
        return '文件夹中没有文件'

@app.route('/process_data', methods=['POST'])
def process_data():
    # 指定文件夹A和文件夹B的路径
    folder_a = app.config['UPLOAD_FOLDER']
    folder_b = path2
    # 确保文件夹B存在,如果不存在则创建
    if not os.path.exists(folder_b):
        os.makedirs(folder_b)
    for filename in os.listdir(folder_b):
        os.remove(os.path.join(folder_b, filename))
    # file.save(os.path.join(app.config['UPLOAD_FOLDER'], file.filename))
    # 遍历文件夹A中的所有文件
    for filename in os.listdir(folder_a):
        file_path = os.path.join(folder_a, filename)
        # 检查是否为文件
        if os.path.isfile(file_path):
            # 处理文件,这里只是简单地复制到文件夹B
            shutil.copy(file_path, folder_b)
            print("okokok")
    # 返回成功的响应给前端
    return jsonify({'status': 'ok'})

if __name__ == '__main__':
    app.run(debug=True)
数据库连接页面 “SqlLink.py”
import pymysql
import pprint
from flask import flash

#连接数据库
mydb = pymysql.Connect(host="127.0.0.1",port=3306,
                       user="***",password="***",
                       db="***",charset='utf8')

#查询是否注册

sql1 = "CREATE TABLE user (id INTEGER PRIMARY KEY AUTOINCREMENT,usr_count TEXT UNIQUE NOT NULL,pwd TEXT NOT NULL);"
sql2 = "CREATE TABLE post (id INTEGER PRIMARY KEY AUTOINCREMENT,author_id INTEGER NOT NULL,created TIMESTAMP NOT NULL DEFAULT CURRENT_TIMESTAMP,title TEXT NOT NULL, body TEXT NOT NULL,FOREIGN KEY (author_id) REFERENCES user (id));"
sql3 = "select usr_count from user ;"


#调用数据库
def CreateDB():
    mydb.ping(reconnect=True)
    cursor = mydb.cursor()
    cursor.execute(sql1)
    # ret = cursor.fetchall()
    # print(ret)
    mydb.commit()
    cursor.close()
    mydb.close()


def inserDB(usr,pwd):
    mydb.ping(reconnect=True)
    cursor = mydb.cursor()
    error = None
    sql5 = "select id from user where usr_count='{}'".format(usr)
    cursor.execute(sql5)
    if cursor.fetchone() is not None:
        error = 'User {} is already registered.'.format(usr)
    else:
        sql4 = "INSERT INTO user (usr_count, pwd) VALUES ('{}', '{}'); ".format(usr,pwd)
        cursor.execute(sql4)
    mydb.commit()
    cursor.close()
    mydb.close()
    if error ==None:
        return 1
    else:
        return 0

def getUcount(con):
    mydb.ping(reconnect=True)
    cursor = mydb.cursor()
    cursor.execute(sql3)
    ret = cursor.fetchall()
    print(ret)
    mydb.commit()
    cursor.close()
    mydb.close()

def getmessage(a,b):
    mydb.ping(reconnect=True)   #检查联通性
    cursor = mydb.cursor()      #建立游标
    sql = "select * from user where usr_count='{}' and pwd ='{}' ".format(a,b)
    cursor.execute(sql)
    ret = cursor.fetchall()
    mydb.commit()
    cursor.close()
    mydb.close()
    data = []
    # 文本格式转换 to_Json格式
    for k in ret:
        target = {}
        for j in range(len(cursor.description)):
            target[cursor.description[j][0]] =k[j]
        data.append(target)

    if len(data)==0:
        return 0
    else:
        return 1

if __name__ == '__main__':
    # print(mydb)
    res = getmessage("lxf","1221")
    # getUcount("ew")
    # pprint.pprint(res)
    print(res)
    # CreateDB()
    # inserDB("12205206","hello1")
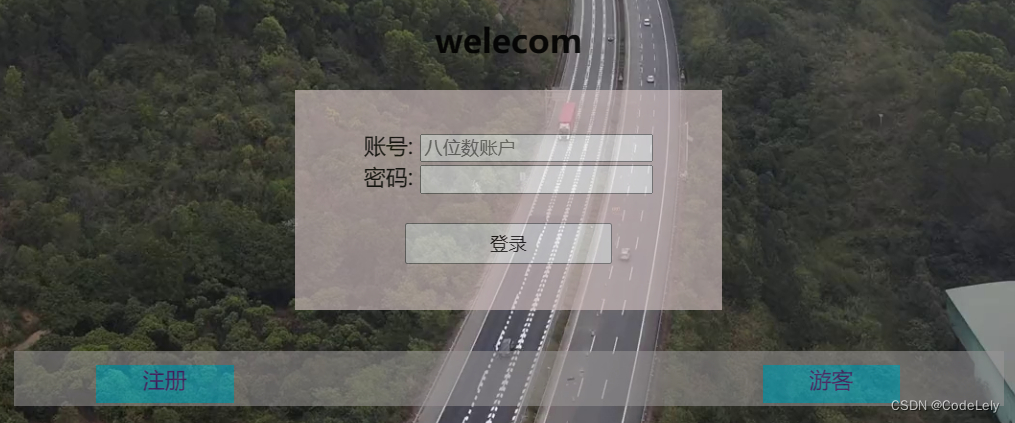
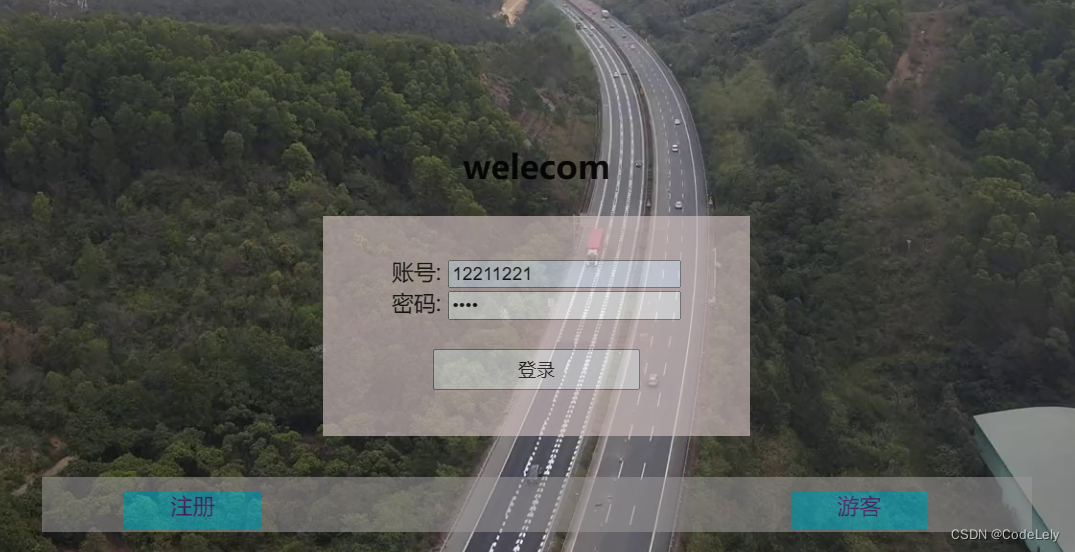
登录页面 “index.html”
<!DOCTYPE html>
<html>
	<head>
		<meta charset="utf-8">
		<title>检测系统</title>
		<link rel="stylesheet" href="#">
        <style>
            .body{
                /* background-image: url("your-image-url.jpg");   */
                background-repeat: no-repeat;
                background-size: cover;
                {#background-image: url(../../img/backimg.jpg);                 #}
                background-image: url("{{ url_for('static', filename='images/backimg.jpg') }}");

            }
            .mydiv1 {
                width: 800px;  /* 设置宽度为300像素 */
                height: auto; /* 设置高度为200像素 */
                /* background-color: #fdfdfd;  */
                margin-left: auto;
                margin-right: auto;
                padding-top: 10px;
                padding-bottom: 10px;
                /* background-image: url(img/backimg.jpg); */
                opacity: 0.9;
            }
            .mydiv2l {
                display: inline-block;
                width: auto;  /* 设置宽度为300像素 */
                /* height: 80px; 设置高度为200像素   */
                height: 95px;
                background-color: #f5f5fb; /* 设置背景颜色为浅灰色,以便更好地看到div的边界 */
                opacity: 0.8;
                margin-right: 100px ;
            }
            .mydiv2r {
                display: inline-block;

                width: 380px;  /* 设置宽度为300像素 */
                height: 100px; /* 设置高度为200像素 */
                background-color: #f9f7f7; /* 设置背景颜色为浅灰色,以便更好地看到div的边界 */
                opacity: 0.6;
                padding-bottom: 5px;
                margin-left: auto;
                margin-right: auto ;
            }
            .mydiv_HeadImg {
                width: 200px;  /* 设置宽度为300像素 */
                height: 200px; /* 设置高度为200像素 */
                background-color: #ffffff; /* 设置背景颜色为浅灰色,以便更好地看到div的边界 */
                opacity: 0;
                margin-left: auto;
                margin-right: auto;
                margin-top: 10px;
            }

            .mydiv_Login {
                width: 250px;  /* 设置宽度为300像素 */
                height: 100px; /* 设置高度为200像素 */
                background-color: #d3c0c0;
                opacity: 0.7;
                padding: 30px;
                /* margin: 30px; */
                margin-left: auto;
                margin-right: auto;
                text-align: center;
            }
            .mydiv_Buttn {
                width: 700px;  /* 设置宽度为300像素 */
                height: 20px; /* 设置高度为200像素 */
                background-color: hsl(0, 2%, 60%);
                opacity: 0.6;
                padding: 10px;
                margin-top: 30px;
                margin-bottom: 20px;
                margin-left: auto;
                margin-right: auto;
            }
            .ss1 {
                display:inline-block;
                width: 100px;
                height: 28px;
                margin-left:  50px;
                margin-right: 190px;
                text-align: center;
                background-color: #14cbe7;
            }
            .ss2 {
                /* display: inline-block; */
                display: inline-block;
                width: 100px;
                height: 28px;
                margin-right: 50px;
                margin-left: 190px;
                text-align: center;
                background-color: #14cbe7;
            }
            .login_bt {
                height: 30px;
                width: 150px;
                text-align: center;
                margin-left: auto;
                margin-right: auto;
            }
        </style>
	</head>

	<body class="body">
		<div class="mydiv1">  <!-- 主界面 -->

            <div class="mydiv2f">
                <div class="mydiv2l">
                    <a href="https://www.cumt.edu.cn/" target="_blank"><img src="{{ url_for('static', filename='images/logo100.png') }}" alt="logo"></a>
                </div>

                <div class="mydiv2r" style="text-align: center;">
                    <h1 >
                        欢迎来到***系统
                    </h1>
                </div>
            </div>

            <div class="mydiv_HeadImg">
			{#  <img src="#" alt="用户头像">#}
            </div>

            <h2 style="text-align: center;">welecom</h2>

            <div class="mydiv_Login" >
                    <form id="loginForm" action="/home" method="post">
                        <label for="username">账号:</label>
                        <input type="text" id="username" name="username"  pattern="[0-9]{8}" placeholder="八位数账户" required>
                        <br>
                        <label for="password">密码:</label>
                        <input type="password" id="password" name="password" required>
                        <br>
                        <br>
                        <button type="submit" class="login_bt">
                            登录
                        </button>
                    </form>
            </div>


            <div class="mydiv_Buttn">

                <div class="ss1">
                    <a href="{{ url_for('register') }}" target="_blank" style="text-decoration: none;"  >注册</a>
                </div>
                <div class="ss2">

                    <a href="{{ url_for('welcom') }}" target="_blank" style="text-decoration: none;">游客</a>

                </div>
            </div>
        </div>
	</body>
</html>
注册页面 “register.html”
<!DOCTYPE html>
<html lang="en">
<head>
    <meta charset="UTF-8">
    <meta name="viewport" content="width=device-width, initial-scale=1.0">
    <title>注册</title>
    <style>
       .mydiv_Login {
                width: 250px;  /* 设置宽度为300像素 */
                height: 100px; /* 设置高度为200像素 */
                background-color: #d3c0c0;
                opacity: 0.7;
                padding: 30px;
                /* margin: 30px; */
                margin-left: auto;
                margin-right: auto;
                text-align: center;
            }
    </style>
</head>
<body>
    {% if error %}
    <p style="color: red;">{{ error }}</p>
    {% endif %}
    <div class="mydiv_Login" >
            <form id="logupForm" method="post" action="{{ url_for('register') }}">
                <label for="username">注册账号:</label>
                <input type="text" id="username" name="username" required>
                <br>
                <label for="password">输入密码:</label>
                <input type="password" id="password" name="password" required>
                <br>
                <br>
                <button type="submit" class="login_bt">
                    注册
                </button>
            </form>
    </div>

</body>
</html>
游客页面 “welecom.html”
这里展示你自己的代码,游客直接可以访问的资源。
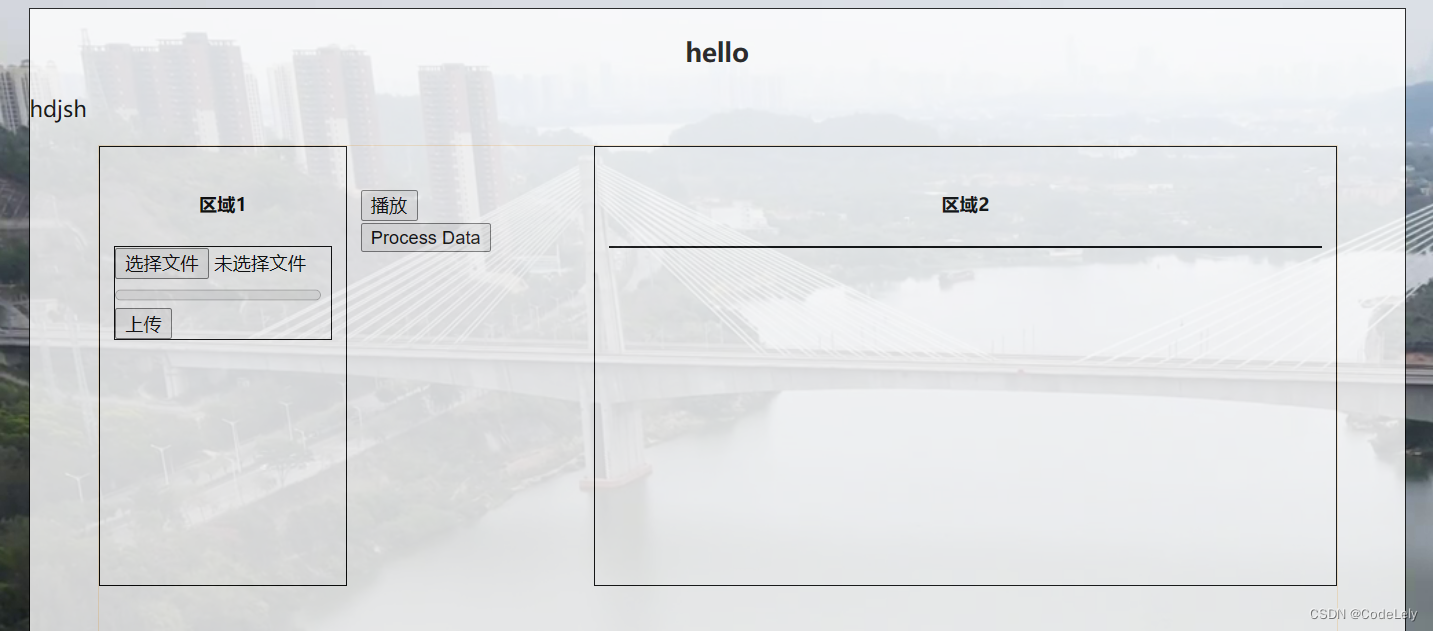
进入系统后的页面 “main.html”
我的主页面是用来做目标检测的,上传视频或者图片,经过数据处理后返回到前端主页进行展示:
<!DOCTYPE html>
<html>
<head>
    <meta charset="utf-8">
    <title>实例展览</title>
    <link rel="stylesheet" href="#">

    <Style>
        .bigdiv {
            margin-left: auto;
            margin-right: auto;
            width: 1000px;
            height: auto;
            background-color: rgba(255, 255, 255 );
            /* opacity: 0.8; */
            border: 1px solid black;

        }
        .middiv1 {
            display: inline-block;
            height: 400px;
            width: 900px;
            margin-left: 50px;
            margin-right: auto;
            margin-bottom: 10px;
            background-color: white;
            border: 1px solid blanchedalmond;
        }
        .middiv2 {
            height: 100px;
            width: 400px;
            margin-left: auto;
            margin-right: auto;
            background-color: white;
            border: 1px solid blanchedalmond;
        }
        .container {
         width: 100%; /* 根据需要设置宽度 */
         overflow: auto; /* 清除浮动效果对父元素高度的影响 */
        }
        .child1 {
         float: left; /* 让子元素浮动到左侧 */
         width: 20%; /* 根据需要设置宽度 */
         height: 80%;
         box-sizing: border-box; /* 确保宽度包括内边距和边框 */
         padding: 10px; /* 可选的内边距 */
         border: 1px solid black;
        }
        .child2 {
         float: left; /* 让子元素浮动到左侧 */
         width: 20%; /* 根据需要设置宽度 */
         height: 80%;
         box-sizing: border-box; /* 确保宽度包括内边距和边框 */
         padding: 10px; /* 可选的内边距 */

        }
        .child3 {
         float: left; /* 让子元素浮动到左侧 */
         width: 60%; /* 根据需要设置宽度 */
         height: 80%;
         box-sizing: border-box; /* 确保宽度包括内边距和边框 */
         padding: 10px; /* 可选的内边距 */
         border: 1px solid black;
        }
        .smldiv1 {
            display: inline-block;
            height: 350px;
            width:350px;
            background-color: bisque;
            border: 1px solid rgb(59, 58, 56);
        }
        .smldiv2 {
            display: inline-block;
            height: 350px;
            width:350px;
            background-color: rgb(132, 118, 99);
            border: 1px solid rgb(59, 58, 56);
        }
        .smldiv3 {
            display: inline-block;
            height: 350px;
            width:190px;
            background-color: rgb(132, 118, 99);
        }
    </Style>
</head>

<body background="{{ url_for('static', filename='images/Backimg2.jpg') }}" style="opacity: 0.8;">

    <div class="bigdiv">
        <h3 style="text-align: center;">hello</h3>
        <p>hdjsh </p>
        <div class="middiv1">
            <div class="child1">
                <h5 style="text-align: center">区域1</h5>

                <div style="border: 1px solid black;">
                    <input type="file" id="file" name="file" >
                    <progress id="progressBar" value="0" max="100" style="width:150px;">hello</progress>
                    <button type="button" onclick="uploadFile()">上传</button>
                </div>
            </div>
            <div class="child2">
                <br>
                {#  中间#}
                <div id="upload-container">
                    <button type="button" onclick="getFile()">播放</button>
                        <div id="progress-container">
{#                            <progress id="progress-bar" value="0" max="100"></progress>#}
                        </div>
                </div>
                <div>
                    <button id="processButton">Process Data</button>
                </div>
            </div>

            <div class="child3">
                <h5 style="text-align: center">区域2</h5>
                <div style="border: 1px solid black;">
{#                    <video width="320" height="240" controls >#}
{#                        <source src="./video/SPSG.mp4" type="video/mp4">#}
{#                        <!-- <source src="movie.ogg" type="video/ogg"> -->#}
{#                    </video>#}

                    <img id="image" style="display:none;width: 350px;height:350px" alt="推理后">
                    <video id="video" controls style="display:none;width: 350px;height: auto">hello</video>
                </div>
            </div>


        </div>

        <div class="middiv2">

            hello

        </div>
    </div>

<script>
    var flag = "video";
    function getFileExtension(filename) {
        return filename.slice((filename.lastIndexOf(".") - 1 >>> 0) + 2);
    }
    function uploadFile(){
        var file = document.getElementById("file").files[0];
        if (getFileExtension(file.name) == "jpg" ) {
            flag = "jpg";
        }else if(getFileExtension(file.name)=="png") {
            flag = "png";
        }else if(getFileExtension(file.name)=="jpeg"){
            flag = "jpeg";
        }else {
            flag = "video";
        }
        var formdata = new FormData();
        formdata.append("file", file);
        var ajax = new XMLHttpRequest();
        ajax.upload.addEventListener("progress", progressHandler, false);
        ajax.addEventListener("load", completeHandler, false);
        ajax.open("POST", "/upload");
        ajax.send(formdata);
        alert(flag);
    }

    function progressHandler(event){
        var percent = (event.loaded / event.total) * 100;
        document.getElementById("progressBar").value = Math.round(percent);
    }

    function completeHandler(event){
        alert(event.target.responseText);
    }
    function getFile(event){
        var xhr = new XMLHttpRequest();
        xhr.open("GET", "/get_file", true);
        xhr.responseType = 'blob';  // 设置响应类型为 blob
        xhr.onload = function () {
            if (xhr.status == 200) {
                var url = window.URL || window.webkitURL;
                var fileUrl = url.createObjectURL(xhr.response);
                console.log(fileUrl);  // 打印出视频的URL
                var video = document.getElementById("video");
                var image = document.getElementById("image");
                if(flag == "video"){
                    video.src = fileUrl;
                    video.style.display = "block";
                    image.style.display = "none";
                }else {
                    image.src = fileUrl;
                    image.style.display = "block";
                    video.style.display = "none";
                }
            }
        }
        xhr.send();
    }

    function getFile1(){
        var xhr = new XMLHttpRequest();
        xhr.open("GET", "/getfile", true);  // "/your_route" 是你的后端路由
        xhr.onload = function () {
            if (xhr.status == 200) {  // 当HTTP状态码为200时,表示请求成功
            var response = xhr.responseText;  // 获取服务器返回的响应文本
            console.log(response);  // 打印出响应文本
            // 在这里添加你需要执行的操作
            }
        }
    xhr.send();
    }

    document.getElementById('processButton').addEventListener('click', function() {
            fetch('/process_data', {
                method: 'POST',
                headers: {
                    'Content-Type': 'application/json'
                }
            })
            .then(response => {
                if (!response.ok) {
                    throw new Error('Network response was not ok.');
                }
                return response.json();
            })
            .then(data => {
                if (data.status === 'ok') {
                    alert('ok');
                    getFile();
                } else {
                    alert('Failed to process data');
                }
            })
            .catch(error => {
                console.error('There has been a problem with your fetch operation:', error);
                alert('Failed to process data');
            });
        });
</script>
</body>
</html>
后续说明
- 源码SqlLink.py中的数据库配置自己注意,实在不行的话可以直接在代码中指定账户的密码从而实现简单的登录操作。
- app.py 文件中的某些路由是我用于上传和请求浏览数据的,读者可自行修改。
- 以上 代码在 数据库是MySQL的情况下应该是能直接运行的,勇敢尝试吧,祝你好运连连。


 1037
1037


 被折叠的 条评论
为什么被折叠?
被折叠的 条评论
为什么被折叠?
 到【灌水乐园】发言


