


springboot自动装配原理
欢迎打开这篇文章
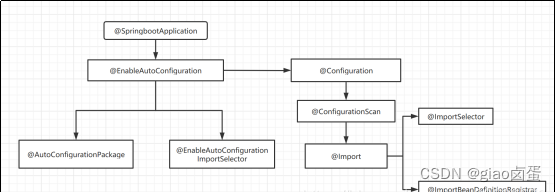
EnableAutoConfiguration 自动装配
Starter组件, 开箱即用
Actuator 监控
Spring Boot Cli 为Spring Cloud 提供了Spring Boot 命令行功能
在Spring Boot中,不得不说的一个点是自动装配,它是starter的基础,也是Spring Boot的核心, 那什么叫自动装配?或者什么叫装配呢?
回顾一下Spring Framework,它最核心的功能是IOC和AOP, IoC容器的主要功能是可以管理对象的生命周期。也就是bean的管理。我们把Bean对象托管到Spring Ioc容器的这个过程称为装配,那什么是自动装配呢?
- 装配,装配什么?
- 自动,怎么自动?
1,spring中bean注入的三种形式
在开始之前,让我们先来看点简单的开胃菜:spring中bean注入的三种形式
首先我们先来一个Person类,这里为了篇幅长度考虑使用了lombok
如果你不知道lombok是什么,那就最好不要知道,加了几个注解之后我的pojo类Person就完成了
@Data
@NoArgsConstructor
@AllArgsConstructor
public class Person {

    private String name;
    private Integer age;
    private Boolean sex;
}
在Spring中(不是Spring Boot),要实现bean的注入,我们有3种注入方式:
1.1setter注入
这是最基本的注入方式
首先我们创建applicationContext.xml文件,在里面加入:
<!-- 手动配置bean对象 -->
<bean id="person" class="pojo.Person">
    <property name="name" value="giao"/>
    <property name="age" value="20"/>
    <property name="sex" value="true"/>
</bean>
这里使用property为bean对象赋值
紧接着我们会在test包下写一个version1.TestVersion1类
/**
 * 第一种bean注入实现方式 - 在xml文件中直接配置属性
 */
public class TestVersion1 {

    @Test
    public void test(){

        ApplicationContext ca = new   ClassPathXmlApplicationContext("applicationContext.xml");
        Person person = ca.getBean("person", Person.class);
        System.out.println(person);
    }
}
这里我使用了ClassPathXmlApplicationContext来加载spring配置文件并且读取其中定义的bean,然后使用getBean方法使用id和类来获取这个Person的Bean对象,结果成功输出:
Person(name=giao, age=20, sex=true)
1.2构造器注入
接下我们采用构造器注入的方式,我们需要更改applicationContext.xml中的property为construct-arg
<!-- 使用构造器 -->
<bean id="person" class="pojo.Person">
    <constructor-arg index="0" type="java.lang.String" value="giao" />
    <constructor-arg index="1" type="java.lang.Integer" value="20"/>
    <constructor-arg index="2" type="java.lang.Boolean" value="true"/>
</bean>
version2.TestVersion2内容不变:
/**
 * 第一种bean注入实现方式 - 在xml文件中直接配置属性
 */
public class TestVersion2 {

    @Test
    public void test(){

        ApplicationContext ca = new   ClassPathXmlApplicationContext("applicationContext.xml");
        Person person = ca.getBean("person", Person.class);
        System.out.println(person);
    }
}
依然输出正确结果
Person(name=giao, age=20, sex=true)
1.3属性注入
使用注解方式的属性注入Bean是比较优雅的做法
首先我们需要在applicationContext.xml中开启注解支持和自动包扫描:
<context:annotation-config />
<context:component-scan base-package="pojo"/>
在pojo类中对Person类加上@Component注解,将其标记为组件,并且使用@Value注解为各属性赋初值
@Component
public class Person {


    @Value("giao")
    private String name;
    @Value("20")
    private Integer age;
    @Value("true")
    private Boolean sex;
}
然后编写version3.TestVersion3
public class TestVersion3 {

    @Test
    public void test(){

        ApplicationContext ac = new ClassPathXmlApplicationContext("applicationContext.xml");
        Person person = ac.getBean("person", Person.class);
        System.out.println(person);
    }
}
运行也可以得到如下结果
Person(name=giao, age=20, sex=true)
2,Spring的两种配置方式
什么?还有什么?接下来我们来聊聊Spring的两种配置方式:基于XML的配置和基于JavaConfig类的配置方式,这对于理解SpringBoot的自动装配原理是非常重要的。
首先我们在Pe
 最低0.47元/天 解锁文章


 3577
3577


 被折叠的 条评论
为什么被折叠?
被折叠的 条评论
为什么被折叠?
 到【灌水乐园】发言


