


网页实例
1.使用jQuery提高开发效率
1)什么是jQuery
jQuery 是一个 JavaScript 库,是一个“写的更少,但做的更多”的轻量级 JavaScript 库,
jQuery 极大地简化了 JavaScript 编程
2)如何在HTML页面中使用jQuery
<script type="text/javascript" src="jquery.js"></script>
<script type="text/javascript">
$(document).ready(function(){
	$("a").click(function(){
		alert("Hello World");
	});
});
<a>点击这里</a>
3)如何使用jQuery选择器获得页面元素对象
<a>点我,我就消失</a>
<p id="jQuery110">我的ID是jQuery110</p>
<p class="nice">我的class是nice</p>
<p class="nice">我的class是nice</p>
<p>段落</p>
<script type="text/javascript">
$(document).ready(function(){
	//隐藏当前元素
	$("a").click(function(){
		$(this).hide();
	});
	$("#jQuery110").hide();//隐藏id=jQuery110的元素
	$("p.nice").hide();//隐藏class=nice的所有段落
	$("p").hide();//隐藏所有段落
});
</script>
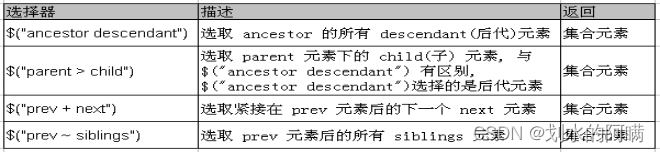
jQuery选择器分为:基本选择器、属性选择器、层级选择器、基本过滤选择器等等
基本选择器的使用
改变 id=jQuery110 的元素的背景色为红色
$("#jQuery110").css("backgroundColor", "red");
改变所有class=nice的元素背景色为红色
$(“.nice").css("backgroundColor", "red");
改变所有段落的背景色为 #00FAFB,字体颜色为红色
$("p").css({"backgroundColor": "#00FAFB", "color": "red"});
改变所有元素的背景色为红色
$(“*").css("backgroundColor", "red");
改变所有<div>元素和 id=jQuery110 的元素的背景色为红色
$(“div,#jQuery110”).css("backgroundColor", “red");
属性选择器的使用
//显示所有含有id属性的元素
$("[id]").show(3000);
//显示所有属性title的值是imoracle的元素
$("[title='imoracle']").show(3000);
//显示所有属性title的值不是imoracle的元素
$("[title!='imoracle']").show(3000);
//显示所有属性title的值以"im"开始的元素
$("[title^='im']").show(3000);
//显示所有属性title的值以"wdp"结束的元素
$("[title$='wdp']").show(3000);
//显示所有属性title的值中含有"oracle"的元素
$("[title*='oracle']").show(3000);
//显示所有属性title的值中含有"oracle"且属性id的值是"oracleWDP"的元素
$("[id='oracleWDP'][title*='oracle']").show(3000);
层级选择器的使用
<form>
    <label>Name:</label>
    <input name="name" />
    <fieldset>
        <label>Newsletter:</label>
        <input name="newsletter" />
    </fieldset>
</form>
<input name="none" />

$(document).ready(function(){
    //匹配表单中所有的子级input元素
    //结果:<input name="name" />
    $("form > input");
    //匹配所有跟在 label后面的input元素
    //结果:<input name="name" />
    // <input name="newsletter" />
    $("label + input");
    //找到所有与表单同辈的 input元素
    //结果:<input name="none" />
    $("form ~ input");
});
基本过滤选择器的使用
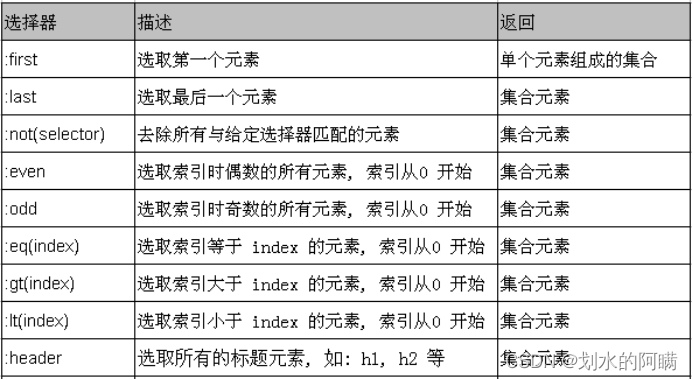
//获取第一个 div 元素
$("div:first")
//获取id不为 me 的所有p元素
$("p:not('#me')")
//获取索引值为偶数的tr元素
$(“tr:even")
//获取索引值大于 2 且为奇数的 div 元素
$(“div:gt(2):odd")
//获取所有的标题元素
$(":header“)
使用jquery实现表格的隔行变色
$("tr:even").css({"background-color": "#cccccc"});
4)jQuery实例
实现动态添加和删除文件上传域
<!DOCTYPE html>
<html>
	<head>
		<meta  charset="utf-8">
		<title>about</title>
		<script type="text/javascript" src="js/jquery-1.8.3.js"></script>
		<script type="text/javascript">
			$(function(){
			    $('.add').live('click',function(){
			        var div_html = '<div>'+$(this).parents('div').html()+'</div>';
			        $(this).parents('div').after(div_html);
			    })
			    $('.del').live('click',function(){
			        var var_index = $(this).parents('div').index();
			        if(var_index > 0){
			            $(this).parents('div').remove();
			        }
			    });
			});
	</script>

	</head>
	<body>
		<form>
			<div>
				<input type='file' name='file' />
				<input type='button' class='add' value='增加' />
				<input type='button' class='del' value='删除' />
			</div>
		</form>
	</body>
</html>
2.HTML5的新特性
- 要使用声明才是html5
- 在页面上添加视频
<video width="320" height="240" controls>
	<source src="video/movie.mp4" type="video/mp4">
</video>
1)在页面上增加音频
<audio controls>
<source src="video/music.mp3" type="audio/mpeg">
</audio>
2)input元素的类型
date或datetim-local实现日期控件
<input type="date" name="birthday">
<input type="datetime-local" name=" birthday">
使用email实现提交时验证邮箱的合法性
<form action="">
	email: <input type="email" name="mymail">
	<input type="submit" value="注册">
</form>
使用number实现数字的输入
<form action="">
数量 ( 1 到 6 之间): <input type="number" name="mynumber" min="1" max="6" required>
	<input type="submit" value="提交">
</form>
使用url实现url验证
<input type="url" name="myurl">
使用datalist实现输入域的选项列表
<form action="">
	浏览器类型<input list="browsers" name="browser">
	<datalist id="browsers">
		 <option value="Internet Explorer">
		 <option value="Firefox">
		 <option value="Chrome">
		 <option value="Opera">
		 <option value="Safari">
	</datalist>
	<input type="submit" value="提交">
</form>
3.网站的页面分析和设计UI user interface 用户界面
1)Bootstrap
bootstrap是快速开发Web应用程序的前端工具包。它是一个CSS和HTML的集合,它使用了最新的浏览器技术,给你的Web开发提供了时尚的版式,表单,buttons,表格,网格系统等等
1)Bootstrap的特点 a)内置的样式很漂亮,而且很多。给人一种简约而不简单的感觉每个属性都有值
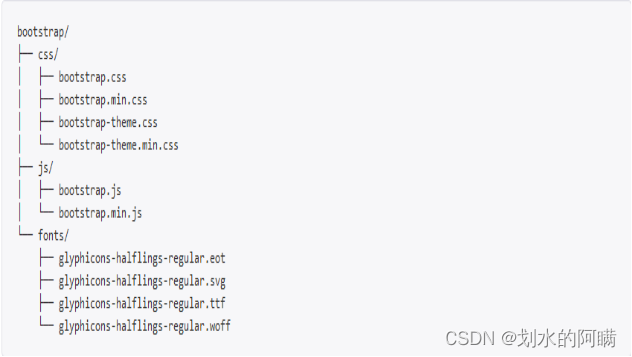
b)bootstrap是基于jquery的,有很多很多插件 1)Bootstrap的中文网
a)https://www.bootcss.com/从网上上可以下载BootStrap b)下载后的文件结构
- 使用Bootstrap
将下载后的文件导入页面
<!DOCTYPE html>
<html>
	<head>
		<meta  charset="utf-8">
		<title>about</title>
<meta name="viewport" content="width=device-width, initial-scale=1.0">
		<script type="text/javascript" src="js/bootstrap.js"> </script>
		<script type="text/javascript" src="js/jquery-1.11.0.js"> </script>
		<link rel="stylesheet"  href="css/bootstrap.css"/>
	</head>
	<body>
		<div class="btn-group" role="group">
		  <button type="button" class="btn btn-default">Left</button>
		  <button type="button" class="btn btn-default">Middle</button>
		  <button type="button" class="btn btn-default">Right</button>
		</div>
	</body>
</html>
5)Bootstrap的栅格系统
Bootstrap内置了一套响应式、移动设备优先的流式栅格系统,随着屏幕设备或视口(viewport)尺寸的增加,系统会自动分为最多12列,Bootstrap中的栅格系统叫做布局,它就是通过一系列的行(row)与列(column)的组合创建页面布局,然后你的内容就可以放入到你创建好的布局当中
<!DOCTYPE html>
<html>
	<head>
		<meta charset="utf-8">
		<title>about</title>
<meta name="viewport" content="width=device-width, initial-scale=1.0">
		<script type="text/javascript" src="js/bootstrap.js"> </script>
		<script type="text/javascript" src="js/jquery-1.11.0.js"> </script>
		<link rel="stylesheet" href="css/bootstrap.css" />
	</head>
	<body>
		<div class="container">
			<h1>一行多列</h1>
			<div class="row">
				<div class="col-xs-4">
					<h2 class="page-header">区域一</h2>
					<p>Bootstrap has a few easy ways to quickly get started</p>
				</div>
				<div class="col-xs-4">
					<h2 class="page-header">区域二</h2>
					<p>If you work with Bootstrap's uncompiled source code</p>
				</div>
				<div class="col-xs-4">
					<h2 class="page-header">区域三</h2>
					<p>Within the download you'll find the following directories and files</p>
				</div>
			</div>
		</div>
	</body>
</html>
container:用container包裹页面上的内容即可实现居中对齐
col-xs-4:这个类通过"-"分为三个部分,第三个部分的数字作为一个泛指,它的范围是1到12,就是可以把一个区域分为12个栏,这个要和row类联合使用
<!DOCTYPE html>
<html>
	<head>
		<meta charset="utf-8">
		<title>about</title>
		<meta name="viewport" content="width=device-width, initial-scale=1.0">
		<script type="text/javascript" src="js/bootstrap.js"> </script>
		<script type="text/javascript" src="js/jquery-1.11.0.js"> </script>
		<link rel="stylesheet" href="css/bootstrap.css" />
	</head>
	<body>
		<div class="container">
			<h1>多行</h1>
			<div class="row">
				<div class="col-xs-8">.col- xs -8</div>
				<div class="col-xs-4">.col- xs -4</div>
			</div>
			<div class="row">
				<div class="col-xs-4">.col- xs -4</div>
				<div class="col-xs-4">.col- xs -4</div>
				<div class="col-xs-4">.col- xs -4</div>
			</div>
			<div class="row">
				<div class="col-xs-6">.col- xs -6</div>
				<div class="col-xs-6">.col- xs -6</div>
			</div>
			</div>
		</div>
	</body>
</html>
6)使用Bootstap创建按钮
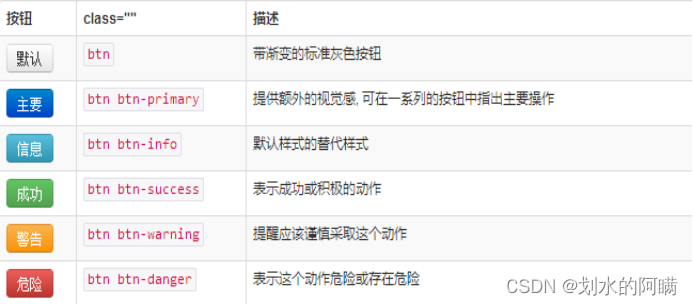
<button type="button" class="btn btn-default">Default</button>
<button type="button" class="btn btn-primary">Primary</button>
<button type="button" class="btn btn-success">Success</button>
<button type="button" class="btn btn-info">Info</button>
<button type="button" class="btn btn-warning">Warning</button>
<button type="button" class="btn btn-danger">Danger</button>
<button type="button" class="btn btn-link">链接</button>
7)使用Bootstap创建导航
普通导航
<ul class="nav nav-tabs">
<li class="active"><a href="#">Home</a></li>
<li><a href="#">Profile</a></li>
<li><a href="#">Messages</a></li>
</ul>
胶囊式标签页
<ul class="nav nav-pills">
<li class="active"><a href="#">Home</a></li>
<li><a href="#">Profile</a></li>
<li><a href="#">Messages</a></li>
</ul>
8)参考api文档使用Bootstap创建其他的特效:分页、进度条、下拉菜单、面板,字体图标(需要在网站加入fonts字体文件夹)等等
9)网站页面分析和设计
a) 实现页面有5个部分组成,分别使用5个div来实现,也可以使用栅格系统的行来实现,我们可以认为是5个页面
<div id="page1" style="background-color: #304760; height: 1000px;">
</div>
<div id="page2" style="background-color:#F17C72; height: 1000px;">
</div>
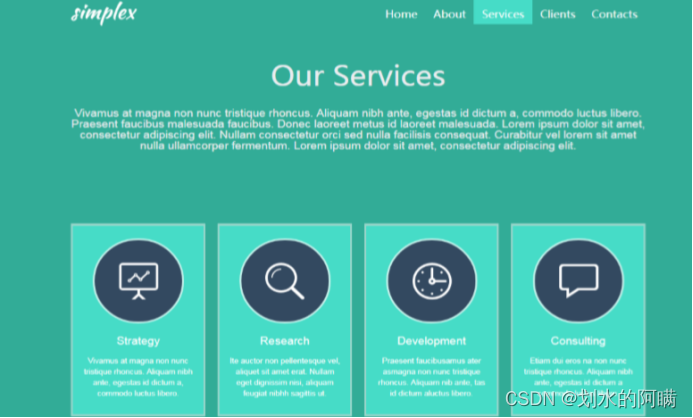
<div id="page3" style="background-color:#32AC97; height: 1000px;">
</div>
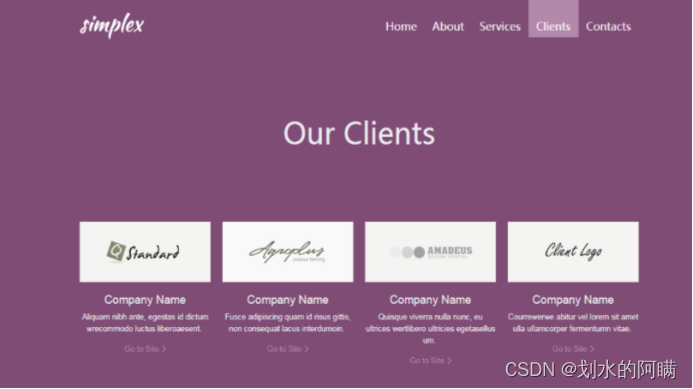
<div id="page4" style="background-color:#7F4C76; height: 1000px;">
</div>
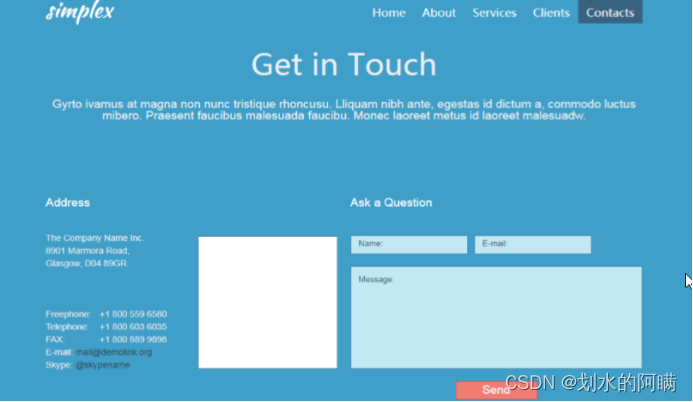
<div id="page5" style="background-color:#3697CC; height: 1000px;">
</div>
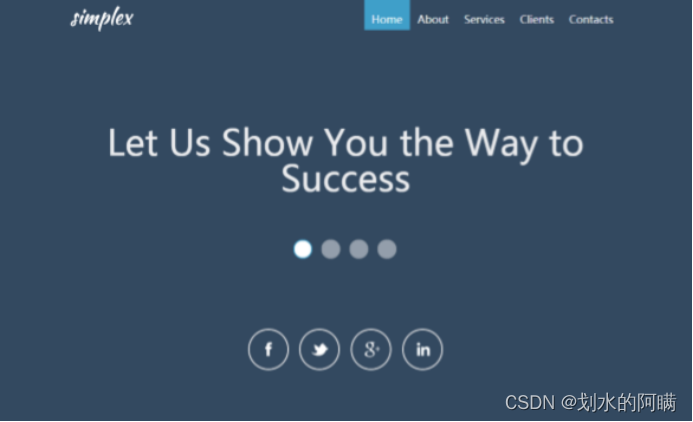
b) 对第一个页面进行分析又分为上部为头部分,显示图片和导航,接下的下面显示文字部分,再下面为点击的切换的图标部分,最下面为图片显示,所以该部分分为
<!-- 第一页的头 -->
<div id="headerdiv">
</div>
<!-- 文字切换区域 -->
<div id="textDiv">
</div>
<!-- 文字切换的图标区域 -->
<div style="margin-left: 45%;margin-top: 180px;float: left;">
</div>
<!--图片显示区域 -->
<div style="float: left;margin-top: 100px;margin-left: 41%;">
</div>
样式为:
#headerdiv {
	width: 100%;
	height: 100px;
	/*position: fixed; 头部悬停*/
}
#textDiv {
	width: 50%;
	height: 200px;
	margin-left: 25%;
	margin-top: 150px;
	float: left;
	font-size: 48px;
	font-weight: bold;
	color: white;
	text-align: center;
}
c)对头部分进行分析分为左右结构,左边放图片,右边放导航
	<!-- 第一页的头 -->
			<div id="headerdiv">
				<!-- 头部分的图片 -->
				<div id="divimg" class="floatLeft">
					<img src="img/logo.png"/>
				</div>
				<!-- 头部分的胶囊式标签页 -->
				<div id="selected" class="floatLeft">
					<ul id="butUL" class="nav nav-pills">
						<li id="li1" class="active"><a href="#" onclick="goToByScroll('page1')">Home</a></li>
						<li id="li2"><a href="#" onclick="goToByScroll('page2')">About</a></li>
						<li id="li3"><a href="#" onclick="goToByScroll('page3')">Services</a></li>
						<li id="li4"><a href="#" onclick="goToByScroll('page4')">Clients</a></li>
						<li id="li5"><a href="#" onclick="goToByScroll('page5')">Contacts</a></li>
					</ul>
				</div>
			</div>
样式为:
#divimg {
	margin-left: 20%;
	padding-top: 30px;
	/* border: 1px solid red; */
}
.floatLeft {
	float: left;
}
#selected {
	width: 40%;
	margin-left: 20%;
	padding-top: 30px;
	/* border: 1px solid red; */
}
ul li a {
	color: #FFFFFF;
	font-size: 16px;
}
实现页面切换的js函数:
function goToByScroll(id) {
	$('html').animate({scrollTop: $("#" + id).offset().top}, 'slow');
}
d)文字切换区域
<!-- 文字切换区域 -->
<div id="textDiv">
	<p id="p1">Let Us Show You the Way to Success</p>
	<p id="p2" style="display: none;">Interminable Energy for Your Project</p>
	<p id="p3" style="display: none;">We know how to solve your problems!</p>
	<p id="p4" style="display: none;">Make your business a booming one!</p>
</div>
e)文字切换区域的图标
<!-- 文字切换的图标区域 -->
<div style="margin-left: 43%;margin-top: 180px;float: left;">
	<div class="divselected" onclick="setText(1)"></div>
	<div class="divselected" onclick="setText(2)"></div>
	<div class="divselected" onclick="setText(3)"></div>
	<div class="divselected" onclick="setText(4)"></div>
</div>
使用的样式:
.divselected {
	width: 32px;
	height: 32px;
	margin-right: 25px;
	background-color: #ADADAD;
	background-image: url(img/pagination.png);
	float: left;
	border-radius: 35px;
	background-position: -48px, 0px;
	cursor: pointer;
}
.divselected:hover{
	background-position: 0px,0px;
}
实现切换的js:
function setText(a) {
	if (a == 1) {
		$("#textDiv p").fadeOut(1000);
		$("#p1").fadeIn(3000);
	} else if (a == 2) {
		$("#textDiv p").fadeOut(1000);
		$("#p2").fadeIn(3000);
	} else if (a == 3) {
		$("#textDiv p").fadeOut(1000);
		$("#p3").fadeIn(3000);
	} else {
		$("#textDiv p").fadeOut(1000);
		$("#p4").fadeIn(3000);
	}
}
f)显示图片区域
<div style="float: left;margin-top: 60px;margin-left: 38%;">
	<img src="img/socials.png" />
</div>
g)倒三角形的实现
<div id="page2" style="background-color:#F17C72; height: 1000px;">
	<div id="san1"></div>
</div>
h)使用样式绘制倒三角形
#san1 {
	border-top: 50px solid #304760;
	border-left: 60px solid transparent;
	border-right: 60px solid transparent;
	margin-left: 48%;
	width: 0;
	height: 0;
}

#san2 {
	width: 0;
	height: 0;
	border-left: 60px solid transparent;
	border-right: 60px solid transparent;
	border-top: 50px solid #F17C72;
	margin-left: 48%;
}

#san3 {
	width: 0;
	height: 0;
	border-left: 60px solid transparent;
	border-right: 60px solid transparent;
	border-top: 50px solid #32AC97;
	margin-left: 48%;
}

#san4 {
	width: 0;
	height: 0;
	border-left: 60px solid transparent;
	border-right: 60px solid transparent;
	border-top: 50px solid #7F4C76;
	margin-left: 48%;
}
i)处理倒三角形在滚动的显示和隐藏
function sanShow(){
	var h = document.documentElement.scrollTop;
	/*第一个三角形*/
	if(h>=(page2.offsetTop-200)){
		document.getElementById("san1").style.display="none";
	}else{
		document.getElementById("san1").style.display="";
	}
	/*第二个三角形*/
	if(h>=(page3.offsetTop-200)){
		document.getElementById("san2").style.display="none";
	}else{
		document.getElementById("san2").style.display="";
	}
	/*第三个三角形*/
	if(h>=(page4.offsetTop-200)){
		document.getElementById("san3").style.display="none";
	}else{
		document.getElementById("san3").style.display="";
	}

	if(h>=(page5.offsetTop-200)){
		document.getElementById("san4").style.display="none";
	}else{
		document.getElementById("san4").style.display="";
	}
}

//jquery的语法
// var h = $(document).scrollTop();
// if(h>=($("#page2").offset().top-200)){
// 		$("#san1").css("display","none");
// 		//$("#san1").hide();
// }else{
// 		//$("#san1").css("display","");
// 		$("#san1").show();
// }

document.onscroll = function() {
	sanShow();
}
j)处理倒三角形在滚动时导航的变化
function setColor(){
	var id = "";
	//获取滚动条的位置
	var h = document.documentElement.scrollTop;
	if(h>=0 && h<page2.offsetTop){
		id="li1";
		headerdiv.style.backgroundColor="#304760";
	}
	/*第二页*/
	if(h>=page2.offsetTop && h<page3.offsetTop){
		id="li2";
		headerdiv.style.backgroundColor="#F17C72";
	}
	/*第三页*/
	if(h>=page3.offsetTop && h<page4.offsetTop){
		id="li3";
		headerdiv.style.backgroundColor="#32AC97";
	}
	/*第四页*/
	if(h>=page4.offsetTop && h<page5.offsetTop){
		id="li4";
		headerdiv.style.backgroundColor="#7F4C76";
	}
	/*第五页*/
	if(h>=page5.offsetTop){
		id="li5"
		headerdiv.style.backgroundColor="#3697CC";
	}

	var lis = document.getElementById("butUL").children;
	for(var i=0;i<lis.length;i++){
		lis[i].setAttribute("class","");
	}

	var liObject = document.getElementById(id);
	liObject.setAttribute("class","active");


//jquery的语法
// var lis = $("#butUL").children();
// for(var i=0;i<lis.length;i++){
// 	$(lis[i]).attr("class","");
// }
// var liObject = $("#"+id);
// liObject.attr("class","active");

}

document.onscroll = function() {
	sanShow();
	setColor();
}

// jquery的语法
// $(document).scroll(function(){
// 	sanShow();
// 	setColor();
// });
page2参考代码:
<div id="page2" style="background-color:#F17C72; height: 1000px;">
	<div id="san1"></div>

	<div style="margin-left: 20%;font-size: 48px;font-weight: bold;color: white;padding-top: 50px;">
		Only Professional <span style="background-color: rgb(64,224,208);">Services</span> for Our <span style="background-color: rgb(122,55,139);">Clients</span>
	</div>

	<div style="margin-top: 50px;">
		<p style="padding-left: 27%;" class="p"><a href="#">Click here</a> for more info about this free website template
			created by TemplateMonster.com</p>
		<p style="padding-left: 27%;" class="p">Lorem ipsum dolor sit amet, consectetur adipiscing elit. In mollis erat
			mattis neque facilisis, sit amet ultricies</p>
	</div>

	<!--展示头像图片-->
	<div style="width: 100%; height: 350px;margin-top: 150px;">
		<div class="headerimage" style="margin-left: 20%;">
			<img src="img/box_img1.jpg" class="imgs" />
			<span>
				<center>
					<p class="firstp">Laura Stegner</p>
				</center>
				<center style="margin-top: -13px;">
					<p style="color: white">senior manager</p>
				</center>
			</span>
			<hr />
			<img src="img/soc1.png" class="menuBar" />
		</div>
		<div class="headerimage">
			<img src="img/box_img2.jpg" class="imgs" />
			<span>
				<center>
					<p class="firstp">Laura Stegner</p>
				</center>
				<center style="margin-top: -13px;">
					<p style="color: white">senior manager</p>
				</center>
			</span>
			<hr />
			<img src="img/soc1.png" class="menuBar" />
		</div>
		<div class="headerimage">
			<img src="img/box_img3.jpg" class="imgs" />
			<span>
				<center>
					<p class="firstp">Laura Stegner</p>
				</center>
				<center style="margin-top: -13px;">
					<p style="color: white">senior manager</p>
				</center>
			</span>
			<hr />
			<img src="img/soc1.png" class="menuBar" />
		</div>
		<div class="headerimage">
			<img src="img/box_img4.jpg" class="imgs" />
			<span>
				<center>
					<p class="firstp">Laura Stegner</p>
				</center>
				<center style="margin-top: -13px;">
					<p style="color: white">senior manager</p>
				</center>
			</span>
			<hr />
			<img src="img/soc1.png" class="menuBar" />
		</div>
	</div>
</div>
参考样式为;
.headerimage {
	float: left;
	width: 220px;
	height: 350px;
	margin-left: 30px;
	background-color: #e6655e;
	opacity: 1;
	border: 4px solid #f4948b;
}
.imgs{
	width: 140px;
	height: 140px;
	margin-left: 36px;
	margin-top: 20px;
	border-radius: 70px;
}
.menuBar{
	margin-left: 30px;
	margin-top: 10px;
}
k)页面整体效果


 4156
4156


 被折叠的 条评论
为什么被折叠?
被折叠的 条评论
为什么被折叠?
 到【灌水乐园】发言


