


目录
使用uinput虚拟设备实现体感鼠标,通过用户空间 input 设备测试程序读取/dev/event*文件获取鼠标状态,鼠标移动数据能随开发板倾角运动改变。
鼠标按键可以使用 Key_DOWN、Key_RIGHT、Key_LEFT、Key_UP 四个按键中任选两个 实现,四个按键的 GPIO 编号为 960 – 963.(本实验使用Key_RIGHT、Key_LEFT分别实现鼠标的右键和左键)
一. qt界面实现
为了测试虚拟鼠标的功能,使用qt软件画了一个窗口,通过以下指令将 .ui文件 转换成python可执行文件。
pyuic5 -x windows_mouse.ui -o windows_mouse.pyqt完整python代码如下
# -*- coding: utf-8 -*-
# Form implementation generated from reading ui file 'windows_mouse.ui'
#
# Created by: PyQt5 UI code generator 5.10.1
#
# WARNING! All changes made in this file will be lost!
# windows_mouse.py
from PyQt5 import QtCore, QtGui, QtWidgets
class Ui_Form(object):
def setupUi(self, Form):
Form.setObjectName("Form")
Form.resize(480, 272) # 调整窗口高度以容纳新控件
self.verticalLayout = QtWidgets.QVBoxLayout(Form)
self.verticalLayout.setObjectName("verticalLayout")
# 原有的 right 按钮和进度条
self.right = QtWidgets.QPushButton(Form)
self.right.setObjectName("right")
self.verticalLayout.addWidget(self.right)
self.progressBarRight = QtWidgets.QProgressBar(Form)
self.progressBarRight.setProperty("value", 0) # 初始值设为 0
self.progressBarRight.setObjectName("progressBarRight")
self.verticalLayout.addWidget(self.progressBarRight)
# 新增的 left 按钮和进度条
self.left = QtWidgets.QPushButton(Form)
self.left.setObjectName("left")
self.verticalLayout.addWidget(self.left)
self.progressBarLeft = QtWidgets.QProgressBar(Form)
self.progressBarLeft.setProperty("value", 0) # 初始值设为 0
self.progressBarLeft.setObjectName("progressBarLeft")
self.verticalLayout.addWidget(self.progressBarLeft)
self.Exit = QtWidgets.QPushButton(Form)
self.Exit.setObjectName("Exit")
self.verticalLayout.addWidget(self.Exit)
self.retranslateUi(Form)
self.Exit.clicked.connect(Form.close)
# 设置 right 按钮右键菜单
self.right.setContextMenuPolicy(QtCore.Qt.CustomContextMenu)
self.right.customContextMenuRequested.connect(self.right_button_clicked)
# 设置 left 按钮左键点击事件
self.left.clicked.connect(self.left_button_clicked)
QtCore.QMetaObject.connectSlotsByName(Form)
def retranslateUi(self, Form):
_translate = QtCore.QCoreApplication.translate
Form.setWindowTitle(_translate("Form", "Form"))
self.right.setText(_translate("Form", "right"))
self.left.setText(_translate("Form", "left"))
self.Exit.setText(_translate("Form", "left - Exit"))
def right_button_clicked(self, pos):
# right 按钮右键点击事件处理
if self.progressBarRight.value() == 0:
self.progressBarRight.setValue(100) # 进度条加满
else:
self.progressBarRight.setValue(0) # 进度条变为 0
def left_button_clicked(self):
# left 按钮左键点击事件处理
if self.progressBarLeft.value() == 0:
self.progressBarLeft.setValue(100) # 进度条加满
else:
self.progressBarLeft.setValue(0) # 进度条变为 0
if __name__ == "__main__":
import sys
app = QtWidgets.QApplication(sys.argv)
Form = QtWidgets.QWidget()
ui = Ui_Form()
ui.setupUi(Form)
Form.show()
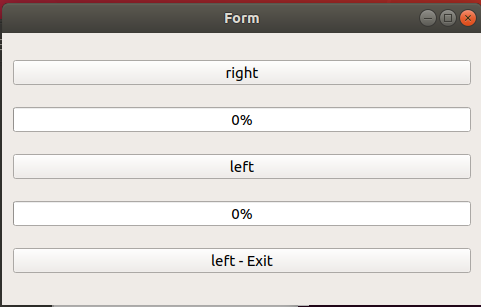
sys.exit(app.exec_())运行python windows_mouse.py出现以下界面。其中right按键只能鼠标右键点击,left按键只能鼠标左键点击,left-Exit为鼠标左键点击的退出按键。
二. 虚拟设备模拟模拟鼠标实现体感鼠标
2.1 函数声明
总共分为四个部分,分别是mpu6050设备初始化及信息获取、虚拟鼠标实现、gpio设备初始化及按键gpio信息获取、资源清理clean。
/* 函数声明 */
// mpu6050和i2c的初始化和功能函数
int i2c_init(const char* i2c_dev);
void mpu6050_write(int fd, uint8_t reg, uint8_t val);
void mpu6050_read(int fd, uint8_t reg, uint8_t* buf, int len);
void mpu6050_init(int fd);
void read_accel(int fd, float* accel);
// 清理
void cleanup_handler(int sig);
// 虚拟鼠标创建及移动、点击
int create_virtual_mouse(const char* dev_name);
void send_mouse_move(int fd, int dx, int dy);
int send_mouse_click(int fd, int button_code);

// 按键对应鼠标点击
void set_gpio_direction(int gpio, const char *direction);
char read_gpio_value(int gpio);
void export_gpio(int gpio);
void unexport_gpio(int gpio);
2.2 虚拟鼠标实现
2.2.1 虚拟鼠标创建函数
1. 创建虚拟鼠标需要:配置鼠标移动和按键事件、初始化设备信息、提交设备配置 三个步骤。
int create_virtual_mouse(const char* dev_name) {
    struct uinput_user_dev uidev;
    int fd = open("/dev/uinput", O_WRONLY | O_NONBLOCK);

    /* 配置基础事件类型 */    // 此处没有错误处理,代码里有
    // 鼠标移动事件
    ioctl(fd, UI_SET_EVBIT, EV_REL);
    ioctl(fd, UI_SET_RELBIT, REL_X);
    ioctl(fd, UI_SET_RELBIT, REL_Y);

    // 鼠标按键事件
    ioctl(fd, UI_SET_EVBIT, EV_KEY);
    ioctl(fd, UI_SET_KEYBIT, BTN_LEFT);
    ioctl(fd, UI_SET_KEYBIT, BTN_RIGHT);

    /* 初始化设备信息 */
    memset(&uidev, 0, sizeof(uidev));
    snprintf(uidev.name, UINPUT_MAX_NAME_SIZE, "%s", dev_name);
    uidev.id.bustype = BUS_USB;
    uidev.id.version = 4;

    /* 提交设备配置 */
    ioctl(fd, UI_DEV_SETUP, &uidev);    // 提交设备配置
    ioctl(fd, UI_DEV_CREATE);           // 创建设备
}
2.2.2 鼠标移动函数
void send_mouse_move(int fd, int dx, int dy) {
    struct input_event ev[3];
    struct timeval tv;

    gettimeofday(&tv, NULL);    // 此函数是获取时间戳

    // X轴移动
    memset(&ev[0], 0, sizeof(ev[0]));	// 初始化ev[0]的所有成员为0
    ev[0].type = EV_REL;
    ev[0].code = REL_X;
    ev[0].value = dx;
    ev[0].time = tv;

    // Y轴移动
    memset(&ev[1], 0, sizeof(ev[1]));
    ev[1].type = EV_REL;
    ev[1].code = REL_Y;
    ev[1].value = dy;
    ev[1].time = tv;

    // 同步事件
    memset(&ev[2], 0, sizeof(ev[2]));
    ev[2].type = EV_SYN;
    ev[2].code = SYN_REPORT;
    ev[2].value = 0;
    ev[2].time = tv;
}
1. 使用到的结构体 input_event 结构体介绍
#include <linux/input.h>

struct input_event {
    struct timeval time;  // 时间戳
    __u16 type;           // 事件类型
    __u16 code;           // 事件代码
    __s32 value;          // 事件值
};| 变量名 | 类型 | 功能 |
|---|---|---|
| time | struct timeval | 记录输入事件发生的时间戳,包含秒(tv_sec)和微秒(tv_usec),通常用于事件排序或性能分析 |
| type | __u16 | 表示输入事件的类型,如按键事件(EV_KEY)、相对位置事件(EV_REL) 、(EV_SYN)同步事件(标记批次结束) |
| code | __u16 | 与 type 结合,具体化事件含义,如具体按键、轴或输入元素 EV_KEY 类型: BTN_LEFT // 鼠标左键(0x110)、 BTN_RIGHT // 鼠标右键(0x111)、 KEY_ENTER // 回车键(0x1c) EV_REL 类型: REL_X // X轴相对移动、 (0x00)REL_Y // Y轴相对移动(0x01)、 REL_WHEEL // 滚轮滚动(0x08) EV_ABS 类型: ABS_X // X轴绝对坐标、( 0x00)ABS_Y // Y轴绝对坐标(0x01) |
| value | __s32 | 表示与事件相关的具体值,含义取决于 event 的 type 和 code EV_KEY 事件: value = 1:按键按下 value = 0:按键释放 value = 2:按键长按(部分设备支持) EV_REL 事件: value = 10:X轴向右移动10像素 value = -5:Y轴向下移动5像素 EV_ABS 事件: value = 500:触摸屏X轴坐标为500 |
2. 注意:每次事件完成都要调用同步事件,将鼠标位置和按键状态更新。
2.2.3 鼠标点击函数
和鼠标移动函数类似,只是将鼠标移动函数中的input_event结构体的参数值给鼠标按键相关的参数即可。
2.3 mpu6050相关函数实现
2.3.1 i2c设备初始化
/* I2C设备初始化 */
int i2c_init(const char* i2c_dev) {
    int fd = open(i2c_dev, O_RDWR);
    if (fd < 0) {
        perror("Failed to open I2C device");
        return -1;
    }
    // 因为ioctl的数据结构体有“从机地址”参数,所以不用单独设置从机地址
    return fd;
}
2.3.2 mpu6050寄存器写入
/* MPU6050寄存器写操作 */
void mpu6050_write(int fd, uint8_t reg, uint8_t val) {
    struct i2c_msg msg;
    uint8_t buf[2] = {reg, val};
    msg.addr  = MPU6050_ADDR;	// 设备地址
    msg.flags = 0;		// 写操作
    msg.len   = 2;		// 数据长度(寄存器地址 + 值)
    msg.buf   = buf;		// 数据缓冲区

    struct i2c_rdwr_ioctl_data ioctl_data;
    ioctl_data.msgs = &msg;	// 消息数组
    ioctl_data.nmsgs = 1;	// 消息数量

    if (ioctl(fd, I2C_RDWR, &ioctl_data) < 0)
        perror("MPU6050 write failed");
}
1. struct i2c_rdwr_ioctl_data结构体详解
struct i2c_rdwr_ioctl_data {
    struct i2c_msg* msgs;  /* I2C 消息数组的指针 */
    int nmsgs;             /* 消息数组的元素个数 */
};| 参数名 | 类型 | 功能 |
|---|---|---|
| msgs | struct i2c_msg* | 指向一个 i2c_msg 结构体数组的指针,每个数组元素描述了一次 I2C 传输操作(消息)。 |
| nmsgs | int | 表示 msgs 数组中元素的个数,即要执行的 I2C 消息传输操作的次数。 |
2. struct i2c_msg结构体详解
struct i2c_msg {
    __u16 addr;        /* I2C从设备地址 */
    __u16 flags;       /* 消息标志 */
    __u16 len;         /* 数据缓冲区长度 */
    __u8 *buf;         /* 数据缓冲区指针 */
};| 参数名 | 类型 | 功能说明 |
|---|---|---|
| addr | __u16 | I2C从设备地址,用于指定要通信的从设备的7位或10位地址 |
| flags | __u16 | 消息标志,用于指定传输方向等信息,如I2C_M_RD(读取操作),flags=0(写入操作)等 |
| len | __u16 | 要传输的数据长度,即buf数组中数据的字节数 |
| buf | __u8 * | 指向数据缓冲区的指针,用于存储要发送的数据或接收到的数据 |
2.3.3 mpu6050寄存器读取
将 i2c_msg 的flags标志换成读取操作即可。
注意:在读取数据之前,主设备(linux开发板)需要先指定要读取的从设备(mpu6050)寄存器地址。所以在读取数据之前需要先进行一次写入。这个写入操作的作用是将寄存器地址发送给 MPU6050,告诉它接下来要从哪个寄存器开始读取数据。
2.3.4 mpu6050初始化
/* MPU6050初始化 (关闭睡眠模式)*/
void mpu6050_init(int fd) {
    mpu6050_write(fd, ACCEL_CONFIG, 0x00); // ±2g量程
    mpu6050_write(fd, PWR_MGMT_1, 0x00);   // 退出睡眠模式
    usleep(100000); // 等待稳定100ms
}
2.3.5 read_accel 加速度数据获取及处理函数
调用mpu6050_read函数读取加速度数据,并进行处理,转换为m/s²的加速度。
/* 读取加速度数据 (XYZ 三轴)*/
void read_accel(int fd, float* accel) {
    uint8_t buf[6];
    mpu6050_read(fd, ACCEL_XOUT_H, buf, 6);

    // 合并原始数据并转换单位
    int16_t raw_x = (int16_t)((buf[0] << 8) | buf[1]);	// X 轴
    int16_t raw_y = (int16_t)((buf[2] << 8) | buf[3]);	// Y 轴
    int16_t raw_z = (int16_t)((buf[4] << 8) | buf[5]);	// Z 轴

    // 转换为 m/s²
    accel[0] = (raw_x / ACCEL_SCALE_2G) * GRAVITY_CM_S2;
    accel[1] = (raw_y / ACCEL_SCALE_2G) * GRAVITY_CM_S2;
    accel[2] = (raw_z / ACCEL_SCALE_2G) * GRAVITY_CM_S2;
}
2.4 按键模拟鼠标点击功能实现
2.4.1 导出export按键对应的gpio
还有对应的撤销导出unexport函数同理。
// 导出gpio
void export_gpio(int gpio) {
    FILE *fp = fopen(GPIO_EXPORT, "w");
    if (fp == NULL) {
        perror("Failed to open export file");
        fprintf(stderr, "Error code: %d\n", errno);
        exit(EXIT_FAILURE);
    }
    fprintf(fp, "%d", gpio);
    fclose(fp);
}
2.4.2 将gpio方向direction设置为输入
// 设置gpio方向为输入
void set_gpio_direction(int gpio, const char *direction) {
    char path[64];
    snprintf(path, sizeof(path), GPIO_DIRECTION, gpio);
    FILE *fp = fopen(path, "w");
    if (fp == NULL) {
        perror("Failed to open direction file");
        fprintf(stderr, "Error code: %d\n", errno);
        exit(EXIT_FAILURE);
    }
    fprintf(fp, "%s", direction);
    fclose(fp);
}
2.4.3 读取按键gpio状态,来控制鼠标按键
char read_gpio_value(int gpio) {
    char path[64];
    snprintf(path, sizeof(path), GPIO_VALUE, gpio);
    FILE *fp = fopen(path, "r");
    if (fp == NULL) {
        perror("Failed to open value file");
        fprintf(stderr, "Error code: %d\n", errno);
        exit(EXIT_FAILURE);
    }
    char value[2];
    fgets(value, sizeof(value), fp);
    fclose(fp);
    return value[0] == '1' ? '1' : '0';
}
2.5 资源清理函数
销毁虚拟设备、关闭i2c、撤销导出按键gpio。
void cleanup_handler(int sig) {
    if (uinput_fd >= 0) {
        // 销毁虚拟设备
        ioctl(uinput_fd, UI_DEV_DESTROY);
        close(uinput_fd);
        printf("\n[Cleanup] Virtual mouse device destroyed\n");
    }
    if (i2c_fd >= 0) {  // 新增:关闭I2C设备
        close(i2c_fd);
        printf("[Cleanup] I2C device closed\n");
        i2c_fd = -1;     // 重置描述符
    }
    int gpios[] = {960, 961, 962, 963, 964};
    int num_gpios = sizeof(gpios) / sizeof(gpios[0]);
    for (int i = 0; i < num_gpios; i++) {
        unexport_gpio(gpios[i]);
    }
    printf("all gpio unexported\n");
    fflush(stdout); // 强制刷新标准输出
    exit(EXIT_SUCCESS);
}
2.6 主函数实现(伪代码)
int main() {
    // 1. 注册信号处理(Ctrl+C)

    /* 2. 创建虚拟鼠标 */

    /* 3. 初始化MPU6050 */

    // 4. 导出五个按键的gpio,并设置方向为输入

    while (1) {

	    // 调整方向
        // 发送给虚拟鼠标使其移动

	    // 读取当前按钮状态
        // 键盘左键对应鼠标左键
        // 键盘右键对应鼠标右键

        // 按键消抖
    }

     //资源清理
}
2.7 源代码及执行步骤
源代码:用户空间MPU6050体感虚拟鼠标驱动程序资源-CSDN文库
# 代码编译 -lm 是因为使用了数学公式
gcc mpu_mouse.c -o mpu_mouse.out -lm

# 功能实现1:添加需要的环境变量,屏幕和鼠标

# Qt-embedded需要的环境变量
# • 指定显示设备
export QT_QPA_PLATFORM=linuxfb
# • 指定输入设备(触摸屏)
export QT_QPA_GENERIC_PLUGINS=evdevtouch:/dev/input/event0
export QWS_MOUSE_PROTO=evdevtouch:/dev/input/event0
# • 指定输入设备(鼠标)
export QT_QPA_GENERIC_PLUGINS=evdevmouse:/dev/input/event0
export QWS_MOUSE_PROTO=evdevmouse:/dev/input/event0

# 功能实现2 # "&"符号是因为要放在后台运行,然后运行鼠标控制程序
python windows_mouse.py &
./mpu_mouse.c


 4762
4762

 被折叠的 条评论
为什么被折叠?
被折叠的 条评论
为什么被折叠?
 到【灌水乐园】发言


