


一、下载
SpringBoot_demo框架代码
补充——>看完后面的再来看这点
Log实体类的Service及Service/Impl没写,不过也没多大影响
二、数据库
可以在本地或者云端建立数据库,User表及Log表
使用过程中进行的操作都会在Log表中进行记录,方便查找问题
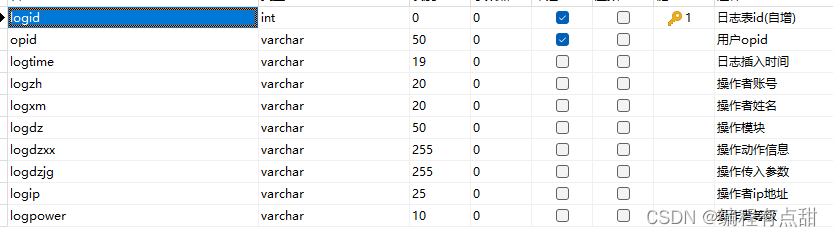
Log表
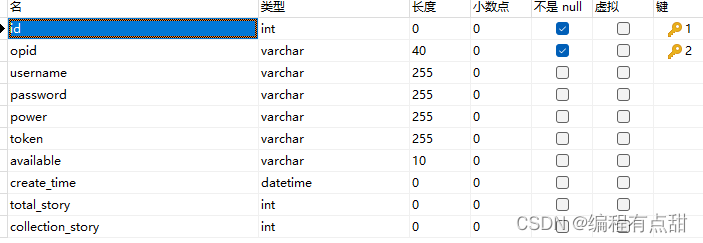
User表(仅供参考)
Photo表(后面的示例表)

三、修改配置
主要
首先去微信公众平台注册账号后,——>开发管理——>开发设置——>复制AppID——>复制AppSecre
粘贴在application.yml中的如下代码后面(125行)
wx:
  appId: AppID
  appSecret: AppSecre
  online_people_url: https://api.weixin.qq.com/sns/jscode2session
然后在数据库配置中修改(48行)
// 数据库的密码,默认账户是root
password: password
// 数据库的地址,可以是云端数据库或者是本地数据库
// 云端:ip地址
// 本地:location
// databasename:要连接的的数据库名
url: jdbc:mysql://地址:3306/databasename?serverTimezone=Asia/Shanghai&useUnicode=true&characterEncoding=utf-8&useSSL=false&allowPublicKeyRetrieval=true
次要(不是很必要)
Knife4jConfig
public Docket docket() {
    Docket docket = new Docket(DocumentationType.SWAGGER_2)
            .apiInfo(apiInfo())
            .enable(true)
            // 分组名称,可以修改
            .groupName("SpringBoot_demo接口文档")
            .select()
            // 这里指定Controller扫描包路径,修改成自己的路径
            .apis(RequestHandlerSelectors.basePackage("com.example.springboot_demo.controller"))
            .paths(PathSelectors.any())
            .build()
            .extensions(openApiExtensionResolver.buildSettingExtensions());
    return docket;
}


private ApiInfo apiInfo() {
    return new ApiInfoBuilder()
    		// 自定义名称,显示在接口界面上
            .title("SpringBoot_demo接口文档")
            // 接口文档的解释,自由发挥
            .description("冲冲冲!!!")
            .contact(new Contact("water", "https://www.alijeon.com", "暂无"))
            .license("Apache License Version 2.0")
            .licenseUrl("https://github.com/springfox/springfox/blob/master/LICENSE")
            // 项目版本
            .version("520.1314")
            .build();
}
application
knife4j:
  enable: true
  setting:
    enableVersion: true
    swaggerModelName: 实体类列表
    enableSearch: false
    enableFooter: false
    enableFooterCustom: true
    // 这里是界面底部显示的文字,自由发挥,编码utf-8
    footerCustomContent: CRUSH>富哥>啤酒肚>黑>体育生>rapper>原石>鬼火少年>老人>小孩>学生党>狗>暖男
  production: false
四、业务代码书写流程
entity——>mapper——>service——>service/impl——>controller
以下以一个Photo类做示例(注意的地方有部分注释)
entity
import com.baomidou.mybatisplus.annotation.*;
import com.baomidou.mybatisplus.extension.activerecord.Model;
import com.fasterxml.jackson.annotation.JsonFormat;
import io.swagger.annotations.ApiModel;
import io.swagger.annotations.ApiModelProperty;
import lombok.Data;
import lombok.experimental.Accessors;

import java.io.Serializable;
import java.util.Date;

@Data
@Accessors(chain = true)
// 要操作的数据库表名
@TableName("photo")
// 模块名,像这样就行了的
@ApiModel(value = "Photo对象", description = "photo表")
// 类名和对象名一致
public class Photo extends Model<Photo> {

    private static final long serialVersionUID = 1L;

	// 接口文档显示的名称
    @ApiModelProperty(value = "PhotoID")
	// id自增
    @TableId(value = "id", type = IdType.AUTO)
    private int id;

    @ApiModelProperty(value = "opid")
    // 映射数据库表中的字段名,value同表中的字段名
    @TableField(value = "opid")
    // 注意驼峰式命名,即不能用_,例如op_id是错误的,opid是正确的
    private String opid;

    @ApiModelProperty(value = "文件夹ID")
    @TableField(value = "folder_id")
    private int folderId;

    @ApiModelProperty(value = "照片名")
    @TableField(value = "photo_name")
    private String photoName;

    @ApiModelProperty(value = "创建时间")
    @JsonFormat(pattern = "yyyy-MM-dd HH:mm:ss", timezone = "GMT+8")
    @TableField(value = "create_time", fill = FieldFill.INSERT)
    private Date createTime;

    @Override
    public Serializable pkVal() {
        return this.id;
    }
}
mapper
import com.baomidou.mybatisplus.core.mapper.BaseMapper;
import org.apache.ibatis.annotations.Mapper;

// Mapper层注解
// 一定加上这个注解
@Mapper
// 继承BaseMapper,对象是实体类
public interface PhotoMapper extends BaseMapper<Photo> {

}
service
import com.baomidou.mybatisplus.extension.service.IService;
import com.example.springboot_demo.common.JSONResult;
import com.example.springboot_demo.entity.Photo;
import org.springframework.web.multipart.MultipartFile;

import java.util.List;

// 继承IService,对象是实体类名
public interface PhotoService extends IService<Photo> {

    public JSONResult<List<Photo>> queryPhoto(Photo param);

    public JSONResult<Photo> insertPhoto(Photo param, MultipartFile file);

    public JSONResult<Photo> updatePhoto(Photo param);

    public JSONResult<Photo> deletePhoto(Photo param);

}
serviceImpl
注意
使用的mybatis-plus,其中的代码并没有sql语句,都是使用Mybatis语法,具体语法查看这里
import com.example.springboot_demo.common.JSONResult;
import com.example.springboot_demo.entity.Photo;
import com.example.springboot_demo.entity.User;
import com.example.springboot_demo.mapper.PhotoMapper;
import com.example.springboot_demo.mapper.UserMapper;
import com.example.springboot_demo.service.PhotoService;
import com.baomidou.mybatisplus.core.conditions.query.QueryWrapper;
import com.baomidou.mybatisplus.extension.service.impl.ServiceImpl;
import com.sun.jersey.api.client.Client;
import com.sun.jersey.api.client.WebResource;
import lombok.experimental.Accessors;
import org.springframework.stereotype.Service;
import org.springframework.transaction.annotation.Transactional;
import org.springframework.web.multipart.MultipartFile;

import javax.annotation.Resource;
import java.util.List;
import java.util.UUID;

// 服务层注解
@Service
@Accessors(chain = true)
// 先继承再实现
public class PhotoServiceImpl extends ServiceImpl<PhotoMapper, Photo> implements PhotoService {

	// 引入mapper
    @Resource
    private UserMapper userMapper;

    @Resource
    private PhotoMapper photoMapper;

	// 根据用户查询Photo信息
    @Override
    public JSONResult<List<Photo>> queryPhoto(Photo param) {
    	// 查询用户,可以提出来
        User user = userMapper.selectOne(new QueryWrapper<User>().eq("opid", param.getOpid()));
        if (user == null) return new JSONResult<List<Photo>>(201, "查询失败,没有该用户", null);
        // 返回数据
        // 语法是Mybaits-plus,即不需要写sql语句,可以去了解以下使用方法
        return new JSONResult<List<Photo>>(200, "查询Photo成功", photoMapper.selectList(new QueryWrapper<Photo>().eq("opid", param.getOpid())));
    }

	// 没有实现,具体的做法先获取文件信息,进行generateUniqueId方法获取名称后上传到服务器或者七牛云,同步存储文件信息到数据库
    @Override
    @Transactional
    public JSONResult<Photo> insertPhoto(Photo param, MultipartFile file) {
        String upload_path = "https://alijeon.com/achong_story/";
        User user = userMapper.selectOne(new QueryWrapper<User>().eq("opid", param.getOpid()));
        if (user == null) return new JSONResult<Photo>(201, "查询失败,没有该用户", null);
        String fileName = generateUniqueId() + ".jpg";
        try {
            Client client = Client.create();
            WebResource webResource = client.resource(upload_path + fileName);
            webResource.put(file.getBytes());
            System.out.println("上传成功");
            System.out.println("图片路径==》" + upload_path + fileName);
        } catch (Exception e) {
            System.out.println("上传失败" + e);
        }
        return new JSONResult<Photo>(200, "插入Photo成功",  null);
    }

	// 没有实现,具体的做法是获取要更新的记录信息,更改数据后按照id进行更新
    @Override
    public JSONResult<Photo> updatePhoto(Photo param) {
        System.out.println(param.toString());
        User user = userMapper.selectOne(new QueryWrapper<User>().eq("opid", param.getOpid()));
        if (user == null) return new JSONResult<Photo>(201, "查询失败,没有该用户", null);
        Photo photo = photoMapper.selectById(param.getId());
        System.out.println("要更新的photo" + photo);
        return new JSONResult<Photo>(200, "更新Photo成功", photo);
    }

	// 直接根据id删除
    @Override
    public JSONResult<Photo> deletePhoto(Photo param) {
        User user = userMapper.selectOne(new QueryWrapper<User>().eq("opid", param.getOpid()));
        if (user == null) return new JSONResult<Photo>(201, "查询失败,没有该用户", null);
        Photo photo = photoMapper.selectById(param.getId());
        System.out.println("要更新的photo" + photo);
        if (photoMapper.deleteById(param.getId()) > 0) return new JSONResult<Photo>(200, "删除Photo成功", photo);
        return new JSONResult<Photo>(203, "删除Photo失败", photo);
    }

    private static String generateUniqueId() {
        UUID uuid = UUID.randomUUID();
        long timestamp = System.currentTimeMillis();
        return Long.toHexString(timestamp) + uuid.toString().replaceAll("-", "");
    }

}
controller
import com.example.springboot_demo.aop.OperationLogger;
import com.example.springboot_demo.common.JSONResult;
import com.example.springboot_demo.entity.Photo;
import com.example.springboot_demo.service.PhotoService;
import io.swagger.annotations.ApiOperation;
import org.springframework.web.bind.annotation.*;
import org.springframework.web.multipart.MultipartFile;

import javax.annotation.Resource;
import java.util.List;

// 解决跨域问题
@CrossOrigin
// 控制层注解
@RestController
@RequestMapping("/photo")
public class PhotoController {

    @Resource
    PhotoService photoService;

	// 方法作用中文显示,自由更改能看懂干嘛的就行
    @ApiOperation("用户查询Photo")
    // 请求接口路径,使用的是Post方法,也可以使用Get方法
    @PostMapping("/photo_query")
    // 操作日志记录
    @OperationLogger(option = "查询Photo",modelName = "Photo查询模块")
    public JSONResult<List<Photo>> queryPhoto(String openid) {
		// 构建参数实体
        Photo param = new Photo();
        param.setOpid(openid);
        return photoService.queryPhoto(param);
    }

    @ApiOperation("用户插入Photo")
    @PostMapping("/photo_insert")
    @OperationLogger(option = "插入Photo",modelName = "Photo插入模块")
    public JSONResult<Photo> insertPhoto(String openid, MultipartFile file) {
        Photo param = new Photo();
        param.setOpid(openid);
        return photoService.insertPhoto(param, file);
    }

    @ApiOperation("用户更新Photo")
    @PostMapping("/photo_update")
    @OperationLogger(option = "更新Photo",modelName = "Photo更新模块")
    public JSONResult<Photo> updatePhoto(Photo param) {
        return photoService.updatePhoto(param);
    }

    @ApiOperation("用户删除Photo")
    @PostMapping("/photo_delete")
    @OperationLogger(option = "删除Photo",modelName = "Photo删除模块")
    public JSONResult<Photo> deletePhoto(String openid, int id) {
        Photo param = new Photo();
        param.setOpid(openid);
        param.setId(id);
        return photoService.deletePhoto(param);
    }

}
五、结果展示
首页界面
实体类列表

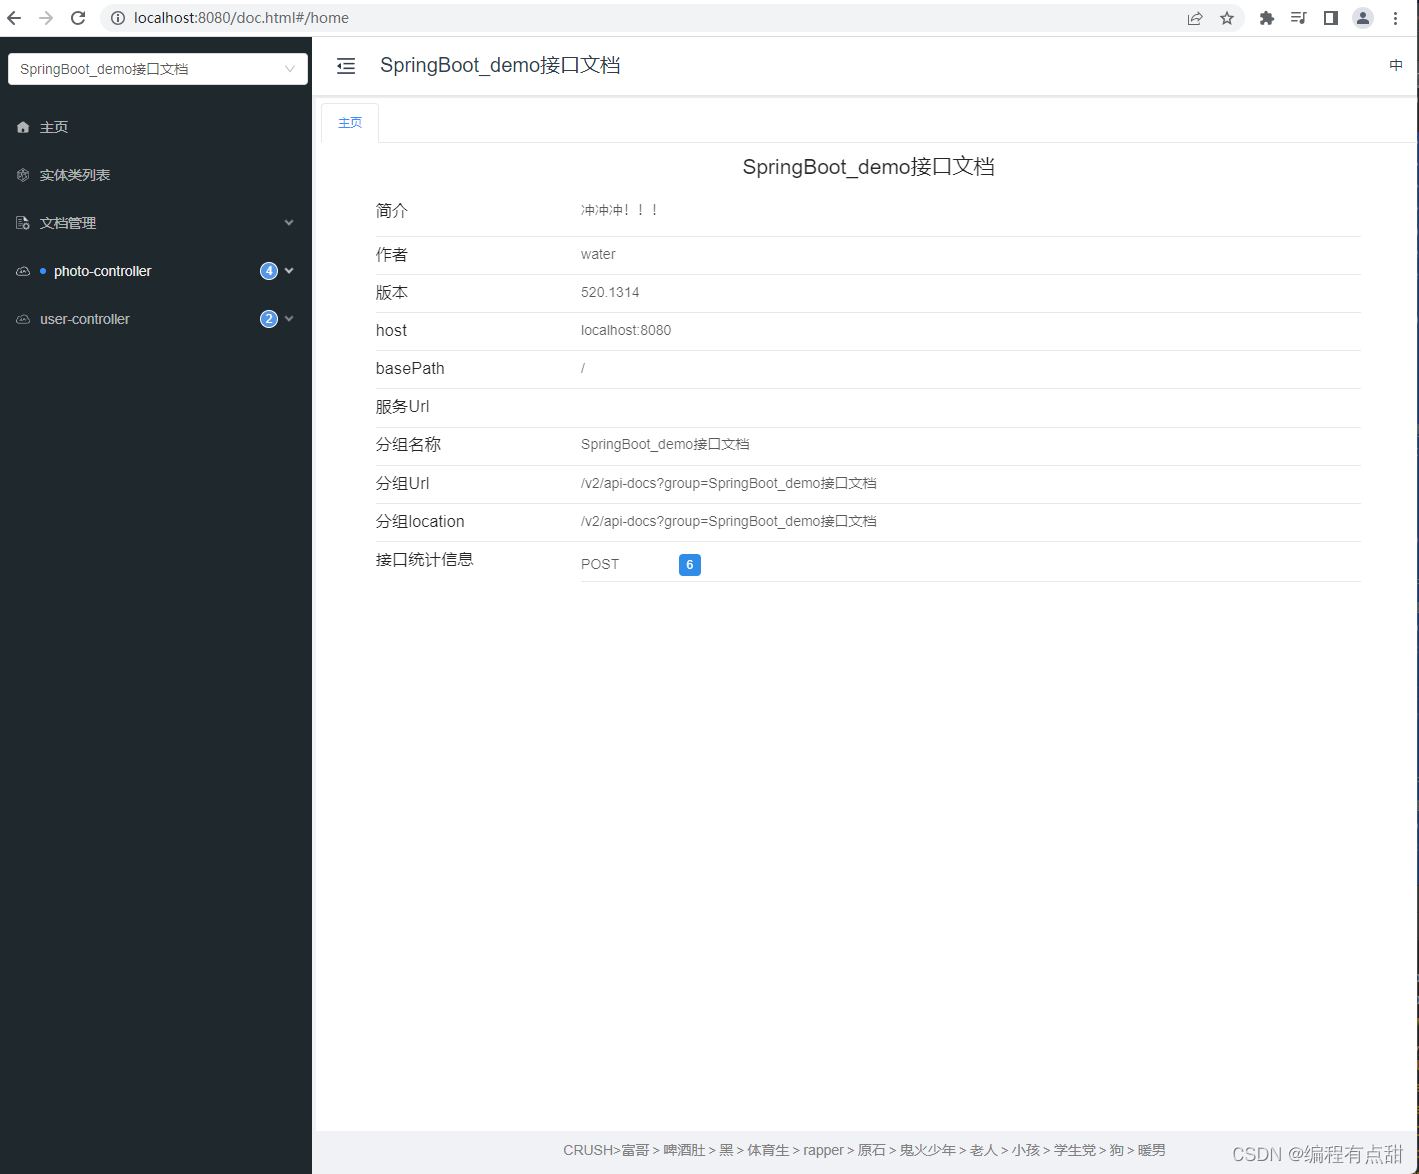
文档接口介绍

全局参数查看
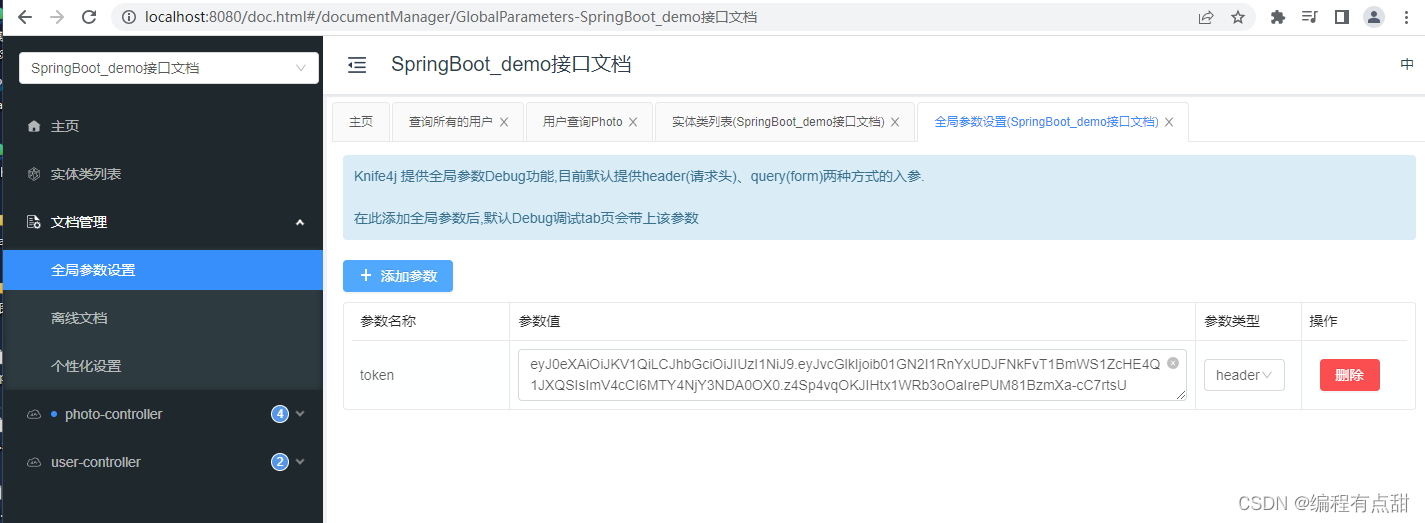
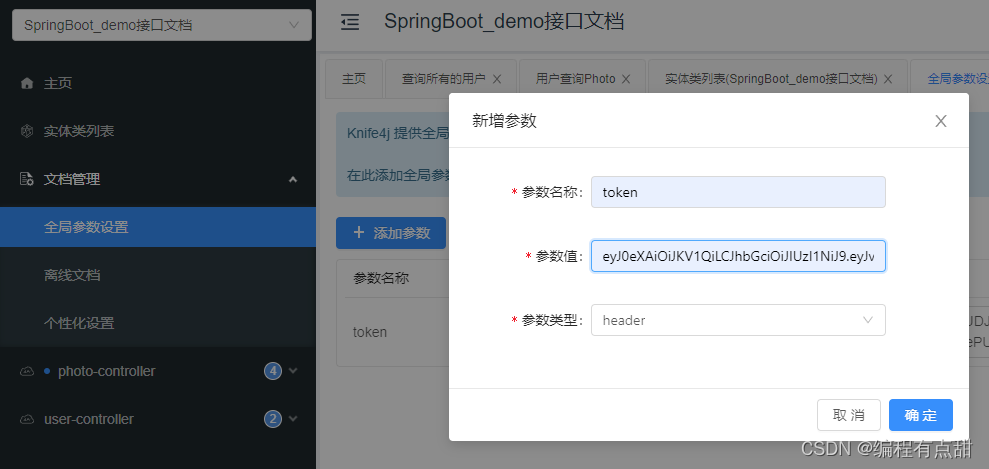
全局参数添加,主要是token
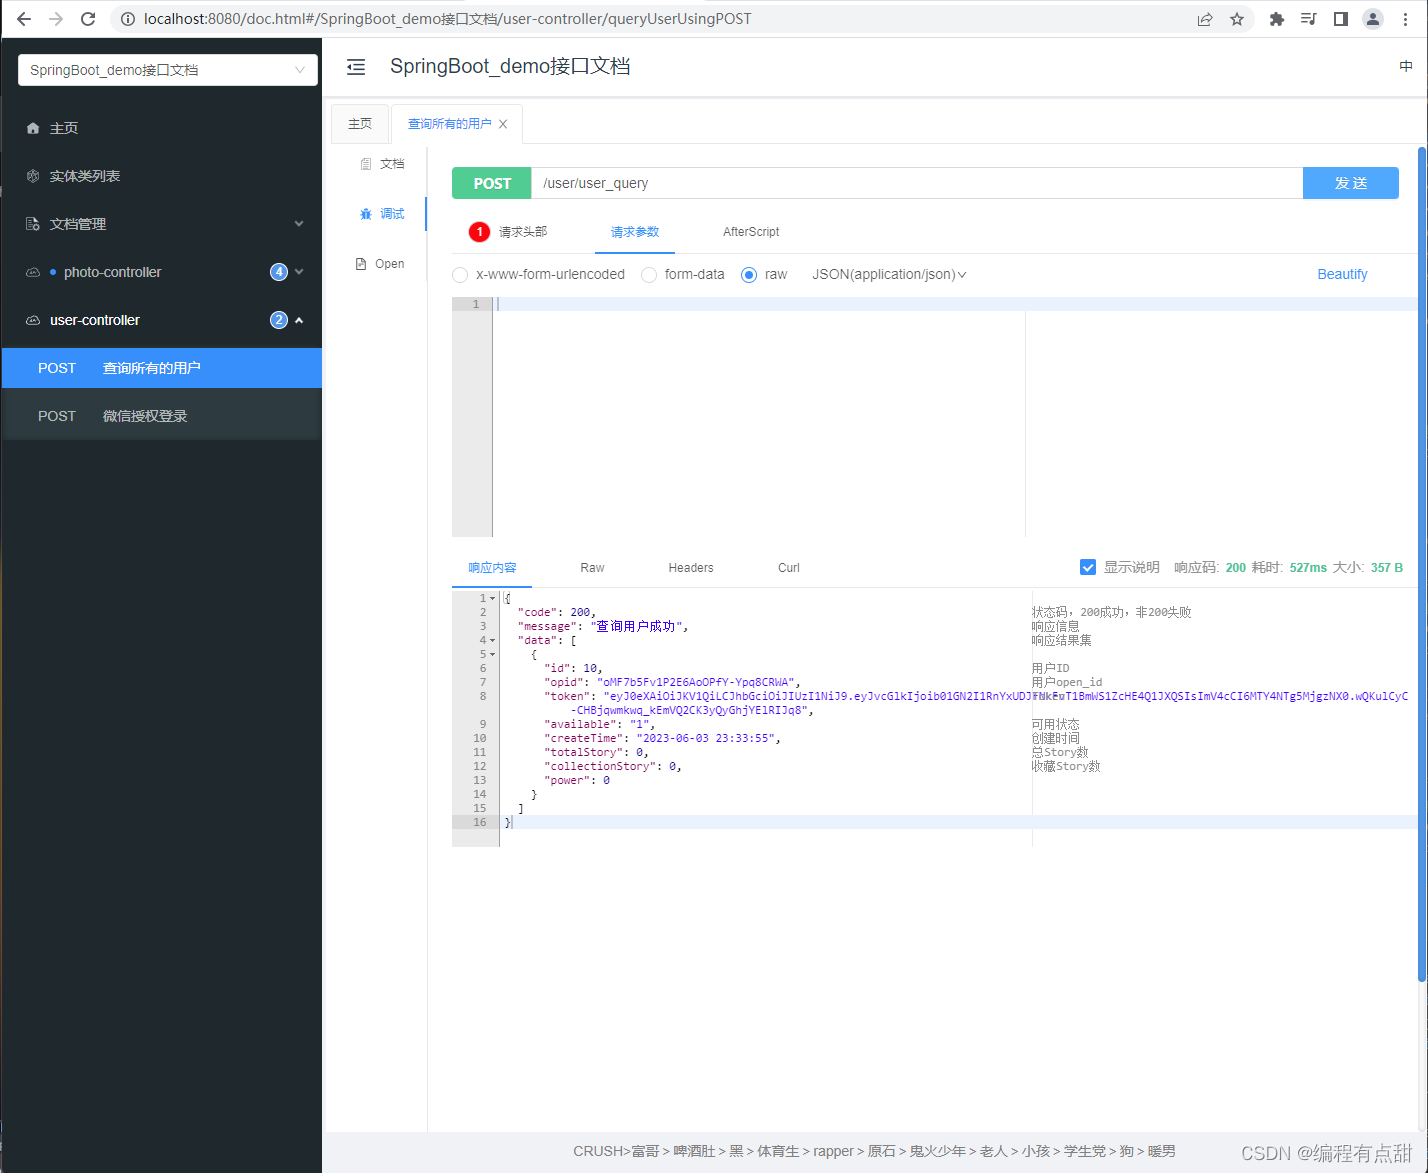
查询所有用户
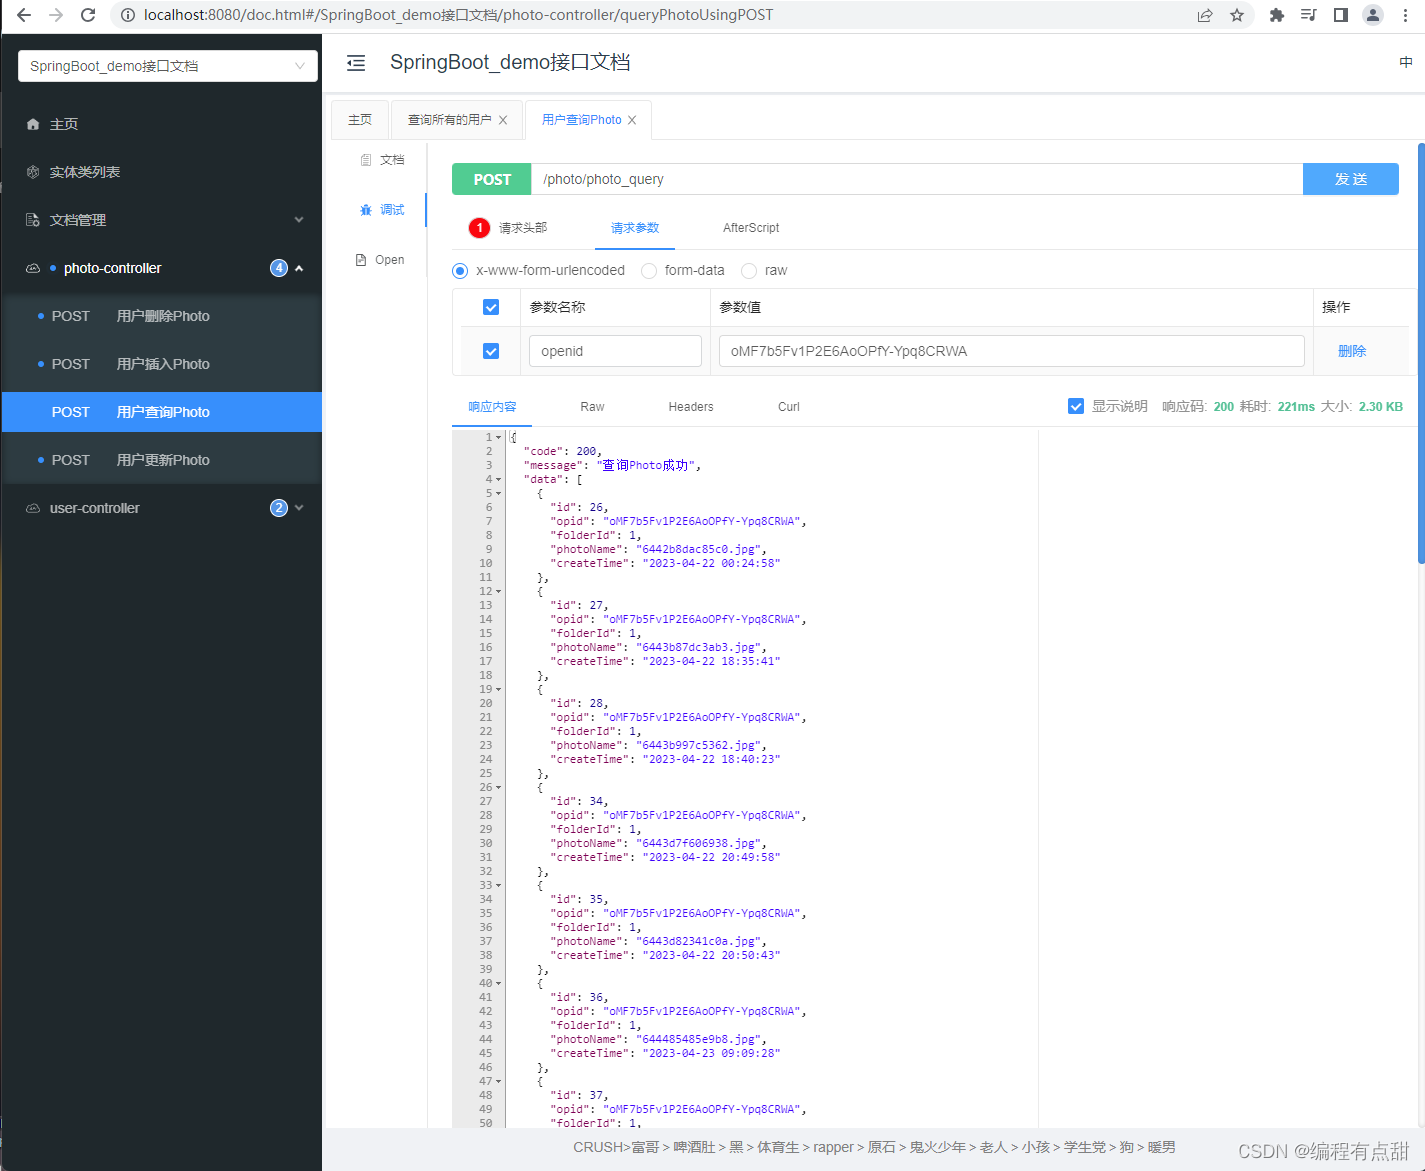
查询指定用户所有的photo


 1091
1091


 被折叠的 条评论
为什么被折叠?
被折叠的 条评论
为什么被折叠?
 到【灌水乐园】发言


