


前期准备
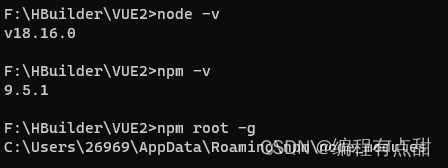
node安装
node.js下载地址
选择D盘一直next就行
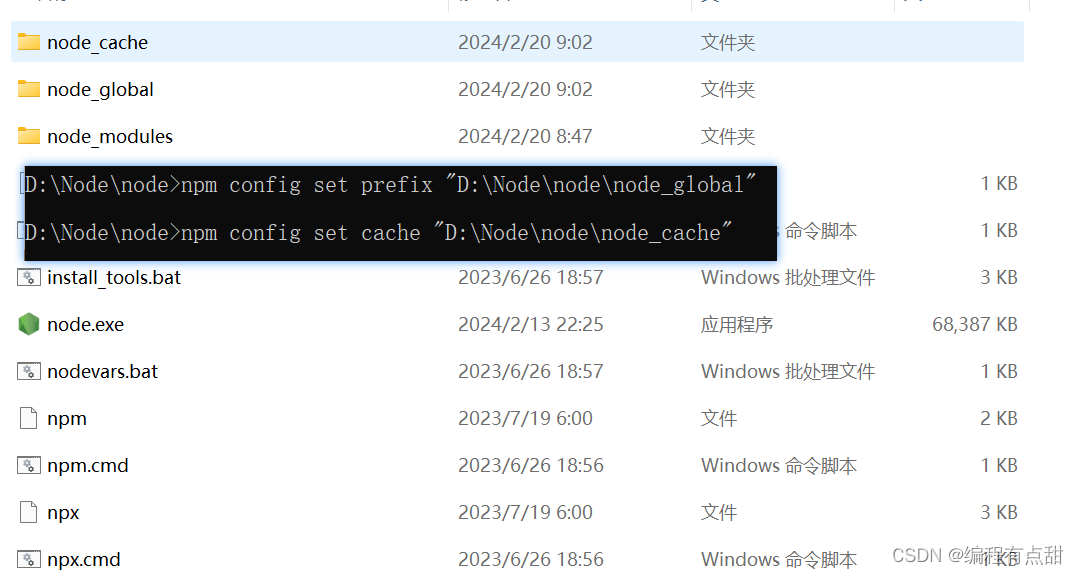
环境配置
打开安装目录
新建两个文件夹【node_global】和【node_cache】
管理员权限CMD
npm config set prefix "D:\node\node_global"
npm config set cache "D:\node\node_cache"
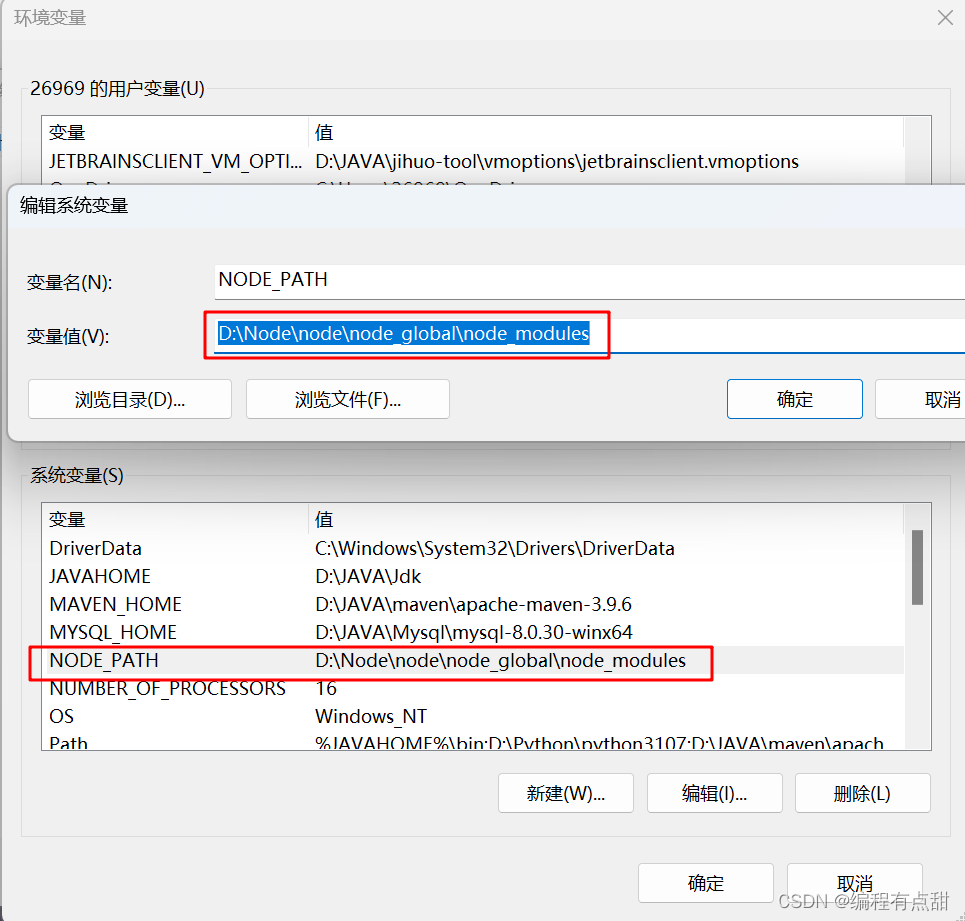
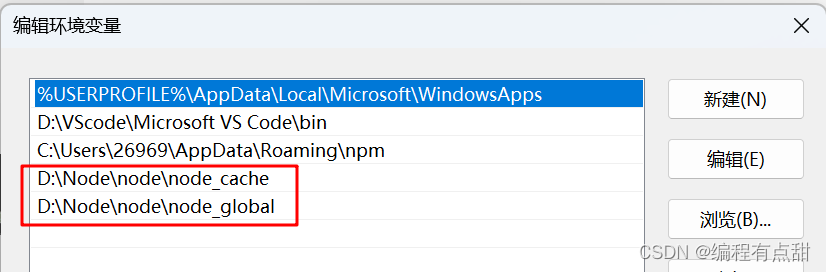
系统环境变量新建
变量名:NODE_PATH
变量值:D:\Node\node\node_global\node_modules
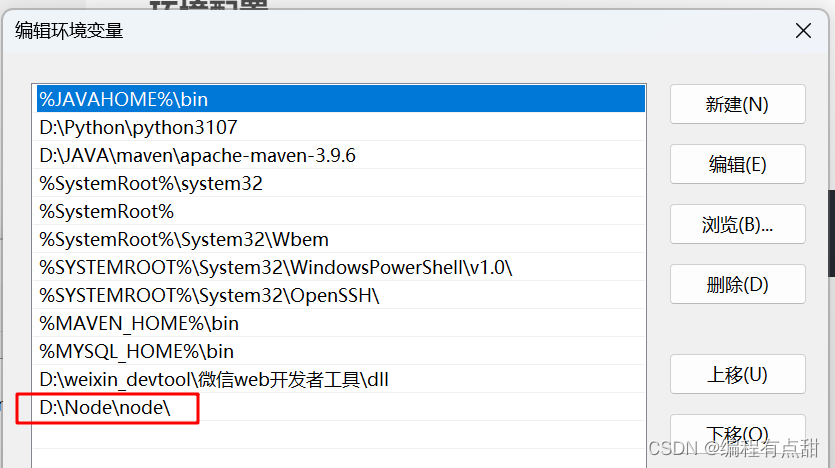
系统环境变量Path新建
D:\Node\node
用户环境变量Path新建
D:\Node\node\node_global
D:\Node\node\node_cache
配置镜像
腾讯源
npm config set registry http://mirrors.cloud.tencent.com/npm/
淘宝源已弃用(使用的话会报错无法安装)
npm install -g cnpm --registry=https://registry.npm.taobao.org

安装cnpm
npm install -g cnpm --registry=http://mirrors.cloud.tencent.com/npm/
验证是否安装成功
cnpm config get registry
](https://img-blog.csdnimg.cn/direct/a32bc9b4dfe2497ea1226df9a1414902.png)
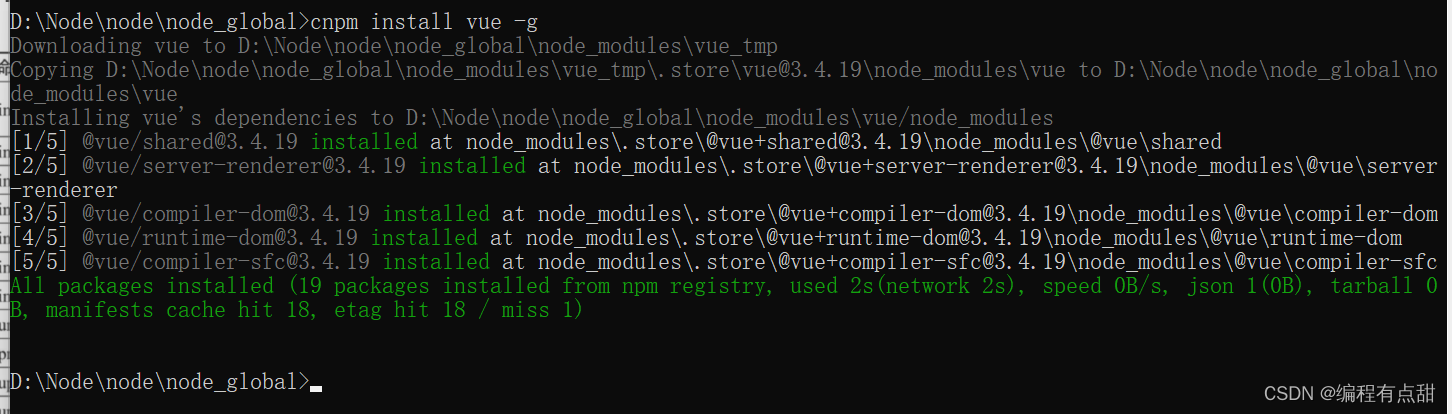
安装 vue 和脚手架
安装 vue.js
cnpm install vue -g
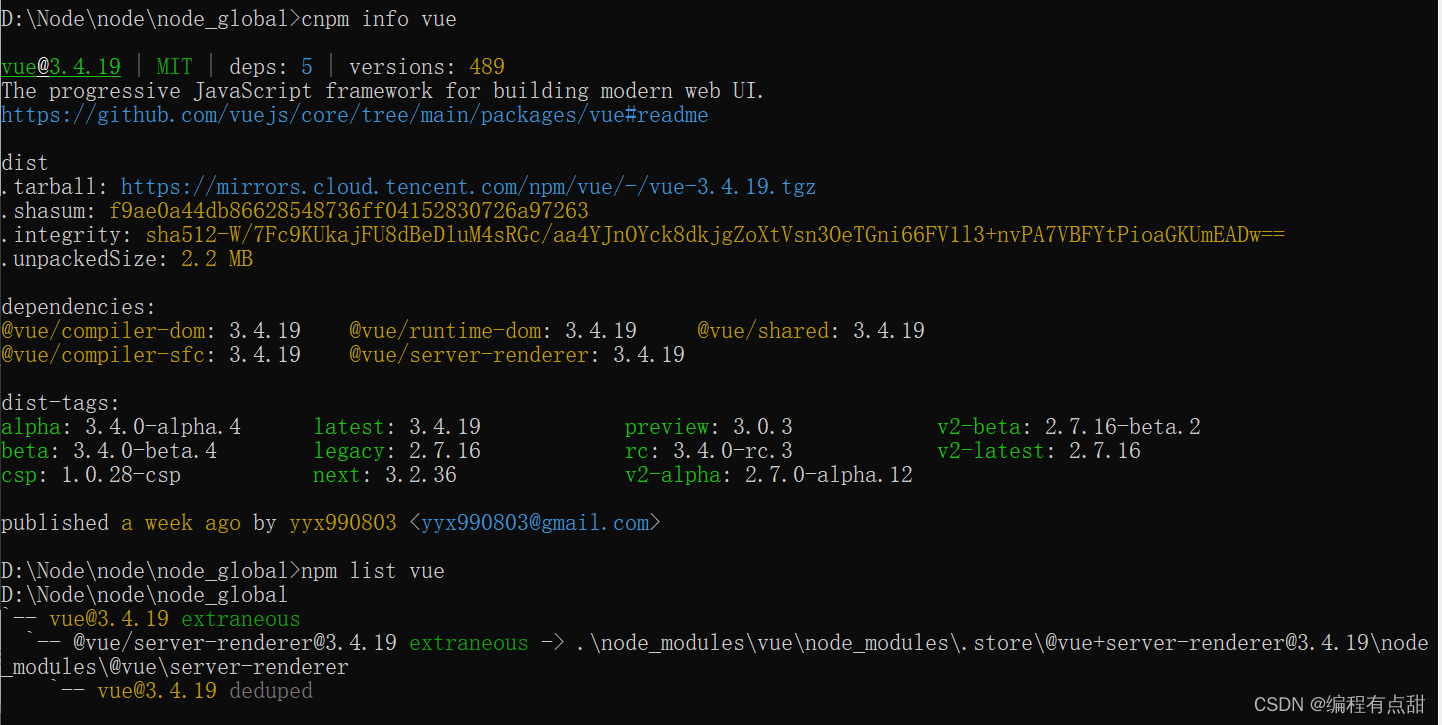
验证安装是否成功
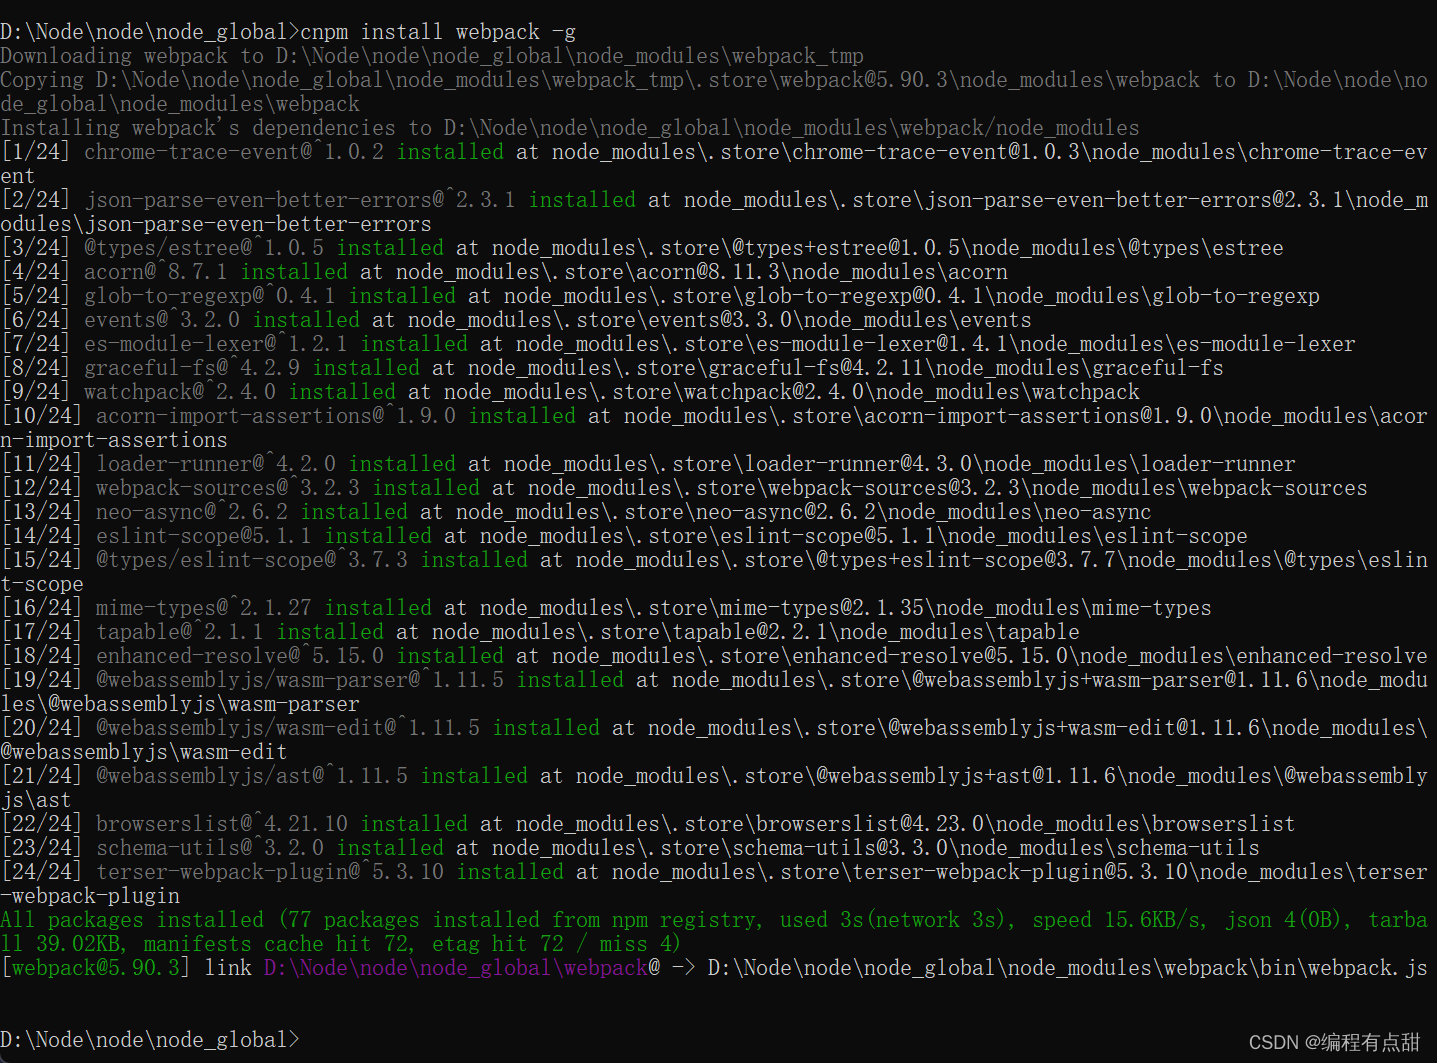
安装 webpack 模块
cnpm install webpack -g
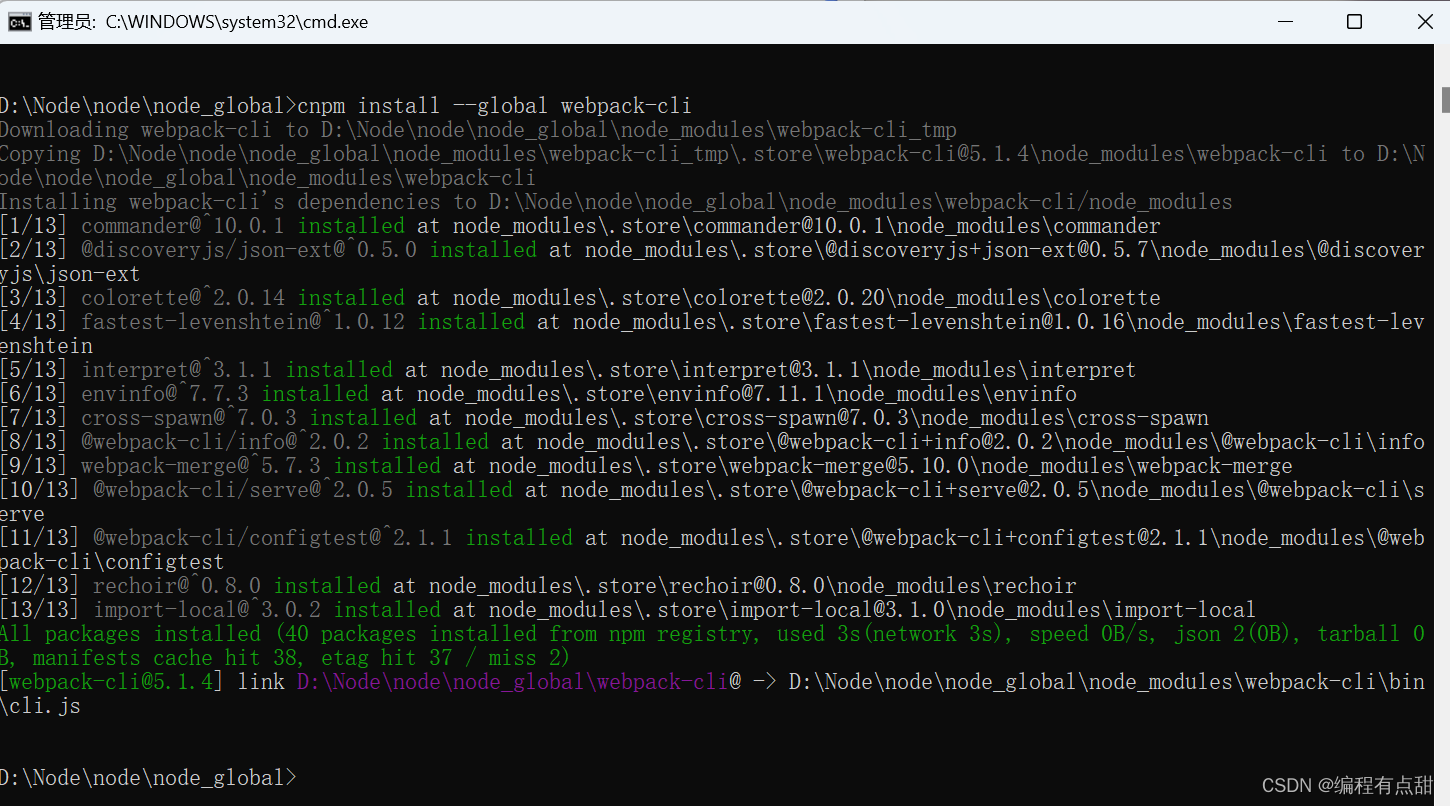
安装 webpack-cli
cnpm install --global webpack-cli
安装vue-cli 3.x
cnpm install @vue/cli –g

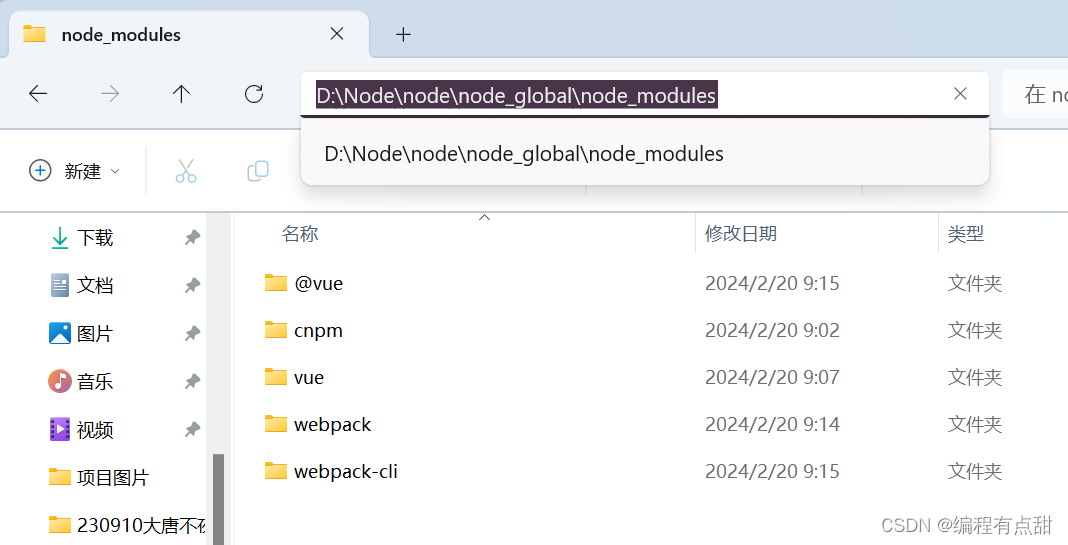
安装完后的目录
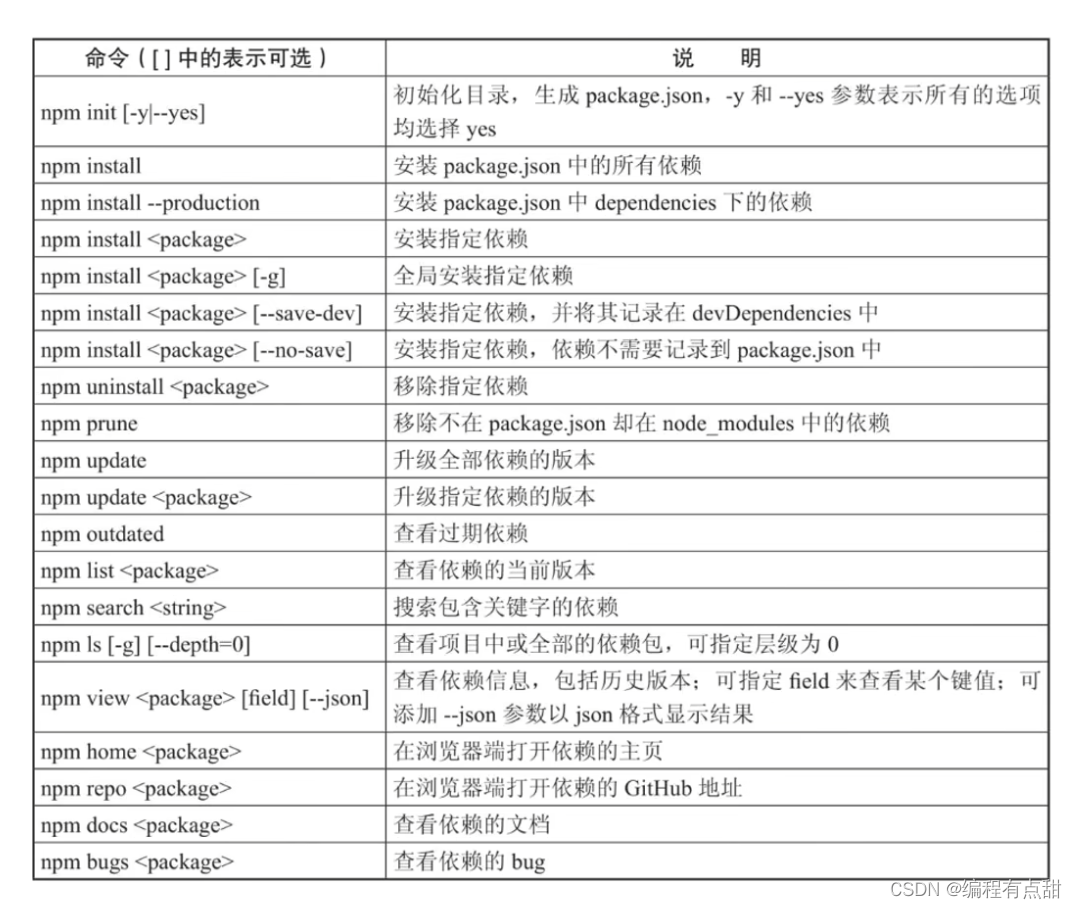
常用命令
创建 vue 3 项目
项目文件
管理员CMD到指定的目录
vue create vue-demo


Element
下载的别人的项目不用下载–node_modules–,下载package.json后npm install
// 安装
// -S 把安装的文件记录到package.json中
npm i element-ui -S
// 引入
import ElementUI from 'element-ui'
import 'element-ui/lib/theme-chalk/index.css'
<template>
    <el-table :data="tableData" style="width: 100%" :row-class-name="tableRowClassName">
        <el-table-column prop="id" label="序号" width="180">
        </el-table-column>
        <el-table-column prop="openId" label="用户open_id" width="180">
        </el-table-column>
        <el-table-column prop="available" label="状态" width="180">
        </el-table-column>
        <el-table-column prop="createTime" label="创建时间" width="180">
        </el-table-column>
        <el-table-column prop="totalStory" label="总数" width="180">
        </el-table-column>
        <el-table-column prop="collectionStory" label="收藏数" width="180">
        </el-table-column>
    </el-table>
</template>

<script>
export default {
    methods: {
        tableRowClassName({ row, rowIndex }) {
            if (rowIndex % 2 === 1) {
                return 'warning-row';
            } else if (rowIndex % 2 === 0) {
                return 'success-row';
            }
            return '';
        }
    },
    data() {
        return {
            tableData: []
        }
    },
    created: function () {
        this.$http.post("/user/user_query").then((response) => {
            console.log(response);
            this.tableData = response.data.data;
        })
    }
}
</script>

<style>
.el-table .warning-row {
    background: oldlace;
}

.el-table .success-row {
    background: #f0f9eb;
}
</style>
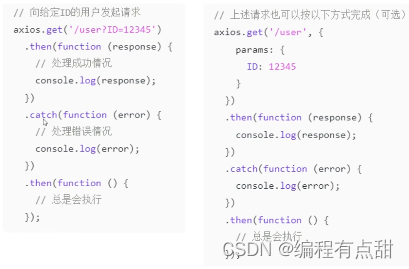
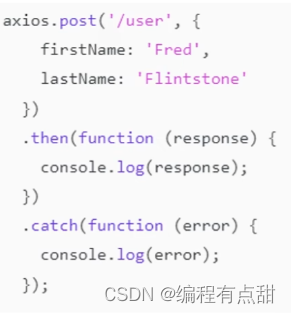
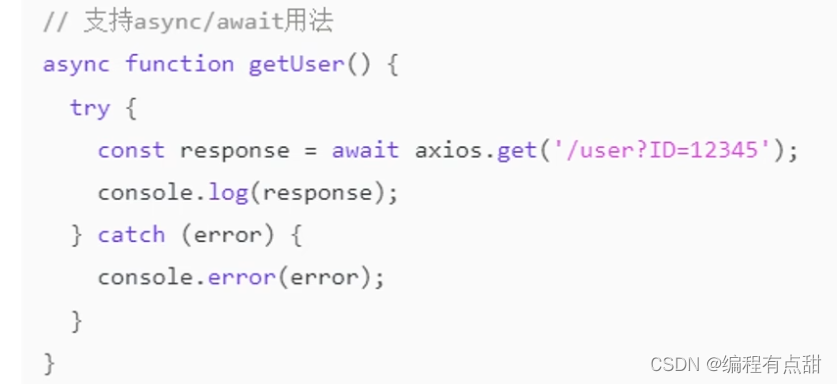
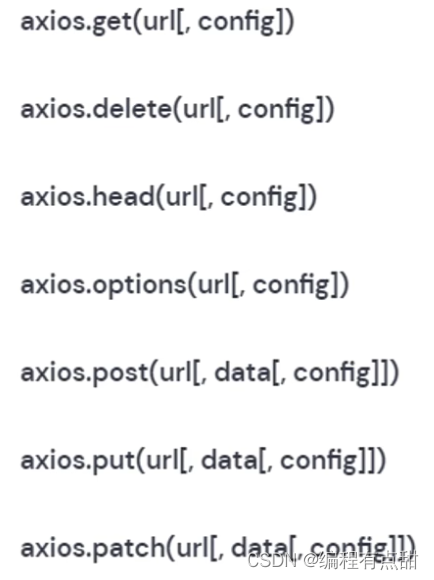
Axios
// 安装
npm install axios

// 配置请求根路径
axios.defaults.baseURL = 'http://localhost:8080';
axios.defaults.headers.post['Content-Type'] = 'application/x-www-form-urlencoded';
// 将axios作为全局的自定义属性,每个组件可以在内部直接访问
// Vue3
// app.config.globalProperties.$http = axios
// Vue2
Vue.prototype.$http = axios;

// 请求	上面的模板
created: function () {
    this.$http.post("/user/user_query").then((response) => {
        console.log(response);
        this.tableData = response.data.data;
    })
}
VueRouter
// 安装
// 4.x结合vue3使用
// 3.x结合vue2使用
npm install vue-router@3
// index.js路由跳转
import VueRouter from "vue-router"
import Vue from "vue"
import Discover from "@/components/Discover.vue"
import Friends from "@/components/Friends.vue"
import My from "@/components/My.vue"
import Toplist from "@/components/Toplist.vue"
import Playlist from "@/components/Playlist.vue"
import Product from "@/components/Product.vue"

// 将VueRouter设置为Vue的插件
Vue.use(VueRouter)

const router = new VueRouter({
    // 指定hash属性与组件之间的对应关系
    routes: [
        { path: "/", redirect: "/discover"},
        { path: '/discover', component: Discover, children: [
            { path: "toplist", component: Toplist },
            { path: "playlist", component: Playlist }
        ]},
        { path: '/friends', component: Friends },
        { path: '/my', component: My, children: [
            { path: ":id", component: Product, props: true }
        ]}
    ]
})

export default router
// main.js
import router from './router'
new Vue({
  render: h => h(App),
  router: router
}).$mount('#app')
// 模板(其他组件代码放后面)
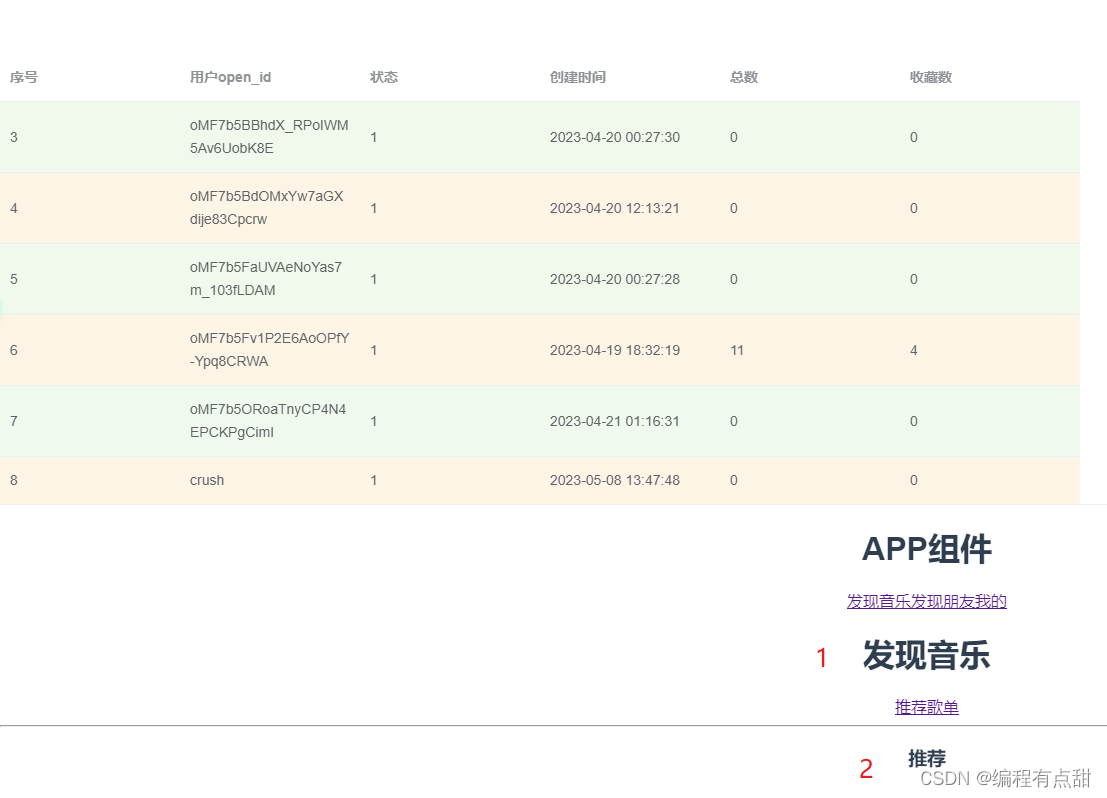
<template>
<!-- 不能有两个根组件 -->
<div id="app">
<User></User>
<h1>APP组件</h1>
<!-- 声明路由链接 -->
<router-link to="/discover">发现音乐</router-link>
<router-link to="/friends">发现朋友</router-link>
<router-link to="/my">我的</router-link>
<!-- 声明路由占位标签 -->
<router-view></router-view>
</div>
</template>
<script>
import User from "@/components/User.vue"
export default {
name: 'App',
components: {
User
}
}
</script>
<style>
#app {
font-family: Avenir, Helvetica, Arial, sans-serif;
-webkit-font-smoothing: antialiased;
-moz-osx-font-smoothing: grayscale;
text-align: center;
color: #2c3e50;
margin-top: 60px;
}
</style>
Vuex
// 记得看自己的vue版本,那个视频我看了五次才发现版本不对,gpt问烂了
npm install vuex@3 --save
// 报错强制安装
npm install vuex@3 --save --force
// store/index.js
import Vue from 'vue'
import Vuex from 'vuex'

Vue.use(Vuex)

const store = new Vuex.Store({
    state: {
        count: 0
    },mutations: {
        increment (state) {
            state.count++
        }
    }
})

export default store
导入store
import store from './store'
new Vue({
  render: h => h(App),
  router: router,
  store: store
}).$mount('#app')
例子
// store/index.js
import Vue from 'vue'
import Vuex from 'vuex'
Vue.use(Vuex)
const store = new Vuex.Store({
state: {
count: 0,
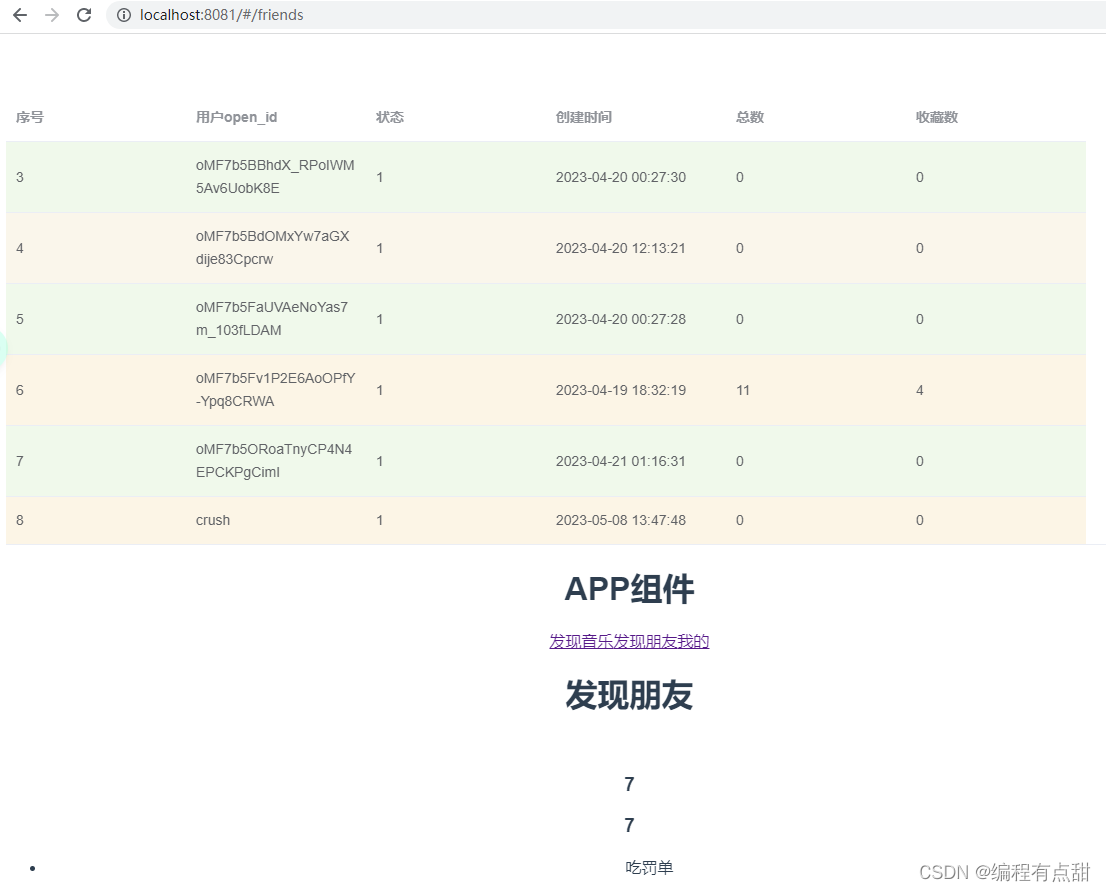
todos: [
{ id: 1, text: '吃罚单', done: true },
{ id: 1, text: '睡觉觉', done: false }
]
}, mutations: {
increment (state, n) {
state.count += n;
}
}, getters: {
doneTodos: state => {
return state.todos.filter( todo => todo.done );
}
}
})
export default store
// CountAdd.vue
<template>
<div id="app">
<h3 @click="increment(1)">{{ this.$store.state.count }}</h3>
<h3 @click="add(1)">{{ count }}</h3>
<ul>
<li v-for="todo in doneTodos" key="todo.id">
{{ todo.text }}
</li>
</ul>
</div>
</template>
<script>
import store from '@/store';
import { mapState, mapGetters, mapMutations } from 'vuex';
export default {
computed: {
...mapState([
// 映射this.count为store.state.count
'count','todos'
// // 箭头函数使代码更简练
// count: state => state.count,
// // 传字符串参数'count'等同于'state => state.count'
// countAlias: 'count',
// // 为了能够使用'this'获取局部状态,必须使用常规函数
// countPlusLocalState (state) {
// return state.count + this.localCount
// }
]),
...mapGetters([
'doneTodos'
])
},
methods: {
...mapMutations([
'increment'
]),
...mapMutations({
add: 'increment'
}),
// add() {
// // 使用store/index.js中的mutations中的increment函数
// store.commit('increment', 1)
// }
}
}
</script>

模块化


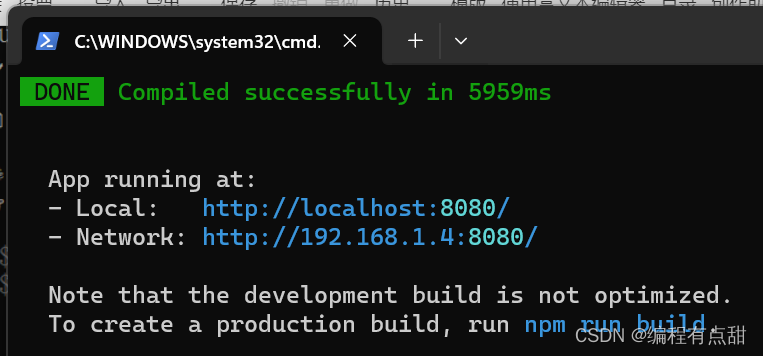
运行
npm run serve
package.json
{
  "name": "vue-demo",
  "version": "0.1.0",
  "private": true,
  "scripts": {
    "serve": "vue-cli-service serve",
    "build": "vue-cli-service build"
  },
  "dependencies": {
    "axios": "^1.4.0",
    "core-js": "^3.8.3",
    "element-ui": "^2.15.13",
    "vue": "^2.6.14"
  },
  "devDependencies": {
    "@vue/cli-plugin-babel": "~5.0.0",
    "@vue/cli-service": "~5.0.0",
    "vue-template-compiler": "^2.6.14"
  },
  "browserslist": [
    "> 1%",
    "last 2 versions",
    "not dead"
  ]
}
示例代码
在需要请求的控制器前面加上@CrossOrigin注解,处理Cors跨域问题
main.js
import Vue from 'vue'
import App from './App.vue'
import ElementUI from 'element-ui'
import 'element-ui/lib/theme-chalk/index.css'
import axios from 'axios'
import router from '@/router'
import store from '@/store'

Vue.config.productionTip = false
Vue.use(ElementUI)
// 配置请求根路径
axios.defaults.baseURL = 'http://localhost:8080';
axios.defaults.headers.post['Content-Type'] = 'application/x-www-form-urlencoded';
// 将axios作为全局的自定义属性,每个组件可以在内部直接访问
// Vue3
// app.config.globalProperties.$http = axios
// Vue2
Vue.prototype.$http = axios;

new Vue({
  render: h => h(App),
  router: router,
  store: store
}).$mount('#app')
App.vue
<template>
  <!-- 不能有两个根组件 -->
  <div id="app">
    <User></User>
    <h1>APP组件</h1>
    <!-- 声明路由链接 -->
    <router-link to="/discover">发现音乐</router-link>
    <router-link to="/friends">发现朋友</router-link>
    <router-link to="/my">我的</router-link>
    <!-- 声明路由占位标签 -->
    <router-view></router-view>
  </div>
</template>

<script>
import User from "@/components/User.vue"
export default {
  name: 'App',
  components: {
    User
  }
}
</script>

<style>
#app {
  font-family: Avenir, Helvetica, Arial, sans-serif;
  -webkit-font-smoothing: antialiased;
  -moz-osx-font-smoothing: grayscale;
  text-align: center;
  color: #2c3e50;
  margin-top: 60px;
}
</style>
router路由跳转
import VueRouter from "vue-router"
import Vue from "vue"
import Discover from "@/components/Discover.vue"
import Friends from "@/components/Friends.vue"
import My from "@/components/My.vue"
import Toplist from "@/components/Toplist.vue"
import Playlist from "@/components/Playlist.vue"
import Product from "@/components/Product.vue"
import CountAdd from "@/components/CountAdd.vue"

// 将VueRouter设置为Vue的插件
Vue.use(VueRouter)

const router = new VueRouter({
    // 指定hash属性与组件之间的对应关系
    routes: [
        { path: "/", redirect: "/discover"},
        { path: '/discover', component: Discover, children: [
            { path: "toplist", component: Toplist },
            { path: "playlist", component: Playlist }
        ]},
        { path: '/friends', component: Friends,  children: [
            { path: "countadd", component: CountAdd }
        ]},
        { path: '/my', component: My, children: [
            { path: ":id", component: Product, props: true }
        ]}
    ]
})

export default router
store
import Vue from 'vue'
import Vuex from 'vuex'

Vue.use(Vuex)

const store = new Vuex.Store({
    state: {
        count: 0,
        todos: [
            { id: 1, text: '吃罚单', done: true },
            { id: 1, text: '睡觉觉', done: false }
        ]
    }, mutations: {
        increment (state, n) {
            state.count += n;
        }
    }, getters: {
        doneTodos: state => {
            return state.todos.filter( todo => todo.done );
        }
    }
})

export default store
User.vue(纯表格)
<template>
    <el-table :data="tableData" style="width: 100%" :row-class-name="tableRowClassName">
        <el-table-column prop="id" label="序号" width="180">
        </el-table-column>
        <el-table-column prop="openId" label="用户open_id" width="180">
        </el-table-column>
        <el-table-column prop="available" label="状态" width="180">
        </el-table-column>
        <el-table-column prop="createTime" label="创建时间" width="180">
        </el-table-column>
        <el-table-column prop="totalStory" label="总数" width="180">
        </el-table-column>
        <el-table-column prop="collectionStory" label="收藏数" width="180">
        </el-table-column>
    </el-table>
</template>

<style>
.el-table .warning-row {
    background: oldlace;
}
.el-table .success-row {
    background: #f0f9eb;
}
</style>

<script>
export default {
    methods: {
        tableRowClassName({ row, rowIndex }) {
            if (rowIndex % 2 === 1) {
                return 'warning-row';
            } else if (rowIndex % 2 === 0) {
                return 'success-row';
            }
            return '';
        }
    },
    data() {
        return {
            tableData: []
        }
    },
    created: function() {
        this.$http.get("/user/user").then((response) => {
        	// 根据自己的数据改变
            this.tableData = response.data.data;
        })
    }
}
</script>
Discover.vue(多层路由)
// 组件(toplist和playlist是两个展示的组件,里面就一个h1标签)
<template>
  <div>
    <h1>发现音乐</h1>
    <!-- 子路由链接 -->
    <router-link to="/discover/toplist">推荐</router-link>
    <router-link to="/discover/playlist">歌单</router-link>
    <hr>
    <router-view></router-view>
  </div>
</template>
My.vue和Product.vue(id路由,父向子组件props传值,{{id}}获取)
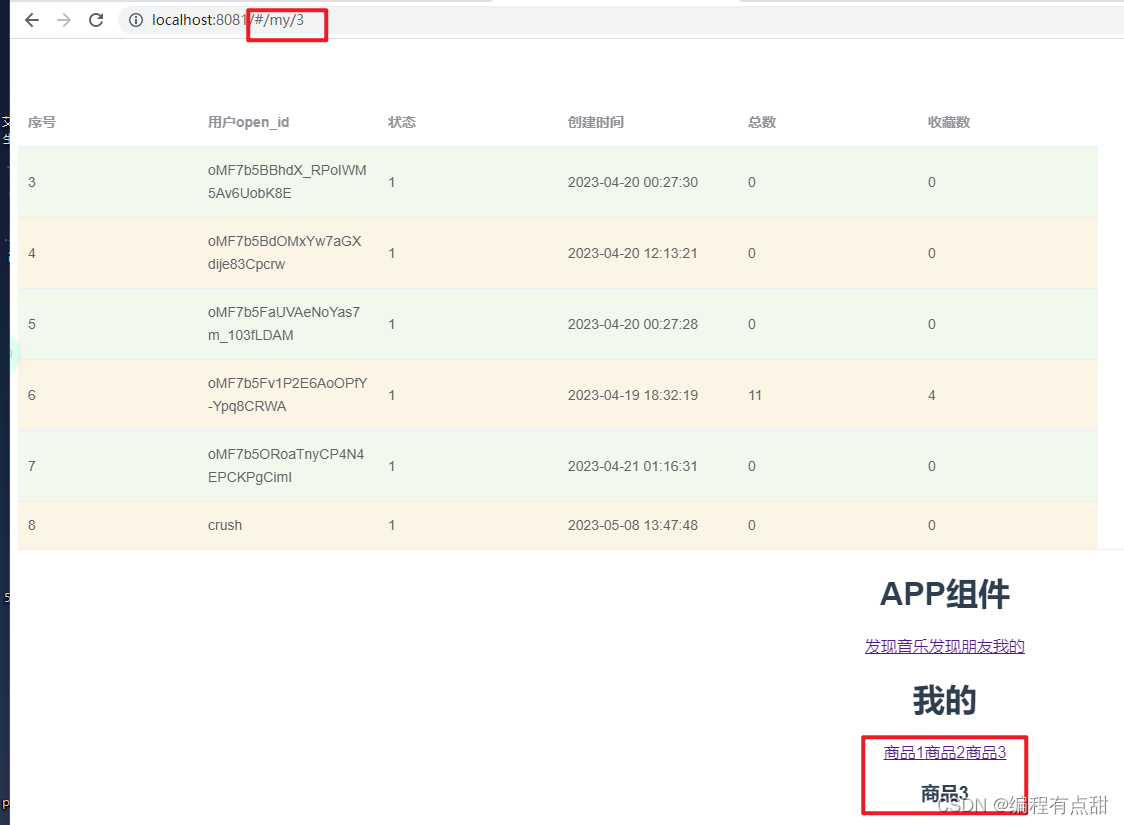
// My.vue
<template>
    <div>
        <h1>我的</h1>
        <router-link to="/my/1">商品1</router-link>
        <router-link to="/my/2">商品2</router-link>
        <router-link to="/my/3">商品3</router-link>
        <router-view></router-view>
    </div>
</template>
// Product.vue
<template>
    <div>
        <!-- 获取动态的id值 -->
        <h3>商品{{ id }}</h3>
    </div>
</template>

<script>
export default {
    props: ["id"],
    // 组件的名称
    name: "Product"
}
</script>
// router/index.js
{ path: '/my', component: My, children: [
   { path: ":id", component: Product, props: true }
]}
CountAdd.vue
<template>
    <div id="app">
        <h3 @click="increment(1)">{{ this.$store.state.count }}</h3>
        <h3 @click="add(1)">{{ count }}</h3>
        <ul>
            <li v-for="todo in doneTodos" key="todo.id">
                {{ todo.text }}
            </li>
        </ul>
    </div>
</template>

<script>
import store from '@/store';
import { mapState, mapGetters, mapMutations } from 'vuex';

export default {
    computed: {
        ...mapState([
            // 映射this.count为store.state.count
            'count','todos'

            // // 箭头函数使代码更简练
            // count: state => state.count,

            // // 传字符串参数'count'等同于'state => state.count'
            // countAlias: 'count',

            // // 为了能够使用'this'获取局部状态,必须使用常规函数
            // countPlusLocalState (state) {
            //     return state.count + this.localCount
            // }

        ]),
        ...mapGetters([
            'doneTodos'
        ])
    },
    methods: {
        ...mapMutations([
            'increment'
        ]),
        ...mapMutations({
            add: 'increment'
        }),
        // add() {
        //     // 使用store/index.js中的mutations中的increment函数
        //     store.commit('increment', 1)
        // }
    }
}
</script>
结果图
注意事项
在需要请求的控制器前面加上@CrossOrigin注解,处理Corss跨域问题
vue-element-admin后台集成
V18.16.0会报错,降到16版本下载地址
// 项目克隆链接
git clone https://github.com/PanJiaChen/vue-element-admin.git
// 配置(删掉以下信息)
1.package.json中的"tui-editor": "1.3.3"
2.src/router/modoules/components.js中21行
    {
      path: 'markdown',
      component: () => import('@/views/components-demo/markdown'),
      name: 'MarkdownDemo',
      meta: { title: 'Markdown' }
    },
3.src\components\MarkdownEditor
4.src\views\components-demo\markdown.vue
// 安装命令
npm install --registry=https://registry.npm.taobao.org
// 启动命令


 9645
9645


 被折叠的 条评论
为什么被折叠?
被折叠的 条评论
为什么被折叠?
 到【灌水乐园】发言


