


无论小程序的时候一般有这个功能,在页面处于首页时候,滑动视图,切换视图顶部滚动导航也跟着切换

1.想要实现这个功能就需要实现顶部导航栏,首先实现顶部滚导航栏 点击高亮颜色显示
模板代码
<scroll-view scroll-x="true" class="scroll-content"  >
//滑动导航栏数组
	<view v-for="(item,index) in topBar" :key="index"  class="scroll-item" >
		<text  :class="index==topindex?'f-color-active':'f-color'" @click="addclick(index)" >{{item.name}}</text>
	</view>
</scroll-view>
采用的是class样式绑定 ,写一份高亮样式,和普通样式,定义一个滑动默认高亮索引当,高亮索引等于当前的v-for点击的索引时候,高亮,
var topindex =ref(0);//默认第一个区域高亮索引
  //高亮方法
 var addclick=(index)=>{
	 console.log("用户点击了第几个tabbar",index);
	 // 索引改变用来判断当前样式是为否点击样式 这样就是
	 topindex.value=index;

 };
css
/* 字体颜色 */
.f-color{
	color: #636263;
}

/* 选中字体颜色 */
.f-color-active{
	color: #2979ff;
}
2.然后接下来实现滑动导航栏点击的时候内容区域的页面跟着切换,大概逻辑是一样的既然上面,通过高亮索引等于当前v-for循环的内容视图索引显示即可,但是要实现页面滑动,顶部导航栏也跟着滑动,所以下面的内容区域不能用view 而是使用swipier轮播器
滑动视图实现滑动效果(当然是关闭了自动切换那些属性的)

swpiper的current属性决定了当前滑动显示的视图区域

所以代码块就可以同v-for滚动导航的数据列表,来实现滚动导航栏在那个索引,内容显示那个索引 ,内容区域使用的是scrollview滚动视图,方便后期数据扩展来动态设置内容区域高度
<!-- swiper顶部的容器,让他可以随着选项卡切换而且切换  改变时候触发切换事件 current属性和数据的index刚好对应-->
			<swiper  :current="topindex" >
				<!-- 要跟着tab循环 所以数据也跟着循环 -->
				<swiper-item  v-for="(item,index) in topBar" :key="index" >
					<!-- 做滑底部刷新 @scrolltolower -->

					<scroll-view :scroll-y="true"  class="swiper-item" >
			<!--内容区域-->
			</scroll-view>
				</swiper-item>
			</swiper>
现在实现了滚动导航栏切换,内容区域切换,但是还没有实现内容区域滑动,上面的滚动条跟着变化所以,为swipper添加滑动事件,
	<!-- viewindex是下方的视图id  滑动内容可以实现导航样式跟着改变到但是无法实现滑动导航区域滑动 -->
	<scroll-view scroll-x="true" class="scroll-content" :scroll-into-view="viewindex" >
		<view v-for="(item,index) in topBar" :key="index"  class="scroll-item" :id="'top'+index">
			<text  :class="index==topindex?'f-color-active':'f-color'" @click="addclick(index)" >{{item.name}}</text>
		</view>
	</scroll-view>
<!-- swiper顶部的容器,让他可以随着选项卡切换而且切换  改变时候触发切换事件 current属性和数据的index刚好对应-->
			<swiper @change="onChangeTab" :current="topindex" :style="'height:'+viewHeight+'px;'">
				<!-- 要跟着tab循环 所以数据也跟着循环 -->
				<swiper-item  v-for="(item,index) in topBar" :key="index" >
					<!-- 做滑底部刷新 @scrolltolower -->

					<scroll-view :scroll-y="true"  :style="'height:'+viewHeight+'px;'" class="swiper-item" >

			</scroll-view>
				</swiper-item>
			</swiper>
修改后的js
  var viewindex= ref(0)
  //高亮方法
 var addclick=(index)=>{
	 console.log("用户点击了第几个tabbar",index);
	 // 索引改变用来判断当前样式是为否点击样式
	 topindex.value=index;
	 console.log(topindex),
	 // 视图跟顺点击改变
	 viewindex="top"+index;
 };
 	 var onChangeTab=(e)=>{
	 // 从wipper 滑动视图的detail拿到索引
	 console.log("用户开始滑动页面",e.detail);
	 // 把滑块索引传递实现滑动改变top 索引  用户滑动那个区域对应顶部导航也跟着滑动
	 addclick(e.detail.current);
 };
滑动事件可以获取到当前元素参数,detail属性中可以知道当前滑动到第几个索引了,因为和滚动导航栏一样是循环的同样导航栏数据,所以索引位置能够皮蓬
这里我为滚动视图添加了:scroll-into-view="viewindex"属性,是因为当内容区域一直滑动,滚动导航栏可以会出现内容高亮的部分在显示可视外边,所以就要用该属性设置,内容区域的索引在哪,滚动导航的视图在哪,不然就出现高亮,但是高亮部分在滚动导航栏末尾
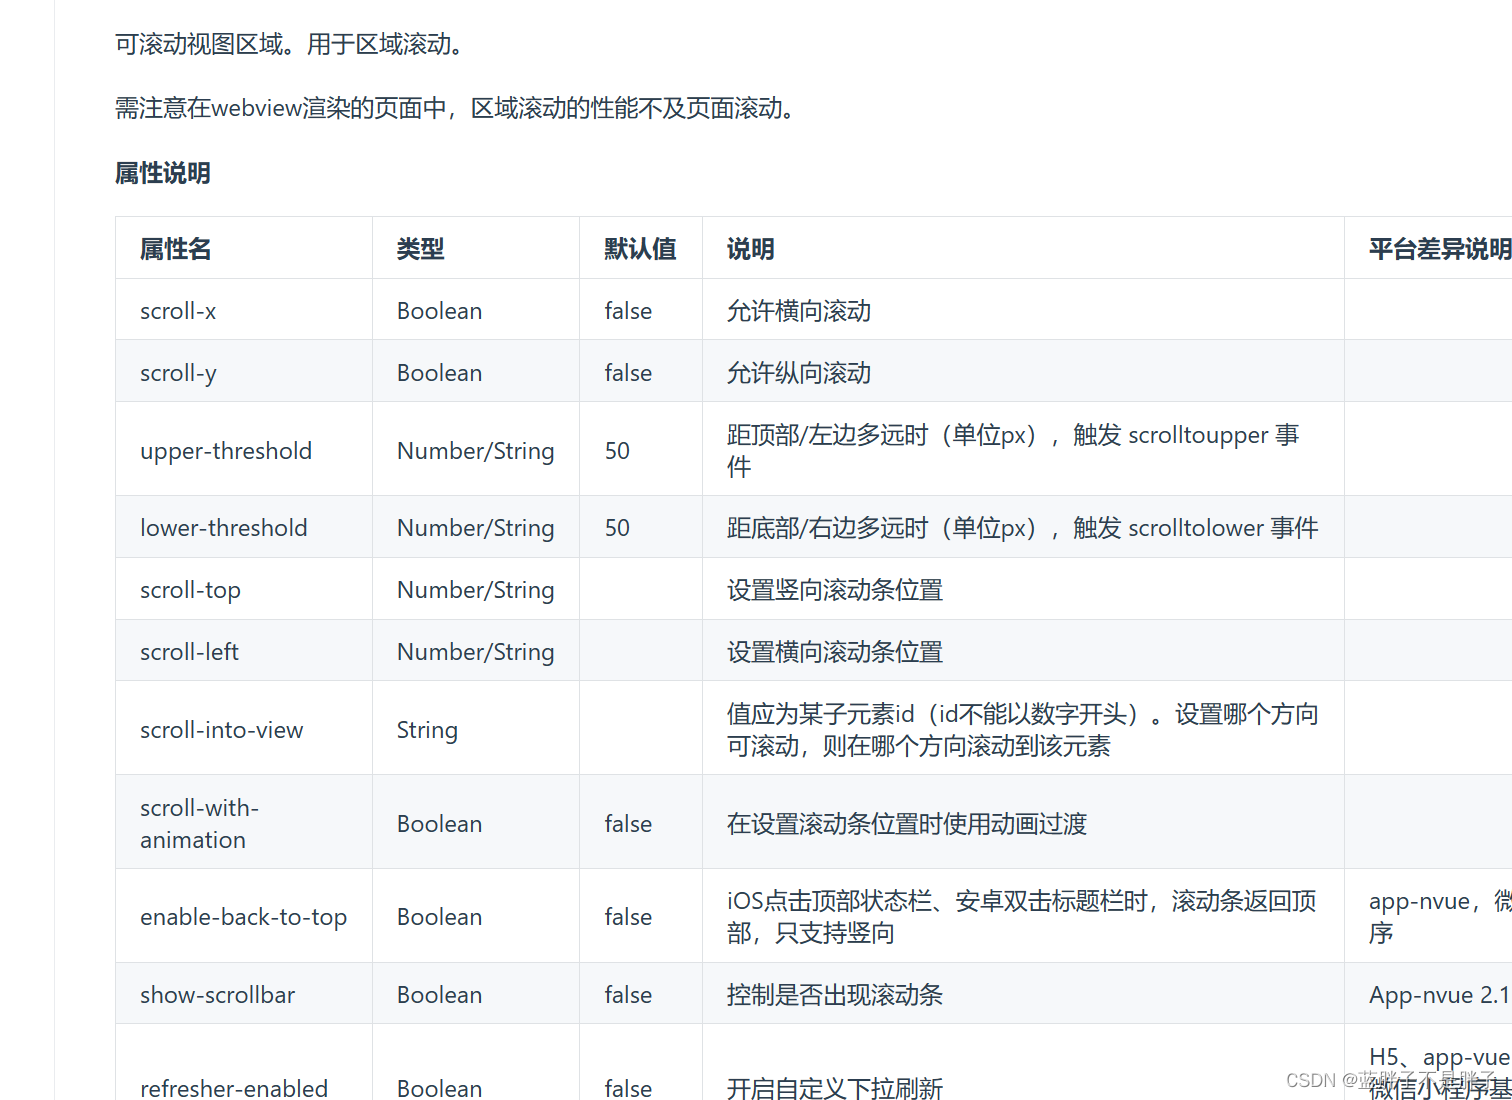
注意哦,这个属性定位视图范围是根据id来的,但是不能以数字开头,所以我的滚动导航栏的子视图id和js方法是做了拼接的
scroll-view对应的子视图
<view v-for="(item,index) in topBar" :key="index" class="scroll-item" :id="'top'+index">
和高亮方法做的拼接
viewindex="top"+index;
这样就实现了内容区域滑动,滚动导航栏滑动,但是还有个问题,当我
内容区域下滑到底刷新数据时(data=[…data,…apirespose.dataArrary]),
高度固定的到导致内容限制不完 善,所以要设置动态高度
所以内容区域的高度是动态变量
<swiper @change="onChangeTab" :current="topindex" :style="'height:'+viewHeight+'px;'">
		<!-- 要跟着tab循环 所以数据也跟着循环 -->
		<swiper-item  v-for="(item,index) in topBar" :key="index" >
			<!-- 做滑底部刷新 @scrolltolower -->

			<scroll-view :scroll-y="true"  :style="'height:'+viewHeight+'px;'" class="swiper-item" >
这里的viewHeight就是设置的变量,初始化为0,没有数据,等页面加载的时候根据手机设备高度来动态计算
var viewHeight=ref(0)
uniapp api获取设备信息

成功的回调函数中包含可使用高度
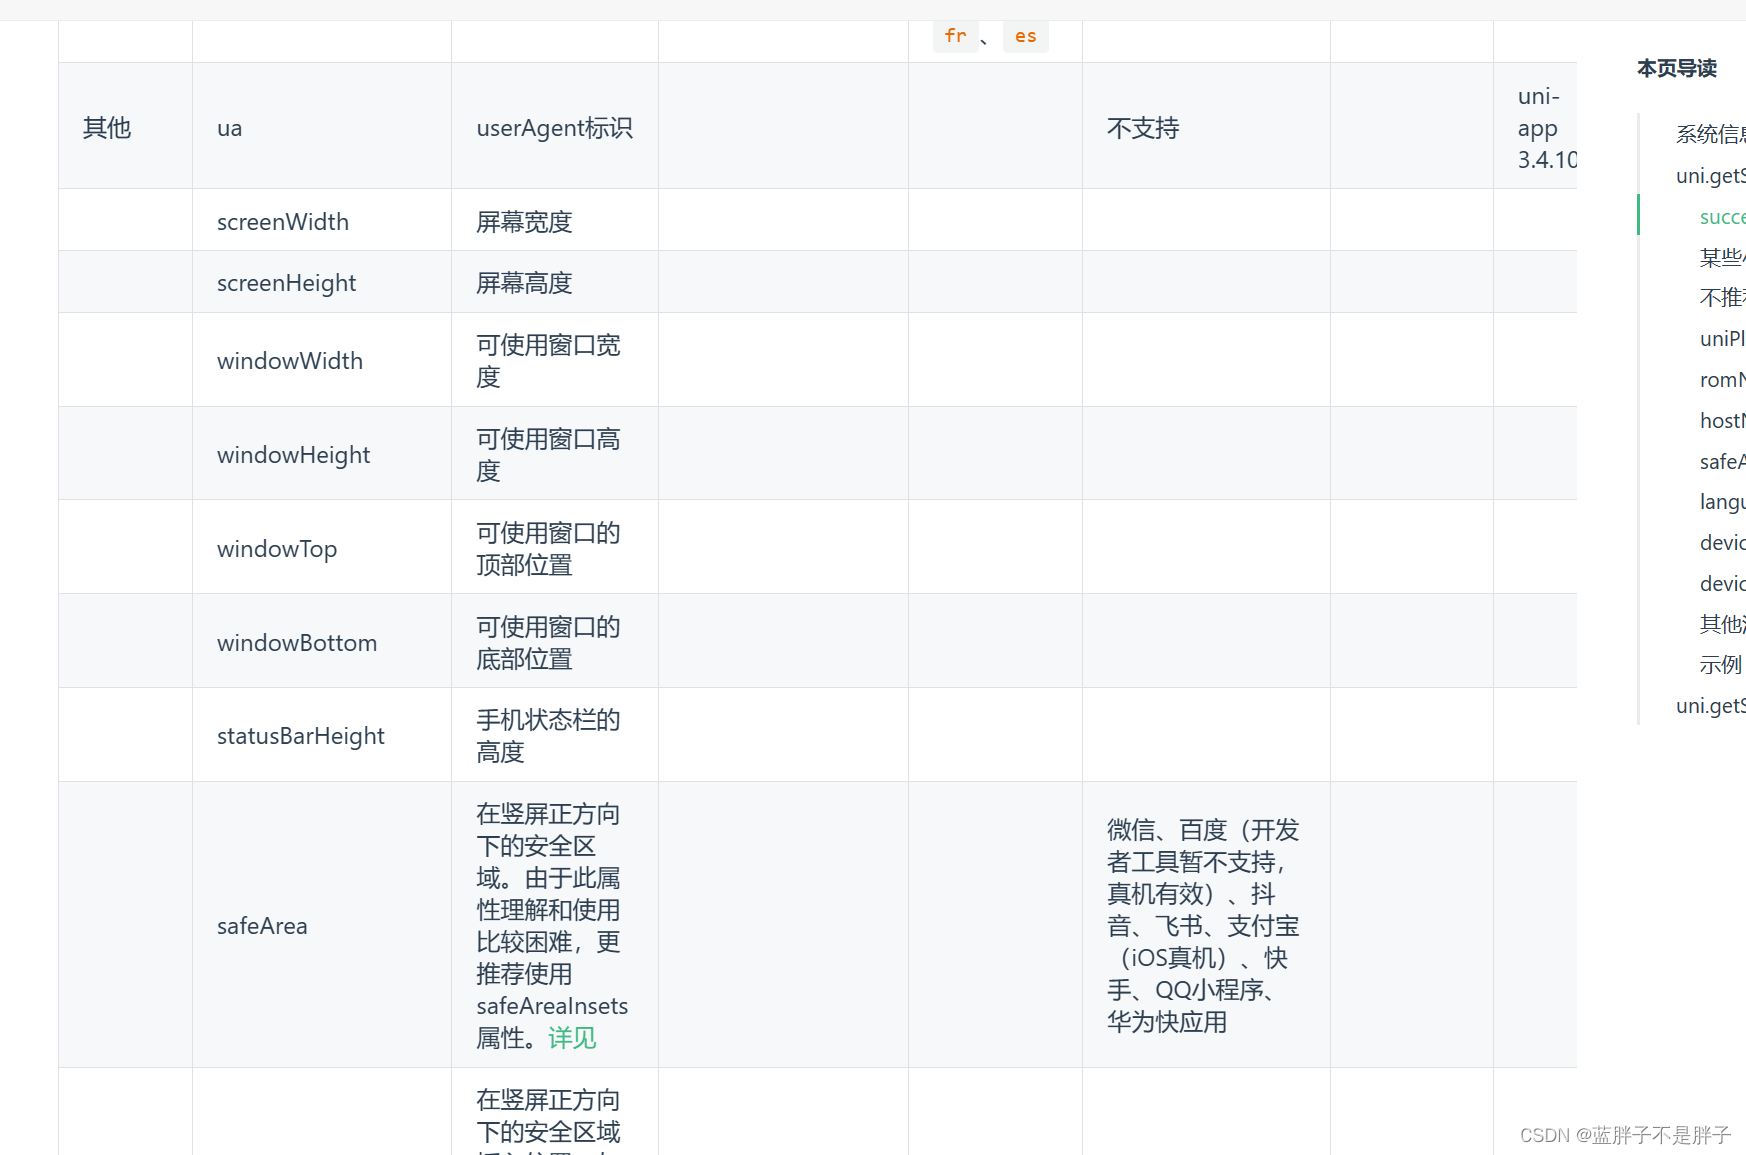
注意获取使用设备的可视化高度的时候要使用同步api 避免页面初始化,异步操作还没执行,应该先计算高度在初始化数据
计算可使用高度
 //获取刘海以及状态栏区域
	const getDeviceHeight = () => {
				const res = uni.getSystemInfoSync();
				const system = res.platform;
				if( system ==='ios' ){
					return 44+res.statusBarHeight;
				}else if( system==='android' ){
					return 48+res.statusBarHeight;
				}else{
					return 0;
				}

			};
页面初始化时候开始计算高度:内容区域高度=可使用高度-滚动导航栏高度(rpx转px)-刘海/挖孔和状态栏高度
  onLoad(()=>{
		   console.log("=============程序开始加载,初始化=================");
		     init();


	   });
	   //减去80
onReady(()=>{
	uni.getSystemInfo({
		success: (res) => {
			viewHeight.value = res.windowHeight - uni.upx2px(80)-getDeviceHeight();
		}
	})
})
这样就实现了所有内容,以下是完整代码,内容区域使用的是整合的组件,采用v-if判断是否应该在高亮时候显示
<template>
	<view class="home">
	<!-- #ifdef MP-WEIXIN -->
	<!-- 自定意的导航 -->
	<view class="wx-nav">
		<view class="iconfont icon-fangdajing left"></view>
		<text uni-title>小 猴 体 育</text>
		<view class="iconfont icon-shouye right"></view>
	</view>
	<!-- 顶部滑动选项卡 -->

	<!-- viewindex是下方的视图id  滑动内容可以实现导航样式跟着改变到但是无法实现滑动导航区域滑动 -->
	<scroll-view scroll-x="true" class="scroll-content" :scroll-into-view="viewindex" >
		<view v-for="(item,index) in topBar" :key="index"  class="scroll-item" :id="'top'+index">
			<text  :class="index==topindex?'f-color-active':'f-color'" @click="addclick(index)" >{{item.name}}</text>
		</view>
	</scroll-view>
	<!-- 导航过后是切换的栏 swper 考虑多方面使用封装为组件 -->

		<view class="wx-content">
			<!-- swiper顶部的容器,让他可以随着选项卡切换而且切换  改变时候触发切换事件 current属性和数据的index刚好对应-->
			<swiper @change="onChangeTab" :current="topindex" :style="'height:'+viewHeight+'px;'">
				<!-- 要跟着tab循环 所以数据也跟着循环 -->
				<swiper-item  v-for="(item,index) in topBar" :key="index" >
					<!-- 做滑底部刷新 @scrolltolower -->

					<scroll-view :scroll-y="true"  :style="'height:'+viewHeight+'px;'" class="swiper-item" >
			<block>
			<!--推荐模块 轮框画图 urls 传递图片数组改变 -->
			 	<indexSwipper greeting="Hola" message="customMessage" v-if="item.name=='推荐'" ></indexSwipper>
				<ShopCard title="猜你喜欢" v-if="item.name=='推荐'" ></ShopCard>
				 <Recommend v-if="item.name=='推荐'" ></Recommend>
				  <CardList v-if="item.name=='推荐'" ></CardList>
				  <CardList v-if="item.name=='推荐'" ></CardList>
				  <CardList v-if="item.name=='推荐'" ></CardList>
				  <CardList v-if="item.name=='推荐'" ></CardList>
				<!--推荐模块 轮框画图 urls 传递图片数组改变 -->
						<ShopCard  v-if="item.name=='运动户外'" title="体育户外"></ShopCard>
									<index-banner url="../../static/img/banner1.jpg" v-if="item.name=='运动户外'"></index-banner >
									<index-icons v-if="item.name=='运动户外'"></index-icons>
									<!-- 就是一个3X4的图片集合 -->
									<!-- 传递imagelist的图片数组动态改变   这里写死-->
									<index-imagelist v-if="item.name=='运动户外'"></index-imagelist>
									<ShopCard title="热销爆品" v-if="item.name=='运动户外'"></ShopCard>
									<index-hot v-if="item.name=='运动户外'"></index-hot>
									<ShopCard title="推荐店铺" v-if="item.name=='运动户外'"></ShopCard>


									<!--推荐模块 轮框画图 urls 传递图片数组改变 -->

									<!-- <index-banner url="../../static/img/banner1.jpg"></index-banner> -->
									<index-icons v-if="item.name=='服饰内衣'"></index-icons >
								<ShopCard title="推荐店铺" v-if="item.name=='服饰内衣'"></ShopCard>
									<index-Shopper  v-if="item.name=='服饰内衣'"></index-Shopper>

			</block>
			</scroll-view>
				</swiper-item>
			</swiper>


		</view>
	</view>
</template>

<script setup>

import ShopCard from '@/components/ShopCard/ShopCard.vue';
import Recommend from '@/components/Recommend/Recommend.vue';
import CardList from "@/components/CardList/CardList.vue";
	  import {
	    onLoad,
		onReady,
	    onShow
	  } from "@dcloudio/uni-app";

	import { reactive, ref,onMounted } from 'vue'
	 var onChangeTab=(e)=>{
		 // 从wipper 滑动视图的detail拿到索引
		 console.log("用户开始滑动页面",e.detail);
		 // 把滑块索引传递实现滑动改变top 索引  用户滑动那个区域对应顶部导航也跟着滑动
 		 addclick(e.detail.current);
	 };
	 //注意这里要弄成响应式 不然只会渲染一次 :scroll-into-view这个属性控制视图在几个
	 var topindex=ref(0);
	 // 滑动导航的索引,
	 var viewindex=ref("top0")
	 // swipper容器的默认高度
	 	var viewHeight = ref(0);
	  //获取刘海以及状态栏区域的剩余空间
	 var addclick=(index)=>{
		 console.log("用户点击了第几个tabbar",index);
		 // 索引改变用来判断当前样式是为否点击样式
		 topindex.value=index;
		 console.log(topindex),
		 // 视图跟顺点击改变
		 viewindex="top"+index;
	 };
	 var topBar=ref([]);
	 var urls=ref([]);
	 //获取刘海以及状态栏区域的空余显示区域
	const getDeviceHeight = () => {
				const res = uni.getSystemInfoSync();
				const system = res.platform;
				if( system ==='ios' ){
					return 44+res.statusBarHeight;
				}else if( system==='android' ){
					return 48+res.statusBarHeight;
				}else{
					return 0;
				}

			};

var init=()=>{
	uni.request({
		url:"http://192.168.10.98:3000/api/index_list/data",
		success: (res) => {
			console.log("发送请求成功,这是返回值",res);
					var resdata=res.data.data;//响应体里面的数据 res.data是相应体一个code 还有个是data
					console.log("得到的滑动标题栏的值",resdata.topBar)
					topBar.value=resdata.topBar

					 console.log("得到各个模块的数据",resdata.data)
		},fail: (e) => {
			console.log(e)
		}
	})
};

       onLoad(()=>{
		   console.log("=============程序开始加载,初始化=================");
		     init();


	   });
onReady(()=>{
	uni.getSystemInfo({
		success: (res) => {
			viewHeight.value = res.windowHeight - uni.upx2px(80)-getDeviceHeight();
		}
	})
})


</script>

<style scoped lang="scss">
.home{
	.wx-nav{
		.iconfont{
			// iconfont字体进行更改大小
			font-size: 26px;
		}
		border-bottom: solid 1rpx #707070;
		background-color:#FFFFFF ;

		.left{

			margin-left: 30rpx;
		}
		.right{
			margin-right: 30rpx;
		}

		padding-bottom: 10rpx;
		margin-top: 80rpx;
		// 没写具体的高 差不多和底部导航栏一样·高合适
		height: 50rpx;
		        width: 100%;
		display: flex;
		justify-content: space-between;
		text-align: center;

	}
	// 滑块
	.scroll-content{
		width: 100%;
		height: 90rpx;
		// 空白空间不换行
		white-space: nowrap;
		.scroll-item{
			padding: 10rpx 30rpx;
			display: inline-block;
			font-size: 32rpx;
			.f-color-active{
				padding: 15rpx 0;
				border-bottom: 6rpx solid #2979ff;
			}

		}


	}
}


</style>


 8995
8995


 被折叠的 条评论
为什么被折叠?
被折叠的 条评论
为什么被折叠?
 到【灌水乐园】发言


