


VUEX官方文档,可以学习详细,这篇笔记是写vue2升级vue3后使用vuex,或者忘记如何使用vuex做状态管理的情况
vueX状态管理
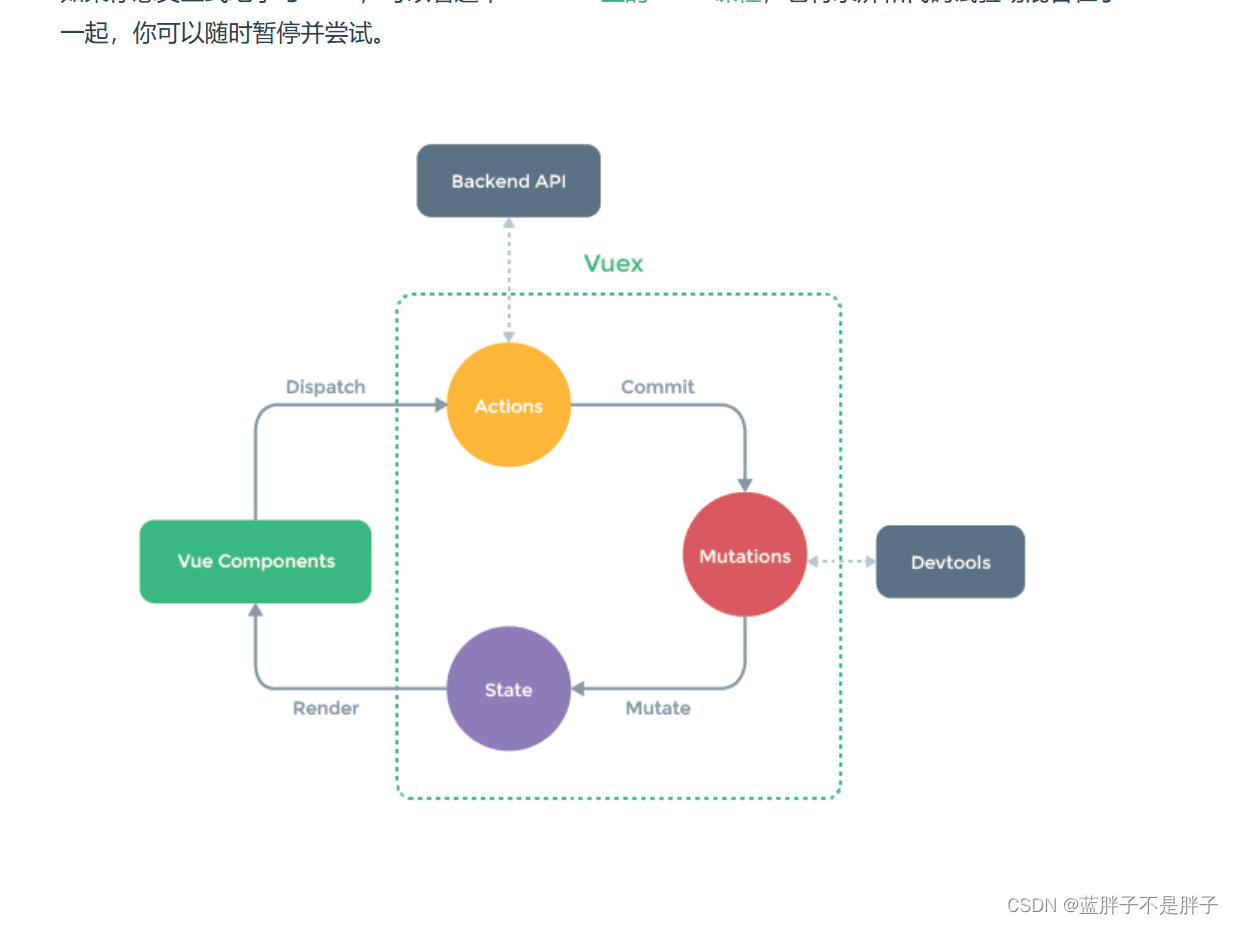
Vue 3 与 Vue 2 有很多不同之处,但 Vuex 的核心概念——State、Getters、Mutations、Actions 和 Modules——保持基本一致。Vuex 4 是为 Vue 3 设计的,所以确保你已经安装了合适的版本。
下面我将逐步引导如何在 Vue 3 项目中使用 Vuex:
- 安装依赖
确保你已经创建了一个 Vue 3 项目。接着,你需要安装 Vuex。可以通过 npm 或 yarn 来安装:
npm install vuex@next
或者
yarn add vuex@next
- 创建 Vuex Store
在你的 Vue 项目的 src 目录下,创建一个新的文件夹,例如命名为 store。在 store 文件夹下,创建一个文件,例如 index.js。在这个文件中,我们将设置和导出 Vuex 的 Store。
src/store/index.js 的内容如下:
import { createStore } from 'vuex';

export const store = createStore({
  state: {
    count: 0
  },
  mutations: {
  //类似 mvc框架的service层参数是state状态管理
    increment(state) {
      state.count++;
    }
  },
  //类似controller
  actions: {
 // 参数是上下文对象
    increment(context) {
    //类似提交service层
      context.commit('increment');
    }
  },
  //类似计算属性
  getters: {
    doubleCount(state) {
      return state.count * 2;
    }
  }
});
在这个例子中,我们定义了一个简单的计数器应用,它包含一个 count 状态,一个用于增加 count 的 increment mutation,一个调用该 mutation 的 increment action,以及一个返回 count 的两倍的 doubleCount getter。
3. 在 Vue 应用中使用 Vuex Store
在你的 main.js(或 main.ts)文件中,你需要导入刚刚创建的 Store,并将其添加到 Vue 应用实例中。
src/main.js 的内容更新如下:
import { createApp } from 'vue';
import App from './App.vue';
import { store } from './store';
//也可以import store from './store/index.js'; //导入自己定义的vuex模块进行挂载

const app = createApp(App);

app.use(store);

app.mount('#app');
在 Vue 项目中,store 文件夹通常用于存放 Vuex 相关的代码,包括 state、mutations、actions 等。当你创建一个 Vuex store 时,你可以将相关代码放在这个文件夹下的 index.js 文件中。
这样命名的原因是,当你从一个文件夹中导入模块时,如果没有指定具体的文件名,JavaScript 就会尝试导入该文件夹下名为 index.js 的文件。因此,将文件命名为 index.js 是一种常见的做法,让代码更简洁。
但是,在你的项目的主文件(例如 main.js)中,你可以选择任何名称来导入你的 store。这个名称只是一个你选择的变量名,用于在项目中引用你的 store。
例如,你可以这样导入 store:
import { store } from ‘./store’;
这里的 store 变量名是你选择的名称,你可以根据项目的需要选择任何合适的名称。在导入语句的右侧,‘./store’ 是相对路径,指向 store 文件夹。由于我们没有指定具体的文件名,因此 JavaScript 会尝试导入 store 文件夹下的 index.js 文件。
如果你将 index.js 文件重命名为另一个名称(例如 store.js),你就需要在导入语句中指定新的文件名:
import { store } from ‘./store/store.js’;
总的来说,index.js 是文件名,用于组织 Vuex 相关的代码;而 store 是变量名,用于在项目中引用 Vuex store。两者的命名可以是不同的。
- 在组件中使用 Vuex Store
现在 Vuex Store 已经被注册到了 Vue 应用实例中,你可以在任何组件中通过 this.$store(在 Vue 2 中)或 Composition API(推荐在 Vue 3 中使用)来访问它。
例如,在一个组件中使用 Vuex 的状态、getters、mutations 和 actions:
<template>
  <div>
    <p>Count: {{ count }}</p>
    <p>Double Count: {{ doubleCount }}</p>
    <button @click="increment">Increment</button>
  </div>
</template>

<script>
import { computed } from 'vue';
//导入实列函数
import { useStore } from 'vuex';

export default {
  setup() {
    const store = useStore();//创建实列对象
//使用计算属性接受是为了防止数据接受响应式,或者还需要ref,reactive包装数据
    const count = computed(() => store.state.count);
    const doubleCount = computed(() => store.getters.doubleCount);
   //VUE2:this.$store.getters.
    const increment = () => {
    //提交给action
      store.dispatch('increment');
    };

    return {
      count,
      doubleCount,
      increment
    };
  }
};
</script>
在这个例子中,我们使用 useStore 来访问 Vuex Store。我们还使用 computed 来创建响应式地引用 Store 的 state 和 getters。最后,我们在 increment 方法中分发一个 action。
使用modules 模块化状态管理
Modules 是 Vuex 中一种重要的组织机制,特别是对于大型应用程序。通过 Modules,你可以将 Store 分解成多个模块,每个模块都拥有自己的 state、mutations、actions、getters,甚至是嵌套模块。这样可以让代码组织得更有序,更易于维护。
下面我将详细说明如何在 Vue 3 项目中使用 Vuex 的 Modules:
- 创建 Vuex Modules
首先,你需要在你的 store 目录下创建各个模块。假设你想创建一个用于用户管理的模块,你可以创建一个名为 user.js 的文件:
src/store/user.js 的内容可能如下:
export const user = {
  namespaced: true, // 开启命名空间
  state: {
    name: 'John Doe'
  },
  mutations: {
    setName(state, name) {
      state.name = name;
    }
  },
  actions: {
  //第一个参数是上下文对象context,包含了vuex的几个状态,state,commit,这里解构,只要commit,用于执行个体mutation
    updateName({ commit }, name) {
      commit('setName', name);
    }
  },
  //类似生命周期
  getters: {
    fullName(state) {
      return `${state.name} Smith`;
    }
  }
};
在这个模块中,我们定义了一个名为 user 的对象,其中包含了该模块的 state、mutations、actions 和 getters。namespaced: true 表示我们想要该模块具有自己的命名空间,这使得它不会与其他模块冲突。
2. 导入和使用 Vuex Modules
接下来,在你的 store 的 index.js 文件中,你需要导入并使用刚刚创建的模块:
import { createStore } from 'vuex';
import { user } from './user';

export const store = createStore({
  modules: {
    user
  }
  // 你还可以定义其他的 state、mutations 等
});
这里,我们在 createStore 函数的参数对象中添加了一个 modules 属性,其中包括了我们想要使用的模块。
3. 在组件中使用 Vuex Modules
在组件中使用命名空间的模块与使用全局的 Vuex Store 略有不同。你可以使用 mapState、mapGetters、mapMutations 和 mapActions 辅助函数,或者直接通过命名空间访问模块:
<template>
  <div>
    <p>{{ fullName }}</p>
    <button @click="updateName('Jane Doe')">Change Name</button>
  </div>
</template>

<script>
import { computed } from 'vue';
import { useStore } from 'vuex';

export default {
  setup() {
    const store = useStore();
    //模块下获取state
    const name =store.statte.user.name
//对应路径下    模块名/getter名
    const fullName = computed(() => store.getters['user/fullName']);//数组形式

    const updateName = (name) => {
    //同上 vue2中这个是this.$store.getter.user.name 就很麻烦
      store.dispatch('user/updateName', name);
    };

    return {
      fullName,
      updateName
    };
  }
};
</script>
模块化使用dispatch 模块/actions 名字
store.dispatch('user/updateName', name);
接收state(需要状态库的状态实时显示)
const bgcolor = computed(() => store.state.topic.theme);
使用getter
const fullName = computed(() => store.getters['user/fullName']);//数组形式
注意,在访问模块的 getters 和 actions 时,我们使用了 ‘user/fullName’ 和 ‘user/updateName’ 这样的字符串。这些字符串包括了模块的命名空间和 getter 或 action 的名称。
通过使用 Modules,你可以使 Vuex Store 更加模块化和可维护。你可以创建许多小的、聚焦于特定功能或领域的模块,而不是将所有的逻辑都放在一个大的 Store 中。在大型项目中,这种结构可以非常有用。
vue3中全局挂载
当我们将对象或方法挂载到Vue实例的原型上或Vue 3中的全局可用性机制,确实能够减少重复导入并提供方便的全局访问。
通过挂载,只需要在适当的位置进行一次导入或实例化,并将其挂载到Vue实例中,然后你可以在整个应用程序的组件中使用this.$参数名来访问挂载的对象或方法,而无需重复导入或创建实例。
这种做法的好处包括:
代码复用和维护性:通过挂载对象或方法到全局,使其在整个应用程序中可以被重复使用,避免了在每个组件中重复导入和实例化的冗余代码。
可读性和简洁性:使用this.$参数名来访问全局对象或方法,代码更加简洁,易读性更强。
全局共享状态:通过挂载,在不同的组件中可以共享相同的对象或方法,方便进行状态管理或共享数据。
比如 vue2中:
import axios  from 'axios';
import store from './store/index.js'; //导入自己定义的vuex模块进行挂载
 Vue.prototype.$axios = axios。
 vue.protype.$store=store
这样就可以在全局使用this.$store.state.参数进行使用,但是vue3中不再使用这种方式挂载了,而是使用全局配置实现挂载
app.config.globalProperties.$store = store
此时的代码就可以使用全局状态管理了
import App from './App'
import store from './store/index.js'; //导入自己定义的vuex模块进行挂载
// #ifndef VUE3
import Vue from 'vue'
import './uni.promisify.adaptor'
Vue.config.productionTip = false
App.mpType = 'app'
const app = new Vue({
  ...App,

})
app.use(store);
app.$mount()


// #ifdef VUE3

import { createSSRApp } from 'vue'
export function createApp() {
  const app = createSSRApp(App)
  app.config.globalProperties.$store = store   //全局挂载 	{{ $store.state.count }}都可以使用
  return {
    app
  }
}
axios同理
新建一个http.js
import axios from 'axios';

const http = axios.create({
  baseURL: 'http://your-api-base-url.com',
  timeout: 10000,
});

// 请求拦截器
http.interceptors.request.use(
  (config) => {
    const token = localStorage.getItem('token');
    if (token) {
      config.headers.Authorization = `Bearer ${token}`;
    }
    return config;
  },
  (error) => {
    return Promise.reject(error);
  }
);

// 响应拦截器
http.interceptors.response.use(
  (response) => {
    return response;
  },
  (error) => {
    if (error.response && error.response.status === 401) {
      console.error('未授权,请登录!');
      // 这里可以做一些未授权的处理,例如跳转到登录页面等
    }
    return Promise.reject(error);
  }
);

export default http;
全局挂载
import { createApp } from 'vue';
import App from './App.vue';
import http from './http';

const app = createApp(App);

app.config.globalProperties.$http = http;

app.mount('#app');
然后任何地方都可以使用
this.$http.get('/some-endpoint').then(response => {
  console.log(response.data);
});


 3万+
3万+


 被折叠的 条评论
为什么被折叠?
被折叠的 条评论
为什么被折叠?
 到【灌水乐园】发言


