


SpringBoot高级
SpringBoot配置
配置文件优先级
按照yaml>yml>properties的顺序加载
存在相同配置项,后加载的会覆盖先加载的
加载顺序越靠后,优先级越高
SpringBoot存在其他的多种方式进行配置,如下所示,越靠下优先级越高
1. Default properties (specified by setting SpringApplication.setDefaultProperties).
2. @PropertySource annotations on your @Configuration classes. Please note that such property sources are not added to the Environment until the application context is being refreshed. This is too late to configure certain properties such as logging.* and spring.main.* which are read before refresh begins.
3. Config data (such as application.properties files). (上述配置文件的方式)
4. A RandomValuePropertySource that has properties only in random.*.
5. OS environment variables. (系统环境变量方式)
6. Java System properties (System.getProperties()). (java系统参数方式)
7. JNDI attributes from java:comp/env.
8. ServletContext init parameters.
9. ServletConfig init parameters.
10. Properties from SPRING_APPLICATION_JSON (inline JSON embedded in an environment variable or system property).
11. Command line arguments. (命令行参数方式)
12. properties attribute on your tests. Available on @SpringBootTest and the test annotations for testing a particular slice of your application.
13. @DynamicPropertySource annotations in your tests.
14. @TestPropertySource annotations on your tests.
15. Devtools global settings properties in the $HOME/.config/spring-boot directory when devtools is active.
系统环境变量方式配置
系统环境变量:将一些配置在系统中设置成全局的环境变量
在run configurations中进行配置
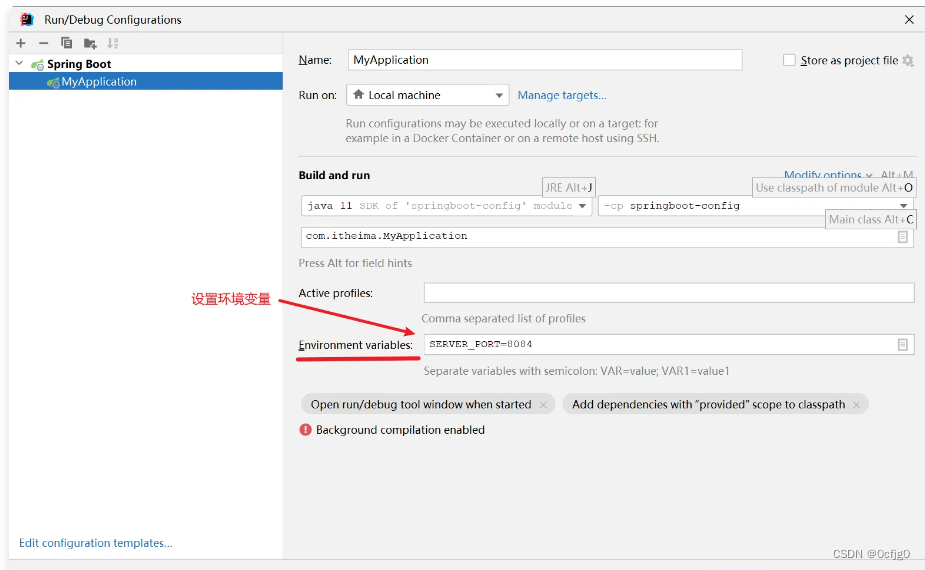
配置规则
配置项目的
.
使用
_
替换
删除所有的
-
字母全部转为大写
java系统参数方式
(System.getProperties())
在run configurations中进行配置
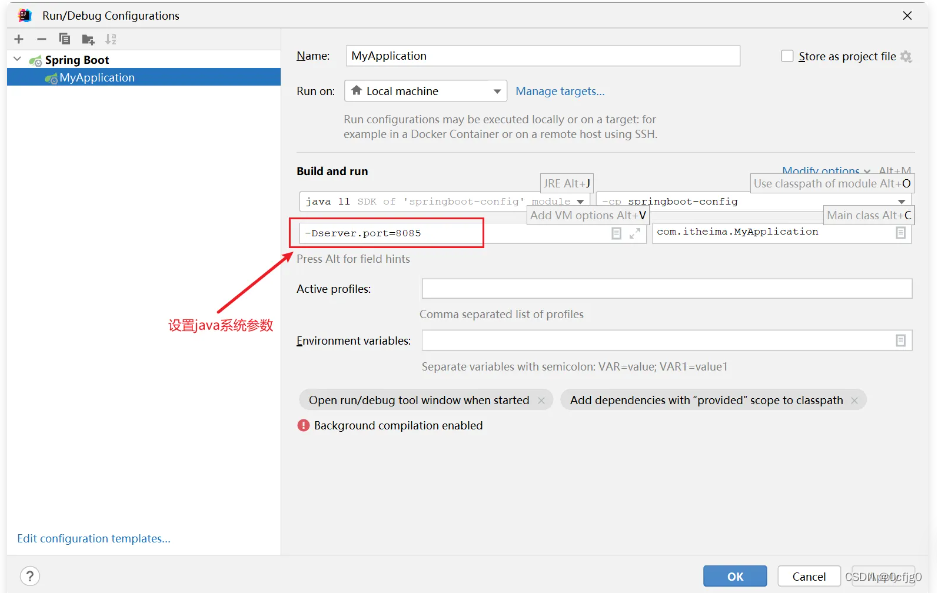
指在运行时,通过
-Dkey=value
进行参数指定
eg:java -Dserver.port=8085 -jar xxxx.jar(命令行)
或
-DServer.port=8085(idea中)
命令行参数方式
在run configurations中进行配置
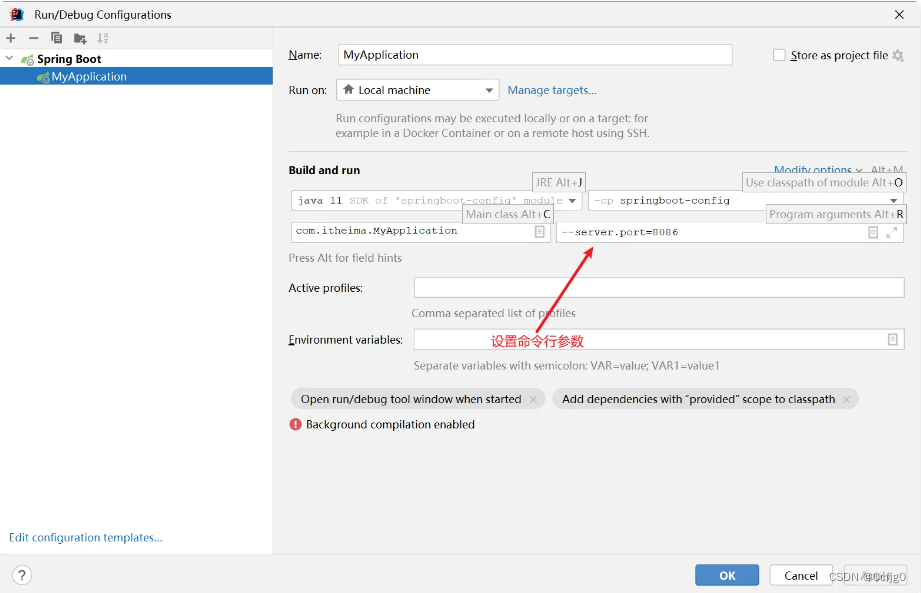
在运行命令后面通过
--key=value
eg:java -jar xxxx.jar --server.port=8086
Spring Bean管理
手动获取容器中的bean对象
在Spring容器中提供了可以主动从IOC容器中获取bean对象的方法,通过
@Resourse
private ApplicationContext applicationContext
对象进行获取
指定类型获取bean
Bean bean = this.applicationContext.getBean(Bean.class);
通过bean的名称获取bean,返回Object类型对象
对象名默认为首字母小写
Object bean = this.applicationContext.getBean("bean");
通过bean的名称获取bean,指定返回对象的类型
Bean bean = this.applicationContext.getBean("bean",Bean.class);
Bean的作用域
在Spring中支持五种作用域,但后三种只在web环境生效
singleton
//容器内同名称的bean只有一个实例(单例)(默认)
//在容器启动时被创建,可以使用@Lazy注解来延迟初始化(延迟到第一次使用时)
prototype
//每次使用该bean时会创建新的实例(非单例)
request
//每个请求范围内会创建新的实例(web环境中)
session
//每个会话范围内会创建新的实例(web环境中)
application
//每个应用范围内会创建新的实例(web环境中)
通过Spring中的
@Scope(ConfigurableBeanFactory.SCOPE_作用域)
注解进行配置,属性为enum类型
需要在标注了
@Configuration
注解的spring配置类上进行配置
第三方Bean
不是我们自己编写的,由第三方依赖提供的类,对于这种类我们无法做到直接通过@Component进行注册
就需要用到
@Bean
注解
通过在配置类中构造一个方法返回一个需要的对象提交到Spring容器中,就可以在需要时进行注入
@Scope(...)
@Configuration()
class Config{
	@Bean //将方法的返回值提交到IOC容器
    //可以通过bean注解的name或者value属性声明bean的名称(默认为方法名)
    //如果第三方bean需要依赖其他的对象,直接在bean注解的方法中设置形参即可,会进行自动注入
    Obj objf(){
		return new Obj();
	}
}
就可以在需要时进行注入
map集合转JSON
Map<String,Object>data = new HashMap<>();
//JSON转化对象
ObjectMapper objectMapper = new ObjectMapper();
//序列化Map为JSON字符串
String json = objectMapper.writeValueAsString(对象名);
SpringBoot原理
SpringBoot框架是Spring4.0之后对Spring框架的简化,提供了两个非常重要的功能:起步依赖和自动配置
起步依赖原理
起步依赖可以大幅简化pom文件中的依赖配置,解决了Spring框架中依赖配置繁琐的问题
引入起步依赖直接包含了一系列web开发需要的依赖
spring-webmvc依赖
//Spring框架进行web程序开发所需要的依赖
servlet-api依赖
//Servlet基础依赖
jackson-databind依赖
//JSON处理工具包
还有AOP依赖,aspect依赖等等
起步依赖
springboot-starter-web
通过maven传递的方式将常见的其他依赖都自动传递进来
自动配置原理
自动配置可以大幅简化使用时bean的声明和bean的配置
自动配置就是当Spring容器启动后,一些配置类,bean对象就自动存入了IOC容器中,无需手动声明,从而简化开发.
@Configuration底层就是@Component,所以配置类也是Spring容器中的一个bean对象
在IOC容器中有很多配置类,都是在SpringBoot启动时加载进来的,同时也会生成很多的bean对象.
加载jar中的bean到IOC容器
当我们通过坐标引入第三方依赖后,尝试使用前面说过的applicationContext对象获取被@Component标注的对象
会发现出现异常找不到对应对象
原因是因为没有Spring组件扫描到
可以通过以下两个方法解决
增加@ComponentScan组件扫描
在启动类上增加@ComponentScan注解同时在参数中指定需要扫描的包
@ComponentScan({"com.test","com.example"})
使用繁琐而且性能也低
使用@Import导入
在启动类上导入
导入方式有以下几种
使用@Import导入普通类
被导入的类会被Spring加载到IOC容器中
@Import(Bean.class)
使用@Import导入配置类
在需要引入的jar包中编写配置类,在配置类中完成对象的注册
可以在配置类中注册多个对象
在引入类的启动类上对jar包中配置类进行引入
@Import(com.example.Config.TokenConfig.class)
public class MyApplication {}


@Configuration
public class TokenConfig {
    @Bean
    public TokenParser tokenParser(){
        return new TokenParser();
    }
}
使用@Import导入ImportSelector接口实现类
通过接口中的selectImports方法返回一个String类型数组,包含要引入的类
@Import(ImportSelectorImpl.class)

public class MyImportSelector implements ImportSelector {

    //把返回数组中的每一个bean注册到IOC容器中
    public String[] selectImports(AnnotationMetadata importingClassMetadata) {

        return new String[]{"com.example.HeaderConfig","com.example.TokenParser"};
    }
}
指定第三方依赖的bean对象和配置类
使用第三方依赖提供的注解,一般以Enable开头,注解中封装了一个@Import注解
@SpringBootApplication
@EnableHeaderConfig  //使用第三方依赖提供的Enable开头的注解
public class MyApplication {
    public static void main(String[] args) {
        SpringApplication.run(MyApplication.class, args);
    }
}

//第三方写的注解内容
@Retention(RetentionPolicy.RUNTIME)
@Target(ElementType.TYPE)
@Import(MyImportSelector.class)//指定要导入哪些bean对象或配置类
//引入接口实现类对象
public @interface EnableHeaderConfig {
}
源码跟踪
@SpringBootApplication注解中包含了
@SpringBootConfiguration
//使用了@Configuration表明SpringBoot启动类就是一个配置类
//包含@Indexed注解用来加速应用启动
@EnableAutoConfiguration
//自动配置的核心注解
//自动载入基于META-INF/spring/org.springframework.boot.autoconfigure.AutoConfiguration.imports文件、META-INF/spring.factories文件中配置类的集合
//这两个配置文件在autoconfigure包中
@ComponentScan
//用来进行组件扫描,扫描引导类所在的包及其子包下所有带有Spring注解的类
//启动类因为具有此注解所以具备扫描包功能
//属性中可以设置不进行扫描

@Configuration(
        proxyBeanMethods = false
    )
    @ConditionalOnClass({Jackson2ObjectMapperBuilder.class})
    static class JacksonObjectMapperConfiguration {
        JacksonObjectMapperConfiguration() {
        }

        @Bean
        @Primary
        @ConditionalOnMissingBean
        ObjectMapper jacksonObjectMapper(Jackson2ObjectMapperBuilder builder) {
            return builder.createXmlMapper(false).build();
        }
    }
Conditional
以Conditional开头的注解,一般都是条件装配的注解
@Conditional
按照一定的条件进行判断,在满足给定的条件后会注册对应bean对象到Spring的IOC容器中
派生了大量的子注解
@ConditionalOnClass:
判断环境中有对应类的字节码文件,注册bean到IOC容器
@ConditionalOnClass(name="类名")
@ConditionalOnMissBean:
@ConditionalOnMissBean(name="bean名称")
//环境中没有对应的名称的bean,注册bean到IOC容器
@ConditionalOnMissBean(xxx.class)
//环境中没有对应类型的bean
@ConditionalOnMissBean
//环境中没有当前类型的bean
@ConditionalOnProperty:
判断配置文件中有对应的属性,注册bean到IOC容器中
@ConditionalOnProperty(name="键",havingValue="值")
@Bean
    @ConditionalOnClass(name="io.jsonwebtoken.Jwts")//环境中存在指定的这个类,才会将该bean加入IOC容器
    public HeaderParser headerParser(){
        return new HeaderParser();
    }
自动配置总结
自动配置的原理其实就是在程序启动时,加载上述的两个配置文件中定义的配置类,将这些类的全限定名封装到String类型的数组中.
再通过@Import注解将这些配置类全部加载到Spring的IOC容器中,配置类中的bean会根据@Conditional的条件进行选择性的装配.
在配置文件的配置类中定义了@Bean标识的方法,Spring会自动调用配置类中的这些方法并将返回值注册到IOC容器中.
自定义starter
SpringBoot中的起步依赖,当我们需要在实际项目开发中使用通用的第三方依赖,就需要用到自定义起步依赖.
SpringBoot官方starter命名:
spring-boot-starter-xxxx
第三方组织提供的starter命名:
xxxx-spring-boot-starter
在自定义一个起步依赖starter的时候,需要按规范定义两个模块
autoconfigure模块(自动配置)
引入时只需要引入一个起步依赖即可,autoconfigure自动配置的依赖会被传递下来
在autoconfigure模块中创建自动配置类
在配置类中,创建一个@Bean方法在spring加载时被自动读取
package com.aliyun.oss;

import org.springframework.boot.autoconfigure.condition.ConditionalOnMissingBean;
import org.springframework.boot.context.properties.EnableConfigurationProperties;
import org.springframework.context.annotation.Bean;
import org.springframework.context.annotation.Configuration;

@Configuration//当前类为Spring配置类
@EnableConfigurationProperties(AliOSSProperties.class)//导入AliOSSProperties类,并交给SpringIOC管理
public class AliOSSAutoConfiguration {

    //创建AliOSSUtils对象,并交给SpringIOC容器
    @Bean
    @ConditionalOnMissingBean
    public AliOSSUtils aliOSSUtils(AliOSSProperties aliOSSProperties){
        AliOSSUtils aliOSSUtils = new AliOSSUtils();
        aliOSSUtils.setAliOSSProperties(aliOSSProperties);
        return aliOSSUtils;
    }

}
将配置类的全限定名写入配置文件.imports
com.aliyun.oss.AliOSSAutoConfiguration
starter模块(进行依赖管理[把程序开发所需的依赖定义在starter起步模块中])
在starter模块中,我们只需要在pom文件中引入autoconfigure,就可以通过依赖传递只引入starter模块实现对整个jar包的依赖引入


 468
468


 被折叠的 条评论
为什么被折叠?
被折叠的 条评论
为什么被折叠?
 到【灌水乐园】发言


