


https://blog.csdn.net/Mr_XiMu/article/details/125026635
https://blog.csdn.net/m0_73192864/article/details/136509244
etcd在生产环境中一般为集群方式部署
etcd使用的2个默认端口号:2379和2380
2379:用于客户端通信(类似于sqlserver的1433,mysql的3306)
2380:用于与集群中的Peer通信
因为etcd是go语言编写的,安装只需要下载对应的二进制文件,并放到合适的路径就行
https://github.com/etcd-io/etcd/tags
安装方式一,用官方提供的脚本(没成功)
https://github.com/etcd-io/etcd/releases/tag/v3.4.33
https://blog.csdn.net/Mr_XiMu/article/details/125026635
mkdir /opt/soft
mkdir /opt/soft/etcd/ && cd  /opt/soft/etcd/
vim etcd
ETCD_VER=v3.5.13

# choose either URL
GOOGLE_URL=https://storage.googleapis.com/etcd
GITHUB_URL=https://github.com/etcd-io/etcd/releases/download
DOWNLOAD_URL=${GOOGLE_URL}

rm -f /opt/soft/etcd/etcd-${ETCD_VER}-linux-amd64.tar.gz
rm -rf /opt/soft/etcd/etcd-download-test && mkdir -p /opt/soft/etcd/etcd-download-test

curl -L ${DOWNLOAD_URL}/${ETCD_VER}/etcd-${ETCD_VER}-linux-amd64.tar.gz -o /opt/soft/etcd/etcd-${ETCD_VER}-linux-amd64.tar.gz
tar -zxvf /opt/soft/etcd/etcd-${ETCD_VER}-linux-amd64.tar.gz -C /opt/soft/etcd/etcd-download-test --strip-components=1
rm -f /opt/soft/etcd/etcd-${ETCD_VER}-linux-amd64.tar.gz

#查看安装是否成功的相关命令
/opt/soft/etcd/etcd-download-test/etcd --version
/opt/soft/etcd/etcd-download-test/etcdctl version
/opt/soft/etcd/etcd-download-test/etcdutl version
chmod 777 etcd
# start a local etcd server
./etcd

# write,read to etcd
/tmp/etcd-download-test/etcdctl --endpoints=localhost:2379 put foo bar
/tmp/etcd-download-test/etcdctl --endpoints=localhost:2379 get foo
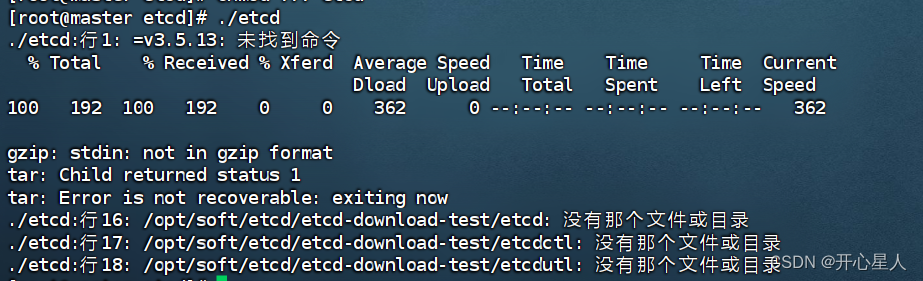
应该是download压缩包的问题,不纠结的去找了。
方式二,逐个执行官方提供脚本(成功)
mkdir /usr/local/mytools && cd /usr/local/mytools

wget https://github.com/etcd-io/etcd/releases/download/v3.4.3/etcd-v3.4.3-linux-amd64.tar.gz

tar xzvf etcd-v3.4.3-linux-amd64.tar.gz

cd etcd-v3.4.3-linux-amd64 && ls

cp etcd etcdctl /usr/local/bin
# etcd是server端,etcdctl是客户端
# 将这etcd和etcdctl两个二进制文件复制到/usr/local/bin目录, 这样系统中可以直接调用etcd/etcdctl这两个程序

etcd --version
etcdctl version

方式三,docker安装(未测试)
rm -rf /tmp/etcd-data.tmp && mkdir -p /tmp/etcd-data.tmp && \
  docker rmi gcr.io/etcd-development/etcd:v3.4.33 || true && \
  docker run \
  -p 2379:2379 \
  -p 2380:2380 \
  --mount type=bind,source=/tmp/etcd-data.tmp,destination=/etcd-data \
  --name etcd-gcr-v3.4.33 \
  gcr.io/etcd-development/etcd:v3.4.33 \
  /usr/local/bin/etcd \
  --name s1 \
  --data-dir /etcd-data \
  --listen-client-urls http://0.0.0.0:2379 \
  --advertise-client-urls http://0.0.0.0:2379 \
  --listen-peer-urls http://0.0.0.0:2380 \
  --initial-advertise-peer-urls http://0.0.0.0:2380 \
  --initial-cluster s1=http://0.0.0.0:2380 \
  --initial-cluster-token tkn \
  --initial-cluster-state new \
  --log-level info \
  --logger zap \
  --log-outputs stderr

docker exec etcd-gcr-v3.4.33  /usr/local/bin/etcd --version
docker exec etcd-gcr-v3.4.33  /usr/local/bin/etcdctl version
docker exec etcd-gcr-v3.4.33  /usr/local/bin/etcdctl endpoint health
docker exec etcd-gcr-v3.4.33  /usr/local/bin/etcdctl put foo bar
docker exec etcd-gcr-v3.4.33  /usr/local/bin/etcdctl get foo
简单操作
启动etcd服务端 etcd
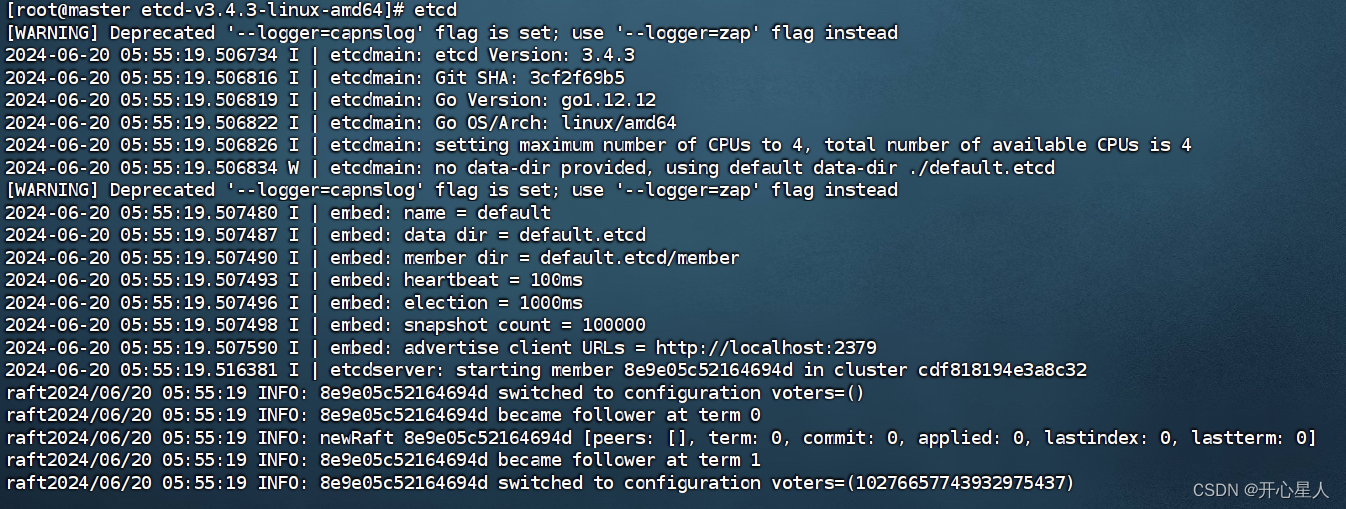
 1.name表示节点名称,默认为default。
 2.data-dir 保存日志和快照的目录,默认为当前工作目录default.etcd/目录下。
 3.在http://localhost:2380和集群中其他节点通信。
 4.在http://localhost:2379提供客户端交互。
 5.heartbeat为100ms,该参数的作用是leader多久发送一次心跳到followers,默认值是100ms。
 6.election为1000ms,该参数的作用是重新投票的超时时间,如果follow在该时间间隔没有收到心跳包,会触发重新投票,默认为1000ms。
 7.snapshot count为10000,该参数的作用是指定有多少事务被提交时,触发截取快照保存到磁盘。
 8.集群和每个节点都会生成一个uuid。
 9.启动的时候会运行raft,选举出leader
客户端读写数据
etcdctl --endpoints=localhost:2379 put foo bar
etcdctl --endpoints=localhost:2379 get foo

删除数据
# 清空数据
etcdctl del / --prefix

#删除所有/test前缀的节点
etcdctl del /test --prefix
监听
#1. 增加一个key,值为hello(客户端窗口1)
etcdctl put key1 "hello"

#2. 打开一个新的客户端窗口2,监听key1的变化
etcdctl watch key1

#3. 回到窗口1,向key1 中删除原有的值put新值为hello work
etcdctl put key1 "hello work"

# 4. 此时可以在窗口2中看到监听输出


# 查看版本信息
curl http://127.0.0.1:2379/version
为etcd创建服务
mkdir -p /var/lib/etcd/ && mkdir -p /etc/etcd/
vim /etc/etcd/etcd.conf
# 节点名称
ETCD_NAME="etcd0"
# 指定数据文件存放位置
ETCD_DATA_DIR="/var/lib/etcd/"
vim /etc/systemd/system/etcd.service
[Unit]
Description=Etcd Server
After=network.target
After=network-online.target
Wants=network-online.target

[Service]
User=root
Type=notify
WorkingDirectory=/var/lib/etcd/
EnvironmentFile=-/etc/etcd/etcd.conf

ExecStart=/usr/local/bin/etcd
Restart=on-failure
LimitNOFILE=65536

[Install]
WantedBy=multi-user.target
重新加载systemd服务
systemctl daemon-reload
记得要把之前的etcd进程给kill掉
 ps -ef | grep etcd
 kill -9 [etcd进程对应pid]
systemctl enable etcd   #开机自启动
systemctl status etcd
systemctl start etcd
systemctl stop etcd
systemctl restart etcd


 1133
1133

 被折叠的 条评论
为什么被折叠?
被折叠的 条评论
为什么被折叠?
 到【灌水乐园】发言


