


目录
4.5 ConfigurationProperties(prefix = "school")
6.1 ConfigurableApplicationContext
一:javaConfig
1.1 javaConfig的作用
javaConfig是xml文件的Java类对象,通过java类来创建spring容器中的相关对象。
1.2 javaConfig的使用

javaConfig是一个java类,在类的上面加上@configuration代表它是,xml文件容器类,加上@bean代表创建对象,返回值类型是对象类型。
@Configuration
public class Config {
    @Bean
    public Student createStudent(){
        Student s1 = new Student();
        s1.setName("张三");
        s1.setAge(20);
        s1.setSex("男");
        return s1;
    }

    @Bean(name = "lisi")
    public Student makeStudent(){
        Student s2 = new Student();
        s2.setName("李四");
        s2.setAge(20);
        s2.setSex("男");
        return s2;
    }
}
xml文件获取对象
ApplicationContext acc = new ClassPathXmlApplicationContext(config);configuration类获取对象
ApplicationContext acc = new AnnotationConfigApplicationContext(Config.class);二:importResource
2.1 importResource的使用
在自己的xml文件java类上面加上注解以及注解路径便可以使用别的xml文件,我们测试类只需要获取到xml文件类便可以使用,该xml文件中路径指向的资源。
@ImportResource(value = "classpath:catbean.xml")三:Propertyresource
3.1 propertyresource的使用
该注解可以获取外部配置文件,即:xxx.properties文件中的相关信息
我们可以通过propertyresource注解获取到配置文件,但是该配置文件需要读取到xxx.properties信息去创建对象,所以需要使用spring中的@value注解赋值,但是由于我们的类没有被xml文件初始化所以需要使用到组件扫描器去扫描我们component组件,去获取创建该对象,导入xml文件的java类中。
properties文件
tiger.name=东北虎
tiger.age=3
实体类
@Component(value = "tiger")
public class Tiger {
    @Value("${tiger.name}")
    private String name;
    @Value("${tiger.age}")
    private int age;

    @Override
    public String toString() {
        return "Tiger{" +
                "name='" + name + '\'' +
                ", age=" + age +
                '}';
    }
}
配置类
@PropertySource(value = "classpath:tiger.properties")
@ComponentScan(basePackages = "com.rbynode.domin")
四:SpringBoot
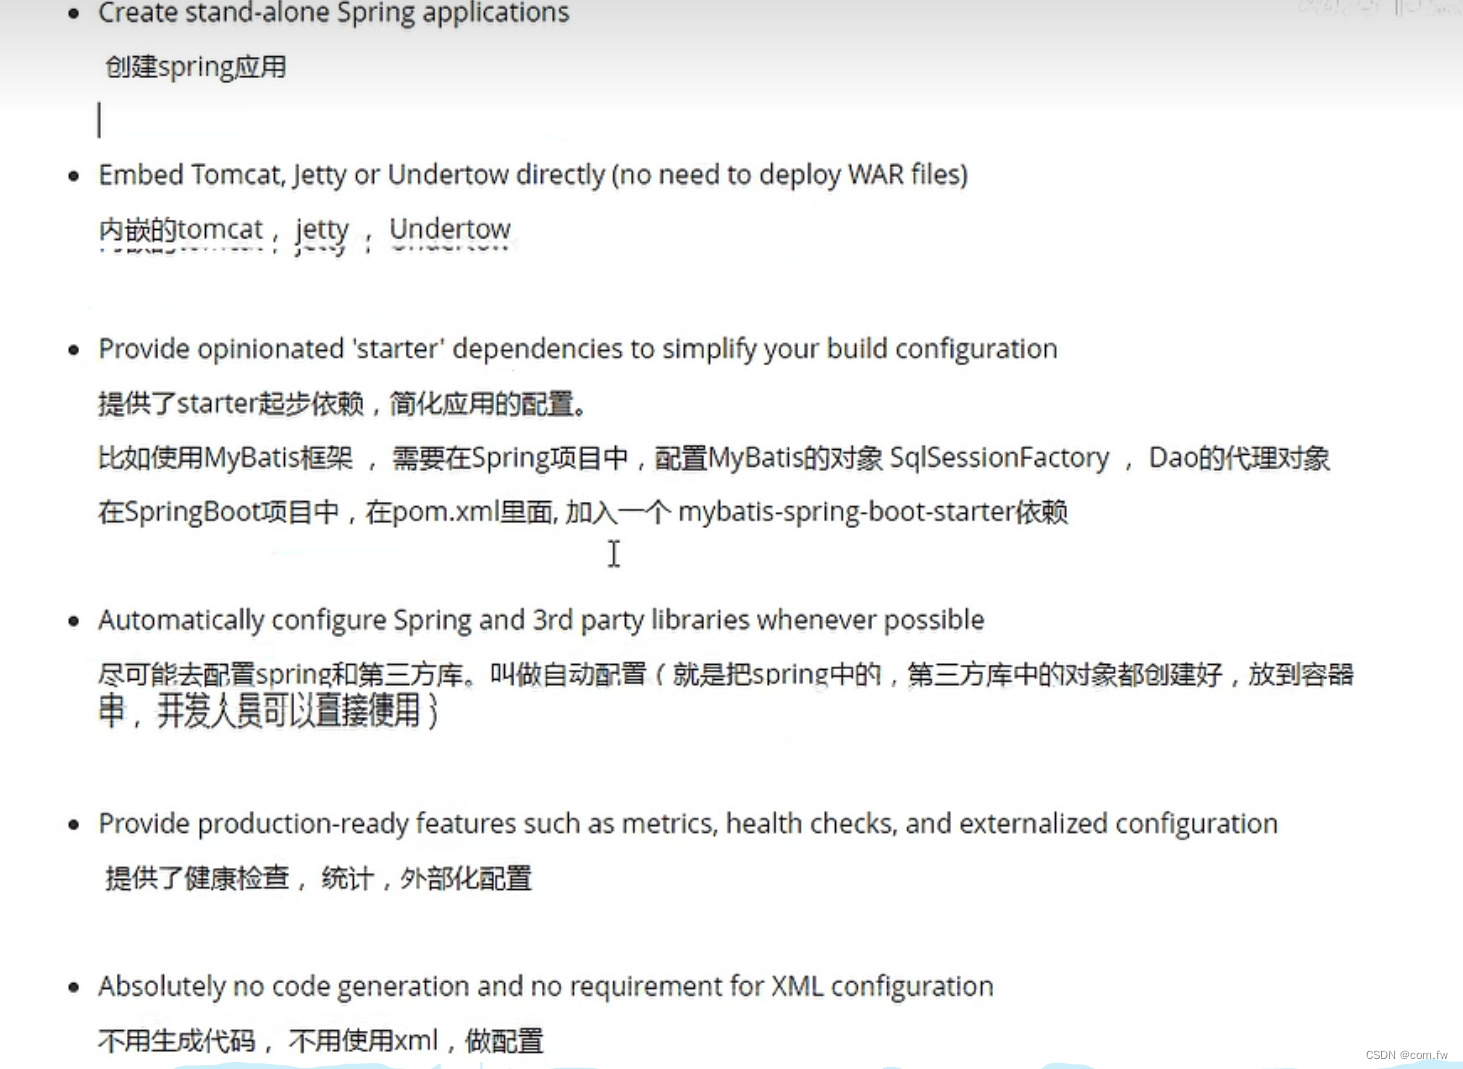
4.1 SpringBootApplication
@SpringBootConfiguration(可以把该类当作配置文件类来使用)
@EnableAutoConfiguration(启用自动配置,配置mybatis等第三方框架)
@ComponentScan(组件扫描器,默认扫描其同级的包下的类)
4.2 SpringBoot配置文件
Tomcat started on port(s): 8080 (http) with context path '/myBoot'我们可以通过springBoot的配置文件来设置端口和上下文
.properties类(key=value)
.yml类(key:value)
4.3 多环境配置
我们在开发的时候会用的多环境开发 ,开发者(dev),测试者(test)等等,我们的springboot只能识别spplication.properties文件,所以我们需要在文件中配置我们需要的路径:
spring.profiles.active=test
properties文件
server.port=8081
server.servlet.context-path=/myTest
yml文件
server:
  port:
    8081
  servlet:
    context-path:
      /myDev
4.4 Value
我们可以通过@Value来获取,properties文件中的value值
@Value("key")
4.5 ConfigurationProperties(prefix = "school")
获取properties上下文信息(二级关系)
@Component
@ConfigurationProperties(prefix = "school")配合使用
通过@Resources或者@Autowire来注入对象信息
五:springboot使用JSP
文件的目录结构
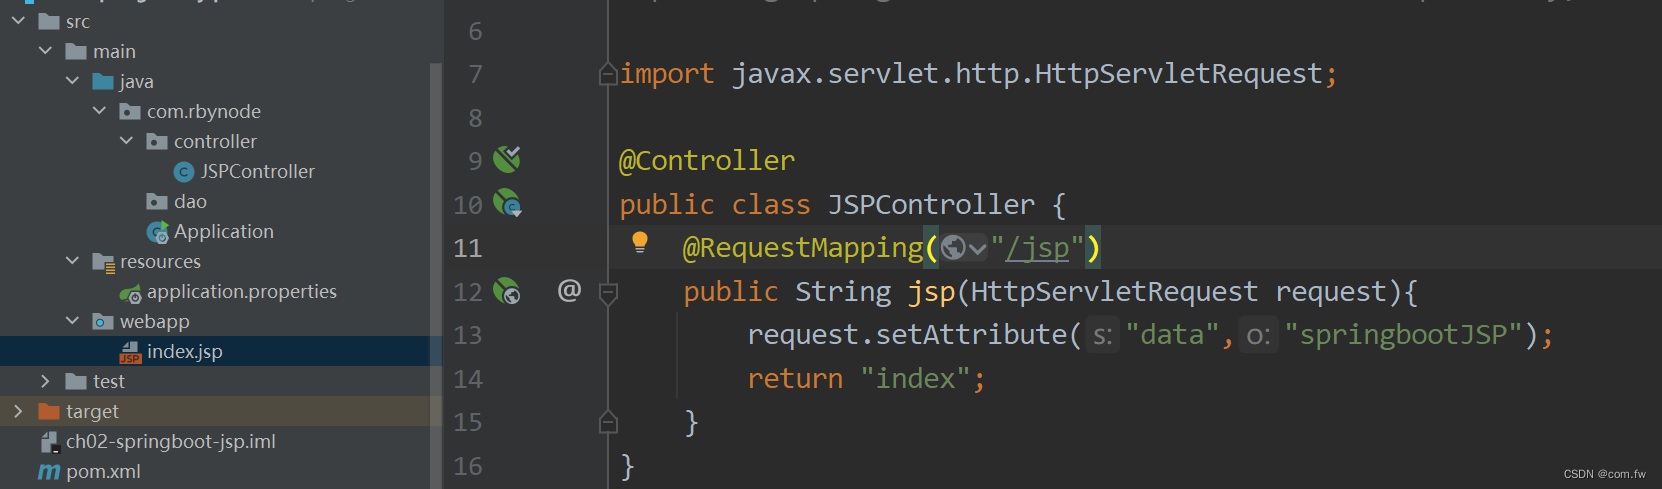
我们在用springboot去使用jsp的时候需要自己去创建如图所示的文件架构。
我们是使用springMVC的思想去完成我们的springboot。
注意如果我们需要传递数据(传到index),回显数据的话,注意不要使用json数据注解。
5.1 依赖项
<?xml version="1.0" encoding="UTF-8"?>
<project xmlns="http://maven.apache.org/POM/4.0.0"
         xmlns:xsi="http://www.w3.org/2001/XMLSchema-instance"
         xsi:schemaLocation="http://maven.apache.org/POM/4.0.0 http://maven.apache.org/xsd/maven-4.0.0.xsd">
    <modelVersion>4.0.0</modelVersion>

    <parent>
        <artifactId>spring-boot-starter-parent</artifactId>
        <groupId>org.springframework.boot</groupId>
        <version>2.7.4</version>
    </parent>

    <groupId>com.rbynode</groupId>
    <artifactId>ch02-springboot-jsp</artifactId>
    <version>1.0-SNAPSHOT</version>

    <properties>
        <maven.compiler.source>16</maven.compiler.source>
        <maven.compiler.target>16</maven.compiler.target>
    </properties>

    <dependencies>
        <!--        处理jsp的依赖-->
        <dependency>
            <groupId>org.apache.tomcat.embed</groupId>
            <artifactId>tomcat-embed-jasper</artifactId>
        </dependency>
        <dependency>
            <groupId>org.springframework.boot</groupId>
            <artifactId>spring-boot-starter-web</artifactId>
        </dependency>
    </dependencies>

    <build>
        <resources>
            <resource>
                <!--                jsp原来的目录-->
                <directory>src/main/webapp</directory>
                <!--                编译后的存放目录-->
                <targetPath>META-INF/resources</targetPath>
                <!--                处理的文件-->
                <includes>
                    <include>**/*.*</include>
                </includes>
            </resource>
        </resources>
        <plugins>
            <plugin>
                <groupId>org.springframework.boot</groupId>
                <artifactId>spring-boot-maven-plugin</artifactId>
                <version>2.7.4</version>
            </plugin>
        </plugins>
    </build>


</project>
六:springBoot的容器类
6.1 ConfigurableApplicationContext
我们一般会使用的ConfigurableApplicationContext容器,通过该容器我们会获取到容器中的相关对象。
强调一点:@Service是加载impl上的,和spring中的xml文件中<Bean>创建对象一样。
ConfigurableApplicationContext acc = SpringApplication.run(Application.class, args);
        UserService userService = (UserService) acc.getBean("user");
        userService.sayHello("任彪煜");
6.2 CommandLineRunner接口
public class Application implements CommandLineRunner {
    @Resource
    private UserServiceImpl userService;
    public static void main(String[] args) {
        System.out.println("容器对象创建之前...");
        ConfigurableApplicationContext acc = SpringApplication.run(Application.class, args);
        System.out.println("容器对象创建之后...");
    }
commandLineRunner接口,是在容器对象applicationContext对象创建之后,执行的方法,一般是用于对象创建好之后,给对象赋值。(数据库的连接等等)
注意:容器对象一创建,该接口的run方法就会被立即去执行。
七:拦截器类
7.1 自定义拦截器
创建拦截器类
public class HandlerServlet implements HandlerInterceptor {
    @Override
    public boolean preHandle(HttpServletRequest request, HttpServletResponse response, Object handler) throws Exception {
        return HandlerInterceptor.super.preHandle(request, response, handler);
    }

    @Override
    public void postHandle(HttpServletRequest request, HttpServletResponse response, Object handler, ModelAndView modelAndView) throws Exception {
        HandlerInterceptor.super.postHandle(request, response, handler, modelAndView);
    }

    @Override
    public void afterCompletion(HttpServletRequest request, HttpServletResponse response, Object handler, Exception ex) throws Exception {
        HandlerInterceptor.super.afterCompletion(request, response, handler, ex);
    }
}
声明明拦截器(spring容器中声明)xml文件
<mvc:interceptors>
        <mvc:interceptor>
            <mvc:mapping path="拦截路径"/>
            <bean class="com.rbynode.handler.HandlerServlet"></bean>
        </mvc:interceptor>
    </mvc:interceptors>
java类对象声明拦截器
true表示交给拦截器管理
public class LoginInterceptor implements HandlerInterceptor {
    @Override
    public boolean preHandle(HttpServletRequest request, HttpServletResponse response, Object handler) throws Exception {
        System.out.println("实现拦截器");
        return true;
    }

}
由于对象创建了,需要加载到容器中,springboot提供了专门的web容器配置类(接口)WebMvcConfigurer
@Configuration
public class WebMVCConfig implements WebMvcConfigurer {
    @Override
    public void addInterceptors(InterceptorRegistry registry) {
        String[] path = {"/user/**"};
        String[] exPath = {"/user/login"};
        registry.addInterceptor(new LoginInterceptor()).addPathPatterns(path).excludePathPatterns(exPath);

    }
}
拦截器拦截请求会执行我们自定义的拦截器中的业务代码,如果排除在外,就不会被执行
八:Servlet类
和拦截器一样都需要自定好自己的类,这里是servlet类,然后我们把他加入到容器类中,即config包下的servlet容器类
@Configuration
public class WebServletConfig {
    @Bean
    public ServletRegistrationBean servletRegistration() {
        ServletRegistrationBean servletRegistrationBean = new ServletRegistrationBean(
                new LoginServlet(), "/myServlet");
        return servletRegistrationBean;
    }
}
这样我们就在容器类中加入了Servlet类
九:Filter类
过滤器常常用来处理字符集
创建自定义的过滤器
public class MyFilter implements Filter {
    @Override
    public void doFilter(ServletRequest request, ServletResponse response, FilterChain chain) throws IOException, ServletException {
        System.out.println("过滤器");
        chain.doFilter(request,response);
    }
}
加入到容器中
@Configuration
public class WebFilterConfig {
    @Bean
    public FilterRegistrationBean filterRegistrationBean(){
        FilterRegistrationBean filterRegistrationBean = new FilterRegistrationBean();
        filterRegistrationBean.setFilter(new MyFilter());
        filterRegistrationBean.addUrlPatterns("/user/*");
        return filterRegistrationBean;
    }
}
9.1 字符集过滤器
在application.properties中去添加字符集可修改的标签
server.servlet.encoding.enabled=false在过滤器中添加springboot框架中自带的过滤器
@Configuration
public class WebFilterConfig {
    @Bean
    public FilterRegistrationBean filterRegistrationBean(){
        FilterRegistrationBean filterRegistrationBean = new FilterRegistrationBean();
        CharacterEncodingFilter characterEncodingFilter = new CharacterEncodingFilter();
        characterEncodingFilter.setEncoding("utf-8");
        characterEncodingFilter.setForceRequestEncoding(true);
        characterEncodingFilter.setForceResponseEncoding(true);
        filterRegistrationBean.setFilter(characterEncodingFilter);
        filterRegistrationBean.addUrlPatterns("/myServlet");
        return filterRegistrationBean;
    }
}
这样我们访问相关的url的时候默认输出UTF-8的数据
9.2 字符集过滤器(配置文件)
在application.properties中配置如下代码,自动生成springboot框架中的DisPatcherServlet
server.servlet.encoding.enabled=true
server.servlet.encoding.charset=UTF-8
server.servlet.encoding.force-request=true
server.servlet.encoding.force-response=true
十:ORM操作Mysql
使用mybatis操作数据库,在springboot中集成mybatis框架
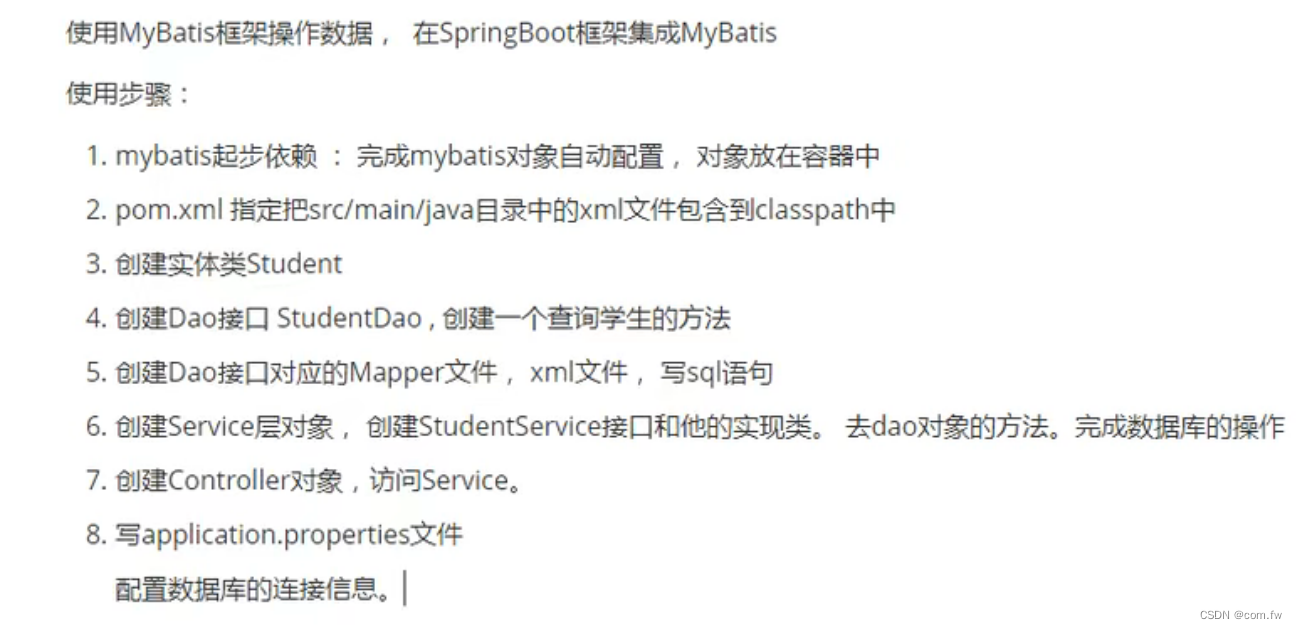
实际操作和spring-mybatis-springMVC差不多只不过是将配置文件全部归结到了application.properties中,并且需要把每一个类需要加上对应的注解Mapper、Service、configuration,Controller等注解。
十一:Spring中的事务控制
事务管理我们直接使用springboot中的注解,因为方便
第一步就是在业务方法上面加上@transcational,加入方法后事务就具有了事务功能
第二步就是在主启动类上面加@EnableTransactionManagement
11.1 逆向工程
简单的pom文件(mybatis-springboot版本太低,对应的自己电脑可以改一下)
<?xml version="1.0" encoding="UTF-8"?>
<project xmlns="http://maven.apache.org/POM/4.0.0"
         xmlns:xsi="http://www.w3.org/2001/XMLSchema-instance"
         xsi:schemaLocation="http://maven.apache.org/POM/4.0.0 http://maven.apache.org/xsd/maven-4.0.0.xsd">
    <modelVersion>4.0.0</modelVersion>

    <groupId>com.rbynode</groupId>
    <artifactId>springboot-mybatis</artifactId>
    <version>1.0-SNAPSHOT</version>

    <parent>
        <artifactId>spring-boot-starter-parent</artifactId>
        <groupId>org.springframework.boot</groupId>
        <version>2.7.4</version>
    </parent>
    <dependencies>
        <dependency>
            <groupId>org.springframework.boot</groupId>
            <artifactId>spring-boot-starter-web</artifactId>
        </dependency>
        <dependency>
            <groupId>org.mybatis.spring.boot</groupId>
            <artifactId>mybatis-spring-boot-starter</artifactId>
            <version>2.0.1</version>
        </dependency>
        <dependency>
            <groupId>mysql</groupId>
            <artifactId>mysql-connector-java</artifactId>
        </dependency>
        <dependency>
            <groupId>org.springframework.boot</groupId>
            <artifactId>spring-boot-starter-test</artifactId>
        </dependency>
    </dependencies>
    <properties>
        <maven.compiler.source>16</maven.compiler.source>
        <maven.compiler.target>16</maven.compiler.target>
    </properties>
    <build>
        <resources>
            <resource>
                <!--                jsp原来的目录-->
                <directory>src/main/webapp</directory>
                <!--                编译后的存放目录-->
                <targetPath>META-INF/resources</targetPath>
                <!--                处理的文件-->
                <includes>
                    <include>**/*.*</include>
                </includes>
            </resource>
            <resource>
                <directory>src/main/java</directory>
                <includes>
                    <include>**/*.xml</include>
                    <include>**/*.properties</include>
                </includes>
            </resource>
            <resource>
                <directory>src/main/resources</directory>
                <includes>
                    <include>**/*.xml</include>
                    <include>**/*.properties</include>
                </includes>
            </resource>
        </resources>
        <plugins>
            <plugin>
                <groupId>org.springframework.boot</groupId>
                <artifactId>spring-boot-maven-plugin</artifactId>
            </plugin>
            <plugin>
                <groupId>org.mybatis.generator</groupId>
                <artifactId>mybatis-generator-maven-plugin</artifactId>
                <version>1.3.7</version>
                <configuration>
                    <configurationFile>GeneratorMapper.xml</configurationFile>
                    <verbose>true</verbose>
                    <overwrite>true</overwrite>
                </configuration>
            </plugin>
            <plugin>
                <groupId>org.springframework.boot</groupId>
                <artifactId>spring-boot-maven-plugin</artifactId>
                <version>2.7.4</version>
            </plugin>
        </plugins>
    </build>

</project>
逆向工程GeneratorMapper.xml文件
<?xml version="1.0" encoding="UTF-8"?>
<!DOCTYPE generatorConfiguration
PUBLIC "-//mybatis.org//DTD MyBatis Generator Configuration 1.0//EN"
"http://mybatis.org/dtd/mybatis-generator-config_1_0.dtd">
<generatorConfiguration>
<!-- 指定连接数据库的JDBC驱动包所在位置,指定到你本机的完整路径,需确保本地路径下存在该jar -->
<classPathEntry location="D:\Java\mysql-connector-java-8.0.28\mysql-connector-java-8.0.28.jar"/>
<!-- 配置table表信息内容体,targetRuntime指定采用MyBatis3的版本 -->
<context id="tables" targetRuntime="MyBatis3">
<!--序列化-->
<plugin type="org.mybatis.generator.plugins.SerializablePlugin"/>
<!--以下需要插件 -->
<!--
插入成功后返回ID
<plugin type="cn.doity.common.generator.plugin.InsertAndReturnKeyPlugin"/>
分页查询功能
<plugin type="cn.doity.common.generator.plugin.SelectByPagePlugin"/>
生成带有for update后缀的select语句插件
<plugin type="cn.doity.common.generator.plugin.SelectForUpdatePlugin"/> -->
<!-- 抑制生成注释,由于生成的注释都是英文的,可以不让它生成 -->
<commentGenerator>
<property name="suppressAllComments" value="true" />
</commentGenerator>
<!-- 配置数据库连接信息 -->
<jdbcConnection driverClass="com.mysql.cj.jdbc.Driver"
connectionURL="jdbc:mysql://localhost:3306/mp?useUnicode=true&characterEncoding=UTF-8&serverTimezone=GMT%2B8"
userId="root"
password="218913mm">
</jdbcConnection>
<!-- 生成model类,targetPackage指定model类的包名, targetProject指定生成的model放在eclipse的哪个工程下面-->
<javaModelGenerator targetPackage="com.rbynode.dao" targetProject="D:\Java\springMVC\ch08-springboot-transactional\src\main\java">
<property name="enableSubPackages" value="false" />
<property name="trimStrings" value="false" />
</javaModelGenerator>
<!-- 生成MyBatis的Mapper.xml文件,targetPackage指定mapper.xml文件的包名, targetProject指定生成的mapper.xml放在eclipse的哪个工程下面 -->
<sqlMapGenerator targetPackage="mapper" targetProject="src/main/resources">
<property name="enableSubPackages" value="false" />
</sqlMapGenerator>
<!-- 生成MyBatis的Mapper接口类文件,targetPackage指定Mapper接口类的包名, targetProject指定生成的Mapper接口放在eclipse的哪个工程下面 -->
<javaClientGenerator type="XMLMAPPER" targetPackage="com.rbynode.dao" targetProject="src/main/java">
<property name="enableSubPackages" value="false" />
</javaClientGenerator>
<!-- 数据库表名及对应的Java模型类名 -->
<table tableName="studentMessage"
domainObjectName="StudentMessage"
enableCountByExample="false"
enableUpdateByExample="false"
enableDeleteByExample="false"
enableSelectByExample="false"
selectByExampleQueryId="false"/>
</context>
</generatorConfiguration>
在application.properties中加入该句代码可以自动识别扫描大量的xml文件
在主类方法之上加上@MapperScan(basePackages = "com.rbynode.dao")可以自动扫描到java/dao包下的mapper类
这两个操作可以实现大量mapper以及其mapper.xml文件的管理
mybatis.mapper-locations=classpath:com/rbynode/dao/*.xml十二:Restful接口架构风格
Rest:使用url表示资源,使用http动作操作资源
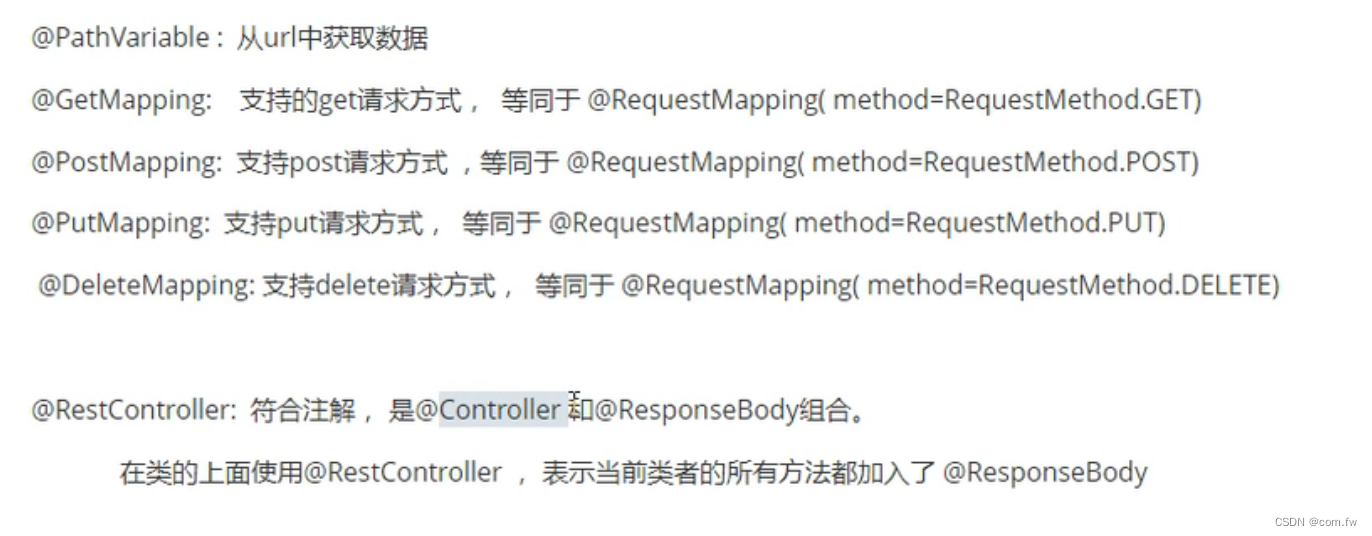
我们以前在url中写数据的话太乱了http://localhost:8080/student?id=1&name=lisi&.......这样子对数据显得比较乱,我们用rest风格去操作就显得很整洁。http://localhost:8080/student/1/lisi....
12.1 PathVariable
作用就是获取url中的数据
get请求
@RestController
public class MyRestController {
    @GetMapping("/student/{stuId}")
    public String queryStudent(@PathVariable(value = "stuId") Integer stuId){
        return "Id:" + stuId;
    }
}
十三:Thymeleaf框架(视图框架)
Thymeleaf是一个模板,视图层,基于html。
如果你要使用Maven开发的话,首先的指明咱们的DIspatherServlet,即在application.properties中去设置我们的实际路径
spring.thymeleaf.cache=false
spring.thymeleaf.encoding=UTF-8
spring.thymeleaf.prefix=classpath:/templates/
spring.thymeleaf.suffix=.html


 2200
2200


 被折叠的 条评论
为什么被折叠?
被折叠的 条评论
为什么被折叠?
 到【灌水乐园】发言


