


🔥 交流讨论:欢迎加入我们一起学习!
🔥 资源分享:耗时200+小时精选的「软件测试」资料包
🔥 教程推荐:火遍全网的《软件测试》教程
📢欢迎点赞 👍 收藏 ⭐留言 📝 如有错误敬请指正!
mark标记
在实际工作中,我们要写的自动化用例会比较多,也不会都放在一个py文件中,如果有几十个py文件,上百个方法,而我们只想运行当中部分的用例时怎么办?
pytest提供了一个非常好用的mark功能,可以给测试用例打上各种各样的标签,运行用例时可以指定运行某个标签。mark功能作用就是灵活的管理和运行测试用例。
标签既可以打到方法上,也可以打到类上,标记的两种方式:
- 🍊 直接标记类或方法或函数:
@pytest.mark.标签名 - 🍊 类属性:
pytestmark = [pytest.mark.标签名, pytest.mark.标签名],需要注意的是属性名称是固定的
<span style="background-color:#282c34"><span style="color:#abb2bf"><span style="color:#f92672">import</span> pytest


<span style="color:#61aeee">@pytest.mark.beta	</span><span style="color:#b18eb1"><em># 可以给类打标签</em></span>
<span style="color:#f92672">class</span> <span style="color:#e6c07b">TestLogin</span>:	<span style="color:#b18eb1"><em># 标记类</em></span>

<span style="color:#61aeee">    @pytest.mark.qc</span>
<span style="color:#61aeee">    @pytest.mark.beta	</span><span style="color:#b18eb1"><em># 也可以多个标签</em></span>
    <span style="color:#61aeee"><span style="color:#f92672">def</span> <span style="color:#61aeee">test_login</span>(<span style="color:#a6e22e">self</span>):</span>	<span style="color:#b18eb1"><em># 标记方法</em></span>
        <span style="color:#f92672">pass</span>

<span style="color:#61aeee">@pytest.mark.smoke		</span><span style="color:#b18eb1"><em># 单个标签</em></span>
<span style="color:#61aeee"><span style="color:#f92672">def</span> <span style="color:#61aeee">test_register</span>():</span>	<span style="color:#b18eb1"><em># 标记函数</em></span>
        <span style="color:#f92672">pass</span>

<span style="color:#f92672">class</span> <span style="color:#e6c07b">TestClass</span>:
    <span style="color:#b18eb1"><em># 加一个 pytestmark的类属性</em></span>
    pytestmark = [pytest.mark.qc, pytest.mark.beta]	<span style="color:#b18eb1"><em># 标签存放在一个列表</em></span>

pytest.main()</span></span>
注册标签名
我们要想运行已经打好标记的函数,还需要对标签名进行注册,告诉pytest有哪些标签,如果不进行注册运行时(pytest的高级版本)可能会报警告让你进行注册。
我们只需要在项目根目录下创建一个pytest.ini文件,注意文件名是不可修改的,否则pytest会找不到。内容格式如下:
<span style="background-color:#282c34"><span style="color:#abb2bf"><span style="color:#b18eb1"><em># pytest.ini</em></span>
<span style="color:#b18eb1"><em># 只能修改=右边的值</em></span>
[pytest]
python_files = demo_*.py	<span style="color:#b18eb1"><em># 模块名以demo_开头</em></span>
python_functions = demo_*	<span style="color:#b18eb1"><em># 方法名以demo_开头</em></span>
python_classes = Demo*	<span style="color:#b18eb1"><em># 类名名以Demo开头</em></span>

<span style="color:#b18eb1"><em># 注册标签</em></span>
markers =
    qc
    beta
    smoke</span></span>
运行指定的标签
通过命令行执行
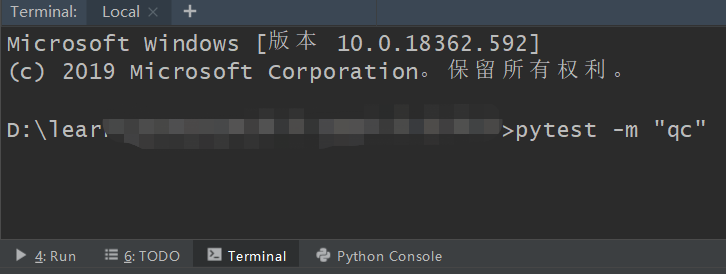
单个标签:pytest -m "标签名" (-m意思是执行标签mark),不想执行某个标签可以用not来取反,即pytest -m "not 标签名"
多个标签:可以加上判断,pytest -m "qc and beta" 或者 pytest -m "qc or beta" 效果是一样的
注意:标签名一定要加双引号,单引号是会报错的。
通过代码执行
这里普及一下,main()方法是可以接收不定长参数的,因此可以把要执行的命令放在一个列表中
<span style="background-color:#282c34"><span style="color:#abb2bf"><span style="color:#f92672">if</span> __name__ == <span style="color:#98c379">'__main__'</span>:
pytest.main([<span style="color:#98c379">'-m qc and beta'</span>, <span style="color:#98c379">'-s'</span>]) <span style="color:#b18eb1"><em># 标签名不需要加引号</em></span></span></span> 关于pytest的指令,可以通过控制台执行pytest --help查看,上面举例中-s命令是指打印更加详细的信息,如果程序运行过程当中的print()信息打印不出来,可以加上-s可选参数,它是-- capture=no的缩写。
skip跳过标记
在维护测试用例的过程中,可能在一个阶段某些用例已经不需要了,或者在指定条件下是不需要运行的,那么我们就可以通过mark.skip跳过这些函数或者类,两种跳过方式:
- 🍑直接跳过:
@pytest.mark.skip(reason = “原因”),这里原因是可选参数 - 🍑条件跳过,即满足某个条件才跳过:
@pytest.mark.skipif(a == 1, reason = “原因”)
<span style="background-color:#282c34"><span style="color:#abb2bf">db_host = <span style="color:#98c379">'localhost'</span>

<span style="color:#61aeee">@pytest.mark.skip(<span style="color:#3388aa">"和现在的需求不符合"</span>)	</span><span style="color:#b18eb1"><em># 不满足当下了,或别人编写的暂时不能删的</em></span>
<span style="color:#61aeee"><span style="color:#f92672">def</span> <span style="color:#61aeee">test_yuz</span>(<span style="color:#a6e22e">self</span>):</span>
    <span style="color:#f92672">pass</span>

<span style="color:#61aeee">@pytest.mark.skipif(db_host == <span style="color:#3388aa">'localhost'</span>, reason=<span style="color:#3388aa">'只测试线上环境,不测试本地环境'</span>)</span>
<span style="color:#61aeee"><span style="color:#f92672">def</span> <span style="color:#61aeee">test_develop_env</span>(<span style="color:#a6e22e">self</span>):</span>
<span style="color:#f92672">pass</span></span></span>最后我邀请你进入我们的【软件测试学习交流群:785128166】, 大家可以一起探讨交流软件测试,共同学习软件测试技术、面试等软件测试方方面面,还会有免费直播课,收获更多测试技巧,我们一起进阶Python自动化测试/测试开发,走向高薪之路
作为一个软件测试的过来人,我想尽自己最大的努力,帮助每一个伙伴都能顺利找到工作。所以我整理了下面这份资源,现在免费分享给大家,有需要的小伙伴可以关注【公众号:程序员二黑】自提!


 4864
4864

 被折叠的 条评论
为什么被折叠?
被折叠的 条评论
为什么被折叠?
 到【灌水乐园】发言


