


文章目录
改造先前的红黑树
前面我们模拟实现了红黑树。而前面我们知道红黑树的就是STL容器里面的set和map容器的底层数据结构。 但是有一个很致命的问题:set容器是K的结构,map是K,V的结构
但是我们先前写好的红黑树的节点数据是一个pair类型!这样一来,map是可以直接使用了。但是set不能使用了,难道我们要实现两颗红黑树吗?
我们不妨来看一看源代码里面是怎么处理的。
参考SGI版本的STL源码
首先我们来看STL里面的红黑树的定义:
//红黑树定义在stl_tree.h
//树的节点的定义,这里用了一个泛型参数
template <class Value>
struct __rb_tree_node
{
  typedef __rb_tree_node<Value>* link_type;
  Value value_field;
};
//再来看看红黑树的定义(简化了)
template <class Key, class Value, class KeyOfValue>
class rb_tree {
protected:;
  typedef __rb_tree_node<Value> rb_tree_node;
可以看到,库里的红黑树并不是把数据类型写死成pair,而是把把数据声明成了一个泛型!也就意味着,下层红黑树并不决定真正存储节点的类型,而是由上层决定。
模拟实现set容器
接下来,我们就来模拟实现set容器,首先我们知道set容器是key模型,但是它是怎么做到和map共用一棵红黑树的呢?同样我们来看看源代码。
参考set的源码
经过简化后,我们能够看到set实现key模型代码的关键所在
template <class Key>
class set {
public:
  // typedefs:

  typedef Key key_type;
  typedef Key value_type;
private:
  typedef rb_tree<Key, Key, identity<value_type>> rep_type;
 rep_type t;  // red-black tree representing set
从模板的定义我们不难可以看到,set就是把key同时作为参数传递给下一层的红黑树。那么这里的第三个参数又是什么意思呢?
首先,回想一下。我们这里的数据是泛型,那么意味着我们传递的数据可能是任意类型:string,int,double甚至可能是Teacher等等的不明确的类型!而底层的红黑树需要根据数据进行有序插入。
而转换数据就是一个重要的事情:identity<value_type>完成的就是这个任务
模拟实现set
接下来我们就来根据库里的代码迅速搭一个框架出来:
namespace chy{

  template<typename K>
	struct KeyofSet
	{
		const K operator()(const K key)
		{
			return key;
		}
	};
	//set的容器的结构
	template<typename K>
	class set
	{
	public:
	//插入算法->调用_tree的insert
      bool insert(const K& key)
	  {
	     return _tree.insert(key);
      }
	private:
		RBTree<K,K,KeyofSet<K>> _tree;
	};
}
这就是set容器的整个大框架。而set的迭代器我们将会在实现了红黑树的迭代器以后再封装出来。map也是如此。
模拟实现map容器
前面我们实现了set容器,下面我们就来实现一下map容器,和set一样,我们先来看看库里面的map的定义。
参考map的源代码
经过简化以后,map的整个大框架如下
template <class Key, class Val>
class map {
public:

// typedefs:
  typedef Key key_type;
  typedef Val data_type;
  typedef Val mapped_type;
  typedef pair<const Key, Val> value_type;
private:
//map的红黑树结构
  typedef rb_tree<Key,pair<const Key, Val> , select1st<value_type>> rep_type;
  rep_type t;  // red-black tree representing map
不难可以看出,map的第二个参数就是一个pair,因此就实现了set和map复用一棵红黑树。不得不佩服前辈们的智慧。
模拟实现map
接下来我们也来封装一下map容器
namespace chy{
//实现转换的仿函数
template<typename K,typename V>
	struct KeyofMap
	{
		const K operator()(const pair<K, V>& kv)
		{
			return kv.first;
		}
	};
 template<typename K,typename V>
 class map
 {
 public:
    bool insert(const K& key)
    {
        return _tree.insert(key);
   }
 private:
	 RBTree<K, pair<K, V>, KeyofMap<K,V>> _tree;
 };

}
到这里,set和map容器的简单雏形就出来了。但是我们还有迭代器和map的operator[]还没有实现,而这些都基于底层结构红黑树。下面我们就来给红黑树添加迭代器。
为红黑树封装迭代器
和实现list的迭代器类似,红黑树的迭代器也是一个自定义类型,大致的结构如下:
template<typename T, typename Ref, typename Ptr>
struct RBTreeIterator
{
  typedef RBTreeNode<T> Node;
  //给迭代器重命名,否则太长了
  typedef RBTreeNode<T,Ref,Ptr> Self;
  //封装节点的指针
  Node* _node;
  explicit RBTreeNode(Node* node)
  		:_node(node)
  		{}
 //重载*
 Ref operator*()
 {
   return _node->_val;
 }
 //重载->()
 Ptr operator->()
 {
    return &_node->_val;
 }
 bool operator==(const Self& s) const
{
			return _node == s._node;
}
		bool operator!=(const Self& s) const
{
			return _node != s._node;
}
//实现++和--才是这里的重头戏!
Self& operator++()
{	//如何实现++
	return *this;
}
Self& operator++(int)
{
	Self tmp(*this);
	++(*this);
	return tmp;
}
Self& operator--()
{
//--如何实现
return *this;
}
Self& operator--(int)
{
			Self tmp(*this);
			--(*this);
			return tmp;
}

};
由于底层的结构是树型结构,所以相对而言++和–是比较繁琐的一个步骤,接下来我们通过图片来分析++应该如何实现。
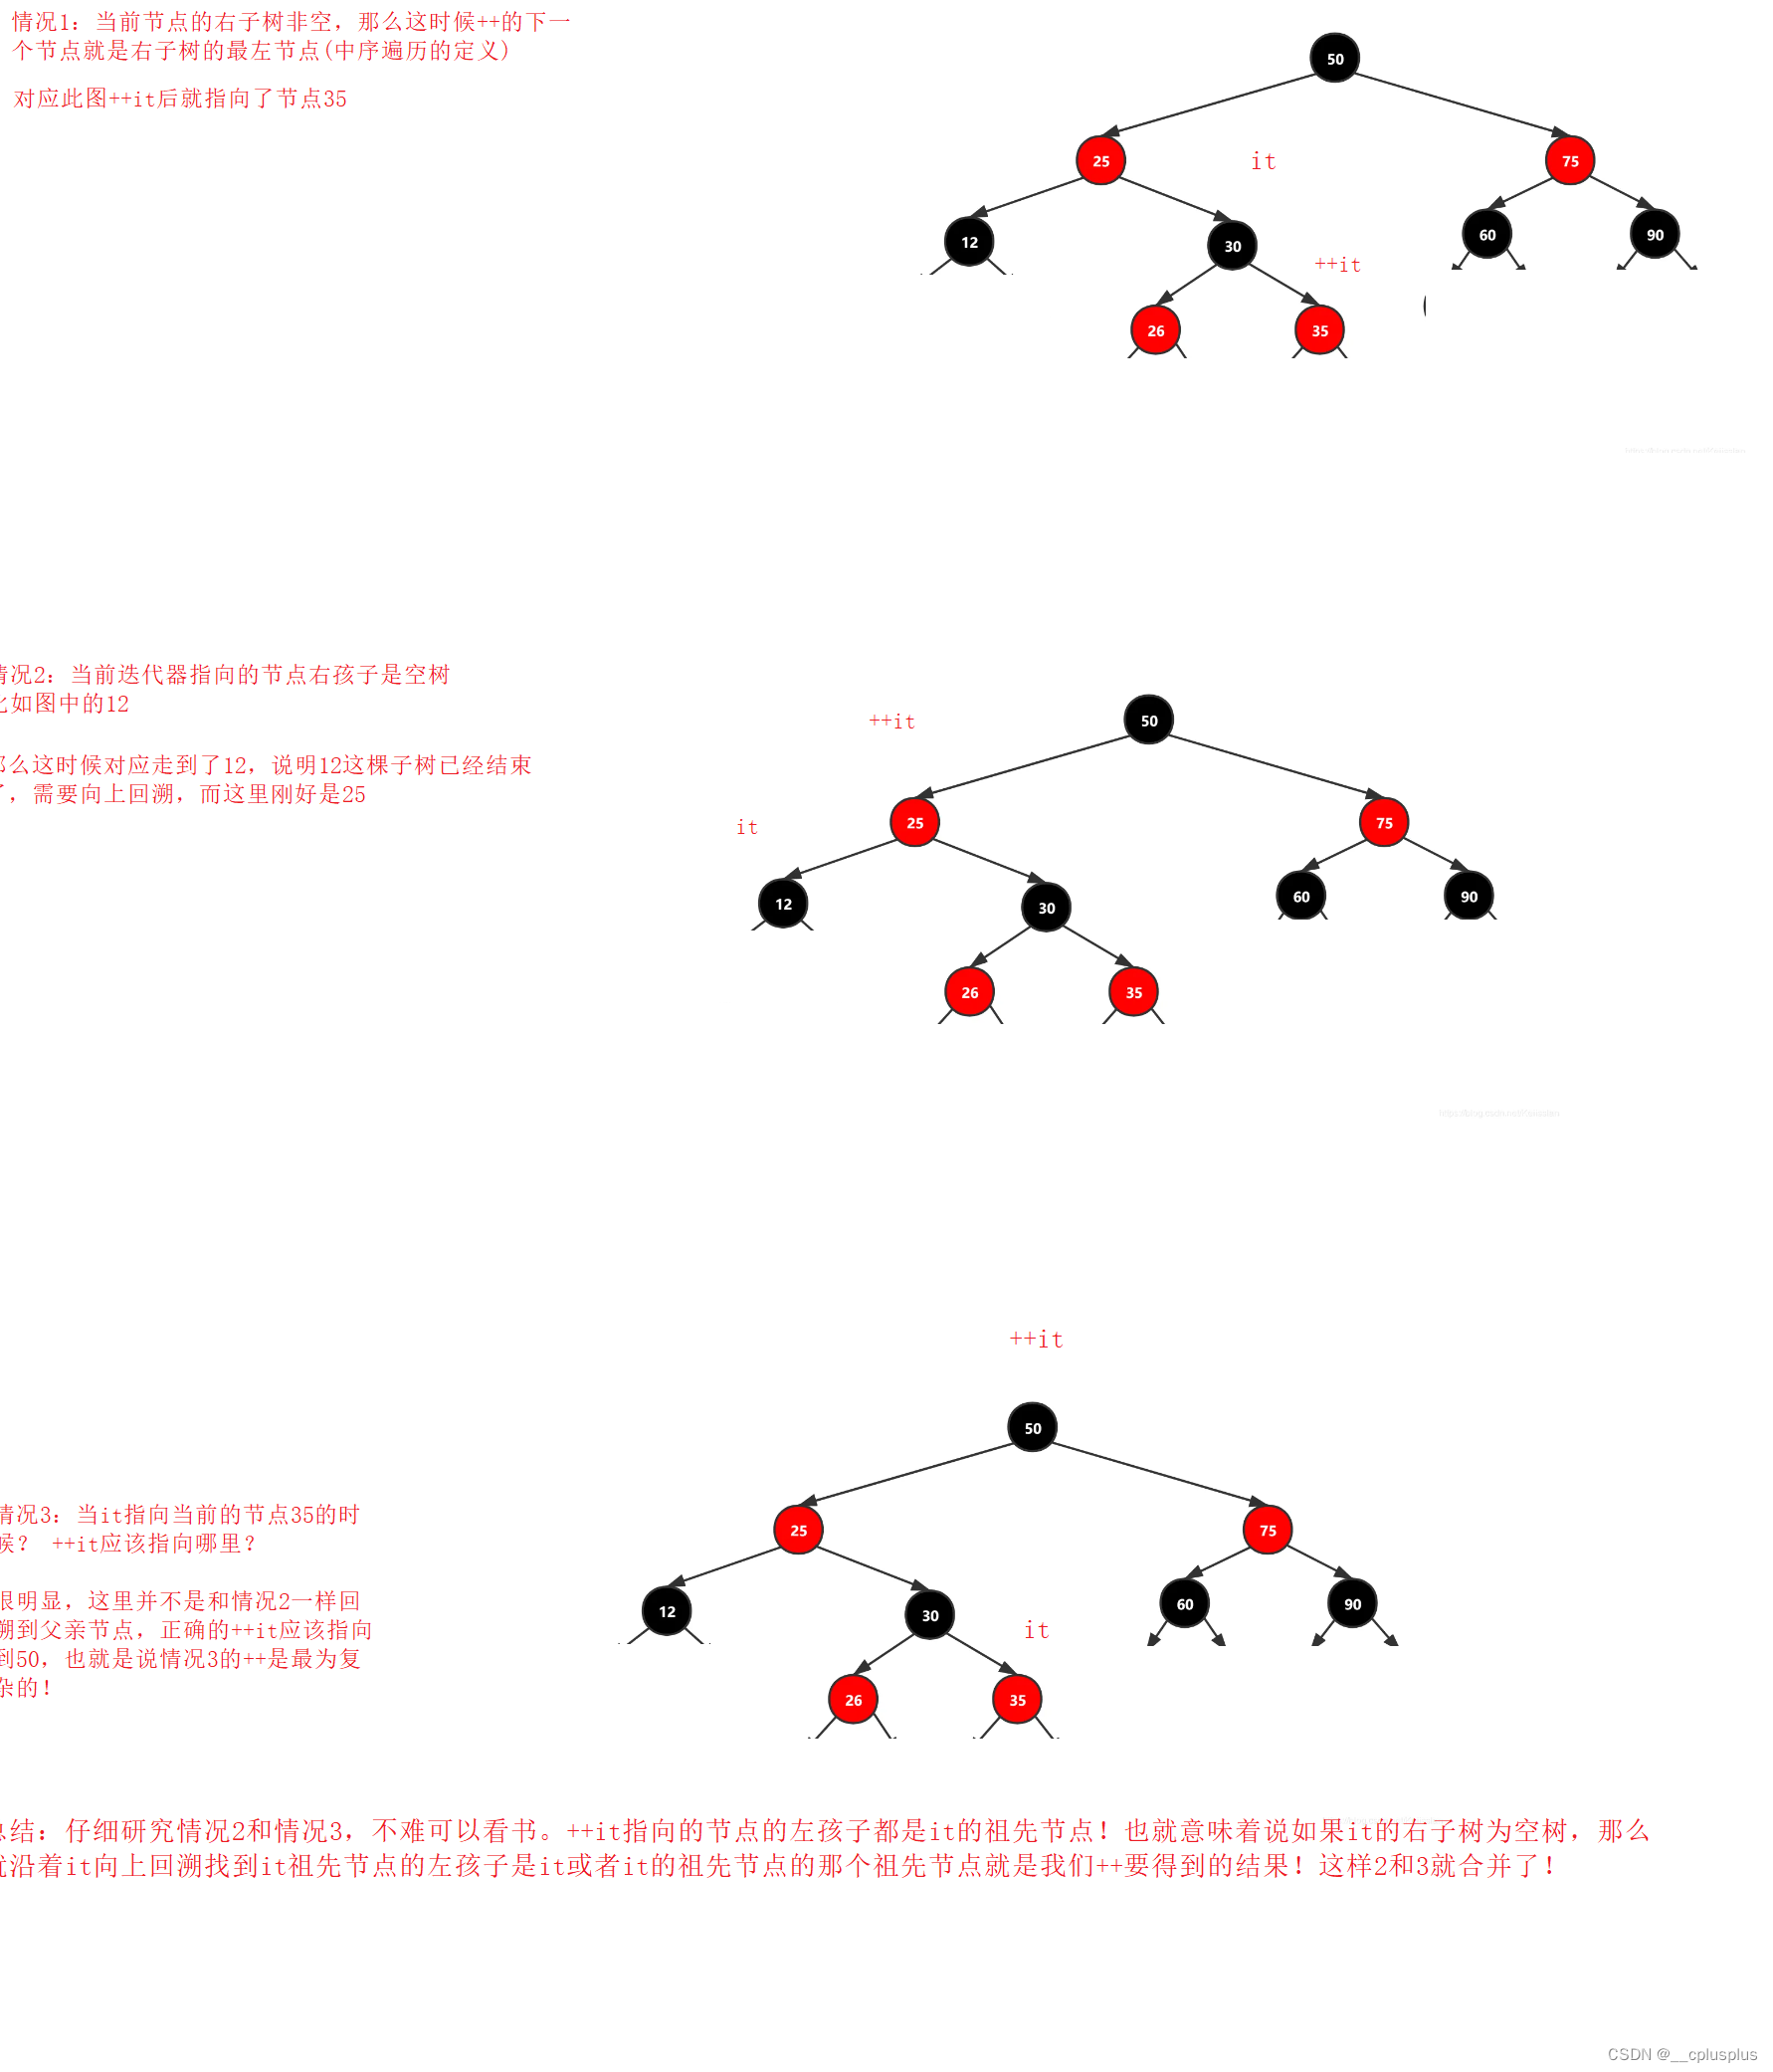
所以基于上面的分析,我们就可以写出如下的代码
Self& operator++()
		{
		  //右子树非空,++寻找右子树的最左节点
			if (_node->_right)
			{
				Node* minRight = _node->_right;
				while (minRight && minRight->_left)
				{
					minRight = minRight->_left;
				}
				_node = minRight;
			}
			//右子树为空,向上回溯到it的祖先节点是it祖先左孩子的祖先节点
			else
			{
				Node* cur = _node;
				Node* parent = cur->_parent;
				while (parent && cur == parent->_right)
				{
					cur = parent;
					parent = parent->_parent;
				}
				_node = parent;
			}
			return *this;
		}
而对于–的操作就是和++对称的,这里直接给出代码
Self& operator--()
		{
//如果左孩子非空,找左孩子的最右节点
			if (_node->_left)
			{
				Node* maxLeft = _node->_left;
				while (maxLeft && maxLeft->_right)
				{
					maxLeft = maxLeft->_right;
				}
				_node = maxLeft;
			}
//左子树为空,那么需要向上回溯到it祖先节点是it祖先节点的右孩子的那个祖先节点
			else
			{
				Node* cur = _node;
				Node* parent = cur->_parent;
				while (parent && parent->_left == cur)
				{
					cur = parent;
					parent = parent->_parent;
				}
				_node = parent;
			}
			return *this;
		}
顺带提供后置的版本
//这里的int是给编译器传的,以便于识别调用对应的版本
Self& operator++(int)
{
			Self tmp(*this);
			++(*this);
			return tmp;
}
Self& operator--(int)
{
			Self tmp(*this);
			--(*this);
			return tmp;
}
接下来我们在来给红黑树添加start()和finish() (为了不和后面set和map的begin()和end()起冲突,所以这里用这两个命名)
class RBTree
	{
		typedef RBTreeNode<T> Node;
	public:
	//套迭代器
		typedef RBTreeIterator<T, T&, T*> iterator;
		typedef RBTreeIterator<T, const T&, const T*> const_iterator;
		RBTree()
			:_root(nullptr)
		{}
		//start是整棵树里面最小的节点
		iterator start()
		{
			Node* minLeft = _root;
			while (minLeft && minLeft->_left)
			{
				minLeft = minLeft->_left;
			}
			return iterator(minLeft);
		}
		iterator finish()
		{
			return iterator(nullptr);
		}
		const_iterator start() const
		{
			Node* minLeft = _root;
			while (minLeft && minLeft->_left)
			{
				minLeft = minLeft->_left;
			}
			return const_iterator(minLeft);
		}
		const_iterator finish() const
		{
			return const_iterator(nullptr);
		}
到这里,红黑树的迭代器基本已经封装完成了。接下来我们封装set和map的迭代器
//封装set
namespace chy {
	template<typename K>
	struct KeyofSet
	{
		const K operator()(const K key)
		{
			return key;
		}
	};
	template<typename K>
	class set
	{
	public:
/*这里使用typename修饰,是因为编译器按需实例化的时候,可能内嵌的类型没有实例化,找出来也可能是虚拟类型,使用typename修饰告诉编译器等待内嵌类型实例化以后再进去寻找
*/
		typedef typename RBTree<K, K,  KeyofSet<K>>::const_iterator iterator;
		typedef typename RBTree<K, K,  KeyofSet<K>>::const_iterator const_iterator;
		iterator begin() const
		{
			return _tree.start();
		}
		iterator end() const
		{
			return _tree.finish();
		}
private:
	RBTree<K, K, KeyofSet<K>> _tree;
map的封装如下:
namespace chy
{
	template<typename K,typename V>
	struct KeyofMap
	{
		const K operator()(const pair<K, V>& kv)
		{
			return kv.first;
		}
	};
 template<typename K,typename V>
 class map
 {


 public:
	 typedef typename RBTree<K, pair<K, V>, KeyofMap<K,V>>::iterator iterator;
	 typedef typename RBTree<K, pair<K, V>, KeyofMap<K,V>>::const_iterator const_iterator;
	 iterator begin()
	 {
		 return _tree.start();
	 }
	 iterator end()
	 {
		 return _tree.finish();
	 }
	 const_iterator begin() const
	 {
		 return _tree.start();
	 }
	 const_iterator end() const
	 {
		 return _tree.finish();
	 }
private:
	  RBTree<K, pair<K, V>, KeyofMap<K,V>> _tree;
但是我们目前的map仍然有不足的地方,我们还没有实现对应的opreator[],而由于operator[]底层调用的是insert,所以我们还需要修改insert。
实现map的operator[]
为了实现operator[],我们需要对应修改insert的代码:
pair<iterator,bool> insert(const T& val)
		{
			if (!_root)
			{
				_root = new Node(val);
				_root->_col = BLACK;
				return make_pair(iterator(_root),true);
			}
			Node* parent = nullptr;
			Node* cur = _root;
			//使用仿函数转换数据对象
			KeyOfT kot;
			while (cur)
			{   //左子树
				if (kot(cur->_val) > kot(val))
				{
					parent = cur;
					cur = cur->_left;
				}
				//右子树
				else if (kot(cur->_val) < kot(val))
				{
					parent = cur;
					cur = cur->_right;
				}
				//停止重复插入
				else
				{
					return make_pair(iterator(cur),false);
				}
			}
			//插入节点默认是红色
			cur = new Node(val);
			//因为旋转会变化,所以提前记录
			Node* newnode = cur;
			if (kot(parent->_val) > kot(val))
				parent->_left = cur;
			else
				parent->_right = cur;
			cur->_col = RED;
			cur->_parent = parent;
			//如果父亲存在且为红色,违反规则三,需要处理
			while (parent && parent->_col == RED)
			{
				Node* grandfather = parent->_parent;
				if (parent == grandfather->_left)
				{
					Node* uncle = grandfather->_right;
					//情况1:叔叔存在且为红色
					//处理方式:叔叔和父亲变黑,祖父变红,继续向上调整
					if (uncle && uncle->_col == RED)
					{
						parent->_col = uncle->_col = BLACK;
						grandfather->_col = RED;
						cur = grandfather;
						parent = cur->_parent;
					}
					//叔叔不存在||叔叔存在且是黑色
					else
					{
						//如果父亲是祖父的左且cur也是父亲的左要右单旋
						if (cur == parent->_left)
						{
							RotateR(grandfather);
							parent->_col = BLACK;
							grandfather->_col = RED;
						}
						//如果cur是父亲的右,就要双旋
						/*   g
						*   p
						*    c
						*/
						else
						{
							RotateL(parent);
							RotateR(grandfather);
							cur->_col = BLACK;
							grandfather->_col = RED;
						}
						break;
					}
				}
				//父亲是祖父的右
				else
				{
					Node* uncle = grandfather->_left;
					//情况1:叔叔存在且为红色
					//处理方式:叔叔和父亲变黑,祖父变红,继续向上调整
					if (uncle && uncle->_col == RED)
					{
						parent->_col = uncle->_col = BLACK;
						grandfather->_col = RED;
						cur = grandfather;
						parent = cur->_parent;
					}
					//叔叔不存在||叔叔存在且是黑色
					else
					{

						//如果父亲是祖父的右且cur也是祖父的右要左单旋转
						if (cur == parent->_right)
						{
							RotateL(grandfather);
							parent->_col = BLACK;
							grandfather->_col = RED;
						}
						else
						{
							RotateR(parent);
							RotateL(grandfather);
							cur->_col = BLACK;
							grandfather->_col = RED;
						}
						break;
					}
				}
			}
			//根节点要保持黑色
			_root->_col = BLACK;
			return make_pair(iterator(newnode),true);
		}
改造set和map的insert
air<iterator,bool> insert(const K& key)
		{
			pair<typename RBTree<K, K, KeyofSet<K>>::iterator, bool> ret = _tree.insert(key);
			return pair<iterator,bool>(iterator(ret.first._node), ret.second);
		}
pair<iterator,bool> insert(const pair<K,V>& kv)
	 {
		 return _tree.insert(kv);
	 }
最后就是封装operator[]
//不存在就插入,存在就返回对应的V的引用
	 V& operator[](const K& key)
	 {
		 pair<iterator, bool> ret = _tree.insert(make_pair(key, V()));
		 return ret.first->second;
	 }
以上就是整篇文章的内容。模拟实现这两个容器是为了更好体会容器的底层结构。而不是造更好的轮子,对底层结构有更深的理解,才能更好使用容器。 如有不足之处还望指出。希望大家共同进步。


 1133
1133


 被折叠的 条评论
为什么被折叠?
被折叠的 条评论
为什么被折叠?
 到【灌水乐园】发言


