


目录
评论
接口说明
接口url:/comments/create/change
请求方式:POST
请求参数:
| 参数名称 | 参数类型 | 说明 |
|---|---|---|
| articleId | long | 文章id |
| content | string | 评论内容 |
| parent | long | 父评论id |
| toUserId | long | 被评论的用户id |
返回数据:
{
    "success": true,
    "code": 200,
    "msg": "success",
    "data": null
}
Vo对象
接收前端参数CommentParam:
package com.huing.blog.vo.params;

import lombok.Data;

/**
 * @Author huing
 * @Create 2022-07-08 16:24
 */
@Data
public class CommentParam {

    /**
     * 文章id
     */
    private Long articleId;

    /**
     * 评论内容
     */
    private String content;

    /**
     * 父评论id
     */
    private Long parent;

    /**
     * 被评论的用户id
     */
    private Long toUserId;
}
Controller控制层
CommentsController:
    /**
     * 评论
     * @param commentParam
     * @return
     */
    @PostMapping("create/change")
    public Result comment(@RequestBody CommentParam commentParam){
        return commentsService.comment(commentParam);
    }
Service业务逻辑层
CommentsService接口:
    /**
     * 评论
     * @param commentParam
     * @return
     */
    Result comment(CommentParam commentParam);
CommentsServiceImpl实现类:
@Override
public Result comment(CommentParam commentParam) {
//拿到当前用户
SysUser user = UserThreadLocal.get();
Comment comment = new Comment();
comment.setArticleId(commentParam.getArticleId());
comment.setAuthorId(user.getId());
comment.setContent(commentParam.getContent());
comment.setCreateDate(System.currentTimeMillis());
Long parent = commentParam.getParent();
if (parent == null || parent == 0) {
comment.setLevel(1);
} else {
comment.setLevel(2);
}
//如果是空,parent就是0
comment.setParentId(parent == null ? 0 : parent);
Long toUserId = commentParam.getToUserId();
comment.setToUid(toUserId == null ? 0 : toUserId);
commentMapper.insert(comment);
// UpdateWrapper<Article> updateWrapper = new UpdateWrapper<>();
// updateWrapper.eq("id",comment.getArticleId());
// updateWrapper.setSql(true,"comment_counts=comment_counts+1");
// this.articleMapper.update(null,updateWrapper);
//这里我们用redis实现
CommentVo commentVo = copy(comment);
return Result.success(commentVo);
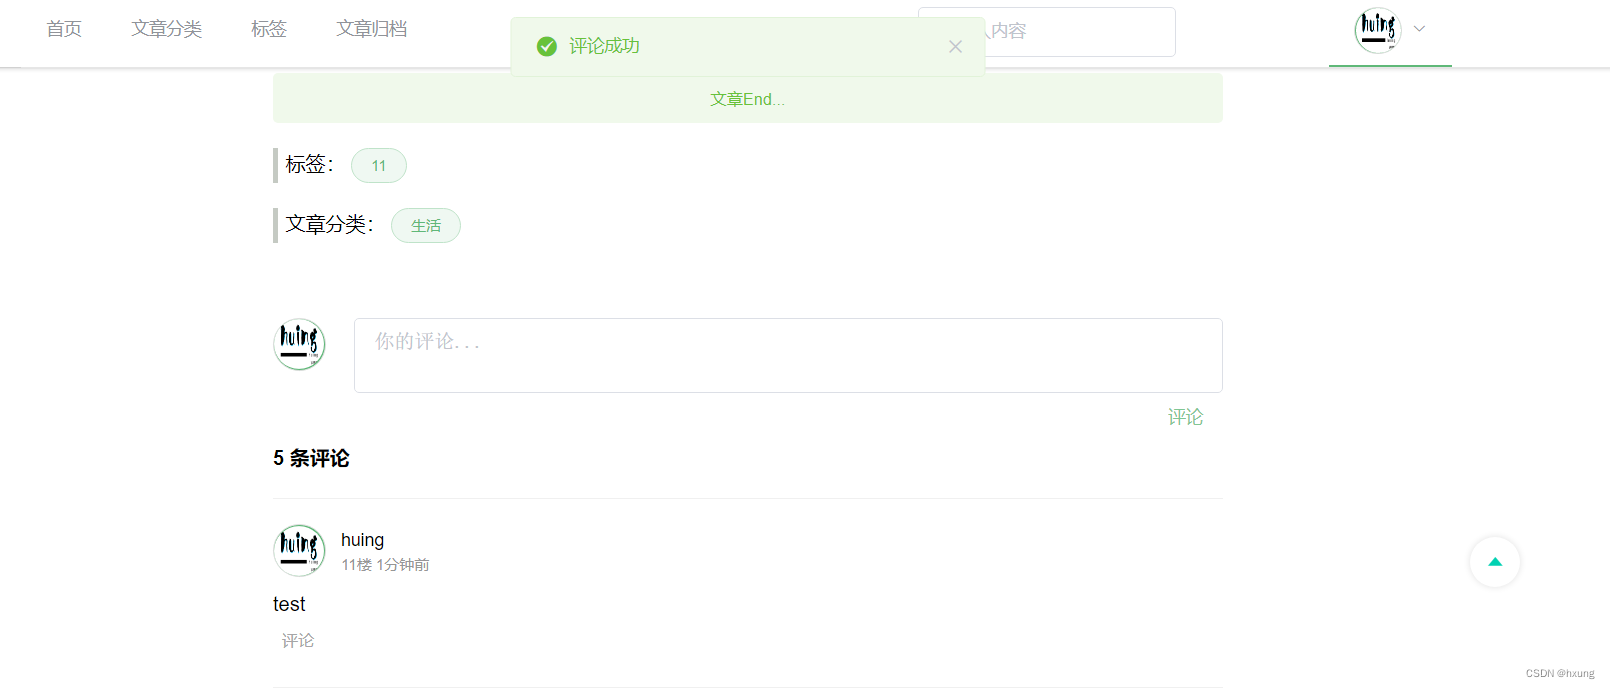
}前端测试
redis incr自增实现阅读数
在之前,我们已经通过redis incr自增实现浏览量:在线博客系统——文章详情(redis incr自增实现增加阅读数和评论数)_hxung的博客-CSDN博客
在这里,我们只需要在ListenHandler和MyAspect类中添加阅读数实现就行:
ListenHandler
添加:
ListenHandler整体代码:
package com.huing.blog.handler;
import com.huing.blog.dao.pojo.Article;
import com.huing.blog.service.ArticleService;
import com.huing.blog.utils.RedisUtil;
import lombok.extern.slf4j.Slf4j;
import org.springframework.beans.factory.annotation.Autowired;
import org.springframework.core.Ordered;
import org.springframework.core.annotation.Order;
import org.springframework.data.redis.core.ZSetOperations;
import org.springframework.scheduling.annotation.EnableScheduling;
import org.springframework.scheduling.annotation.Scheduled;
import org.springframework.stereotype.Component;
import javax.annotation.PostConstruct;
import javax.annotation.PreDestroy;
import java.util.List;
import java.util.Set;
/**
* @Author huing
* @Create 2022-07-06 16:59
*/
@Slf4j
@Component
@Order(Ordered.HIGHEST_PRECEDENCE)
@EnableScheduling
public class ListenHandler {
@Autowired
private ArticleService articleService;
@Autowired
private RedisUtil redisUtil;
private static final String VIEW_KEY = "viewNum"; //浏览量
private static final String COMMENT_KEY = "commentNum"; //评论数
//@PostConstruct该注解被用来修饰一个非静态的void()方法。被@PostConstruct修饰的方法会在服务器加载Servlet的时候运行,并且只会被服务器执行一次。PostConstruct在构造函数之后执行,init()方法之前执行。
//通常我们会是在Spring框架中使用到@PostConstruct注解 该注解的方法在整个Bean初始化中的执行顺序:
//Constructor(构造方法) -> @Autowired(依赖注入) -> @PostConstruct(注释的方法)
@PostConstruct
public void init(){
log.info("数据初始化开始(浏览量,评论数)...");
List<Article> articleList = articleService.findArticleAll();
for (Article article : articleList) {
//将浏览量、点赞数和评论数写入redis
redisUtil.zAdd(VIEW_KEY,article.getId().toString(),article.getViewCounts());
redisUtil.zAdd(COMMENT_KEY,article.getId().toString(),article.getCommentCounts());
}
log.info("数据(浏览量,评论数)已写入redis...");
}
//PreDestroy()方法在destroy()方法执行执行之后执行
@PreDestroy
public void afterDestroy() {
log.info("开始关闭...");
//将redis中的数据写入数据库
Set<ZSetOperations.TypedTuple<String>> viewNum = redisUtil.zReverseRangeWithScores("viewNum", 0, -1);
Set<ZSetOperations.TypedTuple<String>> commentNum = redisUtil.zReverseRangeWithScores("commentNum", 0, -1);
writeNum(viewNum, VIEW_KEY);
writeNum(commentNum, COMMENT_KEY);
log.info("redis写入数据库完毕");
}
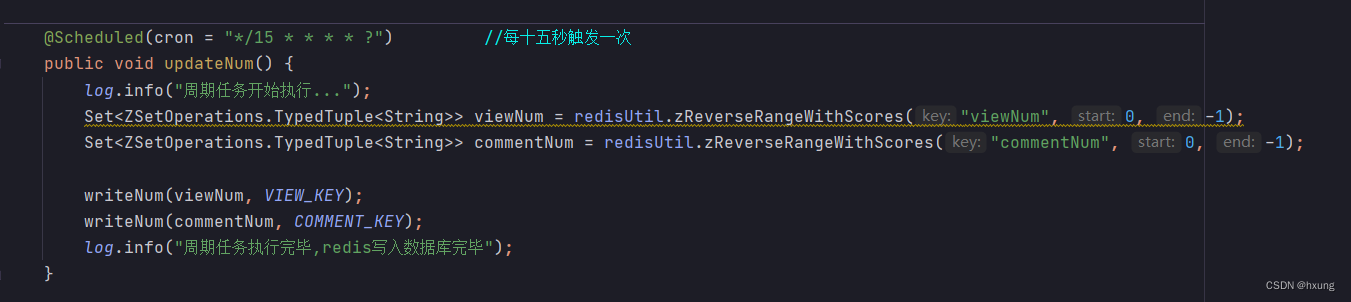
@Scheduled(cron = "*/15 * * * * ?") //每十五秒触发一次
public void updateNum() {
log.info("周期任务开始执行...");
Set<ZSetOperations.TypedTuple<String>> viewNum = redisUtil.zReverseRangeWithScores("viewNum", 0, -1);
Set<ZSetOperations.TypedTuple<String>> commentNum = redisUtil.zReverseRangeWithScores("commentNum", 0, -1);
writeNum(viewNum, VIEW_KEY);
writeNum(commentNum, COMMENT_KEY);
log.info("周期任务执行完毕,redis写入数据库完毕");
}
private void writeNum(Set<ZSetOperations.TypedTuple<String>> set, String fieldName) {
set.forEach(item -> {
Long id = Long.valueOf(item.getValue());
Integer num = item.getScore().intValue();
Article article = articleService.getArticleById(id);
switch (fieldName) {
case VIEW_KEY:
article.setViewCounts(num);
break;
case COMMENT_KEY:
article.setCommentCounts(num);
break;
default:
return;
}
//更新数据库
articleService.updateNumById(article);
log.info("{} 更新完毕", fieldName+id); //id为文章id
});
}
}
MyAspect
添加:
MyAspect整体代码:
package com.huing.blog.common;
import com.huing.blog.service.ArticleService;
import com.huing.blog.utils.RedisUtil;
import com.huing.blog.vo.params.CommentParam;
import org.aspectj.lang.JoinPoint;
import org.aspectj.lang.annotation.After;
import org.aspectj.lang.annotation.Aspect;
import org.aspectj.lang.annotation.Pointcut;
import org.springframework.beans.factory.annotation.Autowired;
import org.springframework.stereotype.Component;
/**
* @Author huing
* @Create 2022-07-06 17:46
*/
//指定为切面类
@Aspect
@Component
public class MyAspect {
@Autowired
private ArticleService articleService;
@Autowired
private RedisUtil redisUtil;
//定义一个名为"myPointCut_ViewNum()"的切面,getById()这个方法中
@Pointcut("execution(public * com.huing.blog.controller.ArticleController.findArticleById(..))")
public void myPointCut_ViewNum() { }
@Pointcut("execution(public * com.huing.blog.controller.CommentsController.comment(..))")
public void myPointCut_CommentNum(){}
//在这个方法执行后
@After("myPointCut_ViewNum()")
public void doAfter(JoinPoint joinPoint) throws Throwable {
Object[] objs = joinPoint.getArgs();
Long id = (Long) objs[0];
//根据id更新浏览量
redisUtil.zIncrementScore("viewNum", id.toString(), 1);
}
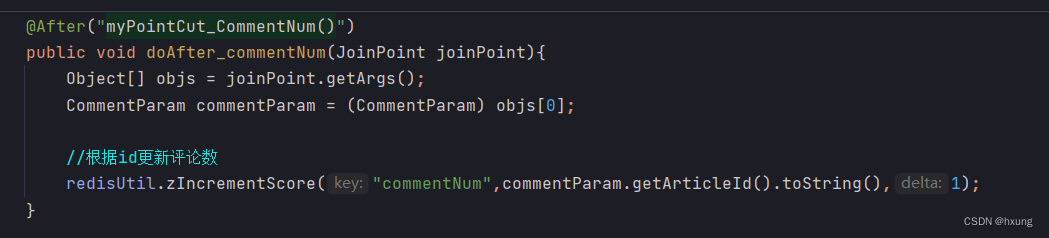
@After("myPointCut_CommentNum()")
public void doAfter_commentNum(JoinPoint joinPoint){
Object[] objs = joinPoint.getArgs();
CommentParam commentParam = (CommentParam) objs[0];
//根据id更新评论数
redisUtil.zIncrementScore("commentNum",commentParam.getArticleId().toString(),1);
}
}前端测试
项目启动控制台:

此时数据库中某文章评论数:

前端页面写评论:
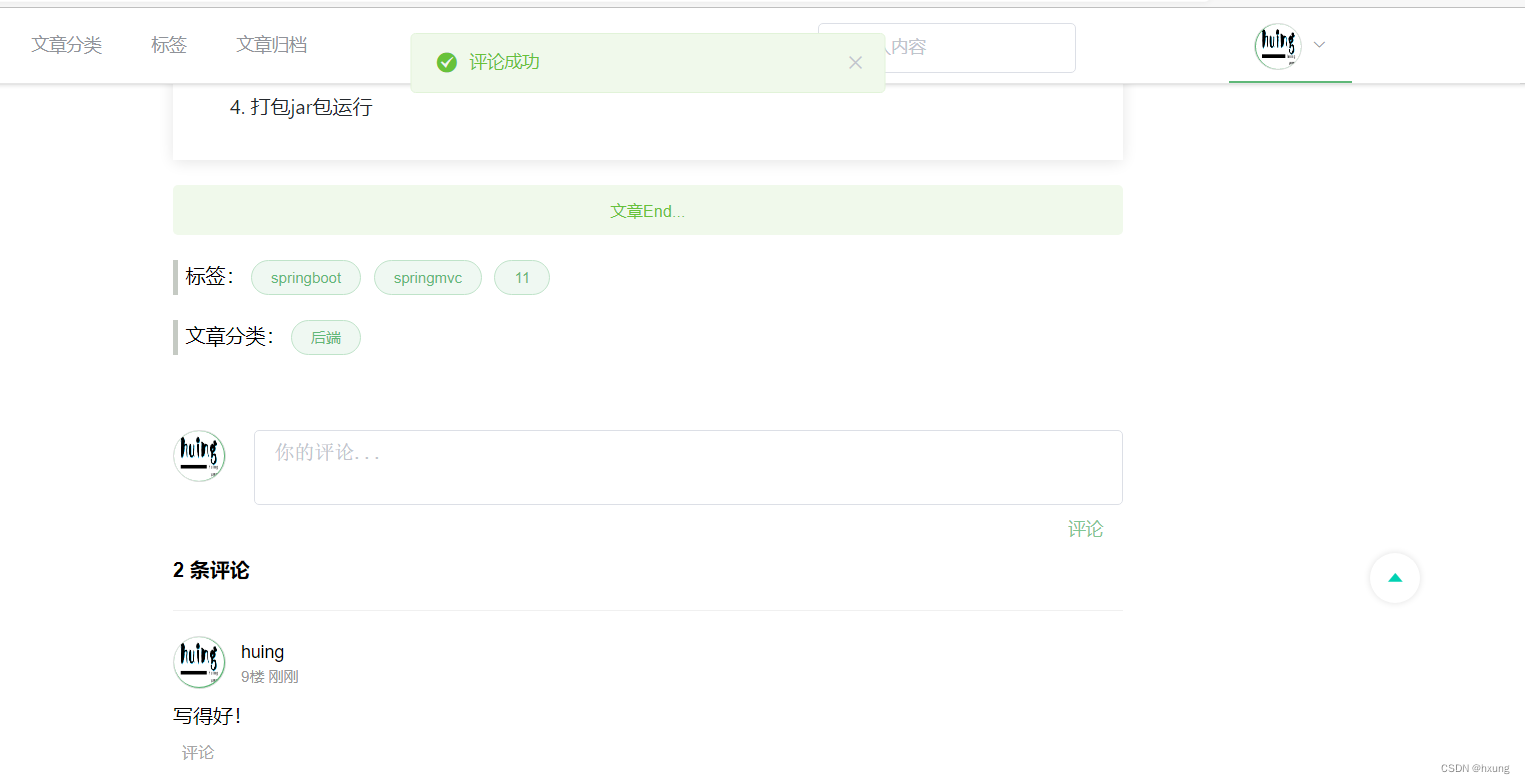
控制台:

数据库:


 663
663


 被折叠的 条评论
为什么被折叠?
被折叠的 条评论
为什么被折叠?
 到【灌水乐园】发言


