


Shiro安全框架简介
Shiro概述
Shiro是apache旗下一个开源安全框架,它对软件系统中的安全认证相关功能进行了抽封装,实现了用户身份认证,权限授权、加密、会话管理等功能,组成了一个通用的安全认证框架。使用shiro就可以非常快速的完成认证、授权等功能的开发,降低系统成本。
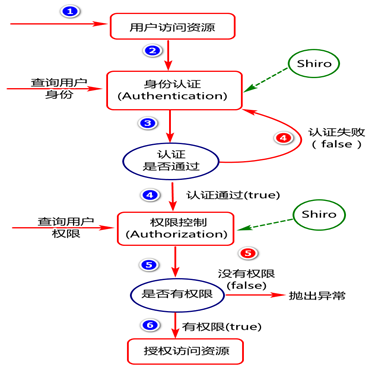
用户在进行资源访问时,要求系统要对用户进行权限控制,其具体流程如图所示:
Shiro概要架构
在概念层面,Shiro 架构包含三个主要的理念,如图所示:
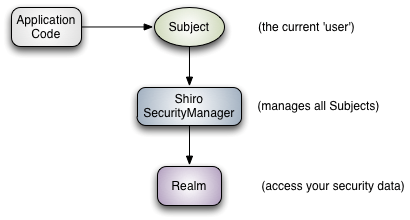
其中:
- Subject :主体对象,负责提交用户认证和授权信息。
- SecurityManager:安全管理器,负责认证,授权等业务实现。
- Realm:领域对象,负责从数据层获取业务数据。
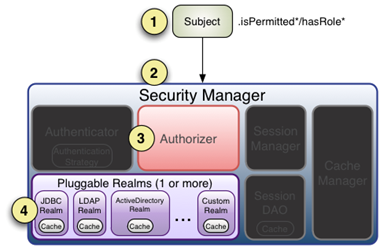
Shiro详细架构
Shiro框架进行权限管理时,要涉及到的一些核心对象,主要包括:认证管理对象,授权管理对象,会话管理对象,缓存管理对象,加密管理对象以及Realm管理对象(领域对象:负责处理认证和授权领域的数据访问题)等,其具体架构如图-6所示:
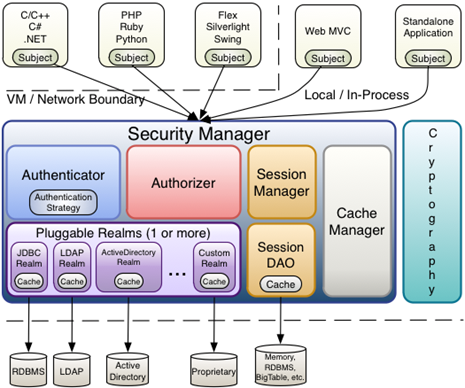
其中:
- Subject(主体):与软件交互的一个特定的实体(用户、第三方服务等)。
- SecurityManager(安全管理器) :Shiro 的核心,用来协调管理组件工作。
- Authenticator(认证管理器):负责执行认证操作。
- Authorizer(授权管理器):负责授权检测。
- SessionManager(会话管理):负责创建并管理用户 Session 生命周期,提供一个强有力的 Session 体验。
- SessionDAO:代表 SessionManager 执行 Session 持久(CRUD)动作,它允许任何存储的数据挂接到 session 管理基础上。
- CacheManager(缓存管理器):提供创建缓存实例和管理缓存生命周期的功能。
- Cryptography(加密管理器):提供了加密方式的设计及管理。
- Realms(领域对象):是shiro和你的应用程序安全数据之间的桥梁。
Shiro框架认证拦截实现
添加shiro依赖
使用spring整合shiro时,需要在pom.xml中添加如下依赖(参考官网http://shiro.apache.org/spring-boot.html),假如项目中添加过shiro-spring依赖,将shiro-spring依赖替换掉即可。代码如下:
<dependency>
<groupId>org.apache.shiro</groupId>
<artifactId>shiro-spring-boot-web-starter</artifactId>
<version>1.7.0</version>
</dependency>
- 1
- 2
- 3
- 4
- 5
- 1
- 2
- 3
- 4
- 5
Shiro核心对象配置
第一步: 创建一个Realm类型的实现类(基于此类通过DAO访问数据库),关键代码如下:
package com.cy.pj.sys.service.realm;
public class ShiroRealm extends AuthorizingRealm {
    /**此方法负责获取并封装授权信息*/
    @Override
    protected AuthorizationInfo doGetAuthorizationInfo(
             PrincipalCollection principalCollection) {
        return null;
    }
    /**此方法负责获取并封装认证信息*/
    @Override
    protected AuthenticationInfo doGetAuthenticationInfo(
         AuthenticationToken authenticationToken)
throws AuthenticationException {
        return null;
    }
}
- 1
- 2
- 3
- 4
- 5
- 6
- 7
- 8
- 9
- 10
- 11
- 12
- 13
- 14
- 15
- 16
- 1
- 2
- 3
- 4
- 5
- 6
- 7
- 8
- 9
- 10
- 11
- 12
- 13
- 14
- 15
- 16
第二步:在项目启动类中添加Realm对象配置,关键代码如下:,关键代码如下:
@Bean
public Realm realm() {//org.apache.shiro.realm.Realm
      return new ShiroRealm();
}
- 1
- 2
- 3
- 4
- 1
- 2
- 3
- 4
第三步: 在启动类中定义过滤规则(哪些访问路径要进行认证才可以访问),关键代码如下:
@Bean
public ShiroFilterChainDefinition shiroFilterChainDefinition() {
    DefaultShiroFilterChainDefinition chainDefinition = new DefaultShiroFilterChainDefinition();
     //配置/user/login/**开头的资源,可以匿名访问(不用登录就可以访问),
     //其中anon为shiro框架指定的匿名过滤器     chainDefinition.addPathDefinition("/user/login/**","anon");
     //配置登出操作
     chainDefinition.addPathDefinition("/user/logout","logout");
     //配置以/**开头的资源必须都要经过认证,
     //其中authc为shiro框架指定的认证过滤器
      chainDefinition.addPathDefinition("/**", "authc");
    return chainDefinition;
}
- 1
- 2
- 3
- 4
- 5
- 6
- 7
- 8
- 9
- 10
- 11
- 12
- 1
- 2
- 3
- 4
- 5
- 6
- 7
- 8
- 9
- 10
- 11
- 12
第四步:在spring的配置文件(application.yml)中,添加登录页面的配置,关键代码如下:
shiro:
loginUrl: /login.html
- 1
- 2
- 1
- 2
说明:假如没有login.html,需要先准备login.html
启动服务进行访问测试
打开浏览器,输入http://localhost/user/检测是否会出现登录窗口。
Shiro框架认证业务实现
认证流程分析
身份认证即判定用户是否是系统的合法用户,用户访问系统资源时的认证(对用户身份信息的认证)流程图所示:
其中认证流程分析如下:
- 系统调用subject的login方法将用户信息提交给SecurityManager
- SecurityManager将认证操作委托给认证器对象Authenticator
- Authenticator将用户输入的身份信息传递给Realm。
- Realm访问数据库获取用户信息然后对信息进行封装并返回。
- Authenticator 对realm返回的信息进行身份认证。
思考:不使用shiro框架如何完成认证操作?filter,intercetor。
认证逻辑实现
第一步: 定义Realm类,并修改ShiroRealm中获取认证信息的方法,关键代码如下:
@Override
protected AuthenticationInfo doGetAuthenticationInfo(AuthenticationToken authenticationToken)
 throws AuthenticationException {
     //1.获取用户提交的认证用户信息
    UsernamePasswordToken upToken=(UsernamePasswordToken) authenticationToken;
    String username=upToken.getUsername();
     //2.基于用户名查询从数据库用户信息
    //3.判断用户是否存在
    if(!"jack".equals(username)) throw new UnknownAccountException();//账户不存在
 //5.封装认证信息并返回
String salt="ABCD";
ByteSource credentialsSalt= ByteSource.Util.bytes(salt);
String hashedPassword="来自数据库的密码";
    SimpleAuthenticationInfo info=
            new SimpleAuthenticationInfo(
                    username, //principal 传入的用户身份
                    hashedPassword,//hashedCredentials
                    credentialsSalt,//credentialsSalt
                    getName());
    return info;
}
- 1
- 2
- 3
- 4
- 5
- 6
- 7
- 8
- 9
- 10
- 11
- 12
- 13
- 14
- 15
- 16
- 17
- 18
- 19
- 20
- 21
- 1
- 2
- 3
- 4
- 5
- 6
- 7
- 8
- 9
- 10
- 11
- 12
- 13
- 14
- 15
- 16
- 17
- 18
- 19
- 20
- 21
第二步:在ShiroRealm中重谢获取凭证加密算法的方法,关键代码如下:
@Override
public CredentialsMatcher getCredentialsMatcher() {
    HashedCredentialsMatcher matcher=new HashedCredentialsMatcher();
    matcher.setHashAlgorithmName("MD5");
    matcher.setHashIterations(1);
    return matcher;
}
- 1
- 2
- 3
- 4
- 5
- 6
- 7
- 1
- 2
- 3
- 4
- 5
- 6
- 7
第三步:定义Controller逻辑
@GetMapping("/login/{username}/{password}")
public JsonResult doLogin(@PathVariable String username,
@PathVariable String password){
    //将账号和密码封装token对象
    UsernamePasswordToken token = //参考官网
            new UsernamePasswordToken(username, password);
    //基于subject对象将token提交给securityManager
    Subject subject = SecurityUtils.getSubject();
    subject.login(token);//提交给securityManager
    return new JsonResult("login ok");
}
- 1
- 2
- 3
- 4
- 5
- 6
- 7
- 8
- 9
- 10
- 11
- 1
- 2
- 3
- 4
- 5
- 6
- 7
- 8
- 9
- 10
- 11
第四步::统一异常处理类中添加shiro异常处理代码,关键如下:
@ExceptionHandler(ShiroException.class)
public JsonResult doShiroException(ShiroException e){
   JsonResult r=new JsonResult();
   r.setState(0);
   if(e instanceof UnknownAccountException){
       r.setMessage("用户名不存在");
   }else if(e instanceof IncorrectCredentialsException){
       r.setMessage("密码不正确");
   }else if(e instanceof LockedAccountException){
       r.setMessage("账户被锁定");
   }else if(e instanceof AuthorizationException){
       r.setMessage("没有权限");
   }else{
       r.setMessage("认证或授权失败");
   }
   return r;
}
- 1
- 2
- 3
- 4
- 5
- 6
- 7
- 8
- 9
- 10
- 11
- 12
- 13
- 14
- 15
- 16
- 17
- 1
- 2
- 3
- 4
- 5
- 6
- 7
- 8
- 9
- 10
- 11
- 12
- 13
- 14
- 15
- 16
- 17
登陆与登出配置
假如已配置,则可忽略。
第一步:在过滤配置中允许登录时的url匿名访问,关键代码如下:
chainDefinition.addPathDefinition("/user/login/**","anon");
- 1
- 1
第二步:再过滤配置中配置登出url操作,关键代码如下:
chainDefinition.addPathDefinition("/user/logout","logout");
- 1
- 1
第三步:启动服务器,进行登录、登出访问测试
Shio框架授权业务实现
授权流程分析
授权即对用户资源访问的授权(是否允许用户访问此资源),用户访问系统资源时的授权流程如图所示:
其中授权流程分析如下:
- 系统调用subject相关方法将用户信息(例如isPermitted)递交给SecurityManager。
- SecurityManager将权限检测操作委托给Authorizer对象。
- Authorizer将用户信息委托给realm。
- Realm访问数据库获取用户权限信息并封装。
- Authorizer对用户授权信息进行判定。
思考:思考不使用shiro如何完成授权操作?intercetor,aop。
4.2 授权逻辑实现
4.2.1 Realm逻辑
修改ShiroRealm中获取权限并封装权限信息的方法,关键代码如下:
@Override
protected AuthorizationInfo doGetAuthorizationInfo(
        PrincipalCollection principalCollection) {
    //1.获取登录用户(登录时传入的用户身份是谁)
    //2.基于登录用户id获取用户权限标识(后续从数据库获取)
    Set<String> stringPermissions=new HashSet<>();
Set<String> stringPermissions=new HashSet<>();
stringPermissions.add(“sys:user:retrieve”)
stringPermissions.add(“sys:user:create”)
    //3.封装数据并返回
    SimpleAuthorizationInfo info=new SimpleAuthorizationInfo();
    info.setStringPermissions(stringPermissions);
    return info;
}
- 1
- 2
- 3
- 4
- 5
- 6
- 7
- 8
- 9
- 10
- 11
- 12
- 13
- 14
- 1
- 2
- 3
- 4
- 5
- 6
- 7
- 8
- 9
- 10
- 11
- 12
- 13
- 14
Service逻辑
在shiro框架中,授权切入点方法需要通过@RequiresPermissions注解进行描述,例如:
@RequiresPermissions("sys:user:update")
@RequestMapping("doUpdate")
public String doUpdate(){
        return "update resource";
}
- 1
- 2
- 3
- 4
- 5
- 1
- 2
- 3
- 4
- 5
其中, @RequiresPermissions注解中定义的内容为,访问此方法需要的权限.
总结(Summary)
本章节首先认识了一个Shiro安全框架,并基于此框架讲解了认证和授权等两大工程。


 1334
1334


 被折叠的 条评论
为什么被折叠?
被折叠的 条评论
为什么被折叠?
 到【灌水乐园】发言


