


1.SpringBoot异常处理
1.1.自定义错误页面
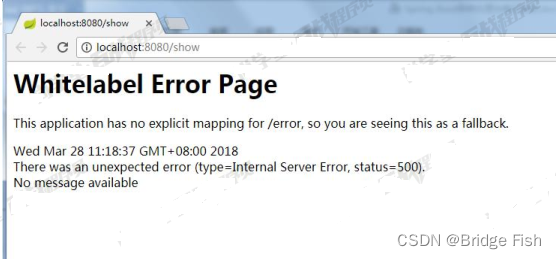
SpringBoot默认的处理异常的机制:SpringBoot 默认的已经提供了一套处理异常的机制。一旦程序中出现了异常 SpringBoot 会向/error 的 url 发送请求。在 springBoot 中提供了一个叫 BasicErrorController 来处理/error 请求,然后跳转到默认显示异常的页面来展示异常信息
如 果我 们 需 要 将 所 有 的 异 常 同 一 跳 转 到 自 定 义 的 错 误 页 面 , 需 要 再src/main/resources/
templates 目录下创建 error.html 页面。注意:名称必须叫 error
1.1.1.controller
/**
 * SpringBoot处理异常方式一:自定义错误页面
 */
@Controller
public class DemoController {

	@RequestMapping("/show")
	public String showInfo(){
		String str = null;
		str.length();
		return "index";
	}

	@RequestMapping("/show2")
	public String showInfo2(){
		int a = 10/0;
		return "index";
	}
}
1.1.2.错误页面
<!DOCTYPE html>
<html>
<head>
<meta charset="UTF-8">
<title>错误提示页面</title>
</head>
<body>
	出错了,请与管理员联系。。。
	<span th:text="${error}"></span>
</body>
</html>
1.2.整合web访问全局异常处理器
1.2.1.处理思路
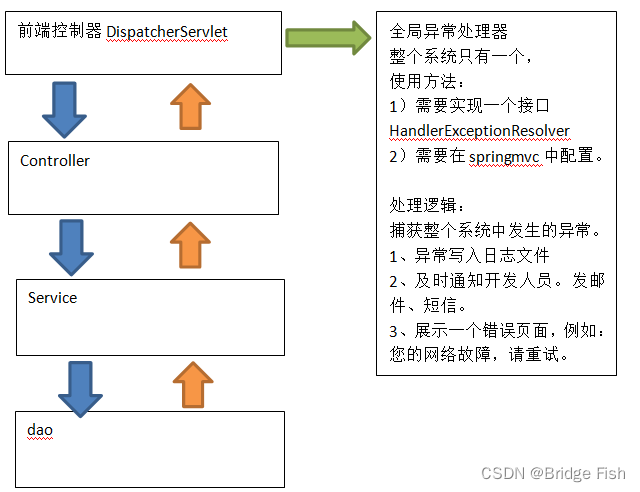
1.2.2.创建全局异常处理器
/**
 * 通过实现HandlerExceptionResolver接口做全局异常处理
 */
@Component
public class GlobalException implements HandlerExceptionResolver {

	@Override
	public ModelAndView resolveException(HttpServletRequest request, HttpServletResponse response, Object handler,Exception ex) {
		ModelAndView mv = new ModelAndView();
		//判断不同异常类型,做不同视图跳转
		if(ex instanceof ArithmeticException){
			mv.setViewName("error1");
		}else if(ex instanceof NullPointerException){
			mv.setViewName("error2");
		}
		mv.addObject("error", ex.toString());

		return mv;
	}
}
1.2.3.错误页面
error1.html
<!DOCTYPE html>
<html>
<head>
<meta charset="UTF-8">
<title>错误提示页面-ArithmeticException</title>
</head>
<body>
	出错了,请与管理员联系。。。
	<span th:text="${error}"></span>
</body>
</html>
error2.html
<!DOCTYPE html>
<html>
<head>
<meta charset="UTF-8">
<title>错误提示页面-NullPointerException</title>
</head>
<body>
	出错了,请与管理员联系。。。
	<span th:text="${error}"></span>
</body>
</html>
1.3.整合ajax全局异常处理
1.3.1.创建全局异常处理器
@ControllerAdvice
public class AjaxGlobalExceptionHandler {


    /**
     * 处理全局异常
     * @param exception   异常
     * @return Map<String, Object>
     */
    @ResponseBody
    @ExceptionHandler(value = Exception.class)
    public Map<String, Object> errorHandler(Exception exception) {
        Map<String, Object> map = new HashMapMap<>();
        map.put("status", 500);
        map.put("msg", exception.getMessage());
        return map;
    }
}
2.Spring Boot整合Junit
2.1.Junit启动器
		<!--junit启动器 -->
		<dependency>
			<groupId>org.springframework.boot</groupId>
			<artifactId>spring-boot-starter-test</artifactId>
		</dependency>
2.2.编写业务代码
2.2.1.dao
@Repository
public class UserDaoImpl {

	public void saveUser(){
		System.out.println("insert into users.....");
	}
}
2.2.2.service
@Service
public class UserServiceImpl {

	@Autowired
	private UserDaoImpl userDaoImpl;

	public void addUser(){
		this.userDaoImpl.saveUser();
	}
}
2.2.3.app
@SpringBootApplication
public class App {

	public static void main(String[] args) {
		SpringApplication.run(App.class, args);
	}
}
2.3.整合Junit
/**
 *  main方法:
 *		ApplicationContext ac=new
 *       			ClassPathXmlApplicationContext("classpath:applicationContext.xml");
 *  junit与spring整合:
 *      @RunWith(SpringJUnit4ClassRunner.class):让junit与spring环境进行整合
 *   	@Contextconfiguartion("classpath:applicationContext.xml")
 */
@RunWith(SpringJUnit4ClassRunner.class)
@SpringBootTest(classes={App.class})
public class UserServiceTest {

	@Autowired
	private UserServiceImpl userServiceImpl;

	@Test
	public void testAddUser(){
		this.userServiceImpl.addUser();
	}
}


 380
380


 被折叠的 条评论
为什么被折叠?
被折叠的 条评论
为什么被折叠?
 到【灌水乐园】发言


