


布局
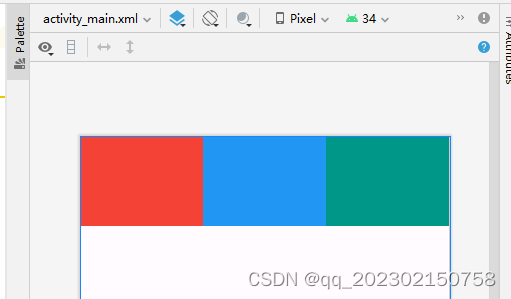
1、线性布局:LinearLayout
特点:按照水平或垂直方向排列子视图,可以通过权重属性控制子视图的相对大小。
适用场景:适合简单的布局,如按钮、文本输入框等的垂直或水平排列。
实际应用
水平:orientation="horizontal"
垂直:orientation="vertical"
权重:layout_weight="1"
截图:
代码:
<LinearLayout
    xmlns:android="http://schemas.android.com/apk/res/android"
    xmlns:app="http://schemas.android.com/apk/res-auto"
    xmlns:tools="http://schemas.android.com/tools"
    android:id="@+id/main"
    android:layout_width="match_parent"
    android:layout_height="match_parent"
    android:orientation="horizontal"
    tools:context=".MainActivity">
    <TextView
        android:layout_width="0dp"
        android:layout_height="100dp"
        android:layout_weight="1"
        android:background="#F44336" />
    <TextView
        android:layout_width="0dp"
        android:layout_height="100dp"
        android:layout_weight="1"
        android:background="#2196F3" />
    <TextView
        android:layout_width="0dp"
        android:layout_height="100dp"
        android:layout_weight="1"
        android:background="#009688" />
</LinearLayout>
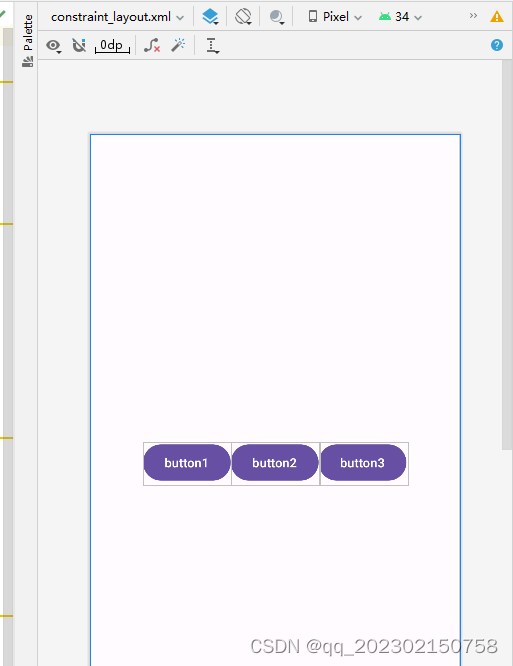
2、约束布局:ConstraintLayout
特点:通过约束关系定位子视图,可以实现复杂的布局,灵活且性能良好。
适用场景:一个控件相对于另一个控件进行定位
实际应用
可以通过拖动视图和添加约束来创建相对位置关系,而不是通过嵌套布局来实现。
可以在编辑器中直观地定义布局,也可以在 XML 中定义约束关系。
可以使用链(Chains)来定义一组视图的布局关系,如水平链或垂直链。
支持动态布局,可以在运行时更改视图的约束关系。
截图:
代码:
<?xml version="1.0" encoding="utf-8"?>
<androidx.constraintlayout.widget.ConstraintLayout xmlns:android="http://schemas.android.com/apk/res/android"
    xmlns:app="http://schemas.android.com/apk/res-auto"
    xmlns:tools="http://schemas.android.com/tools"
    android:layout_width="match_parent"
    android:layout_height="match_parent">
    <Button
        android:id="@+id/button1"
        android:layout_width="wrap_content"
        android:layout_height="wrap_content"
        android:text="button1"
        app:layout_constraintHorizontal_chainStyle="packed"
        app:layout_constraintBottom_toBottomOf="parent"
        app:layout_constraintEnd_toStartOf="@+id/button2"
        app:layout_constraintLeft_toLeftOf="parent"
        app:layout_constraintStart_toStartOf="parent"
        app:layout_constraintTop_toTopOf="parent"/>
    <Button
        android:id="@+id/button2"
        android:layout_width="wrap_content"
        android:layout_height="wrap_content"
        android:text="button2"
        app:layout_constraintBottom_toBottomOf="parent"
        app:layout_constraintEnd_toStartOf="@+id/button3"
        app:layout_constraintStart_toEndOf="@+id/button1"
        app:layout_constraintTop_toTopOf="parent" />
    <Button
        android:id="@+id/button3"
        android:layout_width="wrap_content"
        android:layout_height="wrap_content"
        android:text="button3"
        app:layout_constraintBottom_toBottomOf="parent"
        app:layout_constraintEnd_toEndOf="parent"
        app:layout_constraintStart_toEndOf="@+id/button2"
        app:layout_constraintTop_toTopOf="parent" />
</androidx.constraintlayout.widget.ConstraintLayout>
3、表格布局:TableLayout
特点: 将子视图放置在网格中,支持多行多列的布局,类似于 HTML 中的表格。
适用场景:多个控件进行表格排列。
实际应用
每行数据通过<TableRow>包裹,每列通过<TextView>等视图组件表示。
用stretchColumns属性来指定在布局中拉伸的列。
适合用于显示表格数据,每个单元格中的视图可以是文本、按钮或其他视图组件。
截图:

代码:
<?xml version="1.0" encoding="utf-8"?>
<TableLayout xmlns:android="http://schemas.android.com/apk/res/android"
    xmlns:app="http://schemas.android.com/apk/res-auto"
    android:layout_width="match_parent"
    android:layout_height="match_parent"
    android:stretchColumns="0,2"
    android:shrinkColumns="1"
    android:collapseColumns="2">
    <TableRow>
        <Button android:text="按钮1"/>
        <Button android:text="按钮2"/>
        <Button android:text="按钮3"/>
    </TableRow>
    <Button android:text="独自一行的按钮"/>
    <TableRow>
        <Button android:text="普通按钮1"
            android:layout_column="1"/>
    </TableRow>
    <TableRow>
        <Button android:text="普通按钮2"
            android:layout_span="2"/>
    </TableRow>
</TableLayout>
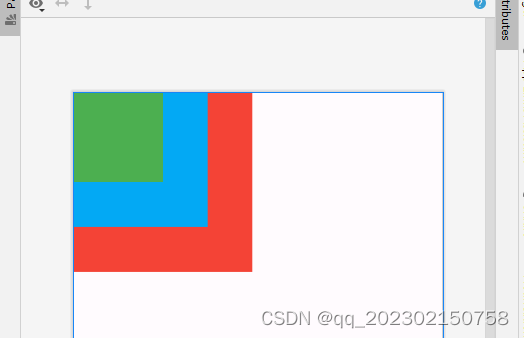
4、帧布局:FrameLayout
特点:子视图叠加显示,最后添加的视图会在最上层显示,通常用于单个子视图的容器。
适用场景:开辟空白区域,帧里面的控件叠加。
实际应用
用layout_gravity属性来设置子视图在父视图中的位置,如左上角、右下角等。
适合用作容器,以显示单个视图组件或用于加载不同的 Fragment。
截图:
代码:
<FrameLayout xmlns:android="http://schemas.android.com/apk/res/android"
    xmlns:tools="http://schemas.android.com/tools"
    android:layout_width="match_parent"
    android:layout_height="match_parent"
    tools:context=".MainActivity">

    <TextView
        android:layout_width="200dp"
        android:layout_height="200dp"
        android:background="#F44336" />
    <TextView
        android:layout_width="150dp"
        android:layout_height="150dp"
        android:background="#03A9F4" />
    <TextView
        android:layout_width="100dp"
        android:layout_height="100dp"
        android:background="#4CAF50" />
</FrameLayout>
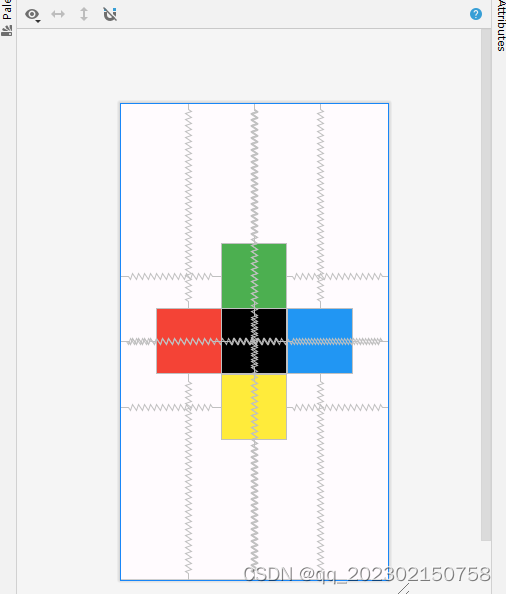
5、相对布局:RelativeLayout
特点:子视图相对于父视图或其他子视图定位,可以实现复杂的布局结构。
适用场景:控件之间存在相应关系。
实际应用
可以通过设置子视图之间的相对位置关系来创建复杂的布局结构。
截图:
代码:
<?xml version="1.0" encoding="utf-8"?>
<RelativeLayout xmlns:android="http://schemas.android.com/apk/res/android"
    android:layout_width="match_parent"
    android:layout_height="match_parent">
    <TextView
        android:id="@+id/tv1"
        android:layout_width="100dp"
        android:layout_height="100dp"
        android:layout_centerInParent="true"
        android:background="@color/black"/>
    <TextView
        android:layout_width="100dp"
        android:layout_height="100dp"
        android:layout_centerInParent="true"
        android:background="#F44336"
        android:layout_toLeftOf="@id/tv1"/>
    <TextView
        android:layout_width="100dp"
        android:layout_height="100dp"
        android:layout_centerInParent="true"
        android:background="#2196F3"
        android:layout_toRightOf="@id/tv1"/>
    <TextView
        android:layout_width="100dp"
        android:layout_height="100dp"
        android:layout_centerInParent="true"
        android:background="#4CAF50"
        android:layout_above="@id/tv1"/>
    <TextView
        android:layout_width="100dp"
        android:layout_height="100dp"
        android:layout_centerInParent="true"
        android:background="#FFEB3B"
        android:layout_below="@id/tv1"/>
</RelativeLayout>
界面交互
1、按钮点击事件
按钮点击事件是最基本的交互操作之一。要实现按钮点击事件,首先需要在布局文件中定义一个按钮。在你的Activity中,通过特定的方法找到这个按钮,并为它设置一个点击事件监听器。当用户点击按钮时,监听器中的代码就会执行。想象你在手机上点击一个按钮,屏幕会弹出一个提示或执行某个操作,比如跳转到另一个界面或显示一条消息。这就是按钮点击事件的核心功能。
代码
Button myButton = findViewById(R.id.my_button);
myButton.setOnClickListener(new View.OnClickListener() {
    @Override
    public void onClick(View v) {
        // 处理点击事件
    }
});
2、列表项点击事件
对于ListView中的列表项,可以设置项的点击事件。列表项点击事件通常用于显示一系列项目,比如联系人列表、购物清单等。当用户点击列表中的某一项时,会触发相应的事件,比如显示该项的详细信息。
代码
ListView listView = findViewById(R.id.my_list_view);
listView.setOnItemClickListener(new AdapterView.OnItemClickListener() {
    @Override
    public void onItemClick(AdapterView<?> parent, View view, int position, long id) {
        // 处理列表项点击事件
    }
});
3、滑动操作
滑动操作主要用于检测用户在屏幕上的滑动手势,常见于照片浏览、新闻阅读等应用。当用户在屏幕上滑动时,可以触发相应的事件,比如翻页或加载更多内容。要实现滑动操作,通常使用`GestureDetector`类来检测不同的手势,比如左滑、右滑、上下滑动等。通过监听这些手势,可以让应用对用户的滑动操作作出相应的反应。
代码
final GestureDetector gestureDetector = new GestureDetector(this, new GestureDetector.SimpleOnGestureListener() {
    @Override
    public boolean onFling(MotionEvent e1, MotionEvent e2, float velocityX, float velocityY) {
        // 处理滑动事件
        return super.onFling(e1, e2, velocityX, velocityY);
    }
});

View view = findViewById(R.id.my_view);
view.setOnTouchListener(new View.OnTouchListener() {
    @Override
    public boolean onTouch(View v, MotionEvent event) {
        return gestureDetector.onTouchEvent(event);
    }
});
4、菜单项
菜单项通常用于提供一些全局的操作选项,比如设置、搜索、分享等。在Android中,菜单项可以在应用的顶部或底部显示,用户点击后会执行相应的操作。在你的Activity中,可以通过覆盖特定的方法来创建和处理菜单项。这样,当用户点击菜单中的某个选项时,对应的代码就会执行。例如,在一个购物应用中,用户可以点击菜单项来切换商品类别,这是菜单项的典型应用。
代码
@Override
public boolean onCreateOptionsMenu(Menu menu) {
    getMenuInflater().inflate(R.menu.my_menu, menu);
    return true;
}

@Override
public boolean onOptionsItemSelected(MenuItem item) {
    switch (item.getItemId()) {
        case R.id.menu_item_1:
            // 处理菜单项1的点击
            return true;
        case R.id.menu_item_2:
            // 处理菜单项2的点击
            return true;
        default:
            return super.onOptionsItemSelected(item);
    }
}
5、对话框
对话框是一种弹出窗口,通常用于显示重要的信息或让用户进行选择。
代码
AlertDialog.Builder builder = new AlertDialog.Builder(this);
builder.setTitle("Title")
    .setMessage("Message")
    .setPositiveButton("OK", new DialogInterface.OnClickListener() {
        @Override
        public void onClick(DialogInterface dialog, int which) {
            // 处理“OK”按钮的点击事件
        }
    })
        .setNegativeButton("Cancel",new DialogInterface.OnClickListener() {
            @Override
            public void onClick(DialogInterface dialog, int which) {
                // 处理“Cancel”按钮的点击事件
            }
        });
AlertDialog dialog = builder.create();
    dialog.show();
总结
本学期Android课程让我收获很多,尤其是布局方面,线性布局、相对布局、帧布局、表格布局和约束布局,这些不同类型的布局我都比较熟悉了,知道如何用它们来设计出各种界面。
不过,在用户交互方面,我还需要多加练习。虽然我了解了一些基本的交互方式,但实际操作起来还不够熟练。比如,按钮点击事件和列表项点击事件,虽然知道它们的重要性,但在代码中实现时常常觉得细节很多,不容易掌握。
总体来说,通过这次课程,我在布局方面打下了坚实的基础,但在用户交互方面还需要进一步的深入学习和实践,才能更加自如地开发功能全面的Android应用。


 1009
1009

 被折叠的 条评论
为什么被折叠?
被折叠的 条评论
为什么被折叠?
 到【灌水乐园】发言


