


全网最细使用Vite搭建一个组件库
准备工作
先使用vite 搭建基础版本脚手架这里不做讲解、由于vite初始化什么都没有安装、我采用了自己改造过的脚手架
详情见GitHub 内置vue-router、commitlint、stylelint、eslint、prettier、unplugin-vue-components、unplugin-auto-import、lint-staged、sentry、pinia、husky...基本上可以满足团队日常开发需求。
😅言归正传、生成目录大概是这样的
├── README.md├── commitlint.config.cjs├── index.html├── package.json├── pnpm-lock.yaml├── public│ ├── version.txt│ └── vite.svg├── src│ ├── App.vue│ ├── api│ │ └── index.ts│ ├── assets│ ├── auto-imports.d.ts│ ├── components│ ├── components.d.ts│ ├── global.d.ts│ ├── hooks│ ├── intercept.ts│ ├── main.ts│ ├── router│ ├── store│ ├── utils│ ├── views│ ├── vite-env.d.ts│ └── workers│ ├── versionCheckWorker.ts│ └── worker.ts├── tsconfig.json├── tsconfig.node.json└── vite.config.ts
一系列的修改操作
-
修改
src为packages,删除views目录 -
修改
alias把所有和src相关的别名路径修改为components、修改目录为vite.config.ts、tsconfig.json
// vite.config.tsalias: [{find: "@",replacement: resolve(__dirname, "../packages"),},],
// tsconfig.json{..."paths": {"@/*": ["packages/*"],},...}
-
删除不需要用到的文件夹
store... -
修改index.html中
script标签中src路径为/packages/main.ts -
packages下新建文件夹theme-chalk后续用来存放样式
修改后的目录结构
├── README.md├── commitlint.config.cjs├── index.html├── package.json├── pnpm-lock.yaml├── public│ ├── version.txt│ └── vite.svg├── packages│ ├── App.vue│ ├── api│ ├── assets│ ├── auto-imports.d.ts│ ├── components│ ├── components.d.ts│ ├── global.d.ts│ ├── hooks│ ├── intercept.ts│ ├── main.ts│ ├── router│ ├── store│ ├── utils│ └── vite-env.d.ts├── tsconfig.json├── tsconfig.node.json└── vite.config.ts
后续就可以在components文件夹下开发组件了,查看组件的话直接在router上配置路径即可
敲黑板:每个组件必须设置
name,不然后续全局注册会有问题components整体格式如下
├── components├── button│ ├──Button.vue│ └──index.ts└──index.ts
相关代码如下
<!-- Button.vue --><template><div class="bq-button"><span>-测试按钮-6</span></div></template><script setup lang="ts">defineOptions({name: "BqButton",});</script><style lang="scss" scoped>@import "@theme-chalk/button.scss";</style>
// index.tsimport Button from "./Button.vue";import { withInstall } from "../../utils/tool";export const BqButton = withInstall(Button);export default BqButton;
withInstall相关方法如下、主要是为了全局注册
import type { App } from "vue";export const withInstall = <T extends Component>(comp: T) => {(comp as Record<string, unknown>).install = (app: App) => {const compName = comp.name;if (!compName) return;app.component(compName, comp);};return comp;};
// 最外层index.tsexport * from "./button";
这时候我们的组件基本就写好了,查看组件只需要在router下配置路径即可
{path: "/",name: "button",meta: {title: "login",},component: () => import(/* webpackChunkName: "button" */ "@/components/button/Button.vue"),},
打包配置
先给大家看配置、再给大家讲为什么
// vite.config.tsimport { defineConfig } from "vite";import vue from "@vitejs/plugin-vue";import { resolve } from "path";import { pluginsConfig, resolveConfig } from "./scripts/preview";import dts from "vite-plugin-dts";export default defineConfig(() => {return {build: {outDir: "build",cssCodeSplit: true,rollupOptions: {external: ["three", "@ant-design/icons-vue", "ant-design-vue", "unplugin-vue-components", "unplugin-auto-import", "vue"],output: [{format: "es",entryFileNames: "[name].js",exports: "named",name: "BqDesign",dir: "./build/dist",},{format: "es",entryFileNames: "[name].js",exports: "named",preserveModules: true,preserveModulesRoot: "packages",dir: "./build/es",},{format: "cjs",entryFileNames: "[name].js",exports: "named",preserveModules: true,preserveModulesRoot: "packages",dir: "./build/lib",},],},lib: {entry: resolve(__dirname, "./packages/index.ts"),name: "BqDesign",fileName: (format) => `bq-design.${format}.js`,formats: ["es", "cjs"],},},plugins: [vue(),dts({tsconfigPath: "./tsconfig.prod.json",outDir: "build/lib",}),dts({tsconfigPath: "./tsconfig.prod.json",outDir: "build/es",}),...pluginsConfig,],resolve: resolveConfig,};});
一点一点给大家捋一下为什么这么写
1、为什么output需要这样配置
首先按照官网给的示例配置并执行
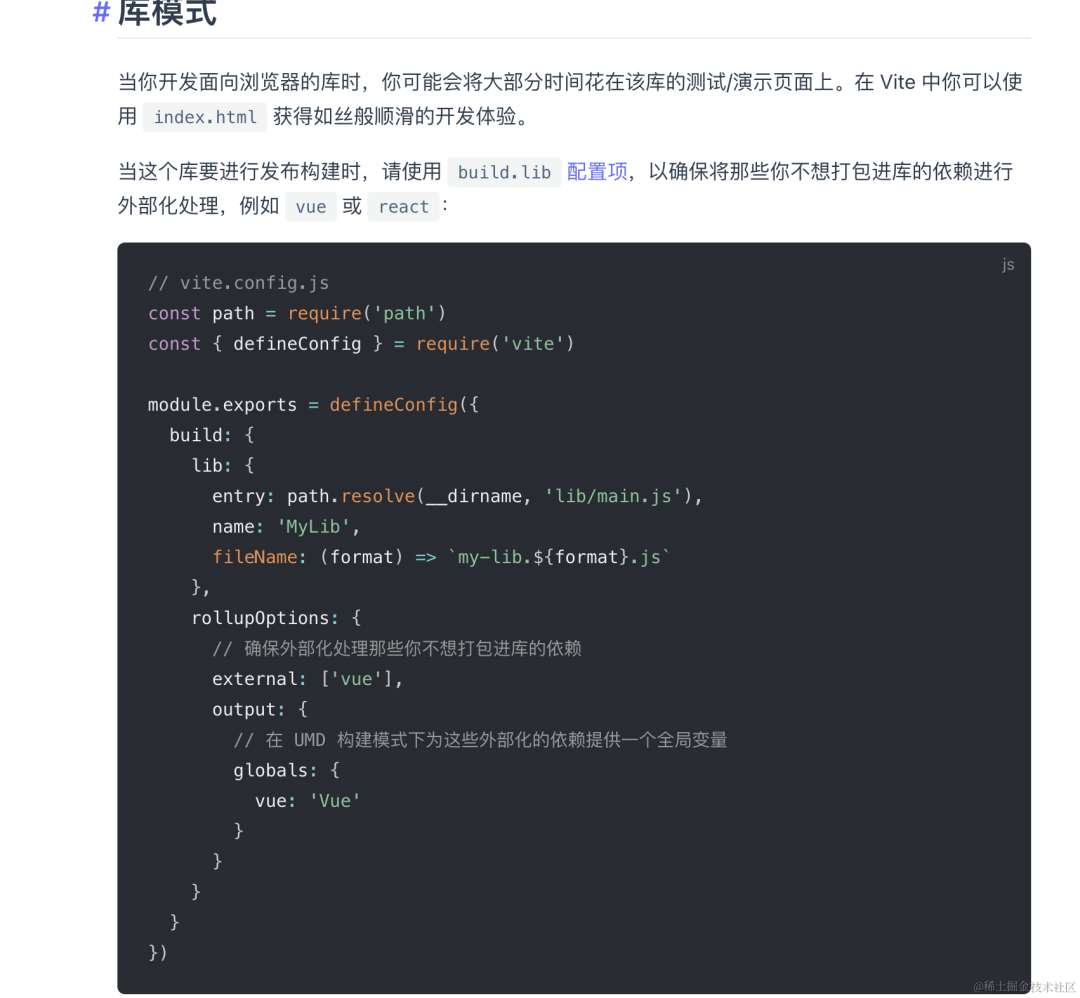
image.png
打包后,有问题吗?没问题。但就是有点奇怪,因为我们打包后结构是这样的
└── dist├── index.js└── style.css
毕竟我们都是见过世面的🤓,为什么我们打包出来的和ant-design-vue、ElementPlus差距这么大, 毕竟学习的过程就是先模仿后创造

image.png
大概看了一下 ElementPlus 是基于vite开发的,ant-design-vue还是webpack、那我们先看一下ElementPlus打包后的结构大概如下
└── build├── dist├── es├── lib├── README.md└── package.json
很明显他输出了三个包(说明我们在output中也需要配置3个输出文件)、首先es文件夹用来兼容esm语法、lib文件夹兼容commentJs、dist也是esm语法他的css是打包在一个文件里的主要是为了全局引入css,配置好后大概是这个样子
output: [{format: "es",entryFileNames: "[name].js",dir: "./build/dist",},{format: "es",entryFileNames: "[name].js",dir: "./build/es",},{format: "cjs",entryFileNames: "[name].js",dir: "./build/lib",},],
之后我们执行打包脚步 pnpm run build 不报错的情况下打包出来应该已经是有三个文件了,但好像js和css还是在一起,怎么办?当然是看文档了🤑
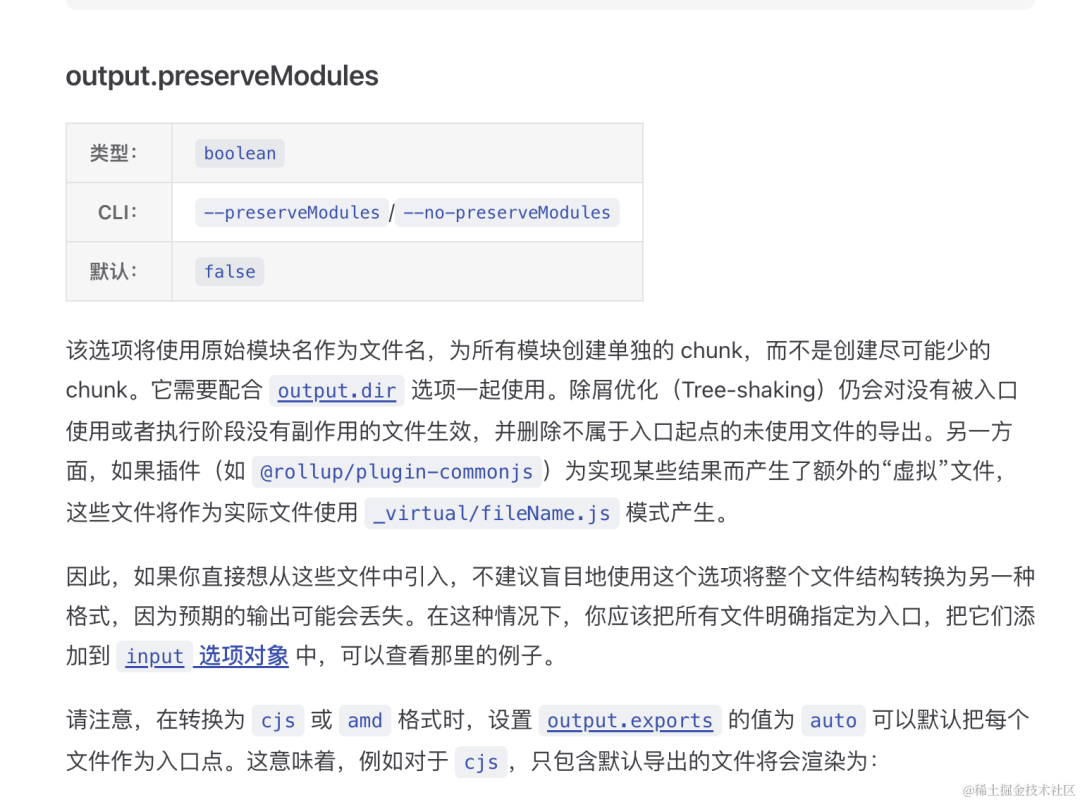
image.png
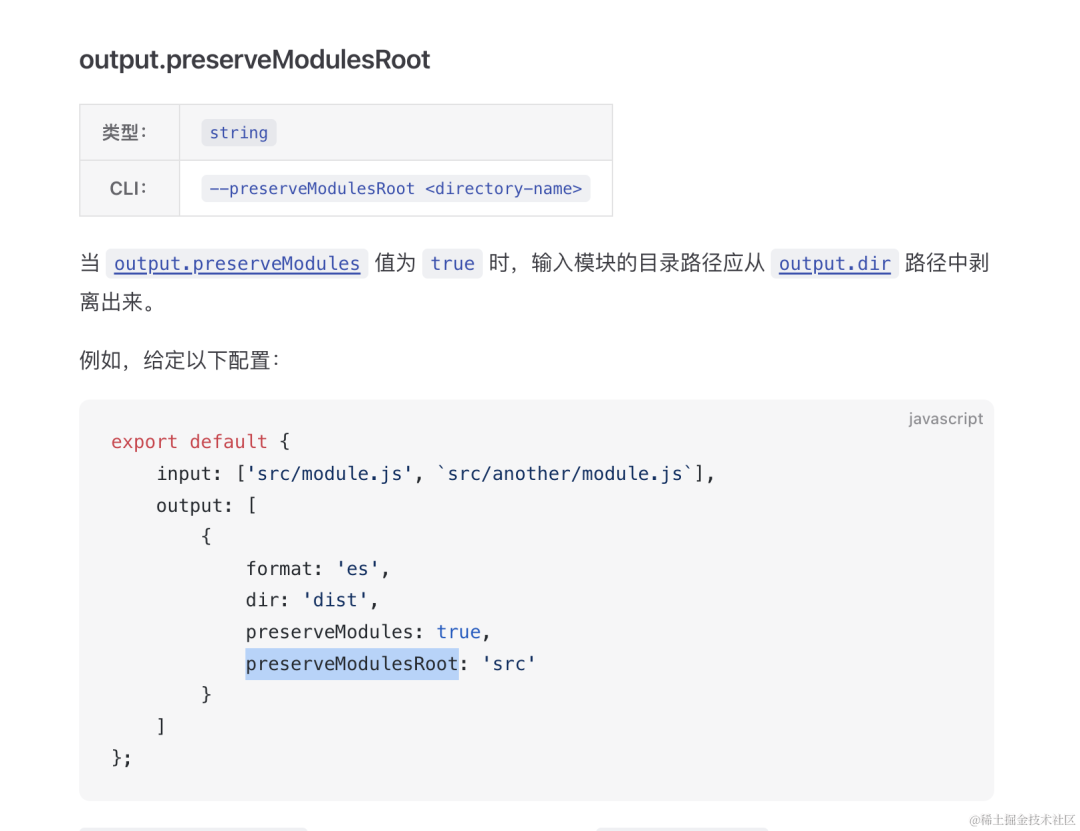
image.png
原来如此、配置后执行打包命令,果然没问题
2、为什么cssCodeSplit是要改为true?
因为在vite在lib模式下cssCodeSplit默认是false,其实官方有说明,可只在英文文档做了说明🥲
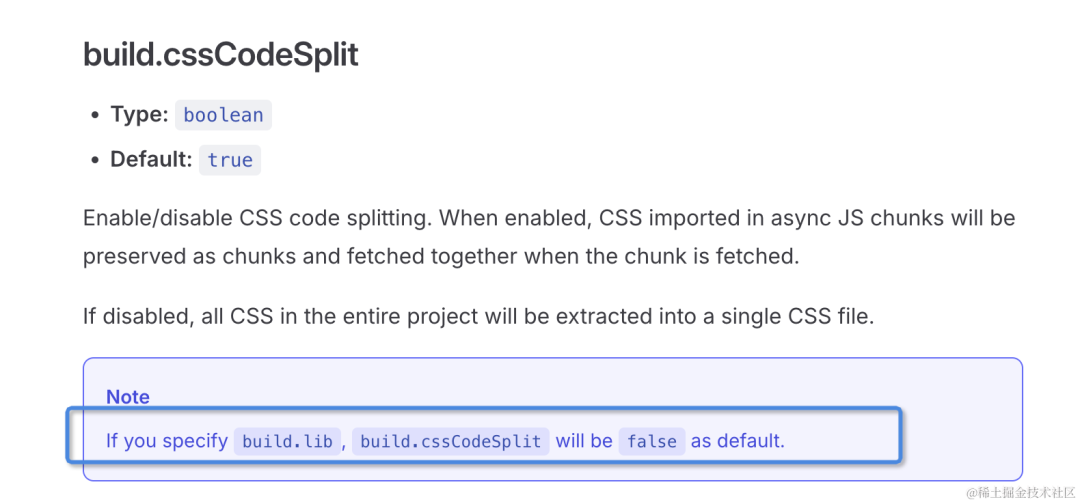
image.png
没注意到的打包后所有组件css都在一个文件、后续就没有办法实现我们的按需引入了
3、如何打包出ts类型标注
使用pnpm下载 vite-plugin-dts 该插件
pnpm add vite-plugin-dts -D
由于我们在lib和es库里都需要打包ts,所以需要配置两个dts,代码如下
dts({tsconfigPath: "./tsconfig.prod.json",outDir: "build/lib",}),dts({tsconfigPath: "./tsconfig.prod.json",outDir: "build/es",}),
tsconfigPath,需要单独引入一个新的tsconfig配置、主要是因为我们打包的include和exclude配置和实际开发中还是有一定区别。并且include配置有问题会导致打包出的类型没有放在实际文件夹下。
新建了一个tsconfig.prod.json文件,代码如下
{"extends": "./tsconfig.json","include": ["packages/**/*.vue","packages/**/*.d.ts","packages/**/*.ts",],"exclude": ["./packages/main.ts","node_modules","./packages/router/*"]}
走到这里其实我们的组件已经小有所成了
开发文档
一个好的组件离不开一个优秀的文档、这里我推荐大家使用VitePress,相对于市面上其他的文档生成工具VitePress拥有着强大的生态环境和相对稳定的版本,文档地址,根据文档操作,之后会在最外层目录下生成一个docs文件,里面就可以快乐的写我们的文档了,这里就不做演示了。
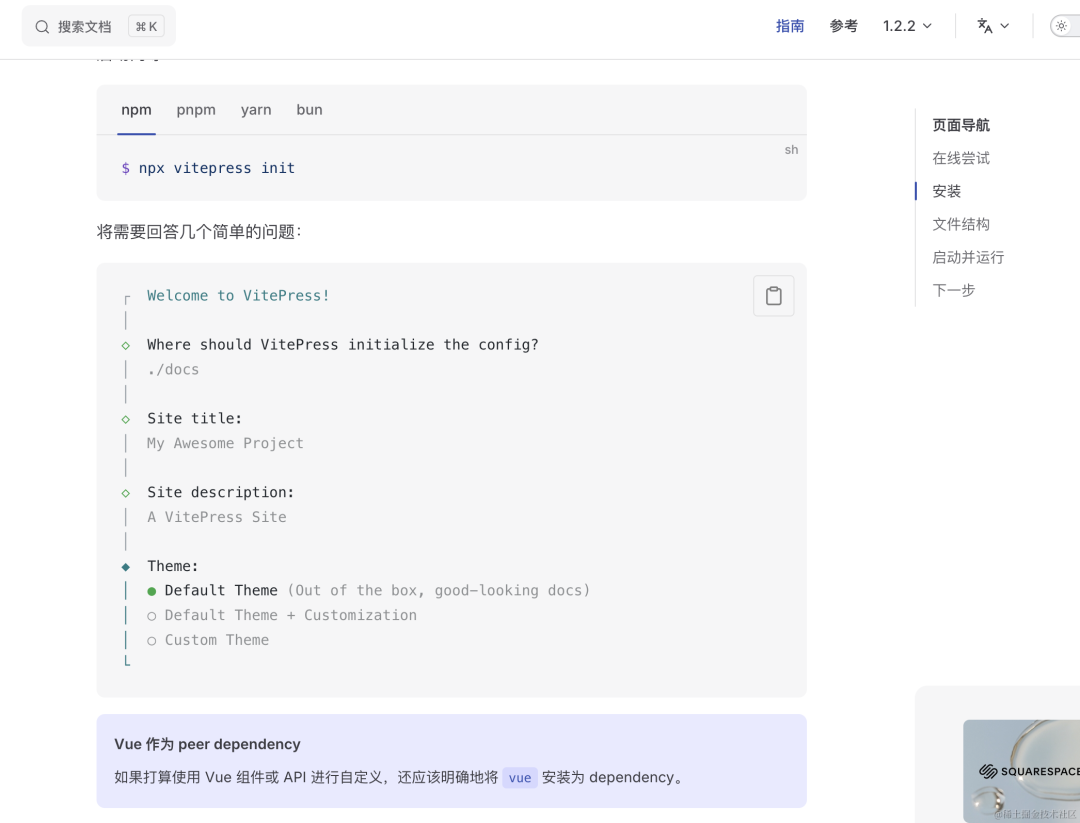
image.png
关于 unplugin-vue-components 自动引入
const BqDesignResolver = () => {return {type: "component" as const,resolve: (name) => {if (name.startsWith("Bq")) {const pathName = name.slice(2).toLowerCase();return {importName: name,from: "bq-design",path: `bq-design/es/components/${pathName}/index.js`,sideEffects: `bq-design/es/components/${pathName}/${name.slice(2)}.css`,};}},};};
更改名称为自己组件库即可
手动导入组件
在vite中严格意义上是不需要手动导入,因为Vite提供了基于 ES Module 的开箱即用的Tree Shaking 功能,但有一种情况就是我开发的组件库引入了第三方包,比如threeJs,但在实际运用中,我只引用了我的Button按钮,会报错,因为我们的导出模块是有关联的,实际这么引用
上述情况使用
Vite一定要在optimizeDeps.exclude添加相应的包如bq-design,因为预加载发现缺少依赖会报错
import {Button} from 'bq-design'开发环境下是会导出全部的bq-design(生产环境并不会哦),默认情况按需引入需要这样导入
import BqButton from "bq-design/es/components/button";但这样还存在着无法引入样式的问题,所以我们需要自己开发一个vite插件进行转换,代码如下
export default function importPlugin() {const regStr = /(?<!\/\/.*|\/\*[\s\S]*?\*\/\s*)import\s*{\s*([^{}]+)\s*}\s*from\s*['"]bq-design['"]/g;return {name: "vite-plugin-import",enforce: "pre",transform: (code: string, id: string) => {if (id.endsWith(".vue")) {const str = code.replaceAll(regStr, (match, imports) => {const list = imports.split(",");const newPath: string[] = [];list.forEach((item: string) => {item = item.trim();const name = item.slice(2).charAt(0).toLowerCase() + item.slice(3);const str = `import ${item.trim()} from 'bq-design/es/components/${name.trim()}';import 'bq-design/es/components/${name.trim()}/${item.trim().slice(2)}.css'`;newPath.push(str);});return newPath.join(";");});return str;}return code;},};}
Webpack用户可以使用 babel-plugin-import进行处理同样这也是ant-design-vue的处理方式


 770
770

 被折叠的 条评论
为什么被折叠?
被折叠的 条评论
为什么被折叠?
 到【灌水乐园】发言


