


1xml配置方式(配置文件+注解的方式)
前提导入相关依赖:pom文件
说明:下方依赖是ssm项目中较为常用的一部分,可能部分依赖对于springmvc配置并未有关系,根据自己需求添加和删除。
<dependencies>
    <!--        springmvc依赖-->
    <dependency>
      <groupId>org.springframework</groupId>
      <artifactId>spring-webmvc</artifactId>
      <version>5.1.2.RELEASE</version>
    </dependency>
    <!--        spring核心依赖-->
    <dependency>
      <groupId>org.springframework</groupId>
      <artifactId>spring-core</artifactId>
      <version>5.1.2.RELEASE</version>
    </dependency>
    <dependency>
      <groupId>org.springframework</groupId>
      <artifactId>spring-context</artifactId>
      <version>5.1.2.RELEASE</version>
    </dependency>
    <!--        spring事务依赖-->
    <dependency>
      <groupId>org.springframework</groupId>
      <artifactId>spring-tx</artifactId>
      <version>5.1.2.RELEASE</version>
    </dependency>
    <!--        spring jdbc-->
    <dependency>
      <groupId>org.springframework</groupId>
      <artifactId>spring-jdbc</artifactId>
      <version>4.2.0.RELEASE</version>
    </dependency>
    <!--        mysql数据库连接驱动-->
    <dependency>
      <groupId>mysql</groupId>
      <artifactId>mysql-connector-java</artifactId>
      <version>5.1.12</version>
    </dependency>
    <!--        Druid数据库连接池-->
    <dependency>
      <groupId>com.alibaba</groupId>
      <artifactId>druid</artifactId>
      <version>1.2.1</version>
    </dependency>
    <!--        Junit集成单元测试依赖坐标-->
    <dependency>
      <groupId>junit</groupId>
      <artifactId>junit</artifactId>
      <version>4.12</version>
      <scope>test</scope>
    </dependency>
<!--        与junit为基础的spring单元测试-->
    <dependency>
      <groupId>org.springframework</groupId>
      <artifactId>spring-test</artifactId>
      <version>5.1.12.RELEASE</version>
    </dependency>

    <!--          servlet-->
    <dependency>
      <groupId>javax.servlet</groupId>
      <artifactId>javax.servlet-api</artifactId>
      <version>3.1.0</version>
      <scope>provided</scope>
    </dependency>
    <!--        jsp-->
    <dependency>
      <groupId>javax.servlet</groupId>
      <artifactId>jsp-api</artifactId>
      <version>2.0</version>
      <scope>provided</scope>
    </dependency>
    <!--        切面变成AspectJ依赖-->
    <dependency>
      <groupId>org.aspectj</groupId>
      <artifactId>aspectjweaver</artifactId>
      <version>1.9.6</version>
    </dependency>
    <!--  lombok(此依赖的目的是简化javabean的书写!)-->
    <dependency>
      <groupId>org.projectlombok</groupId>
      <artifactId>lombok</artifactId>
      <version>1.18.10</version>
    </dependency>
    <!--jsckson -->
    <dependency>
      <groupId>com.fasterxml.jackson.core</groupId>
      <artifactId>jackson-databind</artifactId>
      <version>2.9.9</version>
    </dependency>
    <!--文件上传-->
    <dependency>
      <groupId>commons-fileupload</groupId>
      <artifactId>commons-fileupload</artifactId>
      <version>1.4</version>
    </dependency>
  </dependencies>
1.1XML配置文件SpringMVCConfig.xml
<?xml version="1.0" encoding="UTF-8"?>
<beans xmlns="http://www.springframework.org/schema/beans"
       xmlns:xsi="http://www.w3.org/2001/XMLSchema-instance"
       xmlns:mvc="http://www.springframework.org/schema/mvc"
       xmlns:context="http://www.springframework.org/schema/context"
       xsi:schemaLocation="
       http://www.springframework.org/schema/beans
	   http://www.springframework.org/schema/beans/spring-beans.xsd
       http://www.springframework.org/schema/mvc
	   http://www.springframework.org/schema/mvc/spring-mvc.xsd
       http://www.springframework.org/schema/context
	   http://www.springframework.org/schema/context/spring-context.xsd
	">
    <!--开启注解组件扫描-->
    <context:component-scan base-package="com.yc.controller"/>
    <!--开启mvc注解支持-->
    <mvc:annotation-driven/>
    <!--自定义 视图解析器-->
    <!--<bean class="org.springframework.web.servlet.view.InternalResourceViewResolver">
        //jsp页面放在web-inf下需要配置前缀/WEB-INF/pages/
        <property name="prefix" value="/WEB-INF/pages/"></property>
        //为访问的jsp页面拼接缀.jsp
        <property name="suffix" value=".jsp" ></property>
    </bean>-->

    <!--配置tomcat默认的静态资源处理-->
    <mvc:default-servlet-handler/>

</beans>
Controller层控制类
@Controller
public class HelloWordController {
//    编写普通方法/该项目为独立项目,不属于模块所以有target目录,所以在映射目路径时需要注意加上项目名称
//    当作为模块的项目不需要加上项目名称,应为其项目路径为自动映射上下文。
    @RequestMapping("/page1")
    public String uservo2(UserVO uservo){
        return "/hello.jsp" ;
    }
}
前端页面hello.jsp:
<%--
  Created by IntelliJ IDEA.
  User: l
  Date: 2023/8/4
  Time: 15:19
  To change this template use File | Settings | File Templates.
--%>
<%@ page contentType="text/html;charset=UTF-8" language="java" %>
<html>
<head>
    <title>Title</title>
</head>
<body>
<h1>你好mvc!!!</h1>
</body>
</html>
当我们在浏览器的地址栏中输入 localhost:8080/你的项目名/page1
该请求就会被HelloWordController拦截到进行匹配路径从而找到有 @RequestMapping("/page1")
执行该注解标注的方法通过return跳转到对应得jsp页面。
1.2 自定义视图解析器
在配置文件中添加以下配置
    <!--自定义 视图解析器-->
    <bean class="org.springframework.web.servlet.view.InternalResourceViewResolver">
        <!--jsp页面放在web-inf下需要配置前缀/WEB-INF/pages/-->
        <property name="prefix" value="/WEB-INF/pages/"></property>
        <!--为访问的jsp页面拼接缀.jsp-->
        <property name="suffix" value=".jsp" ></property>
    </bean>
这样我们在访问资源时在注解@RequestMapping("写上你想要映射的URL")
return "jsp页面名字";
如下:
//Controler中写如下方法
@RequestMapping("/hello")
    public String hello(){
        System.out.println("==>HelloWordController33");
        return "hello";
    }
这样在访问路径
localhost:8080/你的项目名/hello
就会根据视图解析器的配置自动给你拼接路径
localhost:8080/你的项目名/WEB-INF/pages/hello.jsp
注意:如果我们不想通过配置的视图解析器来缝合路径访问资源可以采用请求转发或者重定向的方式绕过视图解析器的缝合路径
//Controler中写如下方法===>请求转发
@RequestMapping("/hello1")
    public String hello(){
        System.out.println("==>HelloWordController33");
        return "forward:/hello.jsp";
    }

//Controler中写如下方法===>重定向
@RequestMapping("/hello2")
    public String hello(){
        System.out.println("==>HelloWordController33");
        return "redirect:/hello.jsp";
    }
1.3 Ajax+Json进行数据交互:
Controller类
@Controller
public class TestController {

    @RequestMapping("/ajaxRequest1")
    public String tt2(){
        System.out.println("跳转ajax.jsp页面");
        return "forward:ajax.jsp";
    }
//    Springmvc异步交互的(数据传输与接收)
    @RequestMapping(value = "/ajaxRequest")
    @ResponseBody
    public String tt3(@RequestBody User user){
        System.out.println("===>>>已进入ajaxRequest");
        System.out.println("user==>"+user);
    return "ajax succes!";
}
}
前端jsp页面:
<%--
  Created by IntelliJ IDEA.
  User: l
  Date: 2023/8/8
  Time: 16:31
  To change this template use File | Settings | File Templates.
--%>
<%@ page contentType="text/html;charset=UTF-8" language="java" %>
<html>
<head>
    <title>Title</title>
<%--    导入jq文件--%>
    <script src="${pageContext.request.contextPath}/js/jquery-3.2.1.min.js"></script>
</head>
<body>
    <h1>
        异步处理数据交互
    </h1>
    <button id="button1" name="button1" >数据交互</button>
</body>
    <script>
        // $(function (){
            $("#button1").click(function (){
                $.ajax({
                    url: '${pageContext.request.contextPath}/ajaxRequest',
                    type:'post',
                    data:'{"name":"张三","age":12}',
                    contentType:'application/json;charset=utf-8',
                    success:function (response){
                        alert(response);
                    }
                });
        })

    </script>
</html>
2零配置方式(配置类+注解的方式)
配置类SpringMVCConfig的作用相当于将原本的springMVC的xml配置换成了类来配置。
@Configuration//该注解表明该类属于配置类,为了让容器识别
@ComponentScan("com.hskj.controller")//该注解配置需要扫描的Controller包中的控制类
public class SpringMVCConfig {
}
有了配置类还需要定义一个Servlet容器启动类,在里面加载Spring的配置
//定义一个Servlet容器启动类,在里面加载Spring的配置
public class ServletContainerInitConfig extends AbstractDispatcherServletInitializer {
    //该方法加载SpringMVC容器配置
    @Override
    protected WebApplicationContext createServletApplicationContext() {
        AnnotationConfigWebApplicationContext webApplicationContext=new AnnotationConfigWebApplicationContext();
        webApplicationContext.register(SpringMVCConfig.class);//加载springmvc配置;类
        return webApplicationContext;
    }
    //设置请求归属SpringMVC处理
    @Override
    protected String[] getServletMappings() {
        return new String[]{"/"};//所有请求皆处理
    }
    //加载Spring容器配置
    @Override
    protected WebApplicationContext createRootApplicationContext() {
        return null;
    }

/*说明:
AnnotationConfigWebApplicationContext webApplicationContext=new AnnotationConfigWebApplicationContext();
在Java中创建一个基于注解的Web应用程序上下文(AnnotationConfigWebApplicationContext)。它是通过使用Spring框架来实现的。

Web应用程序上下文是一个容器,用于管理和组织Web应用程序中的各种组件,例如控制器、服务、存储库等等。它是一个能够自动扫描并注册注解标记的类和配置文件的上下文环境。

在这个例子中,使用了AnnotationConfigWebApplicationContext类来创建Web应用程序上下文对象。这个对象会自动扫描并注册使用注解配置的类和组件。*/
Controller层 控制类TestCotroler
@Controller
public class TestController {
@RequestMapping("/test01")
@ResponseBody
public String test01(){
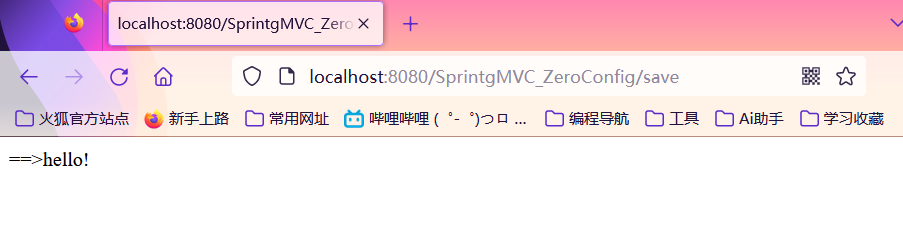
return "==>hello!";
}
}在浏览器地址栏输入路径: localhost:8080/项目名/save

浏览器结果如下(如果返回中文可能会出现乱码情况)
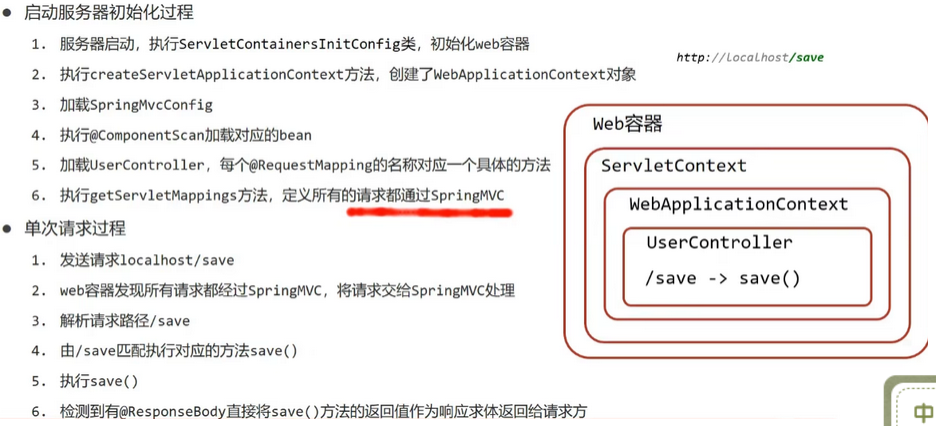
上述通过配置类的方法实现springmvc的方式分析:
(下图是以userController为例)
@Controller
public class UserController {

    @RequestMapping("/save")
    @ResponseBody
    public String save(){
        return "==》hello!";
    }
}


 230
230


 被折叠的 条评论
为什么被折叠?
被折叠的 条评论
为什么被折叠?
 到【灌水乐园】发言


