


HAProxy 是什么?
HAProxy 是一个使用C语言编写的开放源代码的软件。
HAProxy 提供高可用性、负载均衡,以及基于TCP和HTTP的应用程序代理。
HAProxy 特别适用于那些负载特大的web站点,这些站点通常又需要会话保持或七层处理。
HAProxy 运行在当前的硬件上,完全可以支持数以万计的并发连接。
HAProxy 的运行模式可以很简单安全地整合进用户当前的架构中,同时保护用户的web服务器不被暴露到网络上。
HAProxy 实现了一种事件驱动, 单一进程模型,此模型支持非常大的并发连接数。
HAProxy 特性
支持tcp / http 两种协议层的负载均衡,使得其负载均衡功能非常丰富。
支持8种左右的负载均衡算法,尤其是在http模式时,有许多非常实在的负载均衡算法,适用各种需求。
性能非常优秀,基于单进程处理模式(和Nginx类似)让其性能卓越。
拥有一个功能出色的监控页面,实时了解系统的当前状况。
拥有强大的ACL支持,用于访问控制
支持虚拟主机功能,从而实现web负载均衡更加灵活
HAProxy 算法
1.roundrobin 基于权重进行轮询,在服务器的处理时间保持均匀分布时
2.static-rr 基于权重进行轮询,在运行时调整其服务器权重不会生效,但是在后端服务器连接数上没有限制
3.leastconn 最小连接数算法,根据后端的节点连接数大小动态分配前端请求
4.source:是基于请求源IP的算法,此算法对请求的源IP时行hash运算,然后将结果与后端服务器的权理总数相除后转发至某台匹配的后端服务器,这种方法可以使用一个客户端IP的请求始终转发到特定的后端服务器。
5.uri:对部分或整个URI进行hash运算,再经过与服务器的总权重要除,最后转发到某台匹配的后端服务器上。
6.uri_param:椐据URL路径中的参数转发,这样可以保证在后端真实服务器数量不变时,同一个用户的请求始终分发到同一台机器上。
7.hdr:根据httpd头转发,如果指定的httpd头名称不存在,则使用roundrobin算法进行策略转发。
8.rdp-cookie(name):示根据据cookie(name)来锁定并哈希每一次TCP请求。
HAProxy 配置文件
haproxy 的配置文件由两部分组成:全局设定和对代理的设定,共分为五段:global,defaults,frontend,backend,listen。
1.global:全局配置主要用于设定义全局参数,属于进程级的配置,通常和操作系统配置有关。
global
    log 127.0.0.1     local2          #定义haproxy日志输出设置
    log 127.0.0.1   local2  info      #定义haproxy 日志级别
    ulimit-n    82000                  #设置每个进程的可用的最大文件描述符
    maxconn    20480                   #默认最大连接数
    chroot    /usr/local/haproxy       #chroot运行路径
    uid 188                          #运行haproxy 用户 UID
    gid 188                         #运行haproxy 用户组gid
    daemon                          #以后台形式运行harpoxy
    nbproc    2                       #设置进程数量
    pidfile    /usr/local/haproxy/run/haproxy.pid  #haproxy 进程PID文件


# log:全局的日志配置,local0是日志输出设置,info表示日志级别(err,waning,info,debug)

# maxconn:设定每个HAProxy进程可接受的最大并发连接数

# chroot:修改haproxy的工作目录至指定的目录并在放弃权限之前执行chroot()操作,可以提升haproxy的安全级别,不过需要注意的是要确保指定的目录为空目录且任何用户均不能有写权限

# daemon:让haproxy以守护进程的方式工作于后台

# nbproc:指定启动的haproxy进程个数

# pidfile:将haproxy的进程写入pid文件

# ulimit-n:设定每进程所能够打开的最大文件描述符数目

# stats socket <path>定义统计信息保存位置

[root@haproxy ~]# id haproxy
uid=188(haproxy) gid=188(haproxy) 组=188(haproxy)

[root@haproxy ~]# lscpu
Architecture:          x86_64
CPU op-mode(s):        32-bit, 64-bit
Byte Order:            Little Endian
CPU(s):                2
On-line CPU(s) list:   0,1
Thread(s) per core:    1
Core(s) per socket:    2
座:                 1
NUMA 节点:         1
超管理器厂商:  VMware
虚拟化类型:     完全
L1d 缓存:          32K
L1i 缓存:          32K
L2 缓存:           256K
L3 缓存:           6144K
NUMA 节点0 CPU:    0,1
Flags:                 fpu vme de pse tsc msr pae mce cx8 apic sep mtrr pge mca cmov pat pse36 clflush mmx fxsr sse sse2 ss ht syscall nx pdpe1gb rdtscp lm constant_tsc arch_perfmon nopl xtopology tsc_reliable nonstop_tsc eagerfpu pni pclmulqdq ssse3 fma cx16 pcid sse4_1 sse4_2 x2apic movbe popcnt tsc_deadline_timer aes xsave avx f16c rdrand hypervisor lahf_lm abm 3dnowprefetch ssbd ibrs ibpb stibp ibrs_enhanced fsgsbase tsc_adjust bmi1 avx2 smep bmi2 invpcid mpx rdseed adx smap clflushopt xsaveopt xsavec arat spec_ctrl intel_stibp flush_l1d arch_capabilities
2.default:配置默认参数,设置的参数值默认会自动引用到frontend、backend、listen部分中,如果frontend、backend、listen部分也配置了与defaults部分一样的参数,Defaults部分参数对应的值自动被覆盖。
defaults
    log    global                      #引入global定义的日志格式
    mode    http                       #所处理的类别(7层代理http,4层代理tcp)
    maxconn 50000                      #最大连接数
    option  httplog                    #日志类别为http日志格式
    option  httpclose                  #每次请求完毕后主动关闭http通道
    option  dontlognull                #不记录健康检查日志信息
    option  forwardfor                 #如果后端服务器需要获得客户端的真实ip,需要配置的参数,可以从http header 中获取客户端的IP
    retries 3                          #3次连接失败就认为服务器不可用,也可以通过后面设置

    option redispatch                  #当serverID 对应的服务器挂掉后,强制定向到其他健康的服务器,当使用了cookie时,haproxy将会将其请求的后端服务器的serverID插入到cookie中,以保证会话的SESSION持久性;而此时,如果后端的服务器宕掉了,但是客户端的cookie是不会刷新的,如果设置此参数,将会将客户的请求强制定向到另外一个后端server上。
    stats                 refresh 30               #设置统计页面刷新时间间隔
    option               abortonclose            #当服务器负载很高的时候,自动结束掉当前队列处理比较久的连接
    balance             roundrobin                 #设置默认负载均衡方式,轮询方式
    #balance           source                    #设置默认负载均衡方式,类似于nginx的ip_hash
    #contimeout      5000                    #设置连接超时时间
    #clitimeout        50000                   #设置客户端超时时间
    #srvtimeout       50000                   #设置服务器超时时间
    timeout     http-request          10s      #默认http请求超时时间
    timeout     queue                   1m       #默认队列超时时间
    timeout     connect                 10s      #默认连接超时时间
    timeout     client                     1m       #默认客户端超时时间
    timeout     server                   1m       #默认服务器超时时间
    timeout     http-keep-alive     10s      #默认持久连接超时时间
    timeout     check                   10s      #设置心跳检查超时时间
3.frontend:接收请求的前端虚拟节点,Frontend可以更加规则直接指定具体使用后端的backend,frontend 和backend是在haproxy 1.3版本以后引入的组件,在很大程度上简化了haproxy配置文件的复杂性,forntend 可以根据ACL规则直接指定要使用的后端backend。
frontend http_80_in

         bind 0.0.0.0:80                           #设置监听端口

         log global                                #应用全局的日志设置

         option httplog                            #启用http的log

         option httpclose                        #每次请求完毕后主动关闭http通道,HAproxy不支持keep-alive模式

         default_backend wwwpool        #设置请求默认转发的后端服务池
4.backend:后端服务集群的配置,一个Backend对应一个或者多个实体服务器。
backend wwwpool      #定义wwwpool服务器组。

         mode http        #http的7层模式

         option  redispatch

         option  abortonclose

         balance source      #负载均衡的方式,源哈希算法

         cookie  SERVERID    #允许插入serverid到cookie中,serverid后面可以定义

         server web1 192.168.2.120:80 cookie 2 weight 3 check inter 2000 rise 2 fall 3 maxconn 8
5.Listen:Fronted和backend的组合,比如haproxy实例状态监控部分配置。
listen admin_status #Frontend和Backend的组合体,监控组的名称

         bind 0.0.0.0:8888 #监听端口

         mode http #http的7层模式

         log 127.0.0.1 local3 err #错误日志记录

         stats refresh 5s #每隔5秒自动刷新监控页面

         stats uri /admin?stats #监控页面的url访问路径

         stats realm itnihao\ welcome #监控页面的提示信息

         stats auth admin:admin #监控页面的用户和密码admin,可以设置多个用户名

         stats auth admin1:admin1 #监控页面的用户和密码admin1

         stats hide-version #隐藏统计页面上的HAproxy版本信息

         stats admin if TRUE #手工启用/禁用,后端服务器(haproxy-1.4.9以后版本)
查看配置文件内容
cat /etc/haproxy/haproxy.cfg
global
log 127.0.0.1 local2 info
pidfile /var/run/haproxy.pid
maxconn 4000 #优先级低
user haproxy
group haproxy
daemon #以后台形式运行
nbproc 2 #工作进程数量
defaults
mode http #工作模式 http
log global
retries 3 #健康检查
option redispatch #服务不可用后重定向到其他健康服务器
maxconn 4000 #优先级高
contimeout 5000 #ha服务器与后端服务器连接超时时间,单位毫秒ms
clitimeout 50000 #客户端超时
srvtimeout 50000 #后端服务器超时
listen stats
bind *:81
stats enable
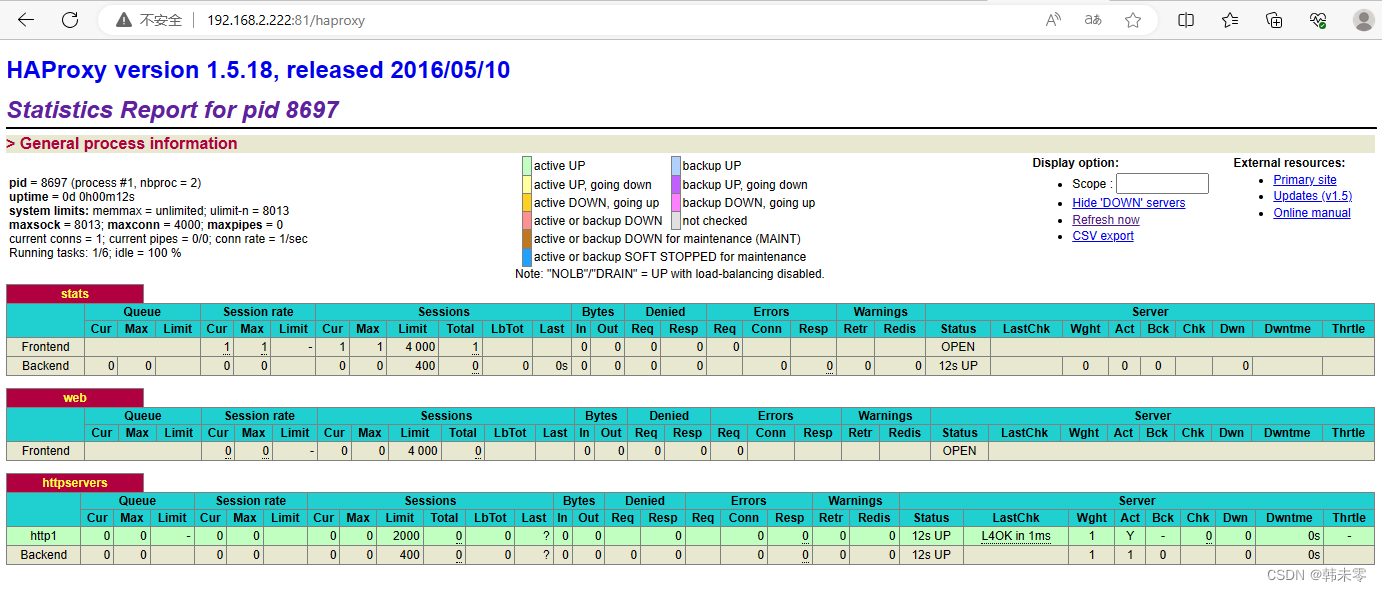
stats uri /haproxy #使用浏览器访问http://192.168.2.222:81/haproxy,可以看到服务器状态
stats auth admin:admin #用户认证
frontend web
mode http
bind *:80 #监听哪个ip和什么端口
option httplog #日志类别 http 日志格式
acl html url_reg -i \.html$ #访问控制列表名称html。规则要求访问以html结尾的url(可选)
use_backend httpservers if html #如果满足acl html规则,则推送给后端服务器httpservers
default_backend httpservers #默认使用的服务器组
backend httpservers #名字与使用的服务器组名一样
balance roundrobin #负载均衡的方式
server http1 192.168.2.120:80 maxconn 2000 weight 1 check inter 1s rise 2 fall 2
环境准备
1、IP地址规划
| 主机名 | IP地址 |
| haproxy | 192.168.2.222 |
| nginx | 192.168.2.120 |
2、关闭防火墙和seLinux
# 立即关闭firewalld
systemctl stop firewalld

# 设置firewalld开启不启动
systemctl disable firewalld

# 查看firewalld的状态
systemctl status firewalld

# 临时关闭seLinux
setenforce 0

# 永久关闭selinux
sed -i 's/SELINUX=enforcing/SELINUX=disabled/g' /etc/selinux/config

# 查看seLinux
getenforce
3、修改主机名
hostnamectl set-hostname haproxy

hostnamectl set-hostname nginx
4、配置静态ip地址
vim /etc/sysconfig/network-scripts/ifcfg-ens33

TYPE="Ethernet"
BOOTPROTO="static"
DEVICE="ens33"
NAME="ens33"
ONBOOT="yes"
IPADDR="192.168.2.120"
PREFIX=24
GATEWAY="192.168.2.1"
DNS1=114.114.114.114

TYPE="Ethernet"
BOOTPROTO="static"
DEVICE="ens33"
NAME="ens33"
ONBOOT="yes"
IPADDR="192.168.2.222"
PREFIX=24
GATEWAY="192.168.2.1"
DNS1=114.114.114.114
部署nginx
1、配置yum源
[root@nginx ~]# cd /etc/yum.repos.d/
[root@nginx yum.repos.d]# vim nginx.repo
[nginx-stable]
name=nginx stable repo
baseurl=http://nginx.org/packages/centos/$releasever/$basearch/
gpgcheck=0
enabled=1
2、下载nginx
[root@nginx ~]# yum install yum-utils -y

[root@nginx ~]# yum install nginx -y
3、启动nginx
systemctl start nginx

systemctl enable nginx

[root@nginx ~]# ps aux|grep nginx
root      20123  0.0  0.0  49072  1168 ?        Ss   19:37   0:00 nginx: master process /usr/sbin/nginx -c /etc/nginx/nginx.conf
nginx     20124  0.0  0.1  49460  1904 ?        S    19:37   0:00 nginx: worker process
nginx     20125  0.0  0.1  49460  1904 ?        S    19:37   0:00 nginx: worker process
root      20127  0.0  0.0 112824   988 pts/0    S+   19:37   0:00 grep --color=auto nginx
4、修改首页
[root@nginx ~]# echo 'hello world!' >/usr/share/nginx/html/index.html
5、访问

部署Haproxy
1、下载 haproxy
yum -y install haproxy2、备份配置文件
cp -rf /etc/haproxy/haproxy.cfg{,.bak}3、编辑配置文件
vim /etc/haproxy/haproxy.cfg


global
    log 127.0.0.1 local2 info
    pidfile /var/run/haproxy.pid
    maxconn 4000
    user 	haproxy
    group   haproxy
    daemon
    nbproc  2
defaults
    mode http
    log global
    retries 3
    option redispatch
    maxconn 4000
    contimeout 5000
    clitimeout 50000
    srvtimeout 50000
listen stats
    bind *:81
    stats enable
    stats uri /haproxy
    stats auth admin:admin
frontend web
    mode http
    bind *:80
    option httplog
    acl html url_reg -i \.html$
    use_backend httpservers if  html
    default_backend httpservers
backend httpservers
    balance roundrobin
    server http1 192.168.2.120:80 maxconn 2000 weight 1  check inter 1s rise 2 fall 2
4、启动服务
systemctl start haproxy

systemctl enable haproxy

[root@haproxy ~]# ps aux|grep haproxy
root       8695  0.0  0.0  44744  1760 ?        Ss   19:41   0:00 /usr/sbin/haproxy-systemd-wrapper -f /etc/haproxy/haproxy.cfg -p /run/haproxy.pid
haproxy    8696  0.0  0.1  48424  3228 ?        S    19:41   0:00 /usr/sbin/haproxy -f /etc/haproxy/haproxy.cfg -p /run/haproxy.pid -Ds
haproxy    8697  0.0  0.0  48424  1164 ?        Ss   19:41   0:00 /usr/sbin/haproxy -f /etc/haproxy/haproxy.cfg -p /run/haproxy.pid -Ds
haproxy    8698  0.0  0.0  48424  1164 ?        Ss   19:41   0:00 /usr/sbin/haproxy -f /etc/haproxy/haproxy.cfg -p /run/haproxy.pid -Ds
root       8700  0.0  0.0 112824   988 pts/0    S+   19:41   0:00 grep --color=auto haproxy

[root@haproxy ~]# netstat -anplut|grep haproxy
tcp        0      0 0.0.0.0:80              0.0.0.0:*               LISTEN      8697/haproxy
tcp        0      0 0.0.0.0:81              0.0.0.0:*               LISTEN      8697/haproxy
udp        0      0 0.0.0.0:42059           0.0.0.0:*                           8696/haproxy
5、访问 http://192.168.2.222:81/haproxy


 2675
2675


 被折叠的 条评论
为什么被折叠?
被折叠的 条评论
为什么被折叠?
 到【灌水乐园】发言


