


进入微信小程序后,点击登录,后台签发Access Token,之后每次请求都携带这个token,并且进行权限认证。
流程图:
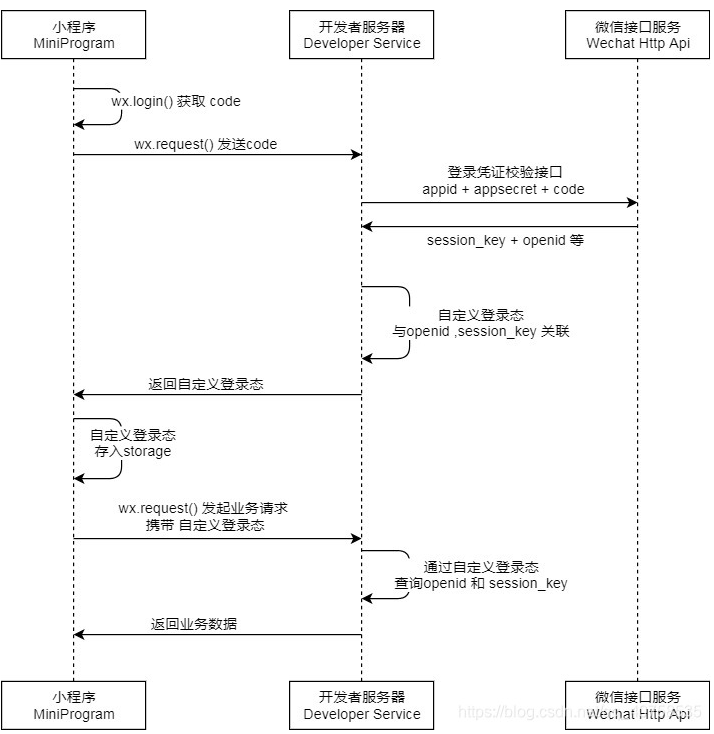
步骤:
1)调用登录API获取code
在小程序前端,调用wx.login()方法获取用户登录凭证code,并将其发送到后台服务器
wx.login({
  success: res => {
    if (res.code) {
      // 发送 code 到后台服务器
      wx.request({
        url: 'https://your-backend.com/login',
        method: 'POST',
        data: {
          code: res.code
        },
        success: response => {
          console.log('Login successful:', response.data);
          // 处理后续逻辑,如保存登录状态等
        },
        fail: error => {
          console.error('Login failed:', error);
        }
      });
    } else {
      console.error('wx.login failed:', res.errMsg);
    }
  },
  fail: error => {
    console.error('wx.login failed:', error);
  }
});
2)后端接收code并向微信登录凭证校验接口发起请求,携带相应参数。如果参数正确,微信会返回openId和session_key
· 在配置文件中配置微信小程序的App ID、App Secret、AccessTokenApiUrl
wechat:
  applet:
    app-id: ################
    app-secret: ##############
    access-token-api-url: ######################
· 创建一个配置类,用于读取配置文件中的微信小程序相关属性。
@Data
@ConfigurationProperties(prefix = "wechat.applet")
public class WechatAppletProperties {
    private String appId;
    private String appSecret;
    private String accessTokenApiUrl;
}
· 在业务逻辑代码中发送POST请求获取微信登录凭证信息获取openId、sessionKey等信息
String appId = wechatAppletProperties.getAppId();
String secret = wechatAppletProperties.getAppSecret();
String url = wechatAppletProperties.getAccessTokenApiUrl();

//构建请求参数
String param = "appid=" + appId +
                "&secret=" + secret +
                "&js_code=" + code +
                "&grant_type=authorization_code";

//通过HttpRequest工具类发送请求、得到返回结果
String response = HttpRequest.sendPost(url, param);
Map responseMap = JSONObject.parseObject(response, HashMap.class);

//得到openid、sessionid
String openId = String.valueOf(responseMap.get("openid"));
String sessionKey = String.valueOf(responseMap.get("session_key"));
HTTP工具类:
public class HttpRequest {
    /**
     * 向指定URL发送GET方法的请求
     *
     * @param url
     *            发送请求的URL
     * @param param
     *            请求参数,请求参数应该是 name1=value1&name2=value2 的形式。
     * @return URL 所代表远程资源的响应结果
     */
    public static String sendGet(String url, String param) {
        String result = "";
        BufferedReader in = null;
        try {
            String urlNameString = url + "?" + param;
            URL realUrl = new URL(urlNameString);
            // 打开和URL之间的连接
            URLConnection connection = realUrl.openConnection();
            // 设置通用的请求属性
            connection.setRequestProperty("accept", "*/*");
            connection.setRequestProperty("connection", "Keep-Alive");
            connection.setRequestProperty("user-agent",
                    "Mozilla/4.0 (compatible; MSIE 6.0; Windows NT 5.1;SV1)");
            // 建立实际的连接
            connection.connect();
            // 获取所有响应头字段
            Map<String, List<String>> map = connection.getHeaderFields();
            // 遍历所有的响应头字段
            for (String key : map.keySet()) {
                System.out.println(key + "--->" + map.get(key));
            }
            // 定义 BufferedReader输入流来读取URL的响应
            in = new BufferedReader(new InputStreamReader(
                    connection.getInputStream()));
            String line;
            while ((line = in.readLine()) != null) {
                result += line;
            }
        } catch (Exception e) {
            System.out.println("发送GET请求出现异常!" + e);
            e.printStackTrace();
        }
        // 使用finally块来关闭输入流
        finally {
            try {
                if (in != null) {
                    in.close();
                }
            } catch (Exception e2) {
                e2.printStackTrace();
            }
        }
        return result;
    }

    /**
     * 向指定 URL 发送POST方法的请求
     *
     * @param url
     *            发送请求的 URL
     * @param param
     *            请求参数,请求参数应该是 name1=value1&name2=value2 的形式。
     * @return 所代表远程资源的响应结果
     */
    public static String sendPost(String url, String param) {
        PrintWriter out = null;
        BufferedReader in = null;
        String result = "";
        try {
            URL realUrl = new URL(url);
            // 打开和URL之间的连接
            URLConnection conn = realUrl.openConnection();
            // 设置通用的请求属性
            conn.setRequestProperty("accept", "*/*");
            conn.setRequestProperty("connection", "Keep-Alive");
            conn.setRequestProperty("user-agent",
                    "Mozilla/4.0 (compatible; MSIE 6.0; Windows NT 5.1;SV1)");
            // 发送POST请求必须设置如下两行
            conn.setDoOutput(true);
            conn.setDoInput(true);
            // 获取URLConnection对象对应的输出流
            out = new PrintWriter(conn.getOutputStream());
            // 发送请求参数
            out.print(param);
            // flush输出流的缓冲
            out.flush();
            // 定义BufferedReader输入流来读取URL的响应
            in = new BufferedReader(
                    new InputStreamReader(conn.getInputStream()));
            String line;
            while ((line = in.readLine()) != null) {
                result += line;
            }
        } catch (Exception e) {
            System.out.println("发送 POST 请求出现异常!"+e);
            e.printStackTrace();
        }
        //使用finally块来关闭输出流、输入流
        finally{
            try{
                if(out!=null){
                    out.close();
                }
                if(in!=null){
                    in.close();
                }
            }
            catch(IOException ex){
                ex.printStackTrace();
            }
        }
        return result;
    }
}
3)保存用户数据到数据库
后端在拿到openid和sessionid之后,将其与小程序前端传递过来的用户数据一起保存到数据库
4)签发登录token并返回给小程序
后端根据用户信息生成token,并返回小程序。小程序将token保存到Storage中以保持登录状态
//为微信用户生成jwt令牌
Map<String,Object> claims=new HashMap<>();
claims.put(user_id,user.getId());
String token =JwtUtil.createJWT(jwtProperties.getUserSecretKey(),jwtPeoperties.getUserTtl(),claims);

//...后面将token加入到Service层返回的wxUserVo中


//jwtProperties为一个配置类,通过jwtProperties来获取xml文件中配置的jwt信息
sample:
  jwt:
    user-secret-key: ####自定义
    user-ttl: 7200000
    user-token-name: authentication
// 后端返回的数据中包含登录 token
wx.request({
url: 'https://your-backend.com/login',
method: 'POST',
data: {
code: res.code
},
success: response => {
const token = response.data.token;
// 保存 token 到 Storage
wx.setStorageSync('token', token);
},
fail: error => {
console.error('Login failed:', error);
}
});
5)最后在security配置类添加权限验证
@Configuration
public class SecurityConfig extends WebSecurityConfigurerAdapter {

    //授权
    @Override
    protected void configure(HttpSecurity http) throws Exception {

        //首页允许所有人可以访问,功能页只对有权限的人才能访问
        http.authorizeRequests()
                .antMatchers("/")
                .permitAll()
                .antMatchers("/level1/**")
                .hasRole("vip1");
    }

    //认证
    @Override
    protected void configure(AuthenticationManagerBuilder auth) throws Exception {

    }
}


 2323
2323

 被折叠的 条评论
为什么被折叠?
被折叠的 条评论
为什么被折叠?
 到【灌水乐园】发言


