


一、Profile 功能
- 为了方便多环境适配,SpringBoot简化了 profile 功能
- 主要的方式:通过创建多个配置文件,选择激活哪些环境
1、application-profile 功能
- 对于默认配置文件 application.yaml 和 application.properties 在任何时候都会加载
- 我们如何区分以及创建不同生产环境的配置文件呢?
- 文件名采用
application-(生产环境).yaml的方式即可
- 文件名采用
- 那我们如何激活指定的环境呢?
- 第一种方式:采用命令行的形式激活
java -jar xxx.jar --spring.profiles.active=环境名- 如果在我们用上面的这条指令的同时,添加了修改属性的指令,那么就会以我们新的属性值为准
- 第二种方式:采用配置文件激活
- 在我们默认的配置文件中
spring.profiles.active=环境
- 在我们默认的配置文件中
- 第一种方式:采用命令行的形式激活
- 有两点我们需要注意:
- 默认配置环境和我们指定激活的环境都会生效
- 如果出现同名配置项,那么以我们 profile 配置优先
2、@Profile条件装配功能
- 通过案例来说明:
- 我们创建一个Person接口,并定义它的两个实现类,并通过 @Profile 注解指明对应生产环境
- 在 @Profile(“prod”) 环境下,才会使用Boss类
- 在 @Profile(“test”) 环境下,才会使用Employee类
- 我们创建一个Person接口,并定义它的两个实现类,并通过 @Profile 注解指明对应生产环境
- Person 接口
package com.atguigu.boot05.bean;

/**
 * @author Bonbons
 * @version 1.0
 */
public interface Person {
    String getName();
    Integer getAge();
}
- Boss类
package com.atguigu.boot05.bean;

import lombok.Data;
import org.springframework.boot.context.properties.ConfigurationProperties;
import org.springframework.context.annotation.Profile;
import org.springframework.stereotype.Component;

/**
 * @author Bonbons
 * @version 1.0
 */
@Data
@Profile("prod")
@Component
@ConfigurationProperties("person")
public class Boss implements Person{
    private String name;
    private Integer age;
}
- Employee类
package com.atguigu.boot05.bean;

import lombok.Data;
import org.springframework.boot.context.properties.ConfigurationProperties;
import org.springframework.context.annotation.Profile;
import org.springframework.stereotype.Component;

/**
 * @author Bonbons
 * @version 1.0
 */
@Data
@Profile("test")
@Component
@ConfigurationProperties("person")
public class Employee implements Person{
    private String name;
    private Integer age;
}
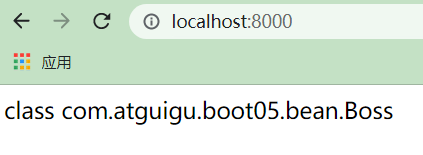
- 编写控制器的测试方法:【演示在不同环境下我们Person接口的实现类是不同的】
    @Autowired
    Person person;
    @GetMapping("/")
    public String hello(){
        return person.getClass().toString();
    }
- 以下为我们的三个配置文件
application.properties
person.name=boss
server.port=8080
spring.profiles.active=prod
application-prod.yaml
person:
  name: prod-boss
server:
  port: 8000
application-test.yaml
person:
  name: test-boss
  age: 25

server:
  port: 7000
3、profile分组
- 我觉得就是可以把一个生产环境分为几个配置文件,通过数组的方式划分不同的生产环境
- 然后通过配置文件激活的时候原来指定环境名,现在替换为环境数组名
application.properties
person.name=boss


server.port=8080

spring.profiles.active=myprod

spring.profiles.group.myprod[0]=ppd
spring.profiles.group.myprod[1]=prod

spring.profiles.group.mytest[0]=test
application-ppd.yaml
person:
  age: 21
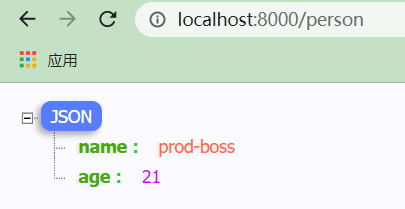
- 编写一个控制器方法,处理 /person 请求,返回Person对象
- 我们prod设置了Person的name属性
- 我们ppd设置了Person的age属性
- 如果一起激活这两个环境,那么Person的数据就会正常显示
二、外部化配置
-
我们将所有的信息抽取成一个文件放在web里面集中管理——外部化配置
-
详情可以参考官方文档
-
外部化配置截图:
[外链图片转存失败,源站可能有防盗链机制,建议将图片保存下来直接上传(img-4XAodyyu-1680057177430)(attachment:cfd409b05609c96f001bbe38142151d3)]
1、外部配置源
- 配置文件常用来源:
-
Java属性文件
-
yaml文件
-
环境变量【电脑本机里面配置的】
[外链图片转存失败,源站可能有防盗链机制,建议将图片保存下来直接上传(img-o9DB5X7o-1680057177432)(attachment:39fcd3a0363be69a1f480542906580bf)]
-
命令行参数
-
2、配置文件查找位置
(1)classpath 根路径下
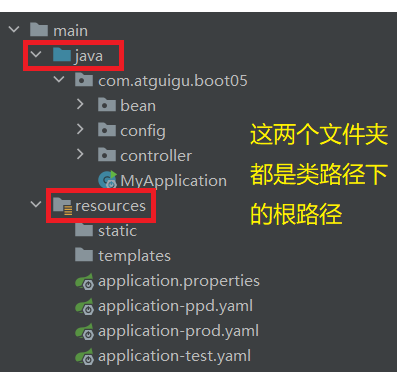
(2)classpath 根路径下的 config 目录
(3)jar 包当前目录
(4)jar 包当前目录下的 config目录

(5) /config子目录的直接子目录
这个需要在Linux服务器的根目录下进行操作
3、配置文件加载顺序
- 当前jar包内部的application.properties和application.yml
- 当前jar包内部的application-{profile}.properties 和 application-{profile}.yml
- 引用的外部jar包的application.properties和application.yml
- 引用的外部jar包的application-{profile}.properties 和 application-{profile}.yml
4、后面的可以覆盖前面的同名配置项
- 我们需要知道,上面配置文件查找位置,后给出的同名配置后覆盖先给出的同名配置
- 对于文件加载顺序,也是后加载的会覆盖先加载的同名配置
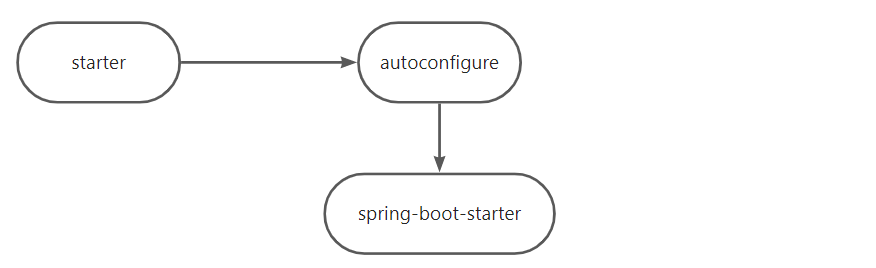
三、自定义 starter
1、starter 启动原理
- starter没有任何代码,只是说明我们当前场景要引入哪些依赖,还会引入了我们当前场景真正的自动配置包 autoconfigure,
- 自动配置包就要引入我们SpringBoot最底层的、每个模块都要用到的 springboot-starter
-
autoconfigure包中配置使用 META-INF/spring.factories 中 EnableAutoConfiguration 的值,使得项目启动加载指定的自动配置类
-
编写自动配置类 xxxAutoConfiguration -> xxxxProperties
- @Configuration
- @Conditional
- @EnableConfigurationProperties
- @Bean
-
引入starter — xxxAutoConfiguration — 容器中放入组件 ---- 绑定xxxProperties ---- 配置项
2、自定义starter
- atguigu-hello-spring-boot-starter(启动器)
- atguigu-hello-spring-boot-starter-autoconfigure(自动配置包)
四、SpringBoot原理
- Spring原理、SpringMVC原理、自动配置原理、SpringBoot原理
1、SpringBoot启动过程
public static ConfigurableApplicationContext run(Class<?>[] primarySources, String[] args) {
   return new SpringApplication(primarySources).run(args);
}             // ↑ 创建SpringApplication         ↑ 运行SpringApplication
(1)创建 SpringApplication
-
保存一些信息
-
判定当前应用的类型 -> ClassUtils: Servlet
// WebApplicationType类 >> 判断类型 static WebApplicationType deduceFromClasspath() { if (ClassUtils.isPresent(WEBFLUX_INDICATOR_CLASS, null) && !ClassUtils.isPresent(WEBMVC_INDICATOR_CLASS, null) && !ClassUtils.isPresent(JERSEY_INDICATOR_CLASS, null)) { return WebApplicationType.REACTIVE; // 返回响应式编程类型 } for (String className : SERVLET_INDICATOR_CLASSES) { if (!ClassUtils.isPresent(className, null)) { return WebApplicationType.NONE; } } return WebApplicationType.SERVLET; // 返回SERVLET编程类型 } -
bootstrappers: 初始启动引导器
(List<Bootstrapper>): 去spring.factories 文件中找 org.springframework.boot.Bootstrapper -
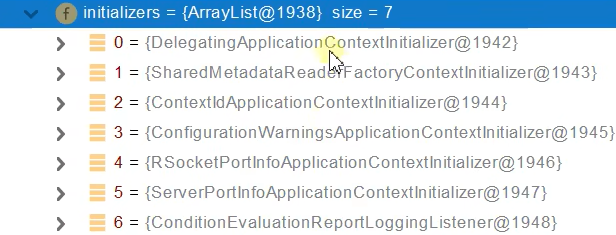
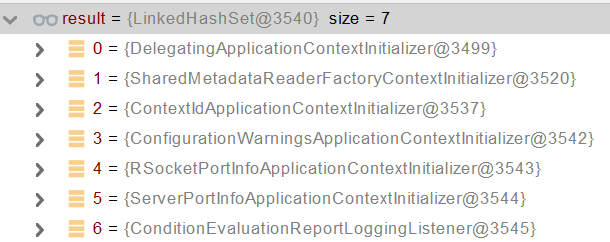
找 ApplicationContextInitializer(初始化器);去spring.factories找 ApplicationContextInitializer
List<ApplicationContextInitializer<?>> initializers
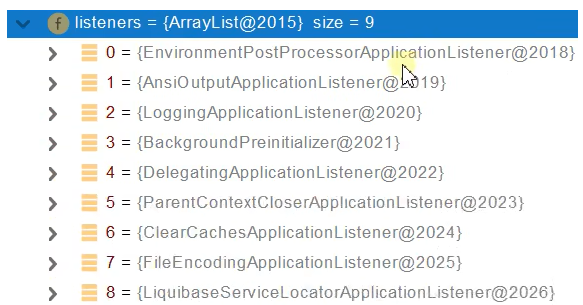
- 找 ApplicationListener (应用监听器);去spring.factories找 ApplicationListener
List<ApplicationListener<?>> listeners
- 创建 SpringApplication 完整代码
// 构造方法
public SpringApplication(ResourceLoader resourceLoader, Class<?>... primarySources) {
    this.resourceLoader = resourceLoader;
    Assert.notNull(primarySources, "PrimarySources must not be null");
    this.primarySources = new LinkedHashSet<>(Arrays.asList(primarySources));
    // WebApplicationType是枚举类 有NONE,SERVLET,REACTIVE 下行webApplicationType是SERVLET
    this.webApplicationType = WebApplicationType.deduceFromClasspath();
    // 初始启动引导器 去spring.factories文件中找org.springframework.boot.Bootstrapper 但我找不到实现Bootstrapper接口的类
    this.bootstrappers = new ArrayList<>(getSpringFactoriesInstances(Bootstrapper.class));
    // 去spring.factories找 ApplicationContextInitializer
    setInitializers((Collection) getSpringFactoriesInstances(ApplicationContextInitializer.class));
    // 去spring.factories找 ApplicationListener
    setListeners((Collection) getSpringFactoriesInstances(ApplicationListener.class));
    this.mainApplicationClass = deduceMainApplicationClass(); // 决定哪个类是我们的主程序
}                               //   ↓
private Class<?> deduceMainApplicationClass() {
	try {
		StackTraceElement[] stackTrace = new RuntimeException().getStackTrace();
		for (StackTraceElement stackTraceElement : stackTrace) {
            // 哪个类有main方法 被找到的第1个类就是主程序类
			if ("main".equals(stackTraceElement.getMethodName())) {
				return Class.forName(stackTraceElement.getClassName());
			}
		}
    }
	catch (ClassNotFoundException ex) {
		// Swallow and continue
	}
	return null;
}
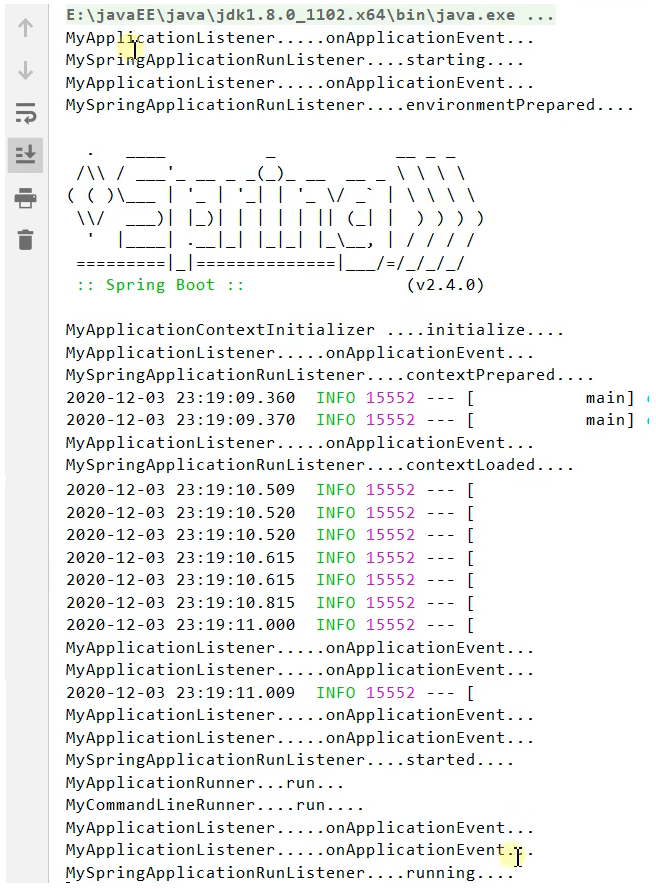
总结:应用创建的过程就是把一些关键的组件信息读取并保存到 SpringAppication中,作为运行SpringApplication的前置工作
(2)运行 SpringApplication
- StopWatch
- 记录应用的启动时间
- 创建引导上下文(Context环境)createBootstrapContext()
- 获取到所有之前的 bootstrappers 挨个执行 intitialize() 来完成对引导启动器上下文环境设置
```java
public interface Bootstrapper {

	/**
	 * Initialize the given {@link BootstrapRegistry} with any required registrations.
	 * @param registry the registry to initialize
	 */
	void intitialize(BootstrapRegistry registry);

}
```
- 让当前应用进入headless模式, java.awt.headless
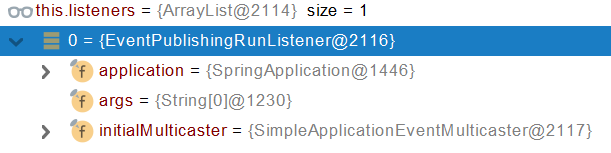
- 获取所有 RunListener(运行监听器)【为了方便所有Listener进行事件感知】
- getSpringFactoriesInstances 去spring.factories找 SpringApplicationRunListener.

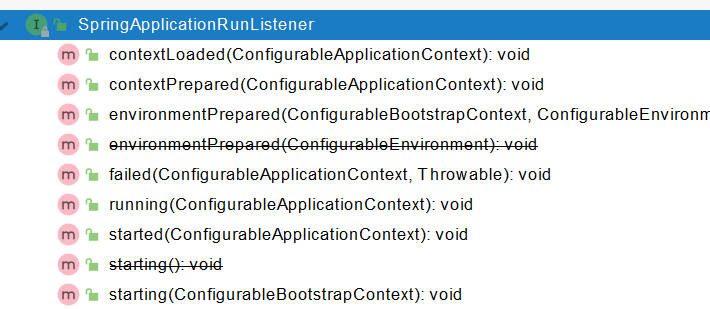
- 遍历 SpringApplicationRunListener 调用 starting 方法;
- 相当于通知所有感兴趣系统正在启动过程的人,项目正在 starting。
- 保存命令行参数;ApplicationArguments
- 准备环境 prepareEnvironment();
- 返回或者创建基础环境信息对象。StandardServletEnvironment
- 配置环境信息对象。
- 读取所有的配置源的配置属性值。 - 绑定环境信息
- 监听器调用 listener.environmentPrepared();通知所有的监听器当前环境准备完成
- 创建IOC容器(createApplicationContext())
- 根据项目类型(Servlet)创建容器,
- 当前会创建 AnnotationConfigServletWebServerApplicationContext
- 准备ApplicationContext IOC容器的基本信息 prepareContext()
- 保存环境信息
- IOC容器的后置处理流程。
- 应用初始化器;applyInitializers;
- 遍历所有的 ApplicationContextInitializer 。调用 initialize.。来对ioc容器进行初始化扩展功能
- 遍历所有的 listener 调用 contextPrepared。EventPublishRunListenr;通知所有的监听器contextPrepared
- 所有的监听器 调用 contextLoaded。通知所有的监听器 contextLoaded;
- 刷新IOC容器。refreshContext
- 创建容器中的所有组件(Spring注解)
// Instantiate all remaining (non-lazy-init) singletons. 使用单例模式 实例化所有剩余的(非延迟初始化)组件。 finishBeanFactoryInitialization(beanFactory); - 容器刷新完成后工作?afterRefresh
- 所有监听 器 调用 listeners.started(context); 通知所有的监听器 started
- 调用所有runners;callRunners()
- 获取容器中的 ApplicationRunner
@FunctionalInterface public interface ApplicationRunner { /** * Callback used to run the bean. * @param args incoming application arguments * @throws Exception on error */ void run(ApplicationArguments args) throws Exception; }- 获取容器中的 CommandLineRunner
@FunctionalInterface public interface CommandLineRunner { /** * Callback used to run the bean. * @param args incoming main method arguments * @throws Exception on error */ void run(String... args) throws Exception; }- 合并所有runner并且按照@Order进行排序
- 遍历所有的runner。调用 run 方法
- 如果以上有异常,
- 调用Listener 的 failed
- 调用所有监听器的 running 方法 listeners.running(context); 通知所有的监听器 running
- running如果有问题。继续通知 failed 。调用所有 Listener 的 failed;通知所有的监听器 failed
- 最终返回IOC容器 return context
- 运行SpringApplication 完整代码
// run()方法
public ConfigurableApplicationContext run(String... args) {
    StopWatch stopWatch = new StopWatch();//开始计时器
    stopWatch.start();//开始计时

    // 1.
    // 创建引导上下文(Context环境)createBootstrapContext()
    // 获取到所有之前的 bootstrappers 挨个执行 intitialize() 来完成对引导启动器上下文环境设置
    DefaultBootstrapContext bootstrapContext = createBootstrapContext();

    // 2.到最后该方法会返回这context
    ConfigurableApplicationContext context = null;

    // 3.让当前应用进入headless模式
    configureHeadlessProperty();

    // 4.获取所有 RunListener(运行监听器)为了方便所有Listener进行事件感知
    SpringApplicationRunListeners listeners = getRunListeners(args);

    // 5. 遍历 SpringApplicationRunListener 调用starting方法
    // 相当于通知所有感兴趣系统正在启动过程的人 项目正在starting
    listeners.starting(bootstrapContext, this.mainApplicationClass);
    try {
        // 6.保存命令行参数 ApplicationArguments
        ApplicationArguments applicationArguments = new DefaultApplicationArguments(args);

        // 7.准备环境
        ConfigurableEnvironment environment = prepareEnvironment(listeners, bootstrapContext, applicationArguments);
        configureIgnoreBeanInfo(environment);

        /*
        打印标志
          .   ____          _            __ _ _
         /\\ / ___'_ __ _ _(_)_ __  __ _ \ \ \ \
        ( ( )\___ | '_ | '_| | '_ \/ _` | \ \ \ \
         \\/  ___)| |_)| | | | | || (_| |  ) ) ) )
          '  |____| .__|_| |_|_| |_\__, | / / / /
         =========|_|==============|___/=/_/_/_/
         :: Spring Boot ::                (v2.4.2)
        */
        Banner printedBanner = printBanner(environment);

        // 创建IOC容器(createApplicationContext())
        // 根据项目类型webApplicationType(NONE,SERVLET,REACTIVE)创建容器,
        // 当前会创建 AnnotationConfigServletWebServerApplicationContext
        context = createApplicationContext();
        context.setApplicationStartup(this.applicationStartup);

        // 8.准备ApplicationContext IOC容器的基本信息
        prepareContext(bootstrapContext, context, environment, listeners, applicationArguments, printedBanner);
        // 9.刷新IOC容器 创建容器中的所有组件 Spring框架的内容
        refreshContext(context);
        // 该方法没内容,大概为将来填入
        afterRefresh(context, applicationArguments);
        stopWatch.stop(); // 停止计时
        if (this.logStartupInfo) { // this.logStartupInfo默认是true
            new StartupInfoLogger(this.mainApplicationClass).logStarted(getApplicationLog(), stopWatch);
        }
        // 10.
        listeners.started(context);

        // 11.调用所有runners
        callRunners(context, applicationArguments);
    }
    catch (Throwable ex) {
        // 13.
        handleRunFailure(context, ex, listeners);
        throw new IllegalStateException(ex);
    }

    try {
        // 12.
        listeners.running(context);
    }
    catch (Throwable ex) {
        // 13.
        handleRunFailure(context, ex, null);
        throw new IllegalStateException(ex);
    }
    return context;
}
2、自定义事件监听组件
-
Ctrl + O 快速批量实现接口方法
-
MyApplicationContextInitializer
import org.springframework.context.ApplicationContextInitializer; import org.springframework.context.ConfigurableApplicationContext; public class MyApplicationContextInitializer implements ApplicationContextInitializer { @Override public void initialize(ConfigurableApplicationContext applicationContext) { System.out.println("MyApplicationContextInitializer ....initialize.... "); } } -
MyApplicationListener
import org.springframework.context.ApplicationEvent; import org.springframework.context.ApplicationListener; public class MyApplicationListener implements ApplicationListener { @Override public void onApplicationEvent(ApplicationEvent event) { System.out.println("MyApplicationListener.....onApplicationEvent..."); } } -
MySpringApplicationRunListener
import org.springframework.boot.ConfigurableBootstrapContext; import org.springframework.boot.SpringApplication; import org.springframework.boot.SpringApplicationRunListener; import org.springframework.context.ConfigurableApplicationContext; import org.springframework.core.env.ConfigurableEnvironment; public class MySpringApplicationRunListener implements SpringApplicationRunListener { private SpringApplication application; public MySpringApplicationRunListener(SpringApplication application, String[] args){ this.application = application; } @Override public void starting(ConfigurableBootstrapContext bootstrapContext) { System.out.println("MySpringApplicationRunListener....starting...."); } @Override public void environmentPrepared(ConfigurableBootstrapContext bootstrapContext, ConfigurableEnvironment environment) { System.out.println("MySpringApplicationRunListener....environmentPrepared...."); } @Override public void contextPrepared(ConfigurableApplicationContext context) { System.out.println("MySpringApplicationRunListener....contextPrepared...."); } @Override public void contextLoaded(ConfigurableApplicationContext context) { System.out.println("MySpringApplicationRunListener....contextLoaded...."); } @Override public void started(ConfigurableApplicationContext context) { System.out.println("MySpringApplicationRunListener....started...."); } @Override public void running(ConfigurableApplicationContext context) { System.out.println("MySpringApplicationRunListener....running...."); } @Override public void failed(ConfigurableApplicationContext context, Throwable exception) { System.out.println("MySpringApplicationRunListener....failed...."); } } -
MyApplicationRunner
import org.springframework.boot.ApplicationArguments; import org.springframework.boot.ApplicationRunner; import org.springframework.core.annotation.Order; import org.springframework.stereotype.Component; @Order(1) // 按照Order排序 数字越大优先级越高 @Component // 放入容器 public class MyApplicationRunner implements ApplicationRunner { @Override public void run(ApplicationArguments args) throws Exception { System.out.println("MyApplicationRunner...run..."); } } -
MyCommandLineRunner
import org.springframework.boot.CommandLineRunner; import org.springframework.core.annotation.Order; import org.springframework.stereotype.Component; /** * 应用启动做一个一次性事情 */ @Order(2) // 按照Order排序 @Component // 放入容器 public class MyCommandLineRunner implements CommandLineRunner { @Override public void run(String... args) throws Exception { System.out.println("MyCommandLineRunner....run...."); } } -
注册MyApplicationContextInitializer,MyApplicationListener,MySpringApplicationRunListener
- resources/META-INF/spring.factories
org.springframework.context.ApplicationContextInitializer=\
  com.atguigu.boot.listener.MyApplicationContextInitializer

org.springframework.context.ApplicationListener=\
  com.atguigu.boot.listener.MyApplicationListener

org.springframework.boot.SpringApplicationRunListener=\
  com.atguigu.boot.listener.MySpringApplicationRunListener
- resources/META-INF/spring.factories


 657
657


 被折叠的 条评论
为什么被折叠?
被折叠的 条评论
为什么被折叠?
 到【灌水乐园】发言


