


目录
2.6BufferedReader 和 InputStreamReader
2.7BufferedWriter 和 OutputStreamWriter
3.2.1Checking a File or Directory
2.3.4Copying a File or Directory
2.3.5Moving a File or Directory
2.3.6Deleting a File or Directory
一、IO流的概念
- IO流,将不同的输入输出,以相同的方式操作read(),write();创建不同类型的流,有不同的实现方式,不同类型的流,又有各自特有的操作方式。
- 无论内部如何工作,所有IO流呈现的都是相同的,简单的模式,程序中流入或流出的一系列数据。
流的类型:
根据流包含的数据,可以将其分类为:
字节流
字符流
二、字节流
InputStream和OutputStream是Java中两个基础的抽象类,它们分别代表字节输入流和字节输出流。InputStream是所有字节输入流的超类,它定义了读取字节数据的基本方法。OutputStream是所有字节输出流的超类,它定义了写入字节数据的基本方法。
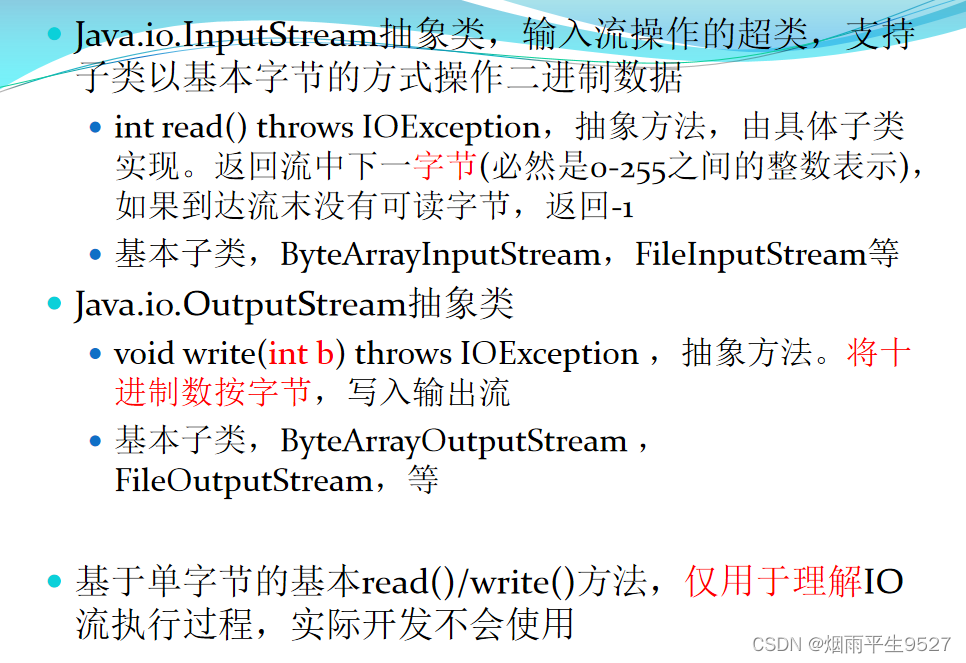
2.1InputStream的方法
read() - 从输入流中读取一个字节的数据
read(byte[] array) - 从流中读取字节并存储在指定的数组中
available() - 返回输入流中可用的字节数
close() - 关闭输入流
import java.io.FileInputStream;
import java.io.FileOutputStream;
import java.io.IOException;

public class Main {
    public static void main(String[] args) {
        getByteStreams();
    }

    public static void getByteStreams() {
        // 使用try-with-resources语句来创建输入流和输出流
        try (FileInputStream in = new FileInputStream("D:/桌面/in.txt");
             FileOutputStream out = new FileOutputStream("D:/桌面/out.txt")){

            // 定义一个字节数组,用于存储从输入流中读取的数据
            byte[] buffer = new byte[1024];
            int bytesRead;

            // 获取输入流中可用的字节数
            int availableBytes = in.available();
            System.out.println("输入流中可用的字节数:" + availableBytes);

            // 从输入流中读取数据,直到读取完毕
            while ((bytesRead = in.read(buffer)) != -1) {
                // 将读取到的数据转换为字符串并打印出来
                String data = new String(buffer, 0, bytesRead);
                System.out.print(data);
                out.write(buffer, 0, bytesRead);
            }
        } catch (IOException e) {
            e.printStackTrace();
        }
    }
}
2.2Outputstream的方法
write() - 将指定的字节写入输出流
write(byte[] array) - 将指定数组中的字节写入输出流
close() - 关闭输出流
使用没有指定字节数组起始位置的write()方法
import java.io.FileInputStream;
import java.io.FileOutputStream;
import java.io.IOException;

public class Main {
    public static void main(String[] args) {
        getByteStreams();
    }

    public static void getByteStreams() {
        // 使用try-with-resources语句来创建输入流和输出流
        try (FileInputStream in = new FileInputStream("D:/桌面/in.txt");
             FileOutputStream out = new FileOutputStream("D:/桌面/out.txt")){

            // 定义一个字节数组,用于存储从输入流中读取的数据
            byte[] buffer = new byte[1024];
            int bytesRead;

            // 从输入流中读取数据,直到读取完毕
            while ((bytesRead = in.read(buffer)) != -1) {
                // 将读取到的数据写入到输出流中
                out.write(buffer);
            }
        } catch (IOException e) {
            e.printStackTrace();
        }
    }
}
2.3资源对象的关闭:
资源文件的关闭:资源文件,比如IO流不会像其他对象,因失去引用而自动释放占用的资源,因此,必须被正确的关闭,否则会导致内存的溢出,以IO流为例,为确保无论是否出现异常,资源均被关闭,应在finally块中手动关闭资源,但这样会让程序中有大量的冗余 ;
解决办法:引入java.lang.AutoCloseable接口,任何实现AutoCloseable接口的类型,均是支持自动关闭的资源类型。然后采用try-with-resources,在try语句中,声明需要关闭的资源,从而保证,无论try块是否引发异常,资源在try块结束后自动关闭(Java7) ;
java.io.Closeable接口继承AutoCloseable接口。原全部需要手动调用close()方法关闭的资源,全部支持try-with-resources自动关闭。
try-with-resources语句,极大的简化了资源处理代码,使开发者无需关心资源状态,无需关心资源对象的创建顺序,无需关心资源对象的正确关闭方式
import java.io.FileInputStream;
import java.io.FileOutputStream;
import java.io.IOException;

public class Main {
    public static void main(String[] args) {
        getByteStreams();
    }

    public static void getByteStreams() {
        // 使用try-with-resources语句来创建输入流和输出流
        try (FileInputStream in = new FileInputStream("D:/桌面/in.txt");
             FileOutputStream out = new FileOutputStream("D:/桌面/out.txt")) {
            int c;
            while ((c = in.read()) != -1) {
                System.out.println("读取字节的10进制整数:" + c);
                out.write(c);
            }
        } catch (IOException e) {
            e.printStackTrace();
        }
    }
}
注意:
(1)资源的自动关闭,与异常无关。异常改怎么处理依然怎么处理。
(2)在try语句中声明使用资源后,执行顺序:
无异常,在try块执行后,自动关闭资源,finally块
- 有异常,自动关闭资源,catch块,finally块
2.4transferTo()方法
transferTo()方法是Java 9中引入的一个新方法,它允许你直接将InputStream中的数据传输到指定的OutputStream中。这个方法返回传输的字节数。
import java.io.FileInputStream;
import java.io.FileOutputStream;
import java.io.IOException;

public class Main {
    public static void main(String[] args) {
        getByteStreams();
    }

    public static void getByteStreams() {
        // 使用 try-with-resources 语句来创建输入流和输出流
        try  (FileInputStream in = new FileInputStream("D:/桌面/in.txt");
              FileOutputStream out = new FileOutputStream("D:/桌面/out.txt")) {

            // 使用 transferTo 方法将输入流的内容传输到输出流中,并获取传输的字节数
            long transferredBytes = in.transferTo(out);

            // 输出传输的字节数
            System.out.println("Transferred bytes: " + transferredBytes);

        } catch (IOException e) {
            e.printStackTrace();
        }
    }
}2.5readAllBytes() 方法
readAllBytes()是 Java 9 中InputStream类的另一个新方法。它允许您一次性读取输入流中的所有字节,并将它们存储在一个字节数组中。这个方法非常适用于读取小文件,但对于大文件可能会导致内存不足的问题。
import java.io.FileInputStream;
import java.io.IOException;

public class Main {
    public static void main(String[] args) {
        readAllBytes();
    }

    public static void readAllBytes() {
        // 使用 try-with-resources 语句来创建输入流
        try (FileInputStream in = new FileInputStream("D:/桌面/in.txt")) {

            // 使用 readAllBytes 方法一次性读取输入流中的所有字节
            byte[] data = in.readAllBytes();

            // 输出读取到的数据
            System.out.println(new String(data));

        } catch (IOException e) {
            e.printStackTrace();
        }
    }
}2.6BufferedReader 和 InputStreamReader
BufferedReader和InputStreamReader都是 Java 中用于从字符输入流中读取文本的类。它们都基于缓冲区来提高读取性能。
InputStreamReader是一个桥接器,它将字节输入流转换为字符输入流。它使用指定的字符集来解码字节流中的字节。
BufferedReader则是一个包装器,它包装一个字符输入流,并为其提供缓冲功能。这样,每次读取时就不需要从底层流中读取数据,而是从缓冲区中读取,从而提高了读取性能。
import java.io.BufferedReader;
import java.io.FileInputStream;
import java.io.IOException;
import java.io.InputStreamReader;

public class Main {
    public static void main(String[] args) {
        readText();
    }

    public static void readText() {
        // 使用 try-with-resources 语句来创建输入流和字符输入流
        try (FileInputStream in = new FileInputStream("D:/桌面/in.txt");
             InputStreamReader reader = new InputStreamReader(in);
             BufferedReader bufferedReader = new BufferedReader(reader)) {

            // 定义一个字符串变量,用于存储从字符输入流中读取的文本
            String line;

            // 从字符输入流中读取文本,直到读取完毕
            while ((line = bufferedReader.readLine()) != null) {
                // 输出读取到的文本
                System.out.println(line);
            }

        } catch (IOException e) {
            e.printStackTrace();
        }
    }
}2.7BufferedWriter 和 OutputStreamWriter
BufferedWriter和OutputStreamWriter都是 Java 中用于将文本写入字符输出流的类。它们都基于缓冲区来提高写入性能。
OutputStreamWriter是一个桥接器,它将字符输出流转换为字节输出流。它使用指定的字符集来编码字符流中的字符。
BufferedWriter则是一个包装器,它包装一个字符输出流,并为其提供缓冲功能。这样,每次写入时就不需要将数据写入到底层流中,而是写入到缓冲区中,从而提高了写入性能。
import java.io.BufferedWriter;
import java.io.FileOutputStream;
import java.io.IOException;
import java.io.OutputStreamWriter;

public class Main {
    public static void main(String[] args) {
        writeText();
    }

    public static void writeText() {
        // 使用 try-with-resources 语句来创建输出流和字符输出流
        try (FileOutputStream out = new FileOutputStream("D:/桌面/out.txt");
             OutputStreamWriter writer = new OutputStreamWriter(out);
             BufferedWriter bufferedWriter = new BufferedWriter(writer)) {

            // 定义要写入的文本
            String text = "Hello, world!";

            // 将文本写入到字符输出流中
            bufferedWriter.write(text);

        } catch (IOException e) {
            e.printStackTrace();
        }
    }
}
三、路径:
绝对路径,始终包含根元素和查找文件所需的完整目录列表。 例如,D:/test/a.txt。找到文件所需的所有信息都包含在路径声明中
相对路径,例如,a.txt。没有更多信息,程序将无法访问。即,相对路径,最终也必须基于绝对路径描述。
为什么用NIO:
Java.io.File类,包含耦合了文件路径声明,以及文件操作方法的类;且是同步阻塞的
NIO2 (java8),将文件路径与文件操作,分离;且支持异步非阻塞
java.nio.file.Path接口,表示系统文件/目录的绝对的/相对的路径
java.nio.file.Files工具类,包含处理文件操作的方法,包括文件的,创建,删除,复制,移动等
Path接口:Path代表一个不依赖于系统的文件路径。即运行在不同操作系统下,Path的具体实现不同(windows/linux),但开发者仅需面向Path描述路径,不同系统,而无需关心操作系统差异。
3.1Path接口:
Path接口是 Java 中用于表示文件系统中的路径的接口。它是 Java 7 中引入的新特性,属于java.nio.file包。
Path接口提供了许多用于操作路径的方法,例如获取文件名、获取父路径、解析相对路径等。此外,它还提供了用于检查路径是否存在、创建目录、删除文件等文件系统操作的方法。
import java.nio.file.Path;
import java.nio.file.Paths;

public class Main {
    public static void main(String[] args) {
        // 使用 Paths.get 方法创建一个 Path 对象
        Path path = Paths.get("D:/桌面/in.txt");

        // 获取文件名
        System.out.println("File name: " + path.getFileName());

        // 获取父路径
        System.out.println("Parent: " + path.getParent());

        // 获取根路径
        System.out.println("Root: " + path.getRoot());

        // 解析相对路径
        Path newPath = path.resolve("b.txt");
        System.out.println("New path: " + newPath);

        // 使用 Path.of 方法创建一个新的 Path 对象
        Path anotherPath = Path.of("D:", "桌面", "c.txt");
        System.out.println("Another path: " + anotherPath);

        // 比较两个路径是否相等
        System.out.println("Paths are equal: " + newPath.equals(anotherPath));
    }
}
Files工具类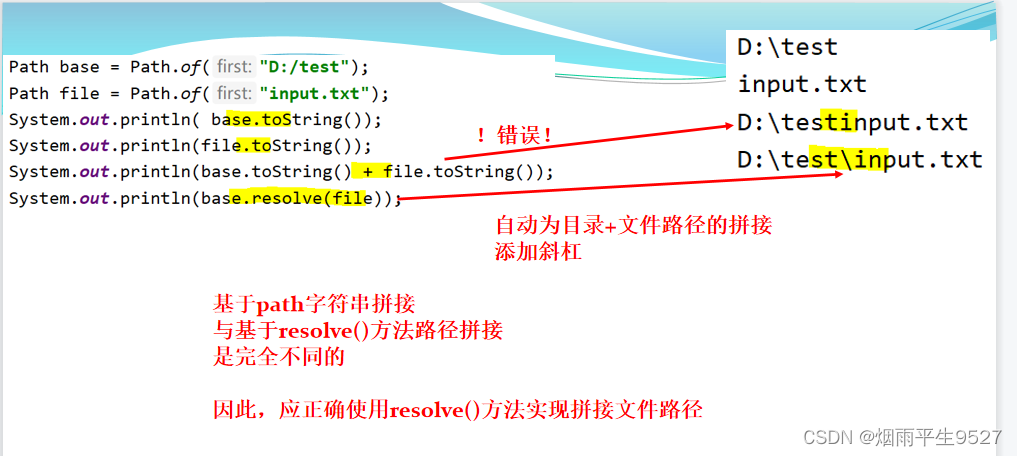
3.2 Files工具类
Files是 Java 中用于操作文件系统的工具类。它是 Java 7 中引入的新特性,属于java.nio.file包。
Files类提供了许多静态方法,用于执行文件系统操作,例如检查文件是否存在、创建目录、删除文件、复制文件等。此外,它还提供了用于读取和写入文件内容的方法。Files方法基于Path操作
3.2.1Checking a File or Directory
- boolean exists(Path path)/notExists(Path path),Path路径是否存在
- Boolean isDirectory(Path path),path是否为目录
import java.nio.file.Files;
import java.nio.file.Path;
import java.nio.file.Paths;

public class Main {
    public static void main(String[] args) {
        // 定义要检查的路径
        Path path = Paths.get("D:/桌面/in.txt");

        // 检查路径是否存在
        if (Files.exists(path)) {
            System.out.println("The path " + path + " exists.");
        } else if (Files.notExists(path)) {
            System.out.println("The path " + path + " does not exist.");
        } else {
            System.out.println("The existence of the path " + path + " cannot be determined.");
        }

        // 检查路径是否为目录
        if (Files.isDirectory(path)) {
            System.out.println("The path " + path + " is a directory.");
        } else {
            System.out.println("The path " + path + " is not a directory.");
        }
    }
}
3.2.2Creating a Directory
Path createDirectory(Path dir) throws IOException。目录路径已存在则异常;目录路径为多级目录,异常
Path createDirectories(Path dir) throws IOException。自动创建多级不存在目录;目录已存在,无异常
import java.io.IOException;
import java.nio.file.Files;
import java.nio.file.Path;
import java.nio.file.Paths;

public class Main {
    public static void main(String[] args) {
        // 定义要创建的目录的路径
        Path singleDirPath = Paths.get("D:/桌面/新建文件夹/new_directory");
        Path multiDirPath = Paths.get("D:/桌面/新建文件夹/new_directory/sub_directory");

        // 使用createDirectory方法创建单级目录
        try {
            Files.createDirectory(singleDirPath);
            System.out.println("Single-level directory created successfully.");
        } catch (IOException e) {
            System.err.println("Failed to create single-level directory: " + e.getMessage());
        }

        // 使用createDirectories方法创建多级目录
        try {
            Files.createDirectories(multiDirPath);
            System.out.println("Multi-level directory created successfully.");
        } catch (IOException e) {
            System.err.println("Failed to create multi-level directory: " + e.getMessage());
        }
    }
}
3.2.3Creating a File
Path createFile(path) throws IOException。基于指定路径,创建文件。文件存在,异常
import java.io.IOException;
import java.nio.file.Files;
import java.nio.file.Path;
import java.nio.file.Paths;

public class Main {
    public static void main(String[] args) {
        // 定义要创建的文件的路径
        Path path = Paths.get("D:/桌面/新建文件夹/new_directory/a.txt");

        // 创建新文件
        try {
            Files.createFile(path);
            System.out.println("File created successfully.");
        } catch (IOException e) {
            System.err.println("Failed to create file: " + e.getMessage());
        }
    }
}
3.3.4Copying a File or Directory
Path copy(Path source, Path target, CopyOption... options) throws IOException,将文件复制到目标文件。默认,如果文件已经存在,异常
import java.io.IOException;
import java.nio.file.CopyOption;
import java.nio.file.Files;
import java.nio.file.Path;
import java.nio.file.Paths;
import java.nio.file.StandardCopyOption;

public class Main {
    public static void main(String[] args) {
        // 定义要复制的文件的路径和目标路径
        Path sourcePath = Paths.get("D:/桌面/新建文件夹/new_directory/a.txt");
        Path targetPath = Paths.get("D:/桌面/新建文件夹/new_directory/target_file.txt");

        // 复制文件
        try {
            Files.copy(sourcePath, targetPath);
            System.out.println("File copied successfully.");
        } catch (IOException e) {
            System.err.println("Failed to copy file: " + e.getMessage());
        }

        // 使用REPLACE_EXISTING选项复制文件
        try {
            Files.copy(sourcePath, targetPath, StandardCopyOption.REPLACE_EXISTING);
            System.out.println("File copied successfully with REPLACE_EXISTING option.");
        } catch (IOException e) {
            System.err.println("Failed to copy file with REPLACE_EXISTING option: " + e.getMessage());
        }
    }
}
java.nio.file.StandardCopyOption 是一个枚举类,它实现了 CopyOption 接口,定义了标准的复制选项。它有三个枚举常量:ATOMIC_MOVE,COPY_ATTRIBUTES 和 REPLACE_EXISTING。
ATOMIC_MOVE: 以原子文件系统操作的方式移动文件。COPY_ATTRIBUTES: 将属性复制到新文件。REPLACE_EXISTING: 如果文件已存在,则替换它。java.nio.file.StandardCopyOption枚举,实现了CopyOption接口,复制选项
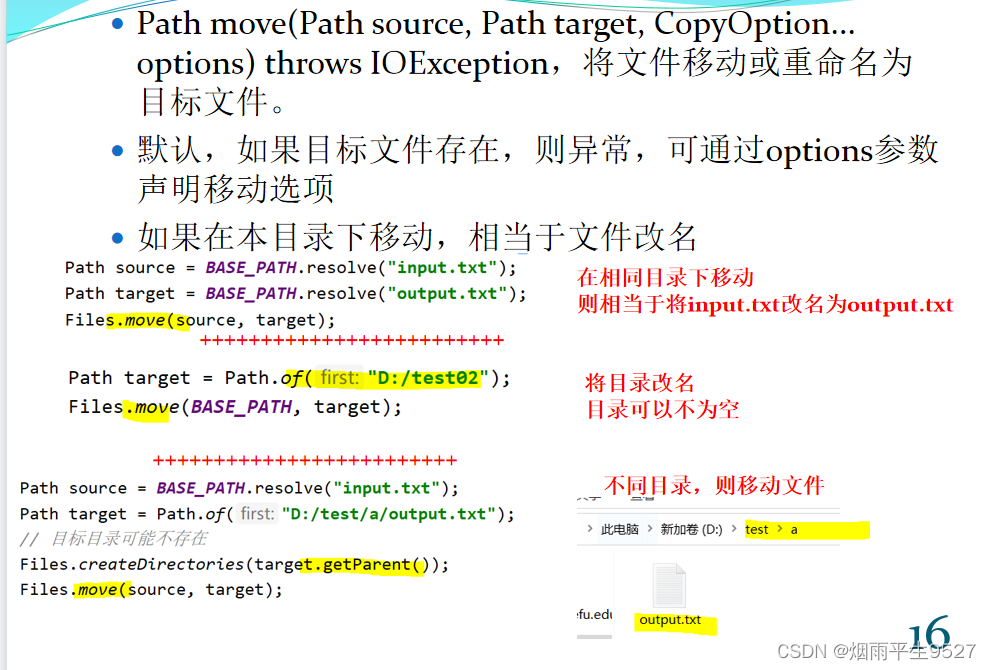
3.3.5Moving a File or Directory
import java.io.IOException;
import java.nio.file.Files;
import java.nio.file.Path;
import java.nio.file.Paths;
import java.nio.file.StandardCopyOption;

public class Main {
    public static void main(String[] args) {
        // 定义要移动的文件的路径和目标路径
        Path sourcePath = Paths.get("D:/桌面/新建文件夹/new_directory/a.txt");
        Path targetPath = Paths.get("D:/桌面/新建文件夹/b.txt");

        // 移动文件
        try {
            Files.move(sourcePath, targetPath);
            System.out.println("File moved successfully.");
        } catch (IOException e) {
            System.err.println("Failed to move file: " + e.getMessage());
        }

        // 使用REPLACE_EXISTING选项移动文件
        try {
            Files.move(sourcePath, targetPath, StandardCopyOption.REPLACE_EXISTING);
            System.out.println("File moved successfully with REPLACE_EXISTING option.");
        } catch (IOException e) {
            System.err.println("Failed to move file with REPLACE_EXISTING option: " + e.getMessage());
        }
    }
}
3.3.6Deleting a File or Directory
void delete(Path path) throws IOException。删除指定路径;路径不存在,异常
boolean deleteIfExists(Path path) throws IOException。路径不存在,不删除。返回是否删除成功
如果路径为目录,目录中包含文件(即不为空),2种删除均异常
import java.io.IOException;
import java.nio.file.Files;
import java.nio.file.Path;
import java.nio.file.Paths;

public class Main {
    public static void main(String[] args) {
        // 定义要删除的文件的路径
        Path path = Paths.get("D:/桌面/新建文件夹/b.txt");
        Path path1 = Paths.get("D:/桌面/新建文件夹/new_directory/target_file.txt");
        // 删除文件
        try {
            Files.delete(path);
            System.out.println("File deleted successfully.");
        } catch (IOException e) {
            System.err.println("Failed to delete file: " + e.getMessage());
        }

        // 使用deleteIfExists方法删除文件
        try {
            boolean deleted = Files.deleteIfExists(path1);
            if (deleted) {
                System.out.println("File deleted successfully with deleteIfExists method.");
            } else {
                System.out.println("File not found with deleteIfExists method.");
            }
        } catch (IOException e) {
            System.err.println("Failed to delete file with deleteIfExists method: " + e.getMessage());
        }
    }
}3.3.7指定路径的遍历(Files的方法):
Stream<Path> walk(Path start, int maxDepth) throws IOException:遍历,基于指定深度遍历path路径中的目录和文件
Stream<Path> walk(Path start) throws IOException:遍历path路径中的所有目录和文件,包括子目录的,观察遍历时的输出顺序,按层次输出的。注意返回值是流,后面可以用流的操作,比如过滤,排序等功能。可以借助于此方法删除非空目录
import java.io.IOException;
import java.nio.file.Files;
import java.nio.file.Path;
import java.nio.file.Paths;
import java.util.stream.Stream;

public class Main {
    public static void main(String[] args) {
        // 定义要遍历的目录的路径
        Path start = Paths.get("D:/桌面");

        // 遍历目录
        try (Stream<Path> stream = Files.walk(start)) {
            stream.forEach(System.out::println);
        } catch (IOException e) {
            System.err.println("Failed to walk directory: " + e.getMessage());
        }
    }
}
import java.io.IOException;
import java.nio.file.Files;
import java.nio.file.Path;
import java.nio.file.Paths;
import java.util.stream.Stream;
public class Main {
public static void main(String[] args) {
// 定义要遍历的目录的路径
Path start = Paths.get("D:/桌面");
// 遍历目录
try (Stream<Path> stream = Files.walk(start, 1)) {
stream.forEach(System.out::println);
} catch (IOException e) {
System.err.println("Failed to walk directory: " + e.getMessage());
}
}
}3.3.8需求:在指定目录下,将指定名称文件全部删除
import java.io.IOException;
import java.nio.file.Files;
import java.nio.file.Path;
import java.nio.file.Paths;
import java.util.stream.Stream;

public class Main {
    public static void main(String[] args) {
        // 定义要遍历的目录的路径
        Path start = Paths.get("D:/桌面/新建文件夹/new_directory");
        String fileName = "a.txt";

        // 遍历目录并删除指定名称的文件
        try (Stream<Path> stream = Files.walk(start)) {
            stream.filter(path -> path.getFileName().toString().equals(fileName))
                    .forEach(path -> {
                        try {
                            Files.delete(path);
                            System.out.println("Deleted file: " + path);
                        } catch (IOException e) {
                            System.err.println("Failed to delete file: " + e.getMessage());
                        }
                    });
        } catch (IOException e) {
            System.err.println("Failed to walk directory: " + e.getMessage());
        }
    }
}
3.3.9需求:删除指定的,包含文件/目录的整个文件目录
import java.io.IOException;
import java.nio.file.Files;
import java.nio.file.Path;
import java.nio.file.Paths;
import java.util.Comparator;
import java.util.stream.Stream;

public class Main {
    public static void main(String[] args) {
        // 定义要删除的目录的路径
        Path start = Paths.get("D:/桌面/新建文件夹/new_directory");

        // 删除目录及其内容
        try (Stream<Path> stream = Files.walk(start)) {
            stream.sorted(Comparator.reverseOrder())
                    .forEach(path -> {
                        try {
                            Files.delete(path);
                            System.out.println("Deleted: " + path);
                        } catch (IOException e) {
                            System.err.println("Failed to delete: " + e.getMessage());
                        }
                    });
        } catch (IOException e) {
            System.err.println("Failed to walk directory: " + e.getMessage());
        }
    }
}
2.3.10需求:按字符串,读取指定文本文件中的内容
String Files.readString(path, charset) throws IOException,基于指定路径及字符集读取文本文件
import java.io.IOException;
import java.nio.file.Files;
import java.nio.file.Path;
import java.nio.file.Paths;

public class Main {
    public static void main(String[] args) {
        // 定义要读取的文件的路径
        Path path = Paths.get("D:/桌面/新建文件夹/new_directory/a.txt");

        // 读取文件内容
        try {
            String content = Files.readString(path);
            System.out.println(content);
        } catch (IOException e) {
            System.err.println("Failed to read file: " + e.getMessage());
        }
    }
}
3.3zip文件读写
3.3.1zip简介
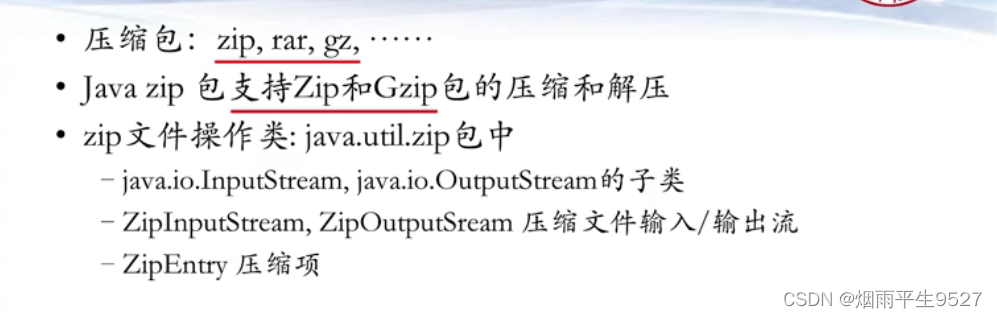
3.3.2压缩处理流程
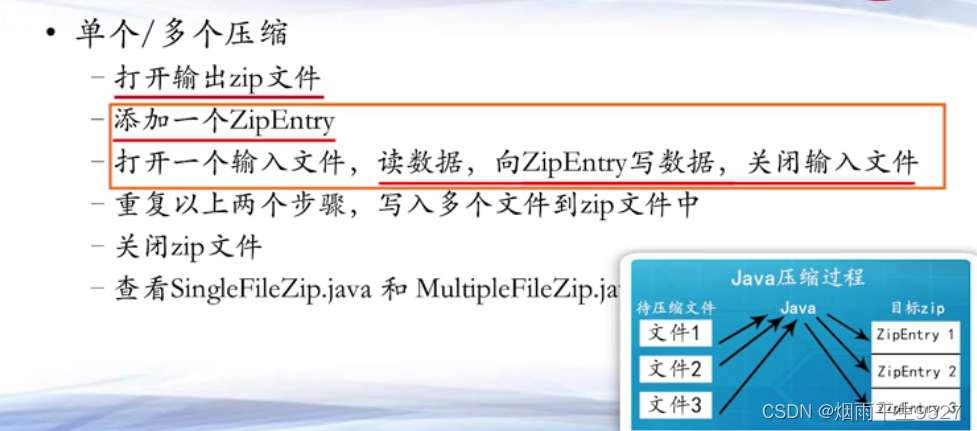
3.3.3单文件压缩
package org.example;

import java.io.*;
import java.util.zip.ZipEntry;
import java.util.zip.ZipOutputStream;

public class Main {
    public static void main(String[] args) throws IOException {
        File file = new File("D://桌面//1.txt");//定义要压缩的文件
        File zipFile = new File("D://桌面//single.zip");//定义压缩文件名称
        InputStream input = new FileInputStream(file);//定义文件的输入流
        ZipOutputStream zipOut = null;//声明压缩流对象
        zipOut = new ZipOutputStream(new FileOutputStream(zipFile));
        zipOut.putNextEntry(new ZipEntry(file.getName()));//设置ZipEntry对象
        zipOut.setComment("single file zip");//设置注释
        int temp = 0;
        byte[] buffer = new byte[1024];//定义缓冲区
        while ((temp=input.read(buffer))!=-1){//读取内容
            zipOut.write(buffer, 0, temp);//压缩输出
        }
        zipOut.finish();//结束当前条目
        input.close();
        zipOut.close();
        System.out.println("single file zip done");
    }
}
3.3.4多文件压缩
package org.example;

import java.io.*;
import java.util.zip.ZipEntry;
import java.util.zip.ZipOutputStream;

public class Main {
    public static void main(String[] args) throws IOException {
        File file = new File("D://桌面//single");//定义要压缩的文件夹
        File zipFile = new File("D://桌面//multiple.zip");//定义压缩文件名称
        InputStream input = null;//定义文件的输入流
        ZipOutputStream zipOut = null;//声明压缩流对象
        zipOut = new ZipOutputStream(new FileOutputStream(zipFile));//初始化压缩流对象
        // zipOut.setComment("multiple file zip");//设置注释
        int temp = 0;
        if(file.isDirectory()){//判断是否是文件夹
            File lists[] = file.listFiles();//列出全部子文件
            for (int i = 0; i < lists.length; i++) {
                input = new FileInputStream(lists[i]);//定义文件输出流
                zipOut.putNextEntry(new ZipEntry(file.getName()
                        +File.separator+lists[i]+lists[i].getName()));//设置ZipEntry对象
                //这里使用了 file.getName() + File.separator + lists[i] + lists[i].getName() 作为名称,
                // 其中 file 是一个 File 对象,表示要压缩的文件;File.separator 是一个常量,表示系统默认的文件分隔符;
                // lists 是一个 File 数组,表示要压缩的文件夹中的所有文件;i 是一个整数,表示当前遍历到的文件的索引。
                System.out.println("正在压缩"+lists[i].getName());
                while ((temp=input.read())!=-1){//读取内容
                    zipOut.write(temp);//压缩输出
                }
                input.close();
            }
        }

        zipOut.close();
        System.out.println("multiple file zip done");
    }
}
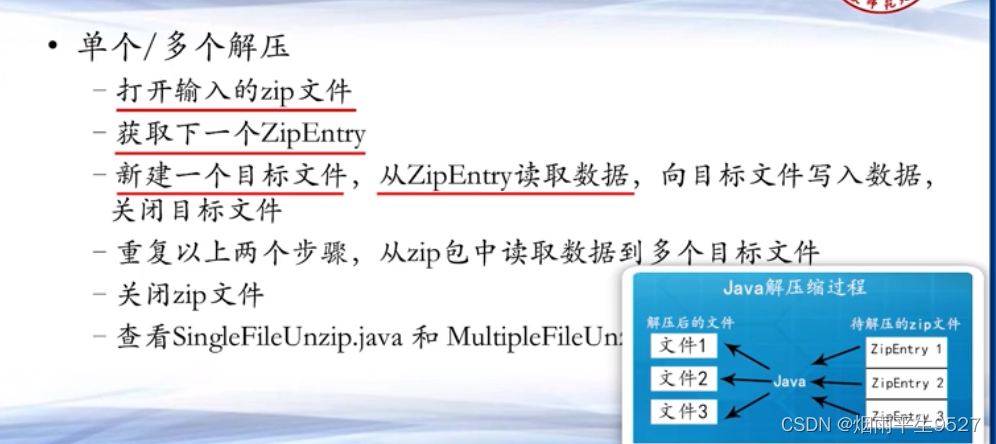
3.3.5解压处理流程
 3.3.6单文件解压
package org.example;

import java.io.File ;
import java.io.*;
import java.util.zip.ZipEntry;
import java.util.zip.ZipInputStream;
import java.util.zip.ZipOutputStream;
public class Main {
    public static void main(String args[]) throws Exception {
//待解压文件, 需要从zip文件打开输入流,读取数据到java中
        File zipFile = new File("D://桌面//single4.zip");   // 定义压缩文件名称
        ZipInputStream input = null; // 定义压缩输入流
        input = new ZipInputStream(new FileInputStream(zipFile));  // 实例化ZIpInputStream
        ZipEntry entry = input.getNextEntry(); // 得到一个压缩实体
        System.out.println("压缩实体名称:" + entry.getName());  //获取压缩包中文件名字
//新建目标文件,需要从目标文件打开输出流,数据从java流入
        File outFile = new File("D://桌面//1" + entry.getName());
        OutputStream out = new FileOutputStream(outFile);   // 实例化文件输出流
        int temp = 0;
        while ((temp = input.read()) != -1) {
            out.write(temp);
        }
        input.close(); // 关闭输入流
        out.close(); // 关闭输出流
        System.out.println("unzip done.");
    }
}
3.3.7多文件压缩
package org.example;

import java.io.File ;
import java.io.*;
import java.util.zip.ZipEntry;
import java.util.zip.ZipFile;
import java.util.zip.ZipInputStream;
import java.util.zip.ZipOutputStream;
public class Main {
    public static void main(String args[]) throws Exception {
//待解压的zip文件,需要在zip文件上构建输入流,读取数据到Java中
        File file = new File("D://桌面//multiple.zip");   // 定义压缩文件名称
        File outFile = null;   // 输出文件的时候要有文件夹的操作
        ZipFile zipFile = new ZipFile(file);   // 实例化ZipFile对象
        ZipInputStream zipInput = null;    // 定义压缩输入流
//定义解压的文件名
        OutputStream out = null;   // 定义输出流,用于输出每一个实体内容
        InputStream input = null;  // 定义输入流,读取每一个ZipEntry
        ZipEntry entry = null; // 每一个压缩实体
        zipInput = new ZipInputStream(new FileInputStream(file));  // 实例化ZIpInputStream
        //遍历压缩包中的文件
        while ((entry = zipInput.getNextEntry()) != null) { // 得到一个压缩实体
            System.out.println("解压缩" + entry.getName() + "文件");
            outFile = new File("D://桌面//" + entry.getName().replaceAll("[\\\\/:*?\"<>|]", ""));   // 定义输出的文件路径
            if (!outFile.getParentFile().exists()) {  // 如果输出文件夹不存在
                outFile.getParentFile().mkdirs();
                //创建文件夹 ,如果这里的有多级文件夹不存在,请使用mkdirs()
                //如果只是单纯的一级文件夹,使用mkdir()就好了
            }
            if (!outFile.exists()) {  // 判断输出文件是否存在
                if (entry.isDirectory()) {
                    outFile.mkdirs();
                    System.out.println("create directory...");
                } else {
                    outFile.createNewFile();   // 创建文件
                    System.out.println("create file...");

                }
            }
            if (!entry.isDirectory()) {
                input = zipFile.getInputStream(entry); // 得到每一个实体的输入流
                out = new FileOutputStream(outFile);   // 实例化文件输出流
                int temp = 0;
                while ((temp = input.read()) != -1) {
                    out.write(temp);
                }
                input.close(); // 关闭输入流
                out.close();   // 关闭输出流
            }
        }
        input.close();
    }
}


 2070
2070


 被折叠的 条评论
为什么被折叠?
被折叠的 条评论
为什么被折叠?
 到【灌水乐园】发言


