


一、概述
1.1缓存介绍
Spring提供了一套cache缓存抽象(注解/接口),使基于spring缓存的使用与实现解耦
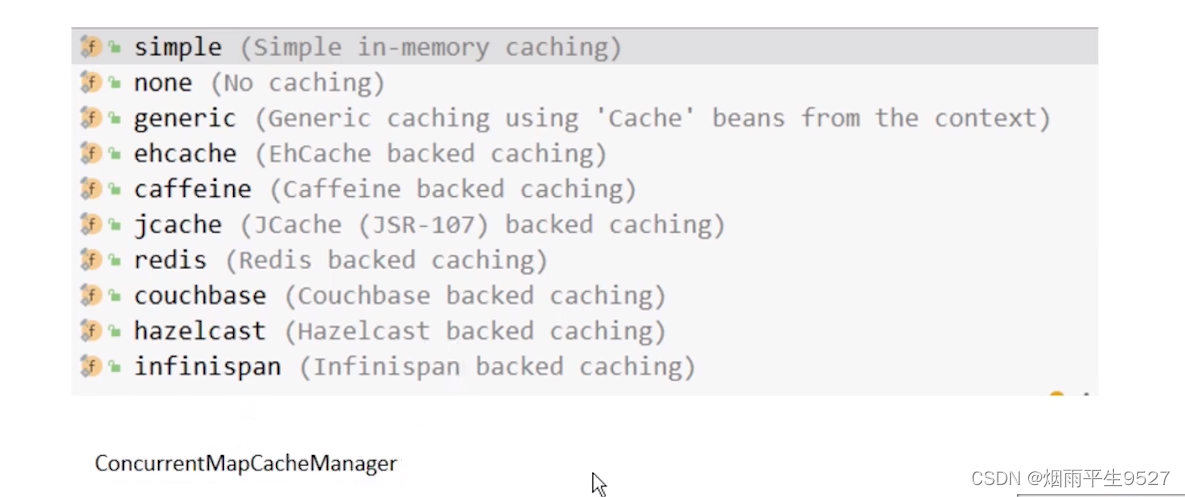
- 默认实现,Spring JDK ConcurrentMap-based Cache
- 第三方实现,caffeine/Ehcache/Redis等
https://docs.spring.io/spring-framework/docs/current/reference/html/integration.html#cache
Spring将缓存应用于方法,从而根据缓存中可用信息减少方法执行次数
即,每次调用目标方法时,spring基于缓存行为,检查是否包含缓存数据。有则直接返回缓存结果,而不再实际调用目标方法。没有则调用目标方法,并将方法返回结果置于缓存。从而下次调用目标方法时,基于缓存行为直接返回缓存结果
由于需要的数据对象已经保存在内存,从而可极大减少CPU执行/降低IO操作/减少数据库请求等
缓存数据,必须可重复使用;对于业务,缓存逻辑必须透明。即,不实际调用目标方法不会造成任何业务影响
Spring缓存基于AOP切面的实现
 1.2SpringCache 特点
- 通过少量的配置annotation 即可使得既有代码支持缓存
- 支持开箱即用Out-Of-The-Box, 即不用安装和部署额外第三方组件即可使用缓存
- 支持 Spring Express Language,能使用对象的任何属性或者方法来定义缓存的key和condition
- 支持AspectJ,并通过其实现任何方法的缓存支持
- 支持自定义key和自定义缓存管理者,具有相当的灵活性和扩展性
- 支持各种缓存实现,如对象,对象列表,默认基ConcurrentMap实现的 ConcurrentMapCache, 同时支持其他缓存实现
综合来说,springCacho并不像正常缓存那样存储数和返回结果作为一个键值对存放在缓存中,等到下等数和返回结果作为一个新的参数来调用该方法时,将会把该方法参法,而是直接从缓存中获取结果进行返回,从而实现缓存的效果
1.3几个重要注解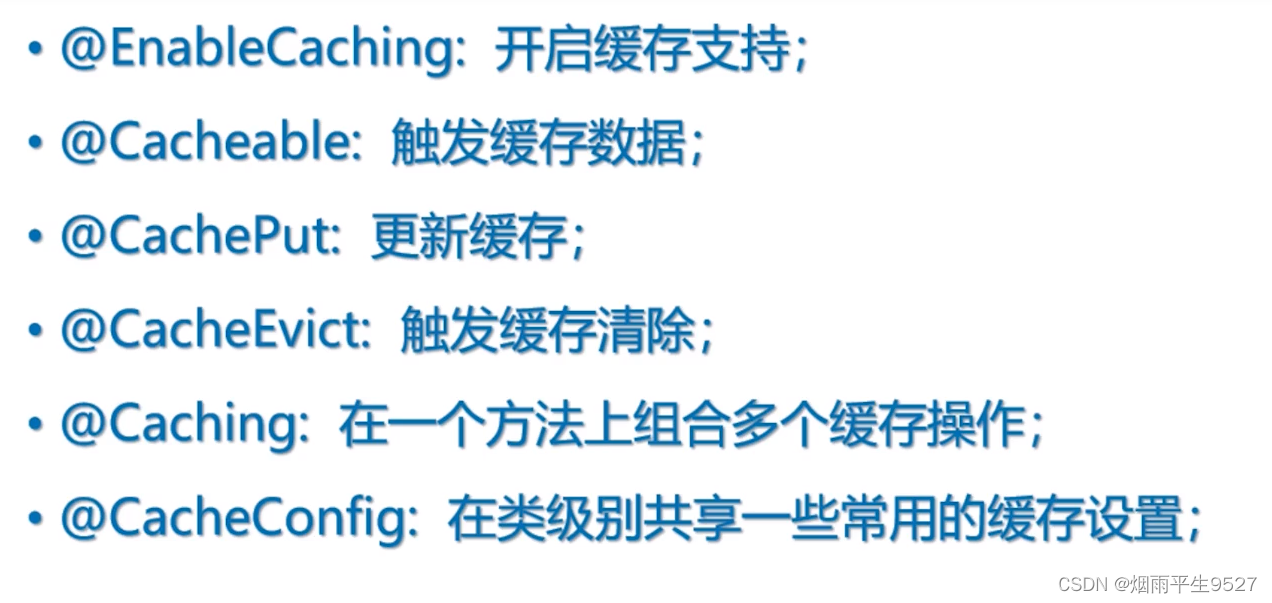
@EnableCaching

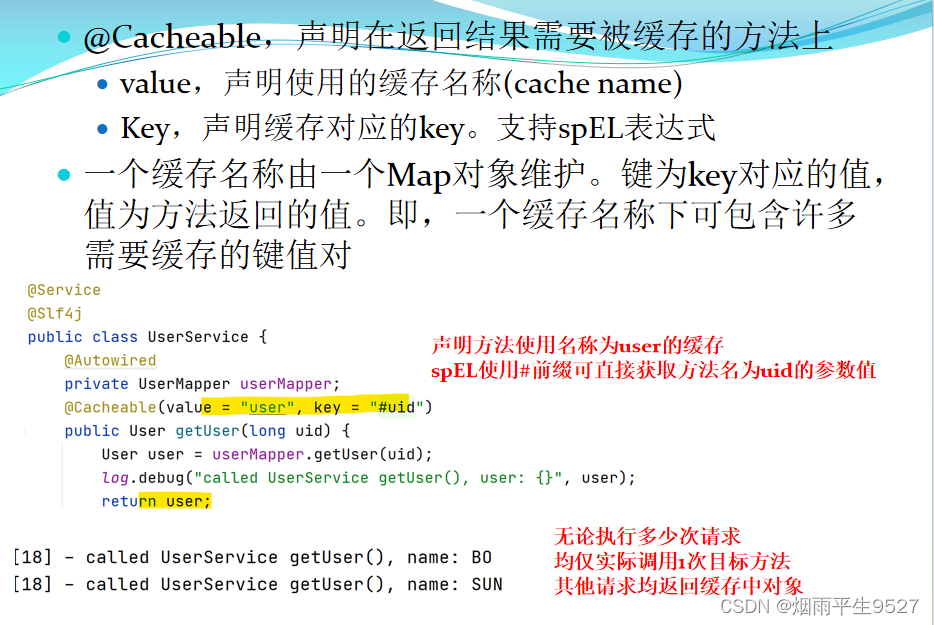
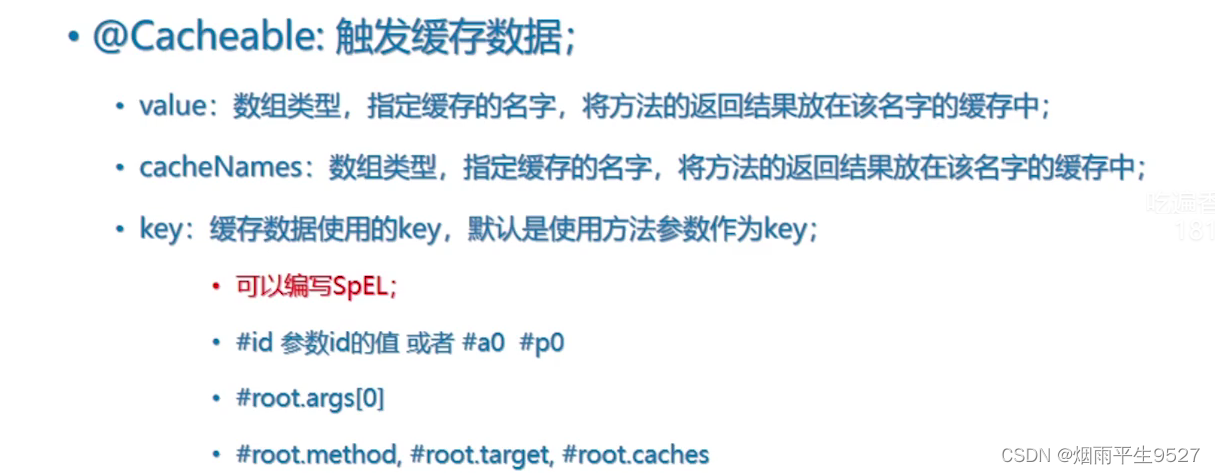
@Cacheable
- ·该注解用于标记缓存,就是对使用注解的位置进行缓存
- ·该注解可以在方法或者类上进行标记,在类上标记时,该类所有方法都支持缓存
@Cacheable使用时通常搭配三个属性使用
- ·value,用来指定Cache的名称,就是存储哪个Cache上,简单来说是cache的命名空间或者大的前缀
- ·key,用于指定生成缓存对应的key,如果没指定,则会默认策略生成key,也可以使用springEL编写,默认是方法参数组合
// 使用@Cacheable注解对findUser方法进行缓存,缓存名称为"users",缓存的key为用户的id
@Cacheable(value="users", key="#user.id")
public User findUser(User user){
    return user;
}

// 使用@Cacheable注解对findUser方法进行缓存,缓存名称为"users",缓存的key为方法参数id
@Cacheable(value="users", key="#root.args[0]")
public User findUser(String id){
    return user;
}
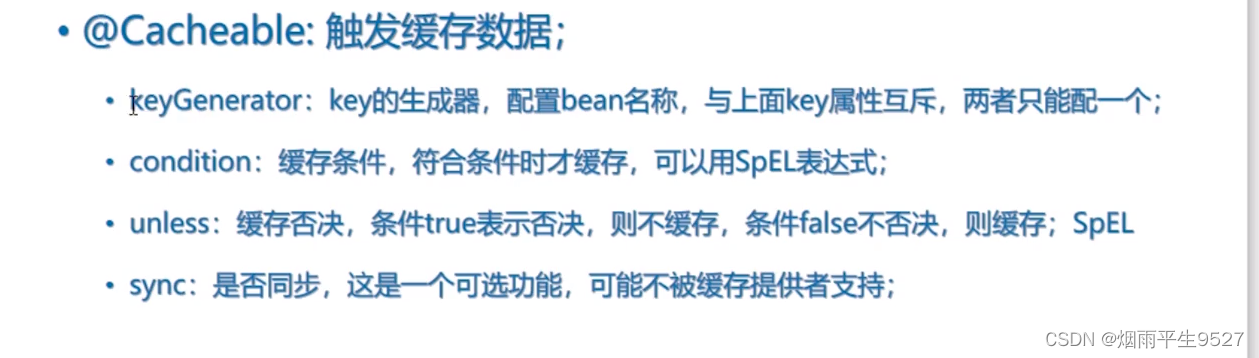
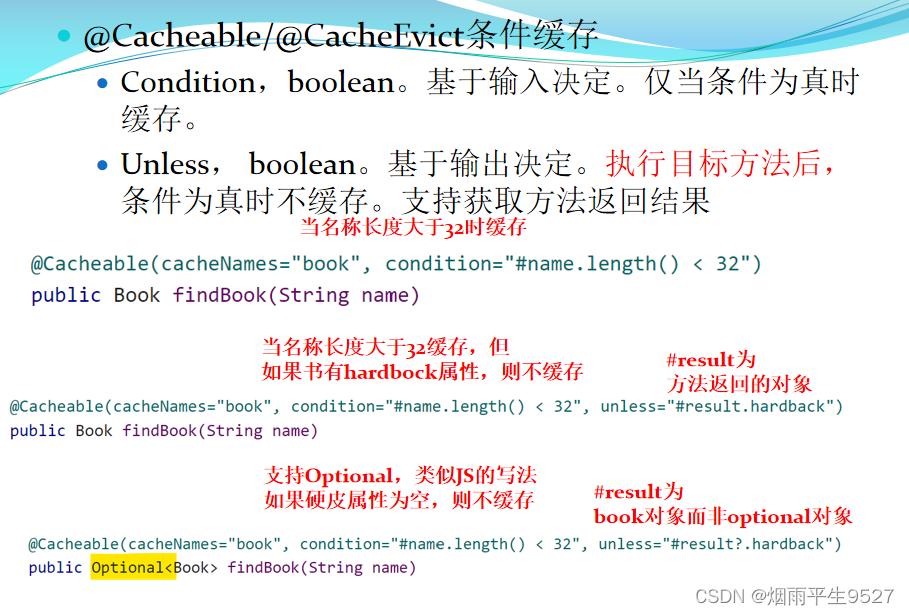
- condition,用来指定当前缓存的触发条件,可以使用springEL编写,如下代码,则当user.id为偶数时才会触发缓存 会触发缓存
@Cacheable(value="users", key="#user.id",condition="#user.id%2==0")
public User findUser(User user){
    return user;
}
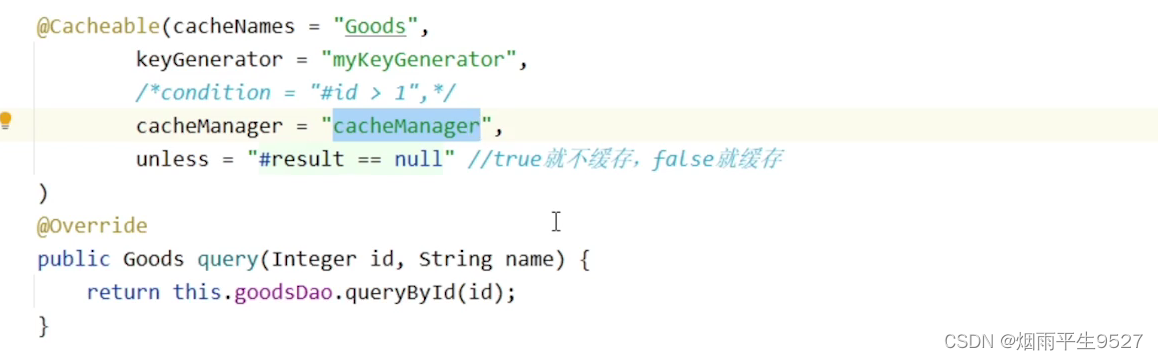

cacheManager
cacheManager, 用于指定当前方法或类使用缓存时的配置管理器,通过cacheManager的配置,可以为不同的方法使用不同的缓存策略,比如有的对象的缓存时间短,有的缓存的长,可以通过自定义配置 cacheManager来实现
@Configuration // 声明这是一个配置类
@EnableCaching // 开启缓存功能
public class SpringCacheConfig {
    @Bean // 定义一个Bean对象
    public CacheManager cacheManager() {
        // 创建Caffeine缓存管理器
        CaffeineCacheManager manager = new CaffeineCacheManager();
        // 创建缓存配置策略
        Cache<Object, Object> cache = Caffeine.newBuilder()
                .expireAfterWrite(5, TimeUnit.SECONDS) // 设置缓存过期时间为5秒
                .maximumSize(200) // 设置缓存最大容量为200个元素
                .build();
        // 为指定名称的缓存,指定配置
        manager.registerCustomCache("user", cache);
        // 允许缓存值为空的键值对。避免缓存穿透
        manager.setAllowNullValues(true);
        // 将管理器注入容器,替换默认管理器对象
        return manager;
    }
}
@CachePut
该注解将标记的方法的返回值放入缓存中,使用方法与@Cacheable一样,通常@CachePut放在数据更新的操作上,举例来说,当getByUserid这样一方法上使用了以userid为key的缓存时,如果更新了这条数据,该key对应的数据是不是要同步变更呢?
答案是肯的,于是,我们就需要在更新数据的地方添加@CachePut注解,当updateByUserid触发之后,getByUserid上面的key对应的缓存对象数据也能同步变更

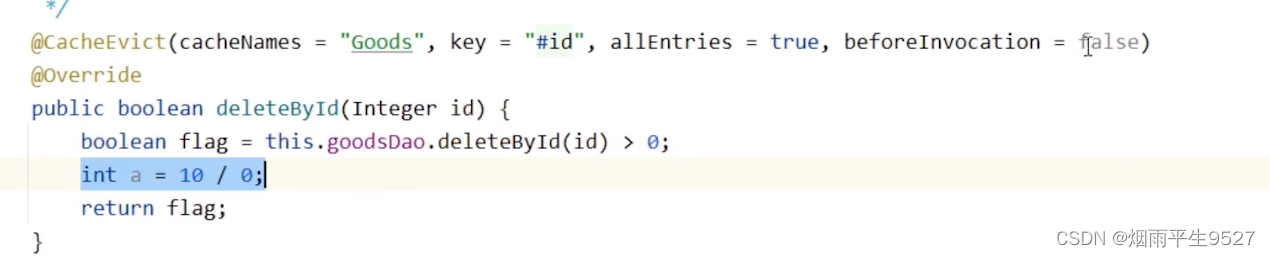
@CacheEvict
- ·该注解用于清理缓存数据
- ·使用在类上时,清除该类所有方法的缓存
- ·@CacheEvict同样拥有@Cacheable三个属性,同时还有一个allEntries属性,该属性默认为false,当为true时,删除该值所有缓存
@CacheEvict在实际使用中需要重点关注,比如一开始我们给用户组,角色,部门等与用户查询相关的业务上面添加了key的时候,当一个userid对应的这条数据被清理的时候,那么关联的key,即所说的用户组,部门角色等关联的用户数据都需要一同清理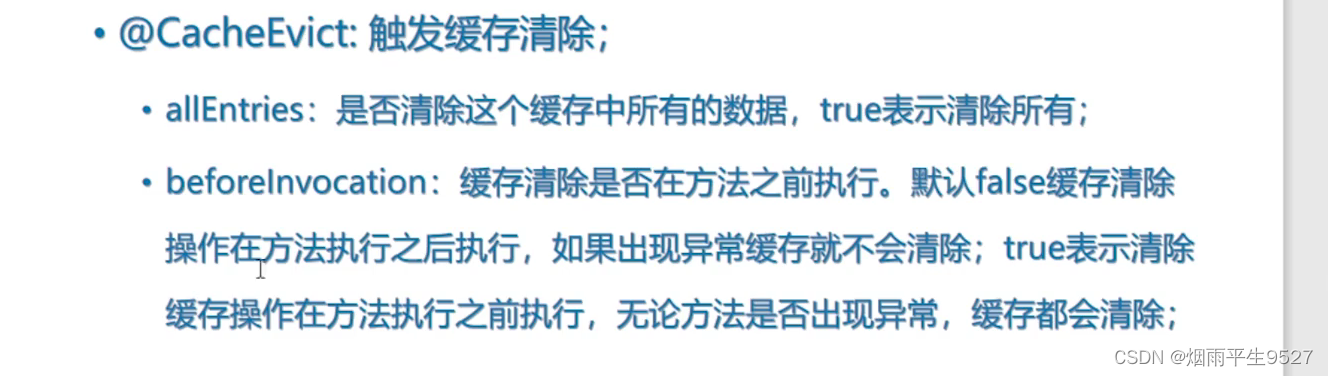
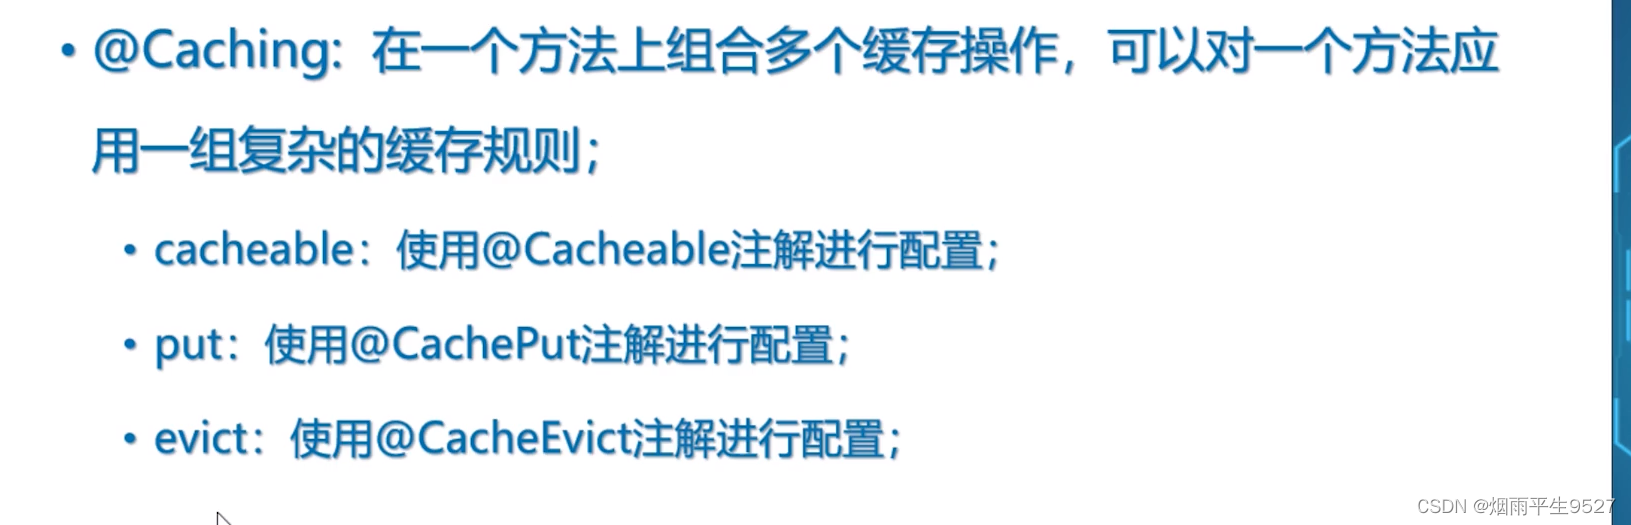
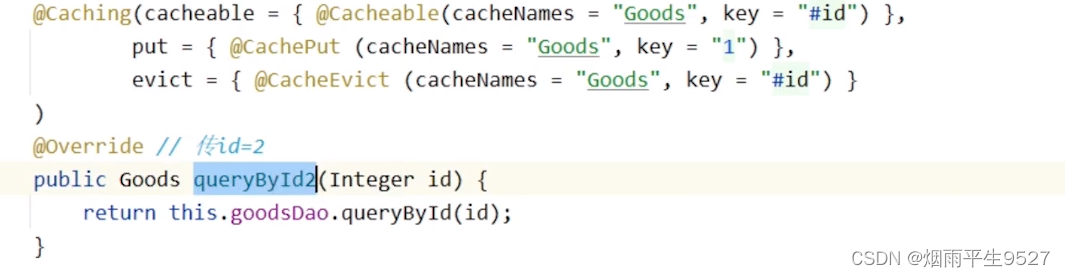
 caching
-
组合多个cache注解一起使用
-
允许在同一方法上使用以上3个注解的组合

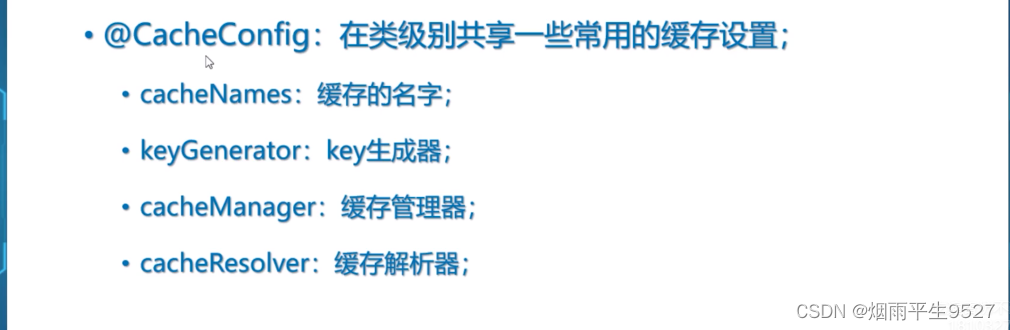
@CacheConfig
补充说明
以上简单介绍了springcache中的几个重要注解,以及各自的作用,通常来讲,在开发过程中,使用springcache也就是在这些注解打交道,里面有一个点值得注意就是,关于方法级别上的key的使用规范和命名规范问题,这里可以关注和参考下springEL的写法规范
二、与springboot的整合(redis版)
2.0应用场景
redis 应用场景
1.利用redis中字符串类型完成项目中手机验证码存储的实现
2.利用redis中字符串类型完成具有失效性业务功能12306 淘宝 订单还有:40分钟
3.利用redis 分布式集群系统中Session共享 memcache 内存数据存储上限 数据类型比较简单 redis 内存 数据上限 数据类型丰富
4.利用redis 可排序set类型元素 分数排行榜之功能 dangdang 销量排行 sales (商品id,商品销量)
5.利用redis 分布式缓存 实现
6.利用redis存储认证之后token信息 微信小程序 微信公众号 用户 openid令牌( token)超时
7.利用redis 解决分布式集群系统中分布式锁问题 redistrict单线程序 n=20定义
2.1添加pom依赖
需要说明的是,springcache提供了多种缓存的实现,其中与redis的整合比较符合大家对redis的使用习惯,同时也更进一步了解springcache在redis中存储的结构,因此这里需引入springboot-redis的依赖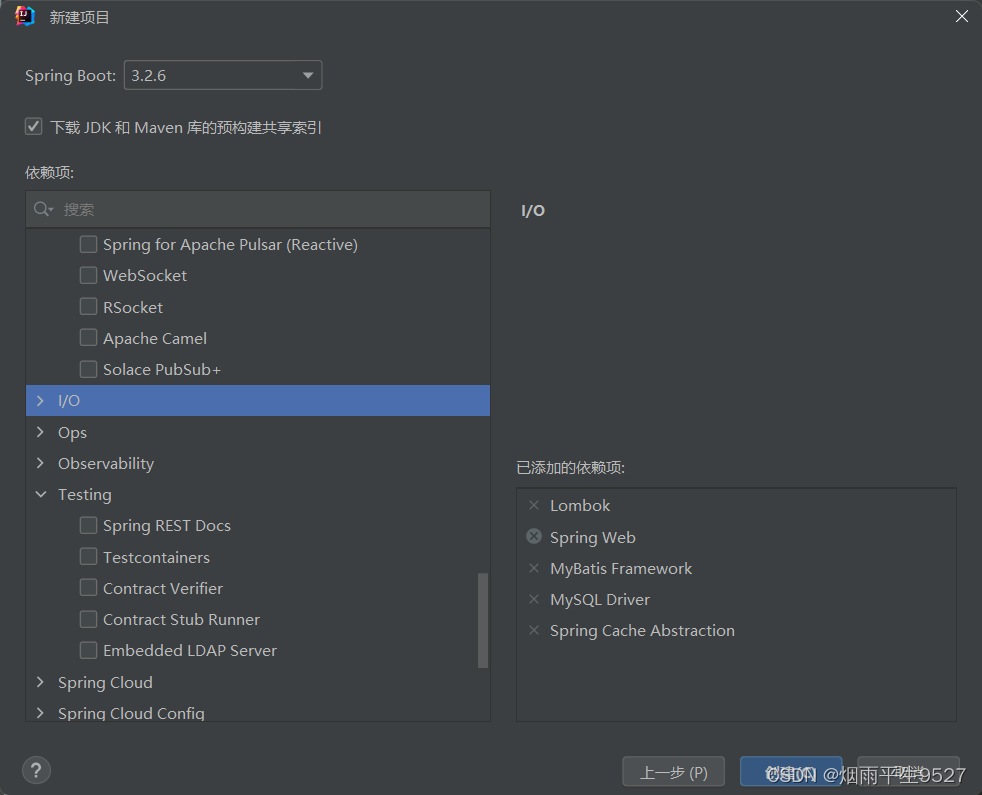
 		<dependency>
            <groupId>org.springframework.boot</groupId>
            <artifactId>spring-boot-starter-cache</artifactId>
        </dependency>

        <dependency>
            <groupId>org.springframework.boot</groupId>
            <artifactId>spring-boot-starter-data-redis</artifactId>
        </dependency>
2.2yml依赖
spring:
  application:
    name: redis-examples
  jackson:
    default-property-inclusion: non_null # springmvc忽略空值属性
  data:
    redis:
      host:
      port:
      password:
      database: 1
  cache: # 整合cache redis。代码声明详细配置时无效
    redis:
      cache-null-values: true # 默认值,可省略。缓存空数据,避免缓存穿透
      time-to-live: 50000 # 单位毫秒,50秒


logging:
  level:
    root: warn
    com:
      yanyu:
         springcache: debug
  pattern:
    console: '%-5level %C.%M[%line] - %msg%n'
server:
  port: 8083
2.3自定义cacheManager
import java.time.Duration;

@Configuration
@EnableCaching
@Slf4j
public class SpringCacheConfig {
    // 按默认jdk序列化对象。未声明全局配置,缓存数据永不过期
    /*@Bean
    public CacheManager cacheManager(RedisConnectionFactory cf) {
        // 全局配置
        RedisCacheConfiguration configG = RedisCacheConfiguration.defaultCacheConfig()
                .entryTtl(Duration.ofSeconds(120L));
        // 独立配置
        RedisCacheConfiguration config = RedisCacheConfiguration.defaultCacheConfig()
                .entryTtl(Duration.ofSeconds(60L));
        RedisCacheManager manager = RedisCacheManager.builder(cf)
                .cacheDefaults(configG)
                .withCacheConfiguration("user", config)
                .build();
        return manager;
    }*/
    // -----------------------------------
    // 持基于jackson的序列化,以及自定义缓存策略
    @Bean
    public CacheManager cacheManager(Jackson2JsonRedisSerializer<Object> serializer,
                                     RedisConnectionFactory cf) {
        // 全局配置:设置默认的缓存配置,包括过期时间和序列化方式
        RedisCacheConfiguration defaults = RedisCacheConfiguration
                .defaultCacheConfig() // 获取默认的缓存配置
                .entryTtl(Duration.ofMinutes(4)) // 设置缓存过期时间为4分钟
                .serializeValuesWith(RedisSerializationContext
                        .SerializationPair
                        .fromSerializer(serializer)); // 使用指定的序列化器进行序列化

        // 独立的缓存配置:为特定的缓存区域设置配置,包括过期时间和序列化方式
        RedisCacheConfiguration userR = RedisCacheConfiguration
                .defaultCacheConfig() // 获取默认的缓存配置
                .entryTtl(Duration.ofMinutes(2)) // 设置缓存过期时间为2分钟
                .serializeValuesWith(RedisSerializationContext
                        .SerializationPair
                        .fromSerializer(serializer)); // 使用指定的序列化器进行序列化

        // 基于全局配置/独立配置,创建redis缓存管理器
        RedisCacheManager manager = RedisCacheManager.builder(cf)
                .cacheDefaults(defaults) // 应用全局配置
                .withCacheConfiguration("user", userR) // 为"user"缓存区域应用独立配置
                .build(); // 构建缓存管理器实例

        return manager; // 返回缓存管理器实例
    }


    // 全局jackson-redis序列化配置。可直接注入到容器覆盖默认配置
    @Bean
    public Jackson2JsonRedisSerializer<Object> jackson2JsonRedisSerializer() {
        // 创建 ObjectMapper 对象,用于配置序列化和反序列化的规则
        ObjectMapper mapper = new ObjectMapper();
        // 设置序列化时忽略空值属性
        mapper.setSerializationInclusion(JsonInclude.Include.NON_NULL);
        // 设置反序列化时忽略不存在的属性,避免异常
        mapper.disable(DeserializationFeature.FAIL_ON_UNKNOWN_PROPERTIES);
        // 设置属性访问权限为任意可见性
        mapper.setVisibility(PropertyAccessor.ALL, JsonAutoDetect.Visibility.ANY);
        // 设置多态类型验证器,允许子类作为父类处理
        PolymorphicTypeValidator ptv = BasicPolymorphicTypeValidator.builder().allowIfSubType(Object.class).build();
        // 激活默认的多态类型处理方式
        mapper.activateDefaultTyping(ptv, ObjectMapper.DefaultTyping.NON_FINAL);
        // 设置日期时间序列化为 ISO 字符串格式,而非对象
        mapper.disable(SerializationFeature.WRITE_DATES_AS_TIMESTAMPS);
        // 注册 JavaTimeModule,支持 Java 8 日期时间类型
        mapper.registerModule(new JavaTimeModule());
        // 创建 Jackson2JsonRedisSerializer 对象,并设置 ObjectMapper 对象
        Jackson2JsonRedisSerializer serializer = new Jackson2JsonRedisSerializer<>(mapper, Object.class);
        return serializer;
    }

    // ------------------------------------
    @Bean("cum") // 定义一个名为"cum"的Bean
    public RedisTemplate<String, Object> redisTemplate(RedisConnectionFactory cf) {
        // 创建 ObjectMapper 对象,用于配置序列化和反序列化的规则
        ObjectMapper objectMapper = new ObjectMapper();
        // 设置反序列化时忽略不存在的属性,避免异常
        objectMapper.disable(DeserializationFeature.FAIL_ON_IGNORED_PROPERTIES);
        objectMapper.disable(DeserializationFeature.FAIL_ON_UNKNOWN_PROPERTIES);
        // 设置序列化时忽略空值属性
        objectMapper.setSerializationInclusion(JsonInclude.Include.NON_NULL);
        // 设置属性访问权限为任意可见性
        objectMapper.setVisibility(PropertyAccessor.ALL, JsonAutoDetect.Visibility.ANY);
        // 按ISO字符串序列化/反序列化日期时间,而非对象
        objectMapper.disable(SerializationFeature.WRITE_DATES_AS_TIMESTAMPS);
        // 注册 JavaTimeModule,支持 Java 8 日期时间类型
        objectMapper.registerModule(new JavaTimeModule());
        // 创建 Jackson2JsonRedisSerializer 对象,并设置 ObjectMapper 对象
        Jackson2JsonRedisSerializer serializer = new Jackson2JsonRedisSerializer<>(objectMapper, Object.class);
        // 创建 RedisTemplate 对象,并设置序列化器、连接工厂等属性
        RedisTemplate<String, Object> redisTemplate = new RedisTemplate<>();
        redisTemplate.setKeySerializer(serializer);
        redisTemplate.setValueSerializer(serializer);
        redisTemplate.setHashValueSerializer(serializer);
        redisTemplate.setHashKeySerializer(serializer);
        redisTemplate.setConnectionFactory(cf);
        return redisTemplate;
    }

    // ---------------------------------------------

    // 也可自定义RedisTemplate注入
    /*@Bean
    public RedisTemplate<String, Object> redisTemplate(RedisConnectionFactory cf) {
        Jackson2JsonRedisSerializer<Object> serializer =
                new Jackson2JsonRedisSerializer<>(Object.class);
        ObjectMapper objectMapper = new ObjectMapper();
        objectMapper.disable(DeserializationFeature.FAIL_ON_IGNORED_PROPERTIES);
        objectMapper.disable(DeserializationFeature.FAIL_ON_UNKNOWN_PROPERTIES);
        objectMapper.setSerializationInclusion(JsonInclude.Include.NON_NULL);
        objectMapper.setVisibility(PropertyAccessor.ALL, JsonAutoDetect.Visibility.ANY);
        PolymorphicTypeValidator ptv =
                BasicPolymorphicTypeValidator.builder()
                        .allowIfSubType(Object.class)
                        .build();
        objectMapper.activateDefaultTyping(ptv, ObjectMapper.DefaultTyping.NON_FINAL);
        serializer.setObjectMapper(objectMapper);
        RedisTemplate<String, Object> redisTemplate = new RedisTemplate<>();
        redisTemplate.setKeySerializer(serializer);
        redisTemplate.setValueSerializer(serializer);
        redisTemplate.setHashValueSerializer(serializer);
        redisTemplate.setHashKeySerializer(serializer);
        redisTemplate.setConnectionFactory(cf);
        return redisTemplate;
    }*/

    /*@Bean
    public CacheManager cacheManager(RedisTemplate<String, Object> redisTemplate,
                                     RedisConnectionFactory cf) {
        // 全局配置
        RedisCacheConfiguration defaults = RedisCacheConfiguration
                .defaultCacheConfig()
                .entryTtl(Duration.ofMinutes(4))
                .serializeValuesWith(RedisSerializationContext
                        .SerializationPair
                        .fromSerializer(redisTemplate.getValueSerializer()));
        // 独立的缓存配置
        RedisCacheConfiguration userR = RedisCacheConfiguration
                .defaultCacheConfig()
                .entryTtl(Duration.ofMinutes(2))
                .serializeValuesWith(RedisSerializationContext
                        .SerializationPair
                        .fromSerializer(redisTemplate.getValueSerializer()));
        // 基于全局配置/独立配置,创建redis缓存管理器
        RedisCacheManager manager = RedisCacheManager.builder(cf)
                .cacheDefaults(defaults)
                .withCacheConfiguration("user", userR)
                .build();
        return manager;
    }*/
    // -------------------------------

}
2.4搭建基本框架
见3.5
2.5测试
GET http://localhost:8083/api/users/1
###
GET http://localhost:8083/api/users/2
###

PATCH http://localhost:8083/api/users
Content-Type: application/json

{
  "id": "1",
  "name": "小明",
  "detail": "956"
}
###
DELETE http://localhost:8083/api/users/1
###
GET http://localhost:8083/api/users

###
GET http://localhost:8083/api/userdtos/1

###
POST http://localhost:8083/api/userdto/1
三、与springboot的整合(Caffeine版)
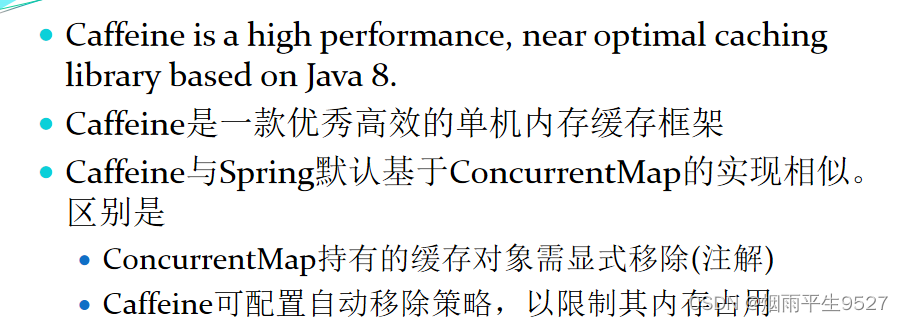
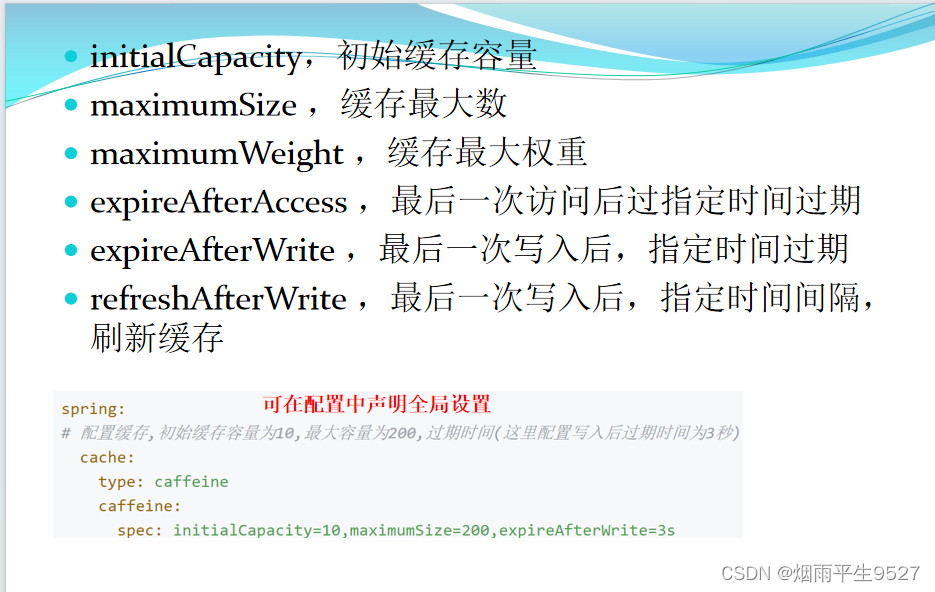
2.1Caffeine介绍
2.2添加依赖
<dependency>
            <groupId>org.springframework.boot</groupId>
            <artifactId>spring-boot-starter-cache</artifactId>
        </dependency>
        <dependency>
            <groupId>com.github.ben-manes.caffeine</groupId>
            <artifactId>caffeine</artifactId>
        </dependency>
2.3添加yml配置
spring:
  cache:
    caffeine: # 如果在代码声明配置并注入缓存管理器,此处配置无效
      spec: expireAfterWrite=240s, maximumSize=200 # 设置Caffeine缓存的配置参数,过期时间为240秒,最大容量为200个元素

logging:
  level: # 设置日志级别
    root: warn # 根日志级别为警告级别
    com:
      example: debug # 对于com.example包下的日志级别为调试级别
  pattern: # 设置日志输出格式
    console: '%-5level %C.%M[%line] - %msg%n' # 控制台日志输出格式,包括日志级别、类名、方法名、行号和日志信息
2.4自定义cacheManager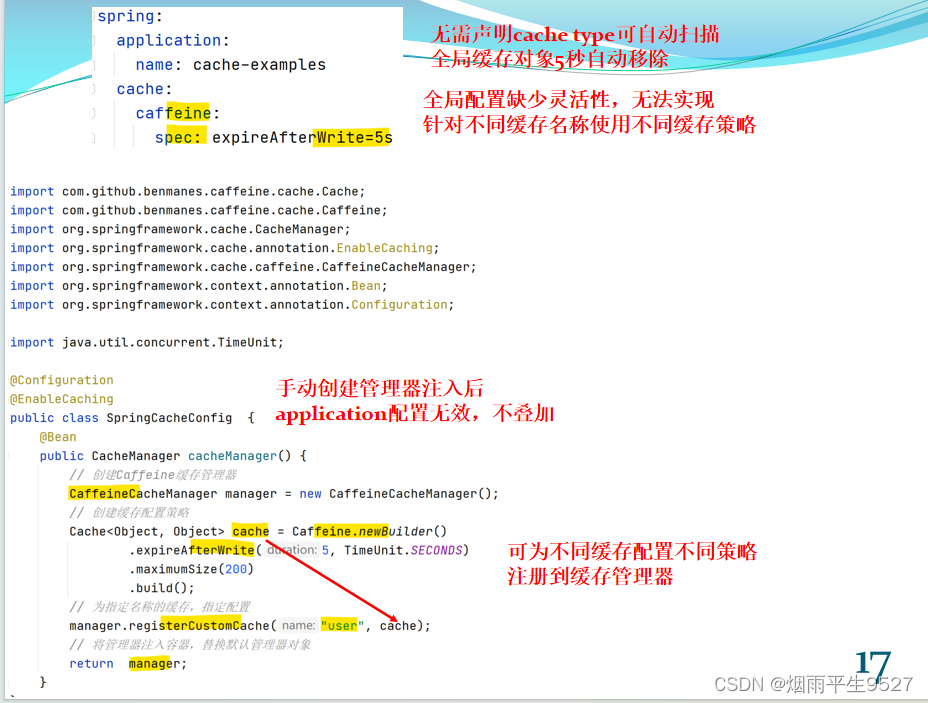
@Configuration // 声明这是一个配置类
@EnableCaching // 开启缓存功能
public class SpringCacheConfig {
    @Bean // 定义一个Bean对象
    public CacheManager cacheManager() {
        // 创建Caffeine缓存管理器
        CaffeineCacheManager manager = new CaffeineCacheManager();
        // 创建缓存配置策略
        Cache<Object, Object> cache = Caffeine.newBuilder()
                .expireAfterWrite(5, TimeUnit.SECONDS) // 设置缓存过期时间为5秒
                .maximumSize(200) // 设置缓存最大容量为200个元素
                .build();
        // 为指定名称的缓存,指定配置
        manager.registerCustomCache("user", cache);
        // 允许缓存值为空的键值对。避免缓存穿透
        manager.setAllowNullValues(true);
        // 将管理器注入容器,替换默认管理器对象
        return manager;
    }
}
2.5搭建基础框架
entity
@Getter
@Setter
@ToString
@NoArgsConstructor
@AllArgsConstructor
@Builder
public class Address {
    private int id;
    private String detail;
    private User user;
}
@Getter
@Setter
@ToString
@NoArgsConstructor
@AllArgsConstructor
@Builder
public class User {
private Long id;
private String name;
}mapper
@Repository // 标记为Spring框架的持久层组件
public class UserMapper {
    private static final List<User> USERS; // 静态用户列表

    static { // 静态代码块,用于初始化用户列表
        User u1 = User.builder().id(1L).name("BO").build(); // 创建用户1
        User u2 = User.builder().id(2L).name("SUN").build(); // 创建用户2
        USERS = new ArrayList<>(); // 初始化用户列表
        USERS.add(u1); // 添加用户1到列表
        USERS.add(u2); // 添加用户2到列表
    }

    // 根据用户ID获取用户信息
    public User getUser(long uid) {
        return USERS.stream() // 使用Java 8的Stream API进行过滤操作
                .filter(u -> u.getId() == uid) // 过滤出ID等于给定ID的用户
                .findFirst() // 获取第一个匹配的用户(如果存在)
                .orElse(null); // 如果没有匹配的用户,返回null
    }

    // 更新用户信息
    public User updateUser(User user) {
        for (int i = 0; i < USERS.size(); i++) { // 遍历用户列表
            if (Objects.equals(user.getId(), USERS.get(i).getId())) { // 如果找到匹配的用户ID
                USERS.set(i, user); // 更新用户信息
            }
        }
        return user; // 返回更新后的用户信息
    }

    // 获取所有用户信息
    public List<User> listUsers() {
        return USERS; // 返回用户列表
    }
}
service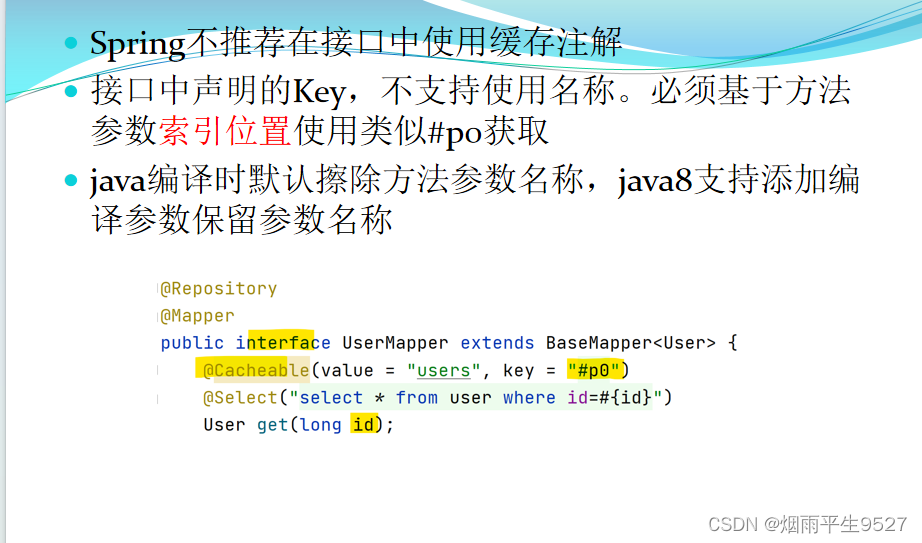
@Service // 标记为Spring框架的服务层组件
@Slf4j // 使用Lombok提供的日志功能
public class UserService {
@Autowired // 自动注入UserMapper对象
private UserMapper userMapper;
@Cacheable(value = "user", key = "#uid") // 缓存用户信息,key为用户ID
public User getUser(long uid) {
User user = userMapper.getUser(uid); // 从UserMapper获取用户信息
log.debug("called UserService getUser() user: {}", user); // 记录调试日志
return user; // 返回用户信息
}
@Cacheable(value = "users") // 缓存所有用户信息
public List<User> listUsers() {
return userMapper.listUsers(); // 从UserMapper获取所有用户信息
}
@CachePut(value = "user", key = "#user.id") // 更新缓存中的用户信息
// 以键值对缓存一个集合对象时,缓存对象是一个整体。无法修改其中某一个元素
// 因此清空整个集合缓存
@CacheEvict(value = "users", allEntries = true)
public User updateUser(User user) {
User u = userMapper.updateUser(user); // 更新用户信息
log.debug("updateUser(), user: {}", u); // 记录调试日志
return user; // 返回更新后的用户信息
}
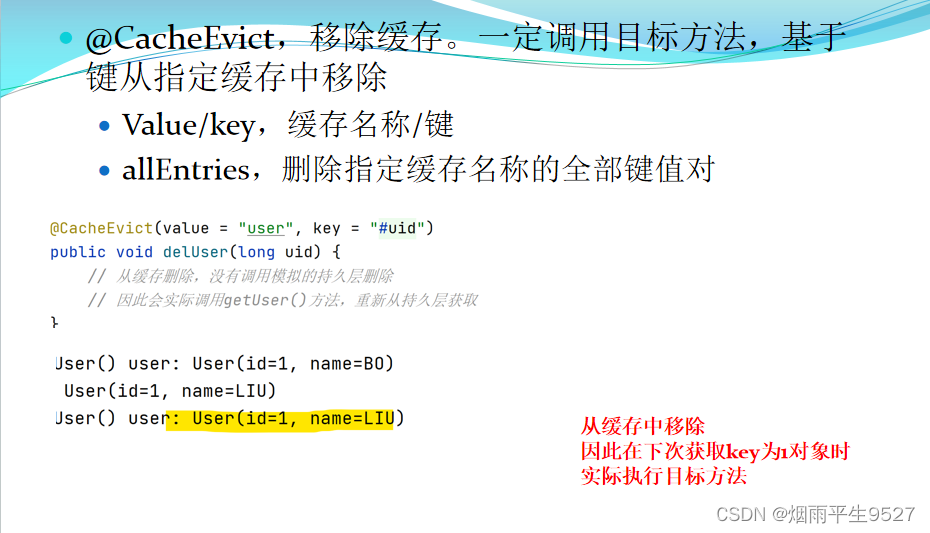
@CacheEvict(value = "user", key = "#uid") // 删除缓存中的用户信息
public void delUser(long uid) {
// 从缓存删除,没有调用模拟的持久层删除
// 因此会实际调用getUser()方法,重新从持久层获取
}
}
controller
@RestController
@RequestMapping("/api/")
public class MyController {
    @Autowired
    private UserService userService;
    @GetMapping("users/{uid}")
    public User getUser(@PathVariable long uid) {
        return userService.getUser(uid);
    }
    @GetMapping("users")
    public List<User> listUsers() {
        return userService.listUsers();
    }
    @PatchMapping("users")
    public User patchUser(@RequestBody User user) {
        return userService.updateUser(user);
    }

    @DeleteMapping("users/{uid}")
    public void delUser(@PathVariable long uid) {
        userService.delUser(uid);
    }
}
测试
GET http://localhost:8081/api/users/1
###
GET http://localhost:8081/api/users/2
###

PATCH http://localhost:8081/api/users
Content-Type: application/json

{
  "id": "1",
  "name": "LIU"
}
###
DELETE http://localhost:8081/api/users/1
###
GET http://localhost:8081/api/users
四、Ecache缓存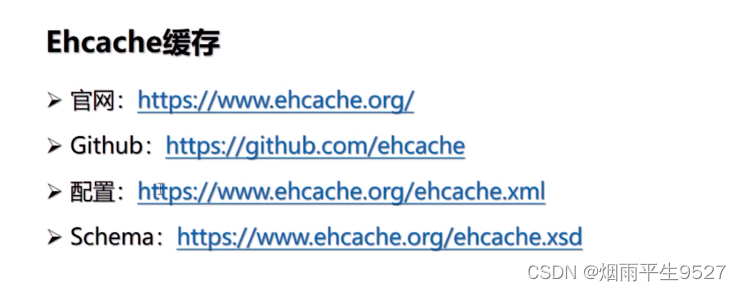
4.1Ecache缓存
- 基于Java的开源的使用最广泛的缓存组件;
- 使用简单,一个jar包,简单配置,即可使用;
- 可以进程内缓存(内存),也可以进程外缓存(磁盘上持久化);
- 目前已经有三个系列版本,1.x(已经过时不用)、2.x和3.x;
- 著名的Hibernate、Shiro里面的缓存就采用了Ecache;
- Ecache还可以支持集群;
4.2使用场景
- 比较适合缓存一些不经常改变的数据;
- 对数据实时性要求不高的场景,多台应用服务器中的缓存是不能进行实时同步的;
- 可以作为其他缓存如Redis的辅助方案,比如做Redis的二级缓存,作为Redis缓存宕机导致大量请求读数据库的解决方案;
4.3使用
添加相关依赖
<!-- https://mvnrepository.com/artifact/net.sf.ehcache/ehcache -->
		<dependency>
			<groupId>net.sf.ehcache</groupId>
			<artifactId>ehcache</artifactId>
			<version>2.10.4</version>
		</dependency>
ehchche配置,关于ehcache的使用,大家可自行查找一下相关资料补习一下,用起来很简单,只要xml的配置文件没问题就可以,更深入的其实都在hcache的配置文件中,作为本地的堆缓存,在应对数据量不是特别大的场景,使用ehcache是个不错的选择,一般是配合redis和其他的缓存工具以一起使用,这里直接贴上,提供参考,
<?xml version="1.0" encoding="UTF-8"?>
<ehcache xmlns:xsi="http://www.w3.org/2001/XMLSchema-instance"
xsi:noNamespaceSchemaLocation="http://ehcache.org/ehcache.xsd"
updateCheck="false">
<!-- diskStore:ehcache其实是支持内存+磁盘+堆外内存,几个层级的缓存 -->
<!-- 在这里设置一下,但是一般不用的 ,这里是基于磁盘的缓存-->
<diskStore path="java.io.tmpdir/Tmp_EhCache" />
<!-- defaultCache,是默认的缓存策略 -->
<!-- 如果你指定的缓存策略没有找到,那么就用这个默认的缓存策略 -->
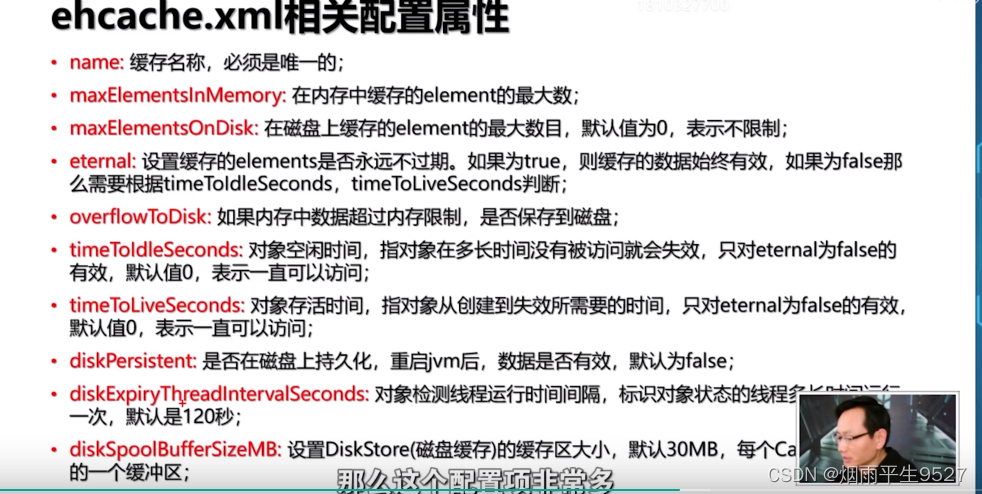
<!-- external:如果设置为true的话,那么timeout就没有效果,缓存就会一直存在,一般默认就是false -->
<!-- maxElementsInMemory:内存中可以缓存多少个缓存条目,在实践中,
你是需要自己去计算的,比如你计算你要缓存的对象是什么?有多大?最多可以缓存多少MB,或者多少个G的数据?除以每个对象的大小,计算出最多可以放多少个对象 -->
<!-- overflowToDisk:如果内存不够的时候,是否溢出到磁盘 -->
<!-- diskPersistent:是否启用磁盘持久化的机制,在jvm崩溃的时候和重启之间,不用 -->
<!-- timeToIdleSeconds:对象最大的闲置的时间,如果超出闲置的时间,可能就会过期,我们这里就不用了,缓存最多闲置5分钟就被干掉了 -->
<!-- timeToLiveSeconds:对象最多存活的时间,我们这里也不用,超过这个时间,缓存就过期,就没了 -->
<!-- memoryStoreEvictionPolicy:当缓存数量达到了最大的指定条目数的时候,需要采用一定的算法,
从缓存中清除一批数据,LRU,最近最少使用算法,最近一段时间内,最少使用的那些数据,就被干掉了 -->
<defaultCache
eternal="false"
maxElementsInMemory="1000"
overflowToDisk="false"
diskPersistent="false"
timeToIdleSeconds="300"
timeToLiveSeconds="0"
memoryStoreEvictionPolicy="LRU" />
<!-- 手动指定的缓存策略 -->
<!-- 比如你一个应用吧,可能要缓存很多种不同的数据,比如说商品信息,或者是其他的一些数据 -->
<!-- 对不同的数据,缓存策略可以在这里配置多种 -->
<cache
name="local"
eternal="false"
maxElementsInMemory="1000"
overflowToDisk="false"
diskPersistent="false"
timeToIdleSeconds="300"
timeToLiveSeconds="0"
memoryStoreEvictionPolicy="LRU" />
<!-- ehcache这种东西,简单实用,是很快速的,1小时上手可以用在项目里了,没什么难度的 -->
<!-- ehcache这个技术,如果讲深了,里面的东西还是很多的,高级的feature,但是我们这里就不涉及了 -->
</ehcache>
 接下来是ehcache的配置类和redis的配置类,springbooti在启动的时候会自动将这两个配置类纳入全局的bean容器管理中,
/**
 * 本地堆缓存配置类
 * @author asus
 */
@Configuration
@EnableCaching
public class EhcacheConfig {

	@Bean
	public EhCacheManagerFactoryBean ehCacheManagerFactoryBean() {
		EhCacheManagerFactoryBean cacheManagerFactoryBean = new EhCacheManagerFactoryBean();
		cacheManagerFactoryBean.setConfigLocation(new ClassPathResource("ehcache.xml"));
		cacheManagerFactoryBean.setShared(true);
		return cacheManagerFactoryBean;
	}

	@Bean
	public EhCacheCacheManager eCacheCacheManager(EhCacheManagerFactoryBean bean) {
		return new EhCacheCacheManager(bean.getObject());
	}
}
/**
 * redis序列化bean
 * @author asus
 *
 */
@Configuration
public class RedisConfig {

	@Bean
    public RedisTemplate<String, String> redisTemplate(RedisConnectionFactory factory) {
        StringRedisTemplate template = new StringRedisTemplate(factory);
        //定义value的序列化方式
        Jackson2JsonRedisSerializer jackson2JsonRedisSerializer = new Jackson2JsonRedisSerializer(Object.class);
        ObjectMapper om = new ObjectMapper();
        om.setVisibility(PropertyAccessor.ALL, JsonAutoDetect.Visibility.ANY);
        om.enableDefaultTyping(ObjectMapper.DefaultTyping.NON_FINAL);
        jackson2JsonRedisSerializer.setObjectMapper(om);

        template.setValueSerializer(jackson2JsonRedisSerializer);
        template.setHashValueSerializer(jackson2JsonRedisSerializer);
        template.afterPropertiesSet();
        return template;
    }


}


 2034
2034

 被折叠的 条评论
为什么被折叠?
被折叠的 条评论
为什么被折叠?
 到【灌水乐园】发言


