


1.动态切换
首先我们准备好两个切换用的Fragmet
public class BottomFragmnet extends Fragment {


    private static final String TAG = "BottomFragment";

    @Override
    public void onAttach(@NonNull Context context) {
        super.onAttach(context);
        Log.d(TAG,"onAttach");
    }

    @Override
    public void onCreate(@Nullable Bundle savedInstanceState) {
        super.onCreate(savedInstanceState);
        Log.d(TAG,"onCreate");
    }

    @Nullable
    @Override
    public View onCreateView(@NonNull LayoutInflater inflater, @Nullable ViewGroup container, @Nullable Bundle savedInstanceState) {
        Log.d(TAG, "onCreateView");

        View view = inflater.inflate(R.layout.bottom_fragmnet,container,false);
        return view;
    }

    @Override
    public void onActivityCreated(@Nullable Bundle savedInstanceState) {
        super.onActivityCreated(savedInstanceState);
        Log.d(TAG,"onActivityCreated");
    }

    @Override
    public void onStart() {
        super.onStart();
        Log.d(TAG,"onStart");
    }

    @Override
    public void onResume() {
        super.onResume();
        Log.d(TAG,"onResume");
    }

    @Override
    public void onPause() {
        super.onPause();
        Log.d(TAG,"onPause");
    }

    @Override
    public void onStop() {
        super.onStop();
        Log.d(TAG,"onStop");
    }

    @Override
    public void onDestroyView() {
        super.onDestroyView();
        Log.d(TAG,"onDestroyView");
    }

    @Override
    public void onDestroy() {
        super.onDestroy();
        Log.d(TAG,"onDestroy");
    }

    @Override
    public void onDetach() {
        super.onDetach();
        Log.d(TAG,"onDetach");
    }
}
<?xml version="1.0" encoding="utf-8"?>
<LinearLayout xmlns:android="http://schemas.android.com/apk/res/android"
    android:orientation="vertical"
    android:layout_width="match_parent"
    android:layout_height="match_parent">

    <TextView
        android:layout_width="match_parent"
        android:layout_height="50dp"
        android:gravity="center_horizontal|center_vertical"
        android:background="#DCDCDC"
        android:textColor="@color/black"
        android:textStyle="bold"
        android:text="BOTTOM_FRAGMENT"/>

</LinearLayout>
public class AnotherBottomFragment extends Fragment {


    private static final String TAG = "AnotherBottomFragment";

    @Override
    public void onAttach(@NonNull Context context) {
        super.onAttach(context);
        Log.d(TAG,"onAttach");
    }

    @Override
    public void onCreate(@Nullable Bundle savedInstanceState) {
        super.onCreate(savedInstanceState);
        Log.d(TAG,"onCreate");
    }


    @Nullable
    @Override
    public View onCreateView(@NonNull LayoutInflater inflater, @Nullable ViewGroup container, @Nullable Bundle savedInstanceState) {
        Log.d(TAG,"onCreateView");
        View view = inflater.inflate(R.layout.another_bottom_fragment,container,false);
        return view;
    }

    @Override
    public void onActivityCreated(@Nullable Bundle savedInstanceState) {
        super.onActivityCreated(savedInstanceState);
        Log.d(TAG,"onActivityCreated");
    }

    @Override
    public void onStart() {
        super.onStart();
        Log.d(TAG,"onStart");
    }

    @Override
    public void onResume() {
        super.onResume();
        Log.d(TAG,"onResume");
    }

    @Override
    public void onPause() {
        super.onPause();
        Log.d(TAG,"onPause");
    }

    @Override
    public void onStop() {
        super.onStop();
        Log.d(TAG,"onStop");
    }

    @Override
    public void onDestroyView() {
        super.onDestroyView();
        Log.d(TAG,"onDestroyView");
    }

    @Override
    public void onDestroy() {
        super.onDestroy();
        Log.d(TAG,"onDestroy");
    }

    @Override
    public void onDetach() {
        super.onDetach();
        Log.d(TAG,"onDetach");
    }
}
<?xml version="1.0" encoding="utf-8"?>
<LinearLayout xmlns:android="http://schemas.android.com/apk/res/android"
    android:orientation="vertical"
    android:layout_width="match_parent"
    android:layout_height="match_parent">

    <TextView
        android:layout_width="match_parent"
        android:layout_height="50dp"
        android:gravity="center_horizontal|center_vertical"
        android:background="#DCDCDC"
        android:textColor="@color/black"
        android:textStyle="bold"
        android:text="ANOTHER_BOTTOM_FRAGMENT"/>

</LinearLayout>
还有实现切换按钮的Fragment
public class TopFragment extends Fragment {

    @Nullable
    @Override
    public View onCreateView(@NonNull LayoutInflater inflater, @Nullable ViewGroup container, @Nullable Bundle savedInstanceState) {
        // 通过LayoutInflater对象将XML布局文件(R.layout.top_fragment)转换为对应的View对象
        View view = inflater.inflate(R.layout.top_fragment,container,false);
        return view;
    }


}
<?xml version="1.0" encoding="utf-8"?>
<LinearLayout xmlns:android="http://schemas.android.com/apk/res/android"
    android:orientation="vertical"
    android:layout_width="match_parent"
    android:layout_height="match_parent">

    <Button
        android:id="@+id/my_top_fragment_btn"
        android:layout_width="200dp"
        android:layout_height="wrap_content"
        android:text="BUTTON"
        android:layout_gravity="center_horizontal"/>

</LinearLayout>
接下来是MainActivity和布局文件
public class MainActivity extends AppCompatActivity {

    private List<Sights> sightsList = new ArrayList<>();

    @Override
    protected void onCreate(Bundle savedInstanceState) {
        super.onCreate(savedInstanceState);
        setContentView(R.layout.activity_main);
        Button my_top_fragment_btn = findViewById(R.id.my_top_fragment_btn);

		//事先设定默认fragment
        getSupportFragmentManager().beginTransaction()
                        .add(R.id.my_bottom_frameLayout,new BottomFragmnet())
                                .commit();

        my_top_fragment_btn.setOnClickListener(new View.OnClickListener() {
            @Override
            public void onClick(View v) {
            //点击事件实现切换
                getSupportFragmentManager().beginTransaction()
                        .replace(R.id.my_bottom_frameLayout,new AnotherBottomFragment())
                        .commit();
            }
        });
    }
}
<?xml version="1.0" encoding="utf-8"?>
<LinearLayout xmlns:android="http://schemas.android.com/apk/res/android"
    xmlns:app="http://schemas.android.com/apk/res-auto"
    xmlns:tools="http://schemas.android.com/tools"
    android:layout_width="match_parent"
    android:layout_height="match_parent"
    android:orientation="vertical"
    tools:context=".MainActivity">

    <fragment
        android:id="@+id/my_top_fragment"
        android:name="com.zzzjian.practice.TopFragment"
        android:layout_width="match_parent"
        android:layout_height="wrap_content"/>


    <FrameLayout
        android:id="@+id/my_bottom_frameLayout"
        android:layout_width="match_parent"
        android:layout_height="wrap_content"/>

</LinearLayout>
效果图:


2.生命周期
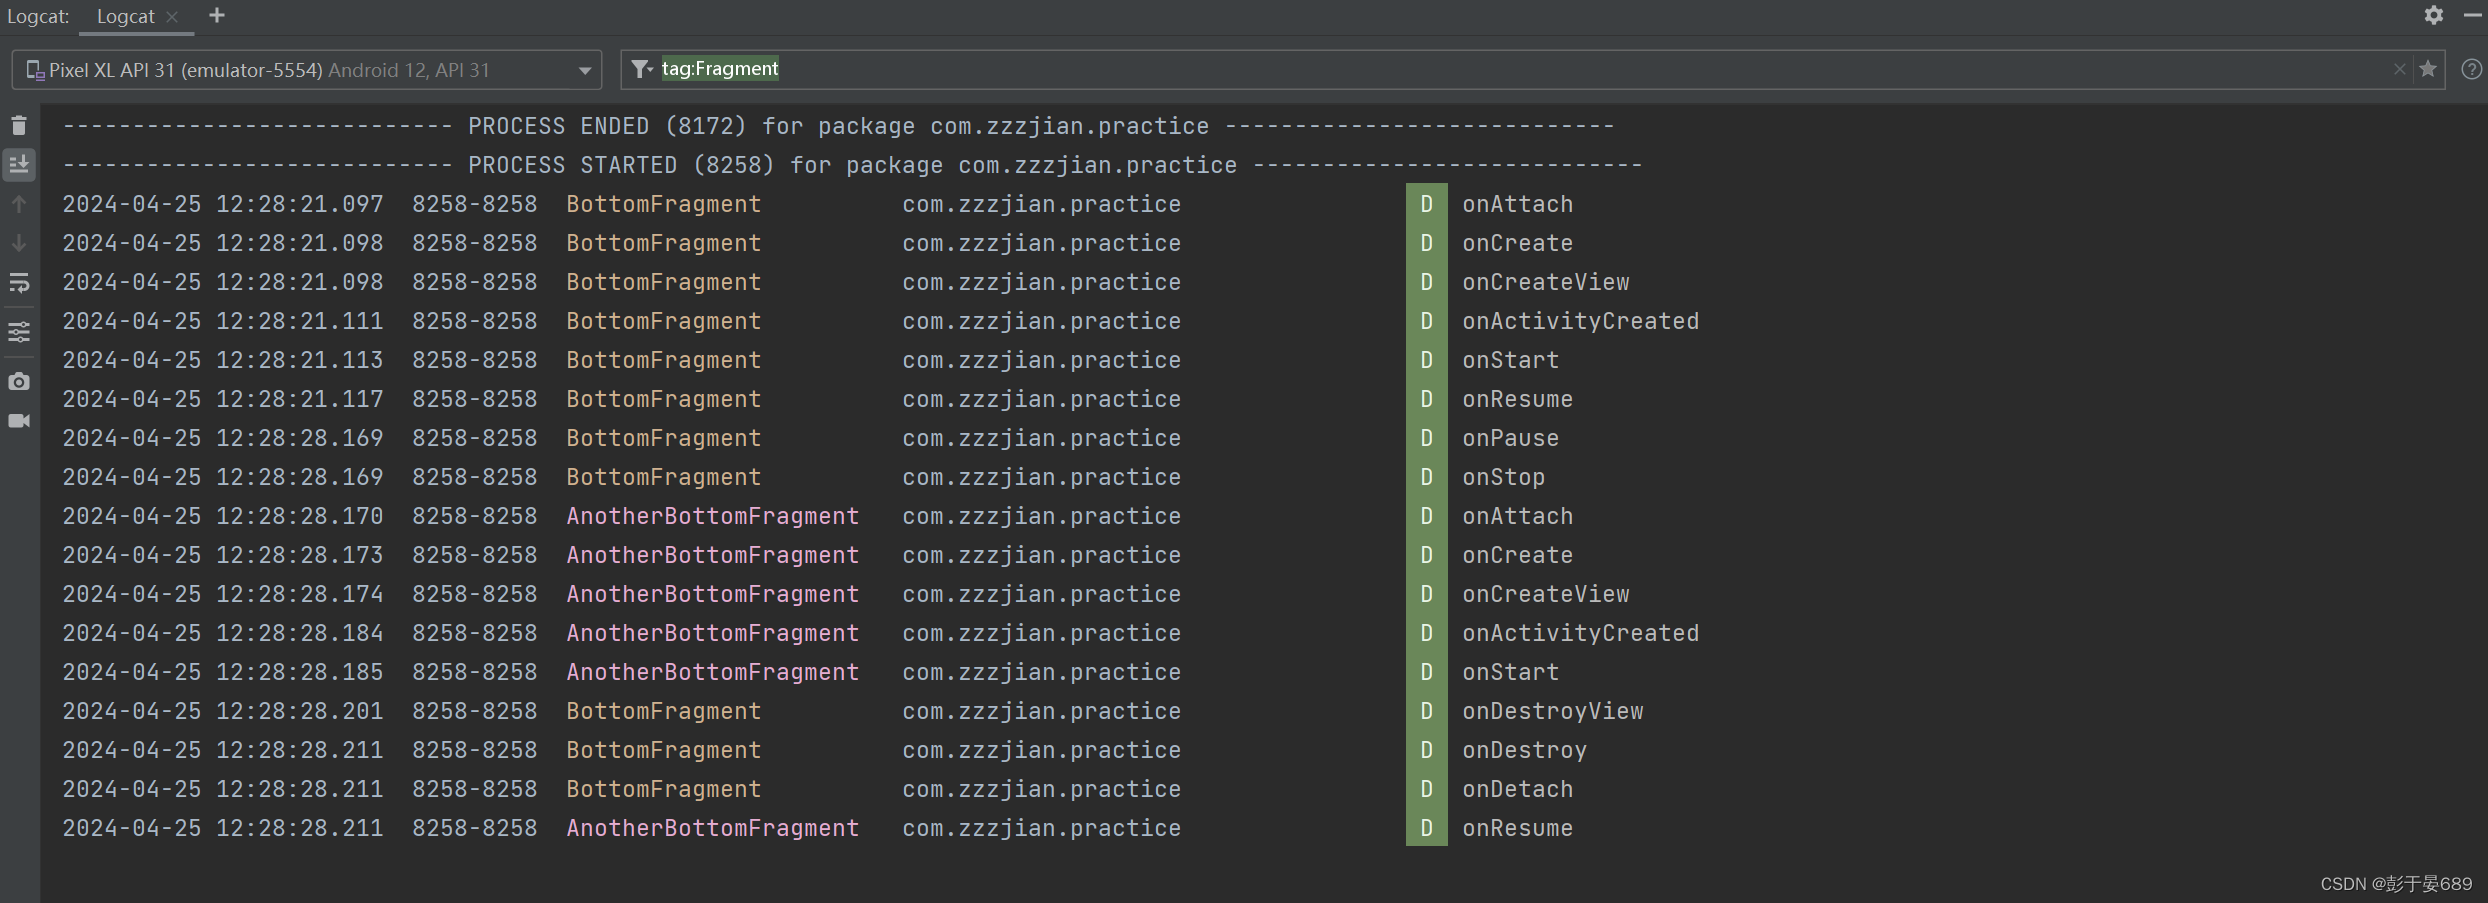
因为事先Fragment中已经写好了日志,我们打开Logcat查看对应日志即可


 712
712


 被折叠的 条评论
为什么被折叠?
被折叠的 条评论
为什么被折叠?
 到【灌水乐园】发言


