


首先要去改一下配置 在 .env.development(开发) 和 .env.production(生产)中修改如下
# Whether to open mock
VITE_USE_MOCK = false // 这里是是否开启模拟数据,如果我们要链接api则需要关掉

# public path
VITE_PUBLIC_PATH = /

# Cross-domain proxy, you can configure multiple
# Please note that no line breaks
VITE_PROXY = [["/basic-api","http://www.test.com/"],["/upload","http://localhost:3300/upload"],["/api","http://www.test.com/"]] // 这里是配置后端地址的地方,前面是前缀名

# VITE_PROXY=[["/api","https://vvbin.cn/test"]]

# Delete console
VITE_DROP_CONSOLE = false

# Basic interface address SPA
VITE_GLOB_API_URL=/api

# File upload address, optional
VITE_GLOB_UPLOAD_URL=/upload

# Interface prefix
VITE_GLOB_API_URL_PREFIX=
使用后面有完整代码
return defHttp.get<GetUserInfoModel>(
    { url: Api.GetUserInfo },
    { apiUrl: '/api' } // 这个是指定要舒勇的api可以不写默认是/basic-api
);
配置好以后我们要了解一下返回的参数 示例:登录接口
{
	"code": 0,
	"msg": "ok",
	"result": {
		"desc": "manager",
		"realName": "Vben Admin",
		"roles": [
			{
				"roleNam": "Super Admin",
				"valu": "super"
			}
		],
		"token": "fakeToken1",
		"userId": "1",
		"username": "vben"
	}
}
和上面一样,code要0的话vben才会判断他成功,返回的数据要放在 result 中 否则会报接口错误
创建页面
首先要在 src\router\routes\modules下面新建一个user.ts文件 在这里创建好文件后不需要去声明,会被视为一个模块,自动加载到菜单中
import type { AppRouteModule } from '/@/router/types';

import { LAYOUT } from '/@/router/constant';
import { t } from '/@/hooks/web/useI18n';

const dashboard: AppRouteModule = {
  path: '/users',
  name: 'Users',
  component: LAYOUT,
  redirect: '/users/index',
  meta: {
    icon: 'simple-icons:about-dot-me',
    title: t('routes.dashboard.interior'),
    orderNo: 100000,
  },
  children: [
    {
      path: 'index',
      name: 'UsersPage',
      component: () => import('/@/views/sys/users/index.vue'),
      meta: {
        title: t('routes.dashboard.user'),
        icon: 'simple-icons:about-dot-me',
      },
    },
    {
      path: 'a',
      name: 'MemberPage',
      component: () => import('/@/views/sys/users/index.vue'),
      meta: {
        title: t('routes.dashboard.member'),
        icon: 'simple-icons:about-dot-me',
      },
    },
  ],
};

export default dashboard;
效果 内部管理 这里如果你想要的是二级菜单,那么可以直接在children中追加一个配置就好了

表格渲染
首先要在 src/api/sys/model下面新建一个user.ts文件 用于存放你的api请求
import { defHttp } from '/@/utils/http/axios';
import { LoginParams, LoginResultModel, GetUserInfoModel } from './userModel';

import { ErrorMessageMode } from '/#/axios';

enum Api {
  Login = 'admin/User/login',
  GetUserInfo = 'admin/User/getUserInfo',
}

/**
 * @description: user login api
 */
export function loginApi(params: LoginParams, mode: ErrorMessageMode = 'modal') {
  return defHttp.post<LoginResultModel>(
    {
      url: Api.Login,
      params,
    },
    {
      errorMessageMode: mode,
    },
  );
}

/**
 * @description: getUserInfo
 */
export function getUserInfo() {
  // return defHttp.get<GetUserInfoModel>({ url: Api.GetUserInfo }, { errorMessageMode: 'none' });

export const myFileList = (params = '') =>
  defHttp.get({
    url: Api.GetUserList,
    params,
    headers: {
      ignoreCancelToken: true,
    },
  });
这里定义好以后,在 C:\Users\qiqiq\Desktop\vue\jianhuaban_Vben\vben-admin-thin-next-main\vben-admin-thin-next-main\src\views\sys创建一个users文件夹,在文件夹中 创建Index.vue 和users.data.ts文件 ,我们先来配置user.data.ts文件 他主要是用来定义一些配置
// import { BasicColumn } from '/@/components/Table';
import { BasicColumn } from '/@/components/Table/src/types/table';
import { FormProps } from '/@/components/Table';
// 表头配置
export const reportcolumns: BasicColumn[] = [
{
title: 'id',
dataIndex: 'id', //这里写与接口对应的参数
align: 'left', //左对齐
},
{
title: '名称',
dataIndex: 'name', //这里写与接口对应的参数
align: 'left', //左对齐
},
{
title: '身份证号码',
dataIndex: 'id_card', //这里写与接口对应的参数
align: 'left', //左对齐
},
{
title: '手机号码',
dataIndex: 'phone', //这里写与接口对应的参数
align: 'left', //左对齐
},
{
title: '状态',
dataIndex: 'status', //这里写与接口对应的参数
align: 'left', //左对齐
},
{
title: '创建时间',
dataIndex: 'created_at', //这里写与接口对应的参数
align: 'left', //左对齐
},
{
title: '更新时间',
dataIndex: 'updated_at', //这里写与接口对应的参数
align: 'left', //左对齐
},
];
// 条件查询配置
export function getFormConfig(): Partial<FormProps> {
return {
labelWidth: 100,
schemas: [
{
field: `userId`,
label: `用户ID`,
component: 'Input',
colProps: {
xl: 12,
xxl: 8,
},
},
{
field: `userName`,
label: `用户名称`,
component: 'Input',
colProps: {
xl: 12,
xxl: 8,
},
},
{
field: `phone`,
label: `手机号码`,
component: 'Input',
colProps: {
xl: 12,
xxl: 8,
},
},
],
};
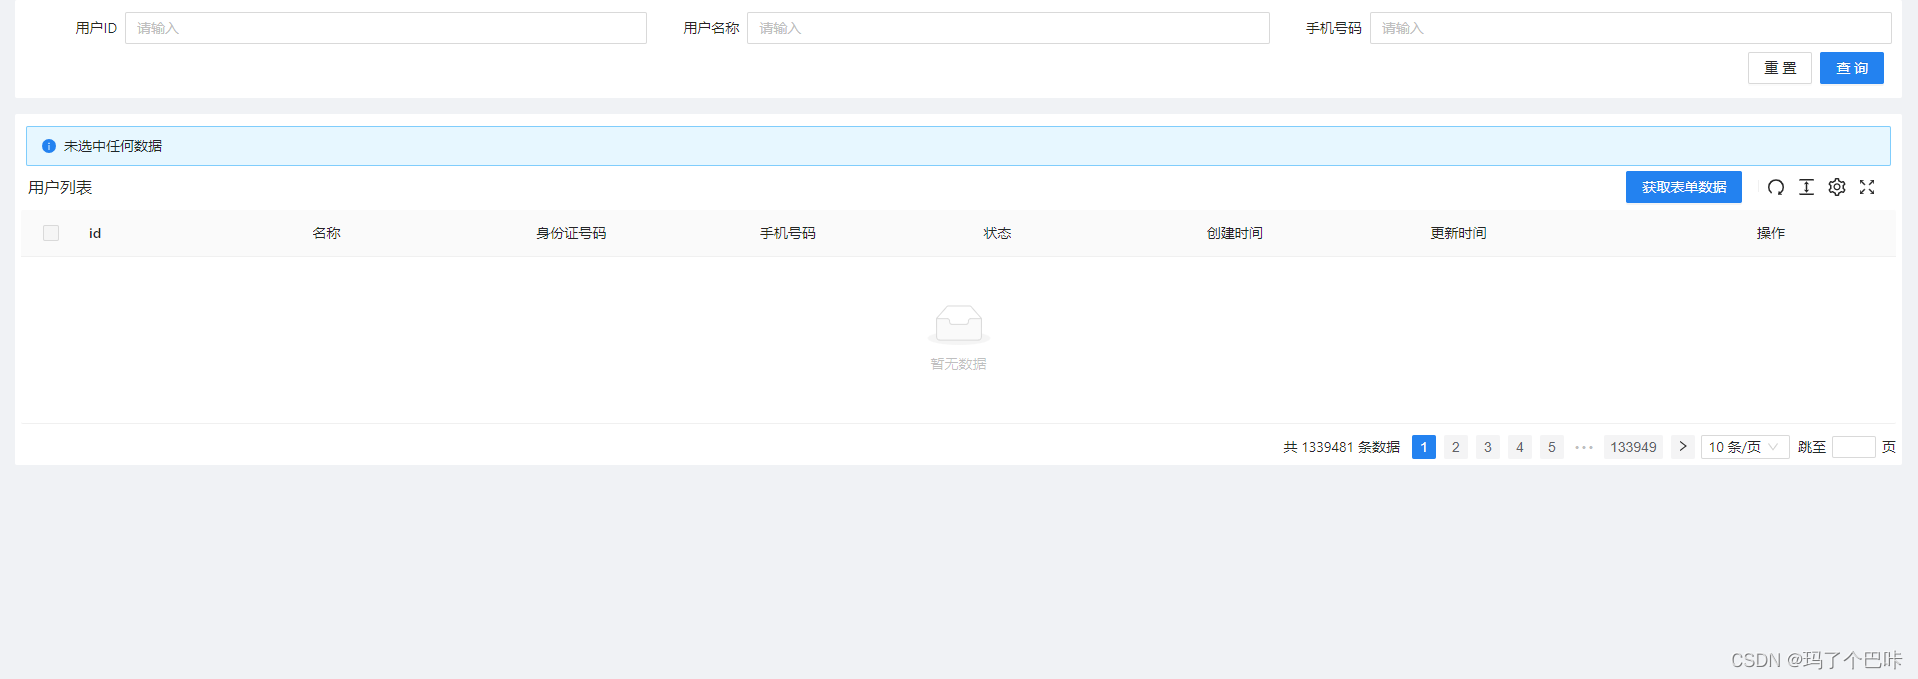
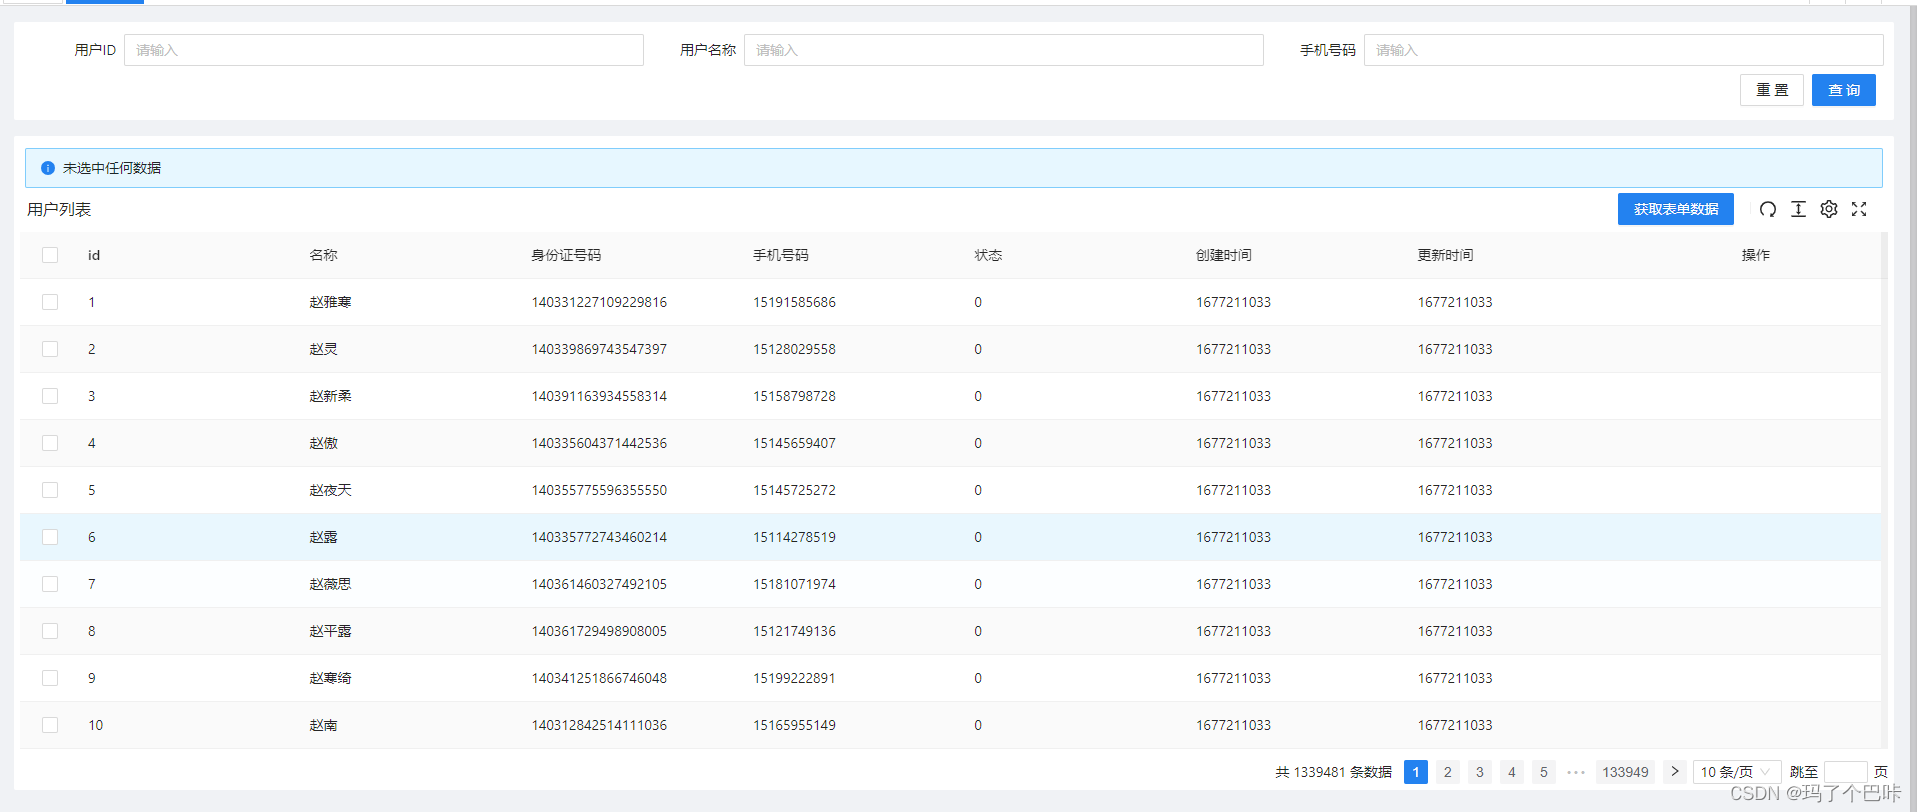
}在定义好数据以后 在index.vue中引入官方的表格组件
这里是视图模块
<template>
  <BasicTable
    @register="registerTable"
    :rowSelection="{ type: 'checkbox', selectedRowKeys: checkedKeys, onChange: onSelectChange }"
  >
    <template #form-custom> 123123123 </template>
    <template #headerTop>
      <a-alert type="info" show-icon>
        <template #message>
          <template v-if="checkedKeys.length > 0">
            <span>已选中{{ checkedKeys.length }}条记录(可跨页)</span>
            <a-button type="link" @click="checkedKeys = []" size="small">清空</a-button>
          </template>
          <template v-else>
            <span>未选中任何数据</span>
          </template>
        </template>
      </a-alert>
    </template>
    <template #toolbar>
      <a-button type="primary" @click="getFormValues">获取表单数据</a-button>
    </template>
    <!--操作栏-->
    <template #action="{ record }">
      <TableAction
          :actions="[
            {
              label: '详情',
              color: 'success',
              onClick: queryDetails.bind(null, record),
            },
            {
              label: '编辑',
              onClick: handleEdit.bind(null, record),
            },
            {
              label: '删除',
              color: 'error',
              popConfirm: {
                title: '是否删除该数据',
                confirm: handleDelete.bind(null, record),
              },
            },
          ]"
        />
    </template>
  </BasicTable>
</template>
这里是script
<script lang="ts">
  import { defineComponent, ref } from 'vue';
  // 引入表格所需的组件
  import { BasicTable, useTable, TableAction } from '/@/components/Table';
  // import { getBasicColumns, getFormConfig } from './tableData';
  import { Alert } from 'ant-design-vue';
  // 这里是引入api.ts文件
  import { myFileList } from '/@/api/sys/model/user'; //引入myfile.api.ts文件
  // 引入表格配置文件
  import { reportcolumns, getFormConfig } from './users.data'; //引入封装好的data文件

  export default defineComponent({
    // 定义自定义组件和引入的时候一定要加上 TableAction 否则操作列表中的按钮无法正常显示
    components: { BasicTable, TableAction, AAlert: Alert },
    setup() {
      const checkedKeys = ref<Array<string | number>>([]);
      const [registerTable, { getForm }] = useTable({
        title: '用户列表',
        api: myFileList,
        columns: reportcolumns,
        useSearchForm: true,
        formConfig: getFormConfig(),
        showTableSetting: true,
        tableSetting: { fullScreen: true },
        showIndexColumn: false,
        rowKey: 'id',
        actionColumn: {
          width: 250,
          title: '操作',
          dataIndex: 'action',
          slots: { customRender: 'action' },
        },
      });

      function getFormValues() {
        console.log(getForm().getFieldsValue());
      }

      function onSelectChange(selectedRowKeys: (string | number)[]) {
        console.log(selectedRowKeys);
        checkedKeys.value = selectedRowKeys;
      }
      function queryDetails(record: Recordable) {
        console.log('点击了详情', record);
      }
      function handleEdit(record: Recordable) {
        console.log('点击了编辑', record);
      }
      function handleDelete(record: Recordable) {
        console.log('点击了删除', record);
      }
      function handleOpen(record: Recordable) {
        console.log('点击了启用', record);
      }

      return {
        registerTable,
        getFormValues,
        checkedKeys,
        onSelectChange,
        handleEdit,
        handleDelete,
        handleOpen,
        queryDetails,
      };
    },
  });
</script>
要说一下的东西是后端返回的数据结构如果不匹配,他会导致数据加载失败,这个时候就要去src\settings\componentSetting.ts中table中去修改一些东西 这里接口对象名默认是item 这里我们可以根据后端接口来修改
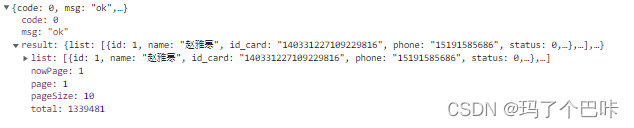
修改前
  table: {
    // Form interface request general configuration
    // support xxx.xxx.xxx
    fetchSetting: {
      // The field name of the current page passed to the background
      pageField: 'page', // 当前页数
      // The number field name of each page displayed in the background
      sizeField: 'pageSize', // 最大页数
      // Field name of the form data returned by the interface
      listField: 'items', // api接口返回的数据对象名
      // Total number of tables returned by the interface field name
      totalField: 'total', // 总数据量
    },
效果
修改后的
table: {
    // Form interface request general configuration
    // support xxx.xxx.xxx
    fetchSetting: {
      // The field name of the current page passed to the background
      pageField: 'page',
      // The number field name of each page displayed in the background
      sizeField: 'pageSize',
      // Field name of the form data returned by the interface
      listField: 'list',
      // Total number of tables returned by the interface field name
      totalField: 'total',
    }
现在的话可以看一下效果

最后BB一下 如果在引入时没有引入 TableAction 效果是这样的 他会导致组件不显示


 1万+
1万+


 被折叠的 条评论
为什么被折叠?
被折叠的 条评论
为什么被折叠?
 到【灌水乐园】发言


