


目录
前言
先前我编写了一篇在Unity游戏中做IoC依赖注入容器的教程文章:
如何在C#项目中(特别是Unity游戏)模仿springboot编写IoC依赖注入容器
在此基础上,我针对Unity游戏的业务需求进行了更进一步的修改,越写越上头,便做出了一个只需要打特性,不需要写配置类、注册类就可以实现依赖注入的框架。
GitHub工程地址如下:
现在我将简单介绍这款框架的使用方法。(当然,也可以看我写的README文档)
介绍
Unity Easy Inject是一个Unity依赖注入(DI)框架,它可以帮助你更好的管理Unity项目中的依赖关系,使得项目更加易于维护和扩展。
本框架的使用方法受SpringBoot的启发,故使用方法与其十分相似。
但由于项目目前仍在早期阶段,故只支持将类对象作为Bean进行注册。
项目由一位从WEB全栈转向Unity的大三初学者开发,故难免会有一些不足之处,欢迎大家提出宝贵意见。
为什么选择Unity Easy Inject?
- 简单易用:只需要简单的几行代码,就可以实现依赖注入,简化开发流程。
- 基于特性:使用特性进行Bean的注册,不需要额外的配置文件。
- 耦合度低:使用依赖注入,可以降低组件之间的耦合度,使得项目更加易于维护和扩展。
平时使用Unity开发项目时,我们经常会遇到这样的问题:当一个游戏组件需要使用另一个游戏组件时,我们需要为组件添加一个public修饰的字段,然后在Unity编辑器中手动拖拽另一个组件到这个字段上。
这样的做法虽然简单,但是当项目变得越来越大时,这样的做法就会变得越来越麻烦,并且耦合度也会变得越来越高。
这个时候我们就会去寻找一种更好的解决方案,控制反转(IoC)就是其中之一。
如果你使用过Zenject等依赖注入框架,你会发现,我们需要手动将类对象作为Bean注册到容器中,这样的做法会使得项目变得更加复杂,比如这样:
public class TestInstaller : MonoInstaller
{
    public override void InstallBindings()
    {
        Container.Bind<TestComponent>().AsSingle();
    }
}
使用Unity Easy Inject,你只需要在类对象上添加一个特性,就可以实现Bean的注册。
字段注入也十分简单,在private修饰的字段上添加一个特性就可以代替上面拖拽组件到public修饰的字段的做法。
不需要额外的配置文件,就像这样:
[GameObjectBean]
public class TestMonoBehaviour : MonoBehaviour
{
    [Autowired]
    private TestComponent testComponent;

    private void Awake()
    {
        testComponent.SetActive(true);
    }
}
是否已经等不及想要尝试了呢?现在就开始吧!
安装
1. 下载源码安装
在GitHub仓库界面点击绿色的Code按钮,选择Download ZIP,下载源码。
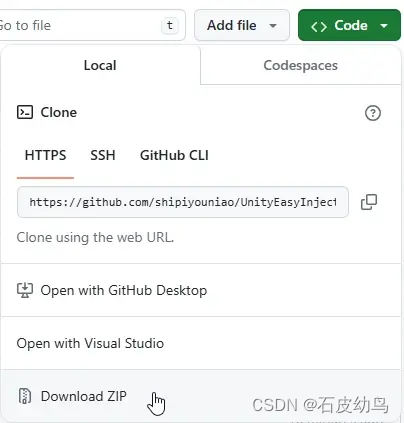
解压后将EasyInject文件夹拷贝到你的Unity项目中的Assets文件夹下即可。
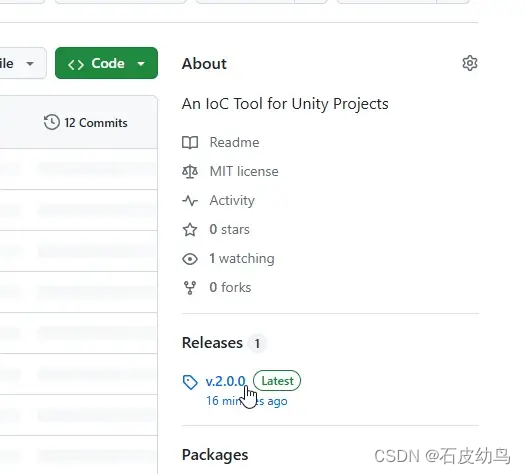
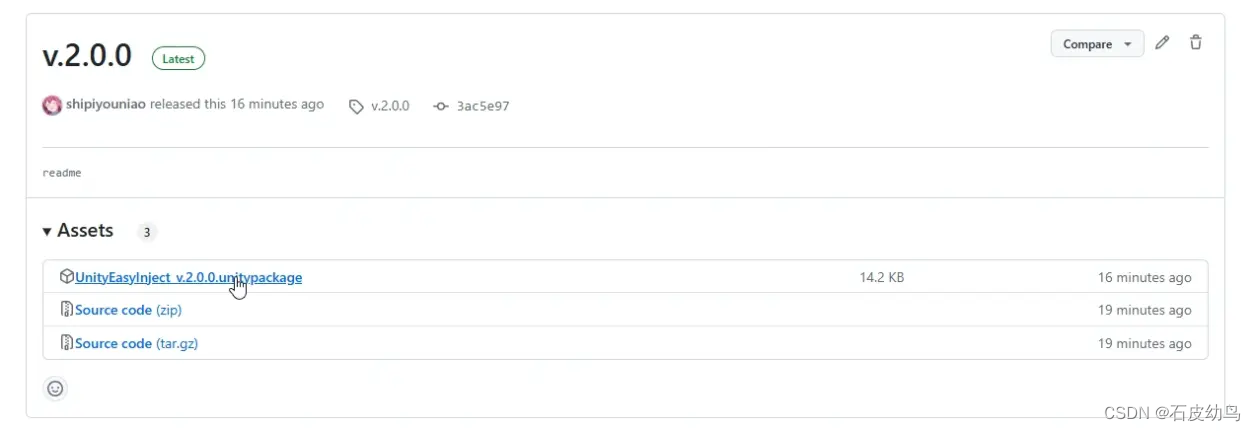
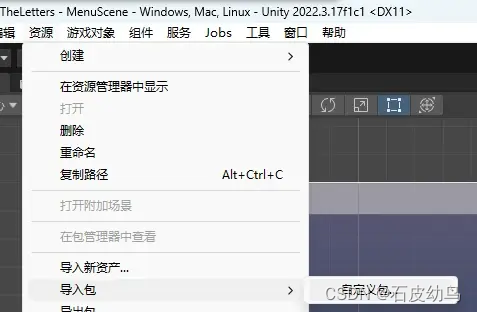
2. 使用Unity Package Manager安装
在仓库界面点击Releases,下载最新的Unity Package文件(*.unitypackage),然后在Unity中选择Assets(资源) -> Import Package(导入包) -> Custom Package(自定义包...),选择下载的Unity Package文件即可。
使用方法
1. 启动IoC容器
请把EasyInject/Controllers目录下的GlobalInitializer作为启动控制器,挂载在每一个场景下的启动物体上。
如果启动控制器的启动时间不对,导致IoC容器没有启动,请把DefaultExecutionOrder特性的参数设置为一个更低的数字。
// 通过设置一个非常低的数字来确保这个脚本是最先执行的
[DefaultExecutionOrder(-1000000)]
public class GlobalInitializer : MonoBehaviour
{
    // 实例化一个IoC容器,存入静态变量中,这样就可以导致整个游戏都只有一个IoC容器
    public static readonly MyIoC Instance = new();

    private void Awake()
    {
        // 每次进入场景都初始化IoC容器
        Instance.Init();
    }
}
IoC容器提供了三个方法:
Init():在每个场景开始时初始化IoC容器,注册所有的Bean。GetBean<T>(string name = ""):获取一个Bean,不填写名字则以空字符串作为名字。CreateGameObjectAsBean<T>(GameObject original, Transform parent, string beanName):创建一个物体作为Bean。
2. 非游戏物体组件类对象
2.1 注册对象
普通对象会在场景开始时最先被注册为Bean,你不需要去亲自使用new关键字实例化对象。
使用特性进行Bean的注册,目前只提供[Component]特性进行注册。
[Component]
public class TestComponent
{
    public void Test()
    {
        Debug.Log("TestComponent");
    }
}
2.2 字段注入获取Bean
如果想使用字段注入,在需要使用的地方使用[Autowired]特性进行注入。被注入的类也必须有[Component]或[GameObjectBean]特性,或是在游戏过程中被作为Bean生成的游戏物体组件类。
[Component]
public class TestComponent2
{
    [Autowired]
    private TestComponent testComponent;

    public void Test()
    {
        testComponent.Test();
    }
}
2.3 构造函数注入获取Bean
如果想使用构造器注入,直接在构造函数参数中声明需要注入的对象即可。
游戏物体组件类绝对不可以这么做,因为Unity的MonoBehaviour类是无法通过构造函数进行实例化的。
[Component]
public class TestComponent3
{
    private TestComponent testComponent;

    public TestComponent3(TestComponent testComponent)
    {
        this.testComponent = testComponent;
    }

    public void Test()
    {
        testComponent.Test();
    }
}
2.4 Bean的名字
[Component]特性还可以接受一个字符串参数,用于指定Bean的名字,但如果使用构造函数,参数上也要使用[Autowired]特性传入名字。
[Component("TestComponent4")]
public class TestComponent4
{
    public void Test()
    {
        Debug.Log("TestComponent4");
    }
}

// 使用构造函数注入
[Component]
public class TestComponent5
{
    private TestComponent4 testComponent4;

    public TestComponent5([Autowired("TestComponent4")] TestComponent4 testComponent4)
    {
        this.testComponent4 = testComponent4;
    }

    public void Test()
    {
        testComponent4.Test();
    }
}

// 使用字段注入
[Component]
public class TestComponent6
{
    [Autowired("TestComponent4")]
    private TestComponent4 testComponent4;

    public void Test()
    {
        testComponent4.Test();
    }
}
2.5 基于里氏替换原则的非游戏物体组件类Bean
如果一个类继承了另一个类,或者实现了接口,那么父类或接口以及父类的父类和接口(以此类推)也会被作为对应的信息存储这个Bean实例。
如果父类或接口有多个子类或实现类,那么请务必在子类或实现类使用[Component]指定名字使其唯一化。
public interface ITestService
{
    void Test();
}

[Component]
public class TestService : ITestService
{
    public void Test()
    {
        Debug.Log("TestService");
    }
}

[Component]
public class TestController
{
    private ITestService testService;

    public TestController(ITestService testService)
    {
        this.testService = testService;
    }

    public void Test()
    {
        testService.Test();
    }
}
3. 游戏物体对象
3.1 注册场景上已存在的游戏物体组件类
游戏物体组件类使用控制反转的方式是在类前使用[GameObjectBean]特性进行注册。
字段的注入时机在Awake()生命周期钩子之前,注入方式与普通对象一样,但是不支持构造函数注入方式。
[GameObjectBean]
public class TestMonoBehaviour : MonoBehaviour
{
    [Autowired]
    private TestComponent testComponent;

    private void Awake()
    {
        testComponent.Test();
    }
}
[GameObjectBean]
public class TestMonoBehaviour2 : MonoBehaviour
{
    [Autowired]
    private TestMonoBehaviour testMonoBehaviour;

    private void Awake()
    {
        testMonoBehaviour.gameObject.SetActive(true);
    }
}
3.2 Bean的名字
如果您需要给游戏物体组件类设置名称,请在[GameObjectBean]特性中传入名字。
[GameObjectBean("TestMonoBehaviour3")]
public class TestMonoBehaviour3 : MonoBehaviour
{
    [Autowired]
    private TestComponent testComponent;

    private void Awake()
    {
        testComponent.Test();
    }
}
3.3 注册没有编写游戏物体组件类的游戏对象
如果您想要把没有编写游戏物体组件类的游戏对象注册为Bean,可以在物体上挂载EasyInject/Behaviours/BeanObject脚本。
这个脚本会把物体名称作为Name注册为Bean,因此在字段注入时,需要在[Autowired]特性中传入名字。
请保证物体名称不会重复,否则会导致不可预知的错误。
[GameObjectBean]
public class TestMonoBehaviour4 : MonoBehaviour
{
    // 这里的名字是物体的名字
    [Autowired("TestObject")]
    private BeanObject testObject;

    private void Awake()
    {
        testObject.SetActive(true);
    }
}
3.4 为场景添加一个作为Bean的物体
如果您想要把一个物体作为Bean,但是这个物体不是初始就会被加载的物体,容器提供了一个名为CreateGameObjectAsBean<T>(GameObject original, Transform parent, string beanName)的方法。
与Unity提供的Instantiate(T original, Transform parent)方法不同,这个方法需要传入一个GameObject作为原型,而非泛型类T。
此外,你还需要传入一个字符串作为Bean的名字,然后在方法泛型参数中传入你挂载在物体上的脚本,也就是Bean的类型。
方法也将返回一个被字段注入完成的T类型的对象,这与Unity的Instantiate(T original, Transform parent)方法返回original的实例不同。
如果您为物体编写了游戏物体组件类,组件的上方不需要标注[GameObjectBean]特性。
请确保这个物体上也挂载了与您传入的泛型参数相同的脚本,除非您传入的泛型参数是BeanObject或AcrossScenesBeanObject,容器会自动帮您挂载,否则会导致不可预知的错误。AcrossScenesBeanObject相关的内容请参考跨场景的Bean。
[GameObjectBean]
public class TestMonoBehaviour5 : MonoBehaviour
{
    public GameObject prefab;

    private void Start()
    {
        // 创建一个物体作为Bean
        var go = GlobalInitializer.Instance.CreateGameObjectAsBean<BeanObject>(prefab, transform, "testObj");
        go.SetActive(true);
    }
}
3.5 基于里氏替换原则的游戏物体组件类Bean
游戏物体组件类也可以基于里氏替换原则进行注册。
如果有多个子类或实现类,那么请务必在子类或实现类当中指定名字使其唯一化。
public interface ISay
{
    void say();
}

[GameObjectBean("TestMonoBehaviour6")]
public class TestMonoBehaviour6 : MonoBehaviour, ISay
{
    public void say()
    {
        Debug.Log("TestMonoBehaviour6");
    }
}

[GameObjectBean("TestMonoBehaviour7")]
public class TestMonoBehaviour7 : MonoBehaviour, ISay
{
    public void say()
    {
        Debug.Log("TestMonoBehaviour7");
    }
}

[GameObjectBean]
public class TestMonoBehaviour8 : MonoBehaviour
{
    [Autowired("TestMonoBehaviour6")]
    private ISay testMonoBehaviour6;

    [Autowired("TestMonoBehaviour7")]
    private ISay testMonoBehaviour7;

    private void Awake()
    {
        testMonoBehaviour6.say();
        testMonoBehaviour7.say();
    }
}
3.6 跨场景的Bean
如果您的游戏物体组件类是跨场景的,必须使用[PersistAcrossScenes]特性。同时请确保这个类在初始化时调用了DontDestroyOnLoad()。
如果您的游戏对象没有编写游戏组件类,可以为其挂载AcrossScenesBeanObject脚本。这个脚本是BeanObject的子类,会自动挂载PersistAcrossScenes特性。
场景之间共享的Bean:
[PersistAcrossScenes]
[GameObjectBean]
public class TestAcrossScenes : MonoBehaviour
{
    private void Awake()
    {
        DontDestroyOnLoad(gameObject);
    }
}
未来计划
- 支持更多的特性,让框架在符合Unity的同时更加逼近SpringBoot
- 支持更多的依赖注入方式,如属性注入
- 适应非Unity项目的普通C#项目
联系方式
如果您有任何问题或建议,或是想要参与代码贡献,请联系我
- QQ: 2960474346
- 邮箱: 2960474346@qq.com


 被折叠的 条评论
为什么被折叠?
被折叠的 条评论
为什么被折叠?
 到【灌水乐园】发言


