


目录
props 验证
1. 什么是 props 验证
指的是 在封装组件时对外界传递过来的 props 数据进行合法性的校验 从而防止数据不合法的问题

使用数组类型的 props 节点的缺点:无法为每个 prop 指定具体的数据类型
2. 对象类型的 props 节点
使用对象类型的 props 节点,可以对每个 prop 进行数据类型的校验,示意图如下

3. props 验证
对象类型的 props 节点提供了多种数据验证方案,例如
- ① 基础的类型检查
- ② 多个可能的类型
- ③ 必填项校验
- ④ 属性默认值
- ⑤ 自定义验证函数
3.1 基础的类型检查
可以直接为组件的 prop 属性指定基础的校验类型 从而防止组件的使用者为其绑定错误类型的数据

3.2 多个可能的类型
如果某个 prop 属性值的类型不唯一,此时可以通过数组的形式,为其指定多个可能的类型

3.3 必填项校验
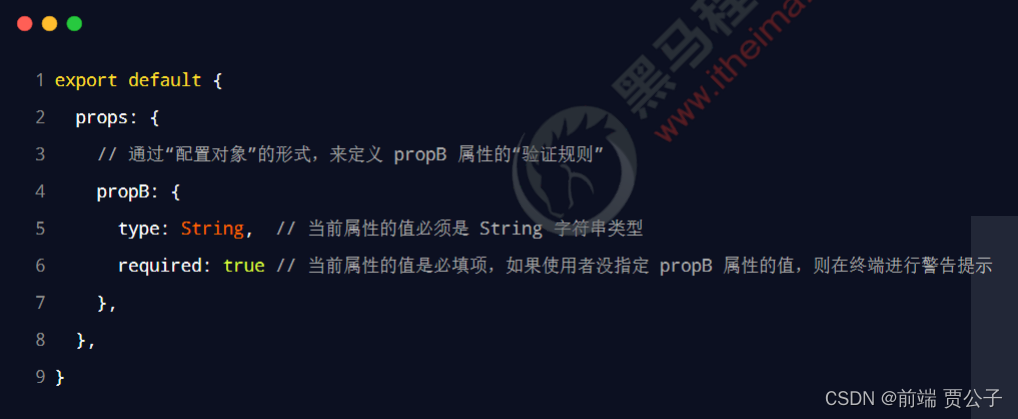
3.4 属性默认值
在封装组件时,可以为某个 prop 属性指定默认值。示例代码如下:

3.5 自定义验证函数
在封装组件时 可以为 prop 属性指定自定义的验证函数从而对 prop 属性的值进行更加精确的控制

计算属性
1. 什么是计算属性

注意:计算属性侧重于得到一个计算的结果,因此计算属性中必须有 return 返回值!
3. 计算属性的使用注意点
- ① 计算属性必须定义在 computed 节点中
- ② 计算属性必须是一个 function 函数
- ③ 计算属性必须有返回值
- ④ 计算属性必须当做普通属性使用
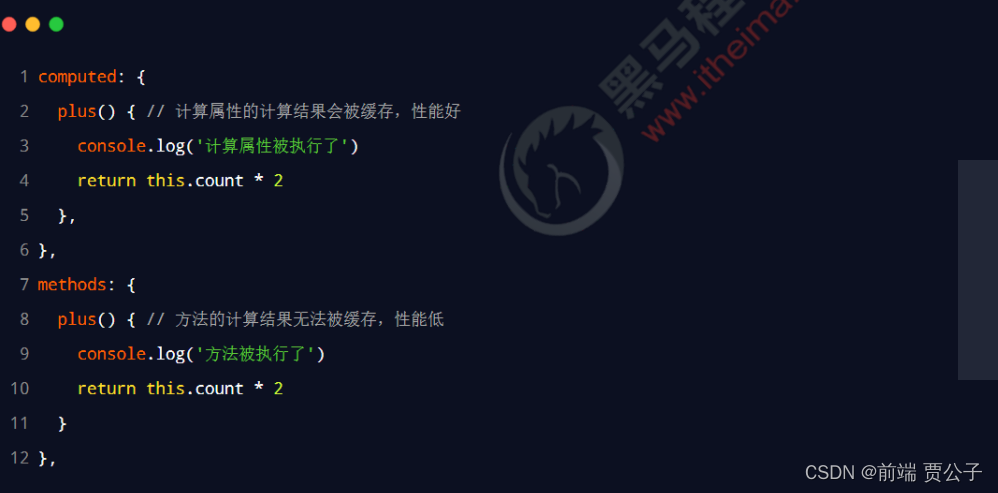
4. 计算属性 vs 方法
5. 计算属性案例
- ① 已勾选的商品总个数
- ② 已勾选的商品总价
- ③ 结算按钮的禁用状态
自定义事件
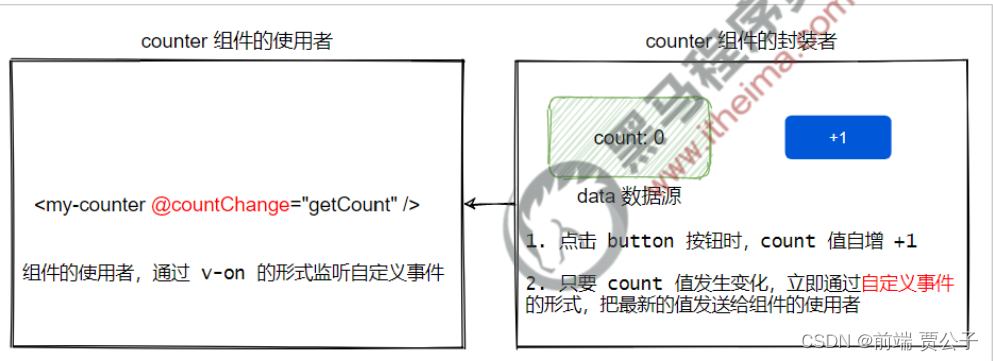
1.什么是自定义事件
在封装组件时 为了让组件的使用者可以监听到组件内状态的变化 此时需要用到组件的自定义事件
 2. 自定义事件的 3 个使用步骤
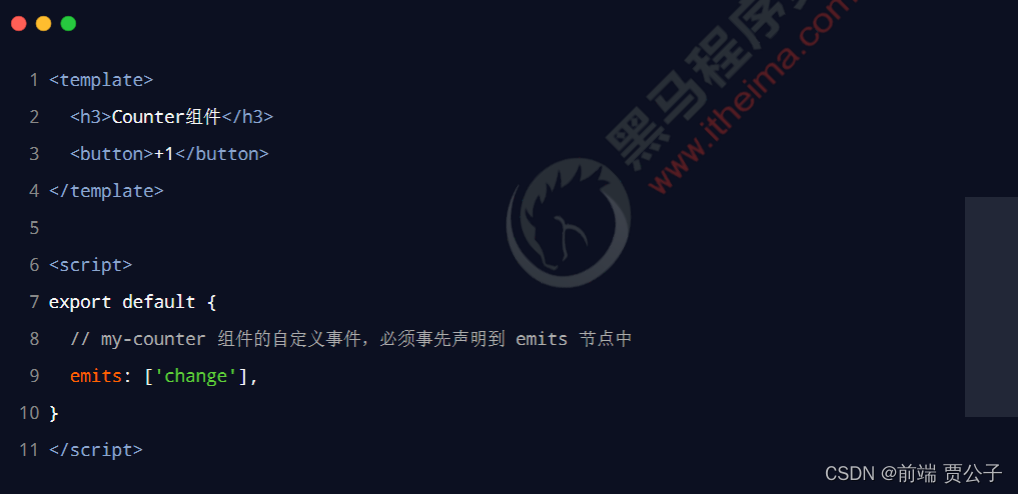
- ① 声明自定义事件
- ② 触发自定义事件
2.2 触发自定义事件
在 emits 节点下声明的自定义事件,可以通过 this.$emit('自定义事件的名称') 方法进行触发

2.3 监听自定义事件
在调用 this.$emit() 方法触发自定义事件时,可以通过第 2 个参数为自定义事件传参

组件上的 v-model
1.为什么需要在组件上使用 v-model
- 外界数据的变化会自动同步到 counter 组件中
- counter 组件中数据的变化,也会自动同步到外界

2. 在组件上使用 v-model 的步骤
任务列表案例
1. 案例效果

2. 用到的知识点
- ① vite 创建项目
- ② 组件的封装与注册
- ③ props
- ④ 样式绑定
- ⑤ 计算属性
- ⑥ 自定义事件
- ⑦ 组件上的 v-model
3. 整体实现步骤

- 1. 在终端运行以下的命令,初始化 vite 项目:
- 2. 使用 vscode 打开项目,并安装依赖项:
- 3. 安装 less 语法相关的依赖项:
npm init vite-app todos
npm install
npm i less -D:root {
font-size: 12px;
}
body {
padding: 8px;
}<template>
<h1>app 根组件</h1>
</template>
<script>
export default {
name: "MyApp",
data() {
return {
//任务列表数据
todolist: [
{ id: 1, task: "周一早晨9点开会", done: false },
{ id: 2, task: "周一晚上8点聚餐", done: false },
{ id: 3, task: "准备周三上午的演讲稿", done: true },
],
};
},
};
</script>
<style lang="less" scoped>
</style><template>
<div></div>
</template>
<script>
export default {
name: "TodoList",
};
</script>
<style lang="less" scoped>
</style>// 导入 TodoList 组件
import TodoList from './components/todo-list/TodoList.vue'
export default {
name: 'MyApp',
// 注册私有组件
components: {
TodoList,
},
}
<template>
 <div>
 <h1>App 根组件</h1>
 <hr />

 <!-- 使用 todo-list 组件 -->
 <todo-list></todo-list>
 </div>
</template>import { createApp } from 'vue'
import App from './App.vue'
// 导入 bootstrap.css 样式表
import './assets/css/bootstrap.css'
import './index.css'
createApp(App).mount('#app')<template>
<ul class="list-group">
<li class="list-group-item d-flex justify-content-between
align-items-center">
<!-- 复选框 -->
<div class="custom-control custom-checkbox">
<input type="checkbox" class="custom-control-input"
id="customCheck1" />
<label class="custom-control-label"
for="customCheck1">Check this custom checkbox</label>
</div>
<!-- badge 效果 -->
<span class="badge badge-success badge-pill">完成</span>
<span class="badge badge-warning badge-pill">未完成</span>
</li>
</ul>
</template> 3.3 为 TodoList 声明 props 属性
export default {
 name: 'TodoList',
   props: {
    list: {
      type: Array,
      required: true,
      default: [],
    },
  },
};<todo-list :list="todolist"></todo-list><template>
<ul class="list-group">
<li class="list-group-item d-flex justify-content-between
align-items-center" v-for="item in list" :key="item.id">
<!-- 复选框 -->
<div class="custom-control custom-checkbox">
<input type="checkbox" class="custom-control-input"
:id="item.id" />
<label class="custom-control-label" :for="item.id">{{
item.task }}</label>
</div>
<!-- badge 效果 -->
<span class="badge badge-success badge-pill">完成</span>
<span class="badge badge-warning badge-pill">未完成</span>
</li>
</ul>
</template> <!-- badge 效果 -->
<span class="badge badge-success badge-pill" v-if="item.done">完成
</span> <span class="badge badge-warning badge-pill" v-else>未完成</span><!-- 复选框 -->
<input type="checkbox" class="custom-control-input" :id="item.id"
v-model="item.done" />
<!-- 注意:App 父组件通过 props 传递过来的 list 是“引用类型”的数
据, -->
<!-- 这里 v-model 双向绑定的结果是:用户的操作修改的是 App 组件中数
据的状态 --><label class="custom-control-label" :class="item.done ? 'delete' :
''" :for="item.id">{{ item.task }}</label>// 为列表设置固定宽度
.list-group {
width: 400px; }
// 删除效果
.delete {
text-decoration: line-through; }4. 封装 todo-input 组件
<template>
 <div>TodoInput 组件</div>
</template> <script>
export default {
 name: 'TodoInput', }
</script> <style lang="less" scoped></style> // 导入 TodoList 组件
import TodoList from './components/todo-list/TodoList.vue'
// 导入 TodoInput 组件
import TodoInput from './components/todo-input/TodoInput.vue'
export default {
name: 'MyApp',
// 注册私有组件
components: {
TodoList,
TodoInput,
},
} <template>
<div>
<h1>App 根组件</h1>
<hr />
<!-- 使用 TodoInput 组件 -->
<todo-input></todo-input>
<!-- 使用 TodoList 组件 -->
<todo-list :list="todolist" class="mt-2"></todo-list>
</div>
</template> <template>
<!-- form 表单 -->
<form class="form-inline">
<div class="input-group mb-2 mr-sm-2">
<!-- 输入框的前缀 -->
<div class="input-group-prepend">
<div class="input-group-text">任务</div>
</div>
<!-- 文本输入框 -->
<input
type="text"
class="form-control"
placeholder="请填写任
务信息"
style="width: 356px"
/>
</div>
<!-- 添加按钮 -->
<button type="submit" class="btn btn-primary mb-2">添加新任务</button>
</form>
</template> data() {
return {
// 新任务的名称
taskname: '',
}
} <input type="text" class="form-control" placeholder="请填写任务信
息" style="width: 356px" v-model.trim="taskname" /><form class="form-inline" @submit.prevent="onFormSubmit"></form>methods: {
// 表单提交的事件处理函数
onFormSubmit() {
// 1. 判断任务名称是否为空
if (!this.taskname) return alert('任务名称不能为空!')
// 2. 触发自定义的 add 事件,并向外界传递数据
// 3. 清空文本框
},
}export default {
name: 'TodoInput',
// 声明自定义事件
emits: ['add'],
}methods: {
// 表单提交的事件处理函数
onFormSubmit() {
// 1. 判断任务名称是否为空
if (!this.taskname) return alert('任务名称不能为空!')
// 2. 触发自定义的 add 事件,并向外界传递数据
this.$emit('add', this.taskname)
// 3. 清空文本框
this.taskname = ''
},
},<!-- 使用 TodoInput 组件 -->
<!-- 监听 TodoInput 的 add 自定义事件 -->
<todo-input @add="onAddNewTask"></todo-input>data() {
return {
// 任务列表的数据
todolist: [
{ id: 1, task: '周一早晨9点开会', done: false },
{ id: 2, task: '周一晚上8点聚餐', done: false },
{ id: 3, task: '准备周三上午的演讲稿', done: true },
],
// 下一个可用的 Id 值
nextId: 4,
}
},
methods: {
 // TodoInput 组件 add 事件的处理函数
 onAddNewTask(taskname) {
 // 1. 向任务列表中新增任务信息
 this.todolist.push({
 id: this.nextId,
 task: taskname,
 done: false, // 完成状态默认为 false
 })

 // 2. 让 nextId 自增+1
 this.nextId++
 },
},<template>
<div>TodoButton 组件</div>
</template> <script>
export default {
name: 'TodoButton', }
</script> <style lang="less" scoped></style>// 导入 TodoList 组件
import TodoList from './components/todo-list/TodoList.vue'
// 导入 TodoInput 组件
import TodoInput from './components/todo-input/TodoInput.vue'
// 导入 TodoButton 组件
import TodoButton from './components/todo-button/TodoButton.vue'
export default {
name: 'MyApp',
// 注册私有组件
components: {
TodoList,
TodoInput,
TodoButton
},
}<template>
<div class="button-container mt-3">
<div class="btn-group">
<button type="button" class="btn btn-primary">全部</button>
<button type="button" class="btn btn-secondary">已完成</button>
<button type="button" class="btn btn-secondary">未完成</button>
</div>
</div>
</template>.button-container {
// 添加固定宽度
width: 400px;
// 文本居中效果
text-align: center; } name: 'TodoButton',
props: {
// 激活项的索引值
active: {
type: Number,
required: true,
// 默认激活索引值为 0 的按钮(全部:0,已完成:1,未完成:2)
default: 0,
},
},
}<template>
<div class="button-container mt-3">
<div class="btn-group">
<button type="button" class="btn" :class="active === 0 ?
'btn-primary' : 'btn-secondary'">全部</button>
<button type="button" class="btn" :class="active === 1 ?
'btn-primary' : 'btn-secondary'">已完成</button>
<button type="button" class="btn" :class="active === 2 ?
'btn-primary' : 'btn-secondary'">未完成</button>
</div>
</div>
</template>data() {
return {
// 激活的按钮的索引
activeBtnIndex: 0
}
}
<!-- 使用 TodoButton 组件 -->
<todo-button :active="activeBtnIndex"></todo-button> 1需求分析:父 -> 子 通过 props 传递了激活项的索引( active )子 -> 父 需要更新父组件中激活项的索引这种场景下适合 在组件上使用 v-model 指令 ,维护 组件内外数据的同步 。
<button type="button" class="btn" :class="active === 0 ? 'btnprimary' : 'btn-secondary'" @click="onBtnClick(0)">
 全部
</button> <button type="button" class="btn" :class="active === 1 ? 'btnprimary' : 'btn-secondary'" @click="onBtnClick(1)">
 已完成
</button> <button type="button" class="btn" :class="active === 2 ? 'btnprimary' : 'btn-secondary'" @click="onBtnClick(2)">
 未完成
</button> export default {
name: 'TodoButton',
// 声明和 v-model 相关的自定义事件
emits: ['update:active'],
props: {
// 激活项的索引值
active: {
type: Number,
required: true,
default: 0,
},
},
}methods: {
// 按钮的点击事件处理函数
onBtnClick(index) {
// 1. 如果当前点击的按钮的索引值,等于 props 传递过来的索引值,
则没必要触发 update:active 自定义事件
if (index === this.active) return
// 2. 通过 this.$emit() 方法触发自定义事件
this.$emit('update:active', index)
},
},
12345678需求分析:点击不同的按钮,切换显示不同的列表数据。此时可以根据当前激活按钮的索引,动态计算出要显 示的列表数据并返回即可!
computed: {
 // 根据激活按钮的索引值,动态计算要展示的列表数据
 tasklist() {
 // 对“源数据”进行 switch...case 的匹配,并返回“计算之后的结果”
 switch (this.activeBtnIndex) {
 case 0: // 全部
 return this.todolist
 case 1: // 已完成
 return this.todolist.filter(x => x.done)
 case 2: // 未完成
 return this.todolist.filter(x => !x.done)
 }
 },
},
<!-- 使用 TodoList 组件 -->
<todo-list :list="tasklist" class="mt-2"></todo-list> 1
总结
① 能够知道如何对 props 进行验证
数组格式、对象格式
type、default、required、validator
② 能够知道如何使用计算属性
computed 节点、必须 return 一个结果、缓存计算结果
③ 能够知道如何为组件绑定自定义事件
v-on 绑定自定义事件、emits、$emit()
④ 能够知道如何在组件上使用 v-model
应用场景:实现组件内外的数据同步
v-model:props名称、emits、$emit('update:props名称')


 2211
2211


 被折叠的 条评论
为什么被折叠?
被折叠的 条评论
为什么被折叠?
 到【灌水乐园】发言


