


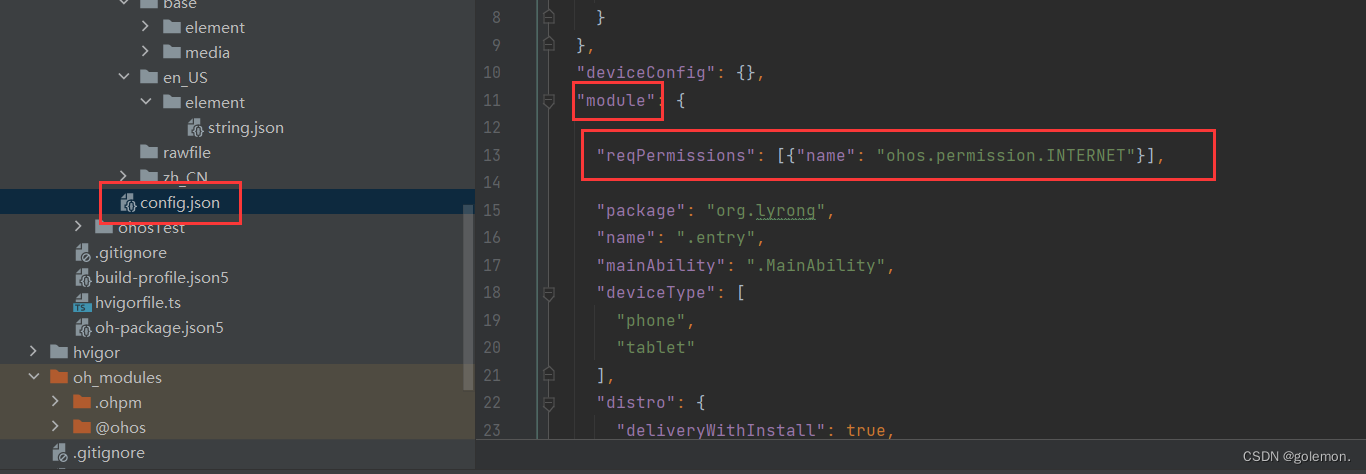
首先,在鸿蒙项目下config.json中找到module项,在里面填写"reqPermissions": [{"name": "ohos.permission.INTERNET"}]
在页面对应js文件内,填写import fetch from '@system.fetch';。
GET和POST区别
GET将表单数据以key=value形式,多个kv则用&相连,并添加到所指定的url后面。
例如:
http://localhost:8080/login/name=glm&password=mlg
POST不会显示kv内容,更加安全。
例如:
http://localhost:8080/login
同时,GET请求用来从服务器获得资源,POST用来向服务器提交数据。
GET请求
fetch.fetch({
            url: 'http://localhost:8080/login', //服务的地址
            data:formData.value, //可有可无,提交的数据,与表单中name属性值相同
            method:"GET",
            header: {
                'Content-Type': 'application/json'
            },
            success:(res)  => {
                console.info("login:"+res.data);
                console.info(JSON.parse(res.data))

                if(JSON.parse(res.data).name != null){ //登录成功,res.data是json数据
                    // console.info("dkjfkjdf")
                    router.replaceUrl({url:"pages/main/index",params:JSON.parse(res.data)})
                }else{
                    //登录失败进行提示
                    promptAction.showToast({message:"账号或密码输入错误!",duration:5000})
                }
            }
        });
POST请求
fetch.fetch({
            url: 'http://localhost:8080/login', //服务的地址
            data:formData.value, //可有可无,提交的数据
            method:"POST",
            header: {
                'Content-Type': 'application/json'
            },
            success:(res)  => {
                console.info("login:"+res.data);
                console.info(JSON.parse(res.data))

                if(JSON.parse(res.data).name != null){ //登录成功,res.data是json数据
                    // console.info("dkjfkjdf")
                    router.replaceUrl({url:"pages/main/index",params:JSON.parse(res.data)})
                }else{
                    //登录失败进行提示
                    promptAction.showToast({message:"账号或密码输入错误!",duration:5000})
                }
            }
        });
strings设置
可以在i18n目录下的json文件中添加一个url字符串:
{
  "strings": {
    "hello": "Hello",
    "world": "World",
    "url": "http://localhost:8080/prj/"
  },
  "Files": {
  }
}
那么GET和POST请求中的url可以写为:
url: this.$t("strings.url")+'cleaner/login', //服务的地址
 fetch.fetch({
            url: this.$t("strings.url")+'login', //服务的地址
            data:formData.value, //可有可无,提交的数据
            method:"POST",
            header: {
                'Content-Type': 'application/json'
            },
            success:(res)  => {
                console.info("login:"+res.data);
                console.info(JSON.parse(res.data))

                if(JSON.parse(res.data).name != null){ //登录成功,res.data是json数据
                    // console.info("dkjfkjdf")
                    router.replaceUrl({url:"pages/main/index",params:JSON.parse(res.data)})
                }else{
                    //登录失败进行Toast提示
                    promptAction.showToast({message:"账号或密码输入错误!",duration:5000})
                }
            }
        });


 2332
2332


 被折叠的 条评论
为什么被折叠?
被折叠的 条评论
为什么被折叠?
 到【灌水乐园】发言


