


参照springboot-alibaba-ribbon项目学习
E:\Codes\Idea_java_works\apesource\springboot\微服务\springboot_alibaba_ribbon
Nacos 微服务注册中心-discover
Nacos 是⼀个更易于构建云原⽣应⽤的动态服务发现、配置管理和服务管理平台。简单来说 Nacos 就是 注册中⼼ + 配置中⼼的组合,提供简单易⽤的特性集,帮助我们解决微服务开发必会涉及到的服务注册 与发现,服务配置,服务管理等问题。 Nacos 还是 Spring Cloud Alibaba 组件之⼀,负责服务注册与发现。
<?xml version="1.0" encoding="UTF-8"?>
<project xmlns="http://maven.apache.org/POM/4.0.0" xmlns:xsi="http://www.w3.org/2001/XMLSchema-instance"
  xsi:schemaLocation="http://maven.apache.org/POM/4.0.0 https://maven.apache.org/xsd/maven-4.0.0.xsd">
  <modelVersion>4.0.0</modelVersion>

  <!--    父工程-->
  <parent>
    <groupId>org.springframework.boot</groupId>
    <artifactId>spring-boot-starter-parent</artifactId>
    <version>2.1.3.RELEASE</version>
    <relativePath/> <!-- lookup parent from repository -->
  </parent>

  <!--    项目基本信息-->
  <groupId>com.ape</groupId>
  <artifactId>springboot_alibaba_demo01</artifactId>
  <version>0.0.1-SNAPSHOT</version>
  <name>springboot_alibaba_demo01</name>
  <description>springboot_alibaba_demo01</description>
  <!--    声明为父pom文件-->
  <packaging>pom</packaging>

  <!--    父项目的子模块-->
  <modules>
    <module>shop_common</module>
    <module>shop_user</module>
    <module>shop_product</module>
    <module>shop_order</module>
  </modules>
  <!--    依赖版本锁定-->
  <properties>
    <java.version>8</java.version>
    <project.build.sourceEncoding>UTF-8</project.build.sourceEncoding>
    <project.reporting.outputEncoding>UTF-8</project.reporting.outputEncoding>
    <spring-cloud.version>Greenwich.RELEASE</spring-cloud.version>
    <spring-cloud-alibaba.version>2.1.1.RELEASE</spring-cloud-alibaba.version>
  </properties>

  <!--
  dependencyManagement所包含的坐标,子项目不会直接继承,需要声明才可继承
  -->
  <dependencyManagement>
    <dependencies>
      <dependency>
        <groupId>com.alibaba.cloud</groupId>
        <artifactId>spring-cloud-alibaba-dependencies</artifactId>
        <version>${spring-cloud-alibaba.version}</version>
        <type>pom</type>
        <scope>import</scope>
      </dependency>
      <dependency>
        <groupId>org.springframework.cloud</groupId>
        <artifactId>spring-cloud-dependencies</artifactId>
        <version>${spring-cloud.version}</version>
        <type>pom</type>
        <scope>import</scope>
      </dependency>
      <dependency>
        <groupId>org.springframework.boot</groupId>
        <artifactId>spring-boot-starter-web</artifactId>
      </dependency>

      <dependency>
        <groupId>org.springframework.boot</groupId>
        <artifactId>spring-boot-starter-test</artifactId>
        <scope>test</scope>
      </dependency>
    </dependencies>
  </dependencyManagement>


  <build>
    <plugins>
      <plugin>
        <groupId>org.springframework.boot</groupId>
        <artifactId>spring-boot-maven-plugin</artifactId>
      </plugin>
    </plugins>
  </build>

</project>
用来注册和管理微服务。
运行命令startup.cmd -m standalone
使用方法:
- 创建好一个微服务项目(父项目与多个子项目)
- 在每个子项目pom.xml中导入依赖(注意版本应该与springboot版本一致)
<dependency>
  <groupId>com.alibaba.cloud</groupId>
  <artifactId>spring-cloud-starter-alibaba-nacos-discovery</artifactId>
  <version>2.1.3.RELEASE</version>
</dependency>- 在配置文件中写端口
spring:
  application:
    name: server-order #服务名称
  datasource:
    driver-class-name: com.mysql.cj.jdbc.Driver
    url: jdbc:mysql://localhost:3306/yuanjiuyuanexcise?useUnicode=true&characterEncoding=UTF-8&zeroDateTimeBehavior=convertToNull&serverTimezone=Asia/Shanghai
    name: root
    password: 123456
  cloud: # 配置端口
    nacos:
      discovery:
        server-addr: 127.0.0.1:8848
server:
  port: 8090
注意:一定是127.0.0.1这个主机号 如果是localhost 后期使用getHost()方法会获得到当前IP地址而不是主机号
如果后期使用Feign或者Ribbon做通信就无所谓
//返回所有叫server-product的服务,是一个List,我们只有一个server-product服务所以直接get(0)
ServiceInstance serviceInstance = discoveryClient.getInstances("server-product").get(0);
String url = serviceInstance.getHost() + ":" + serviceInstance.getPort();- 启动类中使用
@EnableDiscoveryClient注解开启微服务注册 - 浏览器输入localhost:8848/nacos 账密都是nacos 进入图形化界面查看
- 使用的时候 在启动类装配RestTemplate 这种方法不同服务之间发送的请求路径是写死的
@Bean
public RestTemplate restTemplate(){
    return new RestTemplate();
}- 搭配Ribbon来让Nacos自动识别路径 添加
@LoadBalanced负载均衡
@Bean
@LoadBalanced
public RestTemplate restTemplate(){
    return new RestTemplate();
}- 在service的实现类内注入Mapper RestTemplate 请求路径直接写服务名即可
@Service
public class OrderServiceImpl extends ServiceImpl<OrderMapper, Order> implements OrderService {
    @Autowired
    private OrderMapper mapper;
    @Autowired
    private RestTemplate restTemplate;

    //    先找到Product的信息 然后将信息赋值给Order 查询Product的业务在另一个服务 所以需要用到ribbon与nacos
    @Override
    public Order placeOrder(int id) {
        Product product = restTemplate.getForObject("http://server-product/product/" + id, Product.class);
        Order order = new Order();
        order.setPid(product.getPid());
        order.setNumber(1);
        order.setUserName("周永康");
        order.setPPrice(product.getPPrice());
        order.setPName(product.getPName());
        order.setUid(1);
        mapper.insert(order);
        return order;
    }
}
Nacos 配置管理中心-config 实现热更新配置文件,无需重启服务器
- 导入依赖,与springboot版本一致或者与注册中心版本一致
<!--        nacos 配置坐标-->
<dependency>
  <groupId>com.alibaba.cloud</groupId>
  <artifactId>spring-cloud-starter-alibaba-nacos-config</artifactId>
  <version>2.1.3.RELEASE</version>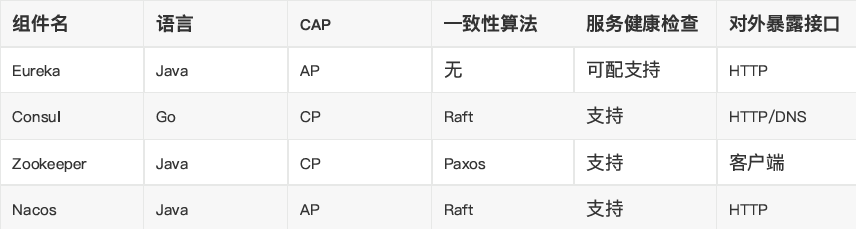
</dependency>- 添加bootstrap.yaml 不能使⽤原来的application.yml作为配置⽂件,⽽是新建⼀个bootstrap.yml作为配置⽂件 配置⽂件优先级(由⾼到低):
bootstrap.properties -> bootstrap.yml -> application.properties -> application.yml
# 使用nacos的配置中心,配置文件由nacos管理 我们只需要导入即可  name+active+file-extension
# 优先级  bootstrap.yml > application.properties > yml > yaml
spring:
  application:
    name: server-order
  cloud:
    nacos:
      config: # nacos配置中心
        server-addr: 127.0.0.1:8848
        file-extension: yml #文件类型
  profiles:
active: dev # 指定环境- 在nacos中创建配置
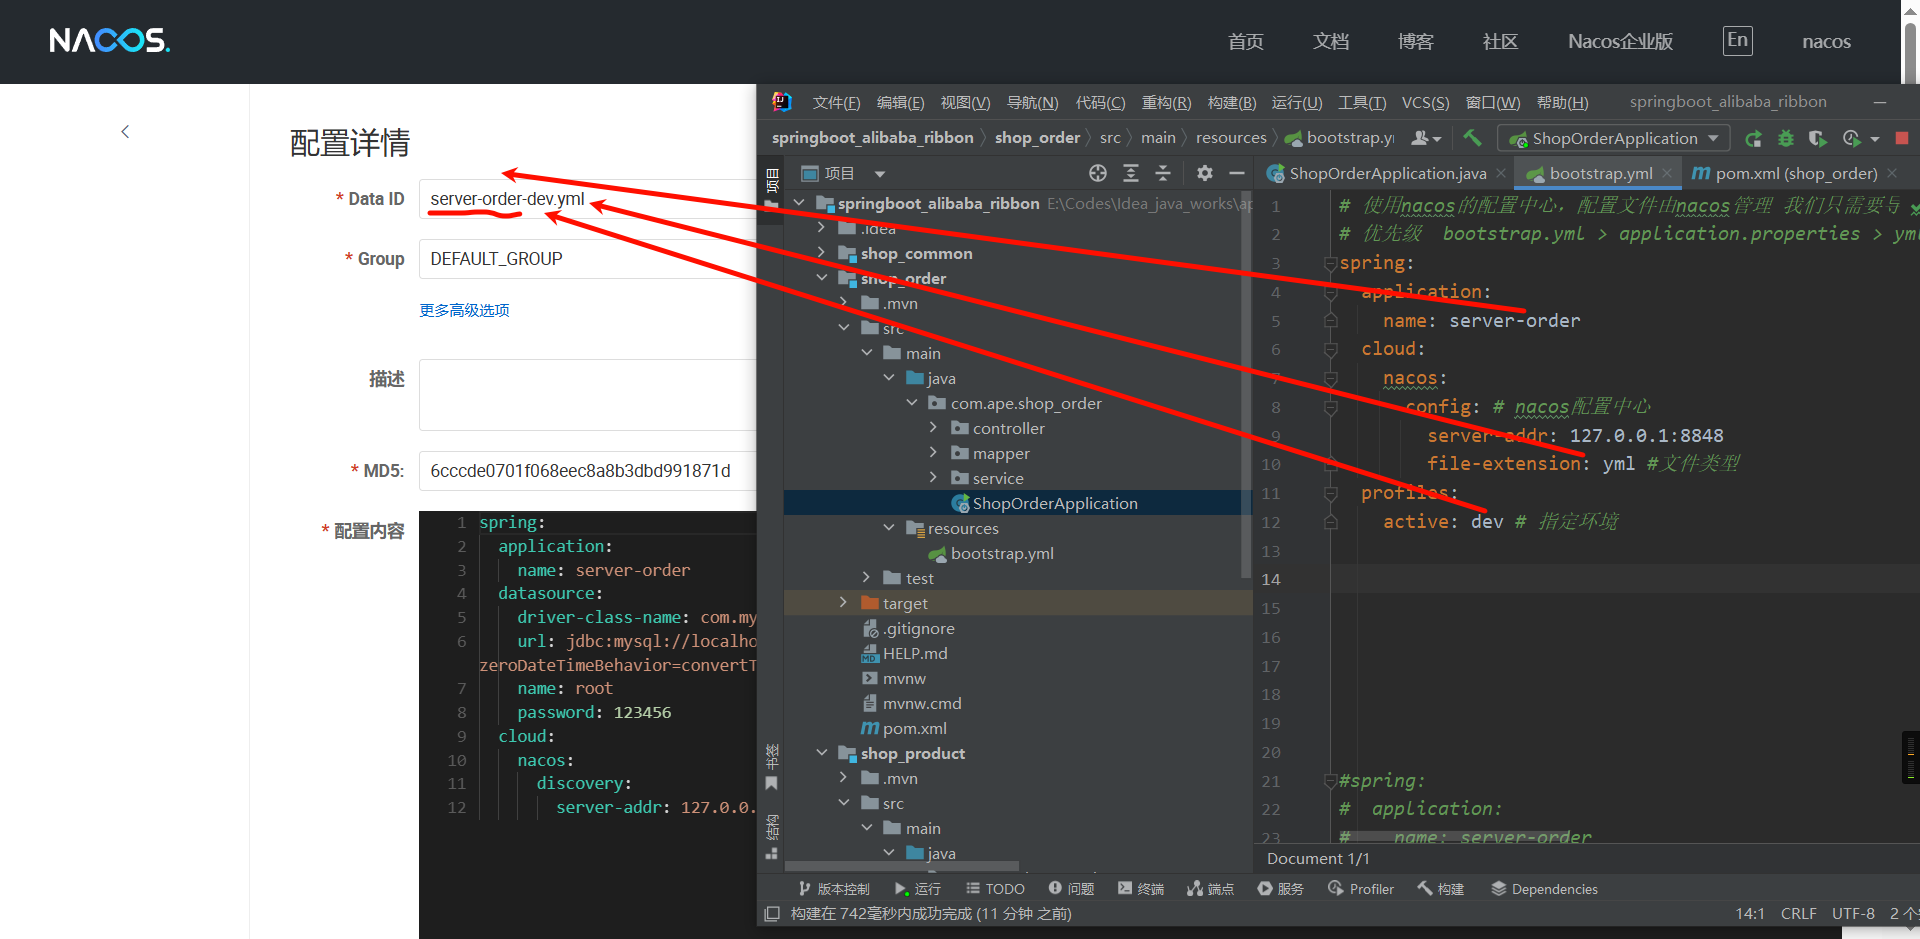
执行流程
配置热更新
- 在nacos配置管理中心的配置文件上添加 指定配置名称
# 配置热更新
config:
appName: order- 在controller代码中添加一个@RefreshScope注解用来热更新
@RestController
@RefreshScope // 用于配置热更新
public class NacosConfigController {
    @Value("${config.appName}") // 使用逐个注入
    private String appName;

    @GetMapping("/nacosconfigname")
    public String test(){
        return appName;
    }
}
测试接口,返回值为order 修改配置管理中心的配置文件appName: order1 返回值为order1
不同微服务共享配置
- 将大家冗余的配置代码抽取出来例如数据库
spring:
  datasource:
    driver-class-name: com.mysql.cj.jdbc.Driver
    url: jdbc:mysql://localhost:3306/yuanjiuyuanexcise?useUnicode=true&characterEncoding=UTF-8&zeroDateTimeBehavior=convertToNull&serverTimezone=Asia/Shanghai
    name: root
password: 123456- 在本地bootstarp.yml中添加
# 使用nacos的配置中心,配置文件由nacos管理 我们只需要导入即可  name+active+file-extension
# 优先级  bootstrap.yml > application.properties > yml > yaml
spring:
  application:
    name: server-order
  cloud:
    nacos:
      config: # nacos配置中心
        server-addr: 127.0.0.1:8848
        file-extension: yml #文件类型
        shared-configs: server-dataBase.yml #-----------共享的配置文件-----------
        refreshable-dataids: server-dataBase.yml #-----------对于该配置使用热更新------------
  #        不同服务之间共享配置
  profiles:
    active: dev # 指定环境
Ribbon负载均衡器
负责通信(直接使用服务名即可,不需要ip端口),负载均衡。
- com.netflix.loadbalancer.RoundRobinRule :以轮询的⽅式进⾏负载均衡 com.netflix.loadbalancer.RandomRule :随机策略
- com.netflix.loadbalancer.RetryRule :重试策略
- com.netflix.loadbalancer.WeightedResponseTimeRule :权重策略。会计算每个服务的权重,越⾼的被调⽤的可能性越⼤
- com.netflix.loadbalancer.BestAvailableRule :最佳策略。遍历所有的服务实例,过滤掉故障实例,并返回请求数最⼩的实例返回
- com.netflix.loadbalancer.AvailabilityFilteringRule :可⽤过滤策略。过滤掉故障和请求数超过阈值的服务实例,再从剩下的实⼒中轮询调⽤
- ZoneAvoidanceRule: 以区域可⽤的服务器为基础进⾏服务器的选择。使⽤Zone对服务器进⾏分类,这个Zone可以理解为⼀个机房、⼀个机架等。⽽后再对Zone内的多个服务做轮询
负载均衡使用场景:当某个服务频繁访问,我们想给这个服务增加一台服务器,在springboot中的做法是下图 端口号命令:-Dserver.port=xxxx
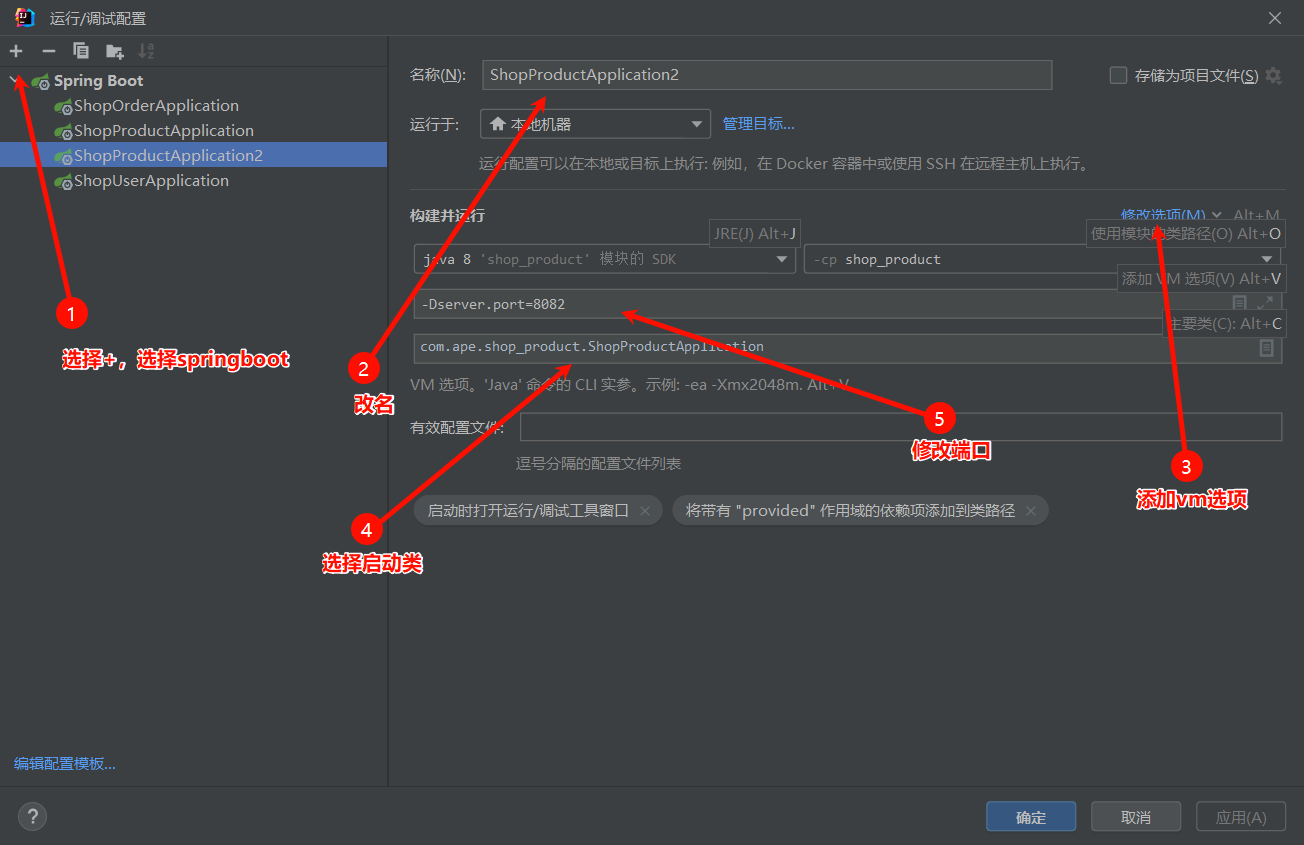
添加一个启动器,用来模拟增加一个服务器
通信
@Bean
public RestTemplate restTemplate(){
    return new RestTemplate();
}
负载均衡:使用@LoadBalanced注解 意思是负载均衡 使用负载均衡的方式来通讯
@Bean
//    使用ribbon(用来通信,使用服务名即可识别ip端口)需要用到的注解 负载均衡(以负载均衡的方式通信)
@LoadBalanced
public RestTemplate restTemplate(){
    return new RestTemplate();
}
全局配置:使用随机负载只要当前服务发请求,不管发给谁,都使用随机负载
//    ribbon的负载策略 这个是全局随机负载
@Bean
public IRule randomRule(){
    return new RandomRule();
}
局部配置:当前服务只有给server-product发请求的时候才是随机负载
# ribbon局部随机策略
server-product:
  ribbon:
    NFLoadBalancerRuleClassName: com.netflix.loadbalancer.RandomRule
Feign微服务通信(RESTful风格 http请求) 使用前提:已开启nacos服务
Feign是Spring Cloud提供的⼀个声明式的伪Http客户端, 它使得调⽤远程服务就像调⽤本 地服务⼀样简单, 只需要创建⼀个接⼝并添加⼀个注解即可。 Nacos很好的兼容了Feign, Feign 默认集了Ribbon, 所以在Nacos下使⽤Fegin默认就实现了负载均衡的效果。
- 加⼊Fegin的依赖 版本与sprigboot版本一致
<!--        feign通信坐标-->
<dependency>
  <groupId>org.springframework.cloud</groupId>
  <artifactId>spring-cloud-starter-openfeign</artifactId>
  <version>2.1.3.RELEASE</version>
</dependency>- 启动类上添加启用feign通信注解
@EnableFeignClients
@SpringBootApplication
@EnableDiscoveryClient // 开启微服务注册
@EnableFeignClients //使用feign通信不需要去声明ribbon负载均衡 默认集成了ribbon
public class ShopOrderApplication {
    public static void main(String[] args) {
        SpringApplication.run(ShopOrderApplication.class, args);
    }
}- 编写一个发送请求的通信接口给Product服务发请求,就创建一个ProductServiceClient接口
package com.ape.shop_order.service;

import com.ape.pojo.Product;
import org.springframework.cloud.openfeign.FeignClient;
import org.springframework.web.bind.annotation.GetMapping;
import org.springframework.web.bind.annotation.PathVariable;

/**
 * 这个接口用来给Product服务发送请求
 */
@FeignClient("server-product")//要通信的服务名
public interface ProductServiceClient {
    //指定调⽤提供者的哪个⽅法
    //@FeignClient+@GetMapping就是⼀个完整的请求路径http://server-product/product/{id}
    @GetMapping("/product/{id}")
    Product selectById(@PathVariable int id);
}- 依赖注入后直接调用接口中的通信方法
@Service
@Slf4j
public class OrderServiceImpl extends ServiceImpl<OrderMapper, Order> implements OrderService {
    @Autowired
    private OrderMapper mapper;
    //    使用通信ProductService接口中的通信方法
    @Autowired
    private ProductServiceClient productServiceClient;

    @Override
    public Order placeOrder(int id) {
        //       调用通信方法
        Product product = productServiceClient.selectById(id);
        Order order = new Order();
        order.setPid(id);
        order.setUserName("周永康");
        order.setUid(1);
        order.setNumber(1);
        order.setPName(product.getPName());
        order.setPPrice(product.getPPrice());
        mapper.insert(order);
        log.info(order.toString());
        return order;
    }
}
Feign使⽤优化
Feign底层发起http请求,依赖于其它的框架。其底层客户端实现包括:
URLConnection:默认实现,不⽀持连接池
Apache HttpClient :⽀持连接池
OKHttp:⽀持连接池 因此提⾼Feign的性能主要⼿段就是使⽤连接池代替默认的URLConnection 这⾥我们⽤Apache的HttpClient来演示
<!--        feign优化 使用HttpClient支持连接池-->
<dependency>
  <groupId>org.apache.httpcomponents</groupId>
  <artifactId>httpclient</artifactId>
  <version>4.5.14</version>
</dependency>
配置文件
# 配置连接池
feign:
 httpclient:
   enabled: true
   max-connections: 200 #最大连接数
   max-connections-per-route: 50 #每个路径的最大连接数
Dubbo(PRC) 微服务通信
思想是把服务的对象加载到nacos服务器上,再供其他服务调用,这里的nacos服务器有点 IOC的味道。
使用步骤(分清楚调用者和被调用者,调用者是消费者,被调用者是生产者)
- 在公共服务common中定义service层里的接口ProductService这样在Product服务中的service层就不用写ProductService接口了
package com.ape.service;

import com.ape.pojo.Product;
import org.springframework.web.bind.annotation.PathVariable;

/**
 实战中,会将所有服务接⼝设计给⼀个叫做api的服务,单独维护,此处就在common服务设置
 */
public interface ProductService {
    Product selectById(int id);
}- 给product服务添加依赖 注意版本与springboot版本要匹配
<!--dubbo-->
<dependency>
  <groupId>com.alibaba.cloud</groupId>
  <artifactId>spring-cloud-starter-dubbo</artifactId>
  <version>2.1.2.RELEASE</version>
</dependency>- 添加dubbo配置
# dubbo的配置
dubbo:
  scan:
    base-packages: com.ape.shop_product.service.impl  #开启包扫描
  protocols:
    dubbo:
      name: dubbo  #服务协议
      port: -1 #服务端口 随机端口
  registry:
address: spring-cloud://localhost # 注册中心- 编写service.impl包下的ProductService实现类并且暴露出来 这个
@Service是dubbo包提供的
package com.ape.shop_product.service.impl;

import com.ape.pojo.Product;
import com.ape.service.ProductService;
import com.ape.shop_product.mapper.ProductMapper;
import com.baomidou.mybatisplus.extension.service.IService;
import com.baomidou.mybatisplus.extension.service.impl.ServiceImpl;
import org.apache.dubbo.config.annotation.Service;

import javax.annotation.Resource;

@Service
public class ProductServiceImpl extends ServiceImpl<ProductMapper, Product> implements ProductService, IService<Product> {
    @Resource(name = "productMapper")
    private ProductMapper mapper;
    @Override
    public Product selectById(int id) {
        return mapper.selectById(id);
    }
}- 给消费者添加依赖
<!--dubbo-->
<dependency>
  <groupId>com.alibaba.cloud</groupId>
  <artifactId>spring-cloud-starter-dubbo</artifactId>
  <version>2.1.2.RELEASE</version>
</dependency>- 给消费者添加配置
dubbo:
  registry:
    address: spring-cloud://localhost # 注册中⼼
  cloud:
subscribed-services: server-product #定义的提供者名称- 调用服务
package com.ape.shop_order.service.impl;

import com.ape.pojo.Order;
import com.ape.pojo.Product;
import com.ape.service.ProductService;
import com.ape.shop_order.mapper.OrderMapper;
import com.ape.shop_order.service.OrderService;
import com.baomidou.mybatisplus.extension.service.impl.ServiceImpl;
import lombok.extern.slf4j.Slf4j;
import org.apache.dubbo.config.annotation.Reference;
import org.springframework.beans.factory.annotation.Autowired;
import org.springframework.stereotype.Service;

@Service
@Slf4j
public class OrderServiceImpl extends ServiceImpl<OrderMapper, Order> implements OrderService {
    @Autowired
    private OrderMapper mapper;

    //dubbo 调用
    @Reference
    private ProductService productService;

    @Override
    public Order placeOrder(int id) {
        //       调用通信方法
        Product product = productService.selectById(id);
        Order order = new Order();
        order.setPid(id);
        order.setUserName("周永康");
        order.setUid(1);
        order.setNumber(1);
        order.setPName(product.getPName());
        order.setPPrice(product.getPPrice());
        mapper.insert(order);
        log.info(order.toString());
        return order;
    }
}


 5068
5068

 被折叠的 条评论
为什么被折叠?
被折叠的 条评论
为什么被折叠?
 到【灌水乐园】发言


