


目录
一、xxl-job介绍
xxl-job 是一个轻量级分布式任务调度框架,支持动态添加、修改、删除定时任务,支持海量任务分片执行,支持任务执行日志在线查看和分页查询,同时支持任务失败告警和重试机制,支持分布式部署和高可用。xxl-job 的核心思想是将任务的调度和执行分离,通过调度中心统一控制任务的分配和执行,实现任务的统一管理和调度。xxl-job 可以轻松集成到 Spring、Spring Boot、Dubbo 等主流框架中,使用简单方便,已经广泛应用于各大互联网公司的生产环境中。
二、安装xxl-job 调度器
2.1 拷贝数据库脚本并运行
# XXL-JOB v2.4.0-SNAPSHOT
# Copyright (c) 2015-present, xuxueli.

CREATE database if NOT EXISTS `xxl_job` default character set utf8mb4 collate utf8mb4_unicode_ci;
use `xxl_job`;

SET NAMES utf8mb4;

CREATE TABLE `xxl_job_info` (
  `id` int(11) NOT NULL AUTO_INCREMENT,
  `job_group` int(11) NOT NULL COMMENT '执行器主键ID',
  `job_desc` varchar(255) NOT NULL,
  `add_time` datetime DEFAULT NULL,
  `update_time` datetime DEFAULT NULL,
  `author` varchar(64) DEFAULT NULL COMMENT '作者',
  `alarm_email` varchar(255) DEFAULT NULL COMMENT '报警邮件',
  `schedule_type` varchar(50) NOT NULL DEFAULT 'NONE' COMMENT '调度类型',
  `schedule_conf` varchar(128) DEFAULT NULL COMMENT '调度配置,值含义取决于调度类型',
  `misfire_strategy` varchar(50) NOT NULL DEFAULT 'DO_NOTHING' COMMENT '调度过期策略',
  `executor_route_strategy` varchar(50) DEFAULT NULL COMMENT '执行器路由策略',
  `executor_handler` varchar(255) DEFAULT NULL COMMENT '执行器任务handler',
  `executor_param` varchar(512) DEFAULT NULL COMMENT '执行器任务参数',
  `executor_block_strategy` varchar(50) DEFAULT NULL COMMENT '阻塞处理策略',
  `executor_timeout` int(11) NOT NULL DEFAULT '0' COMMENT '任务执行超时时间,单位秒',
  `executor_fail_retry_count` int(11) NOT NULL DEFAULT '0' COMMENT '失败重试次数',
  `glue_type` varchar(50) NOT NULL COMMENT 'GLUE类型',
  `glue_source` mediumtext COMMENT 'GLUE源代码',
  `glue_remark` varchar(128) DEFAULT NULL COMMENT 'GLUE备注',
  `glue_updatetime` datetime DEFAULT NULL COMMENT 'GLUE更新时间',
  `child_jobid` varchar(255) DEFAULT NULL COMMENT '子任务ID,多个逗号分隔',
  `trigger_status` tinyint(4) NOT NULL DEFAULT '0' COMMENT '调度状态:0-停止,1-运行',
  `trigger_last_time` bigint(13) NOT NULL DEFAULT '0' COMMENT '上次调度时间',
  `trigger_next_time` bigint(13) NOT NULL DEFAULT '0' COMMENT '下次调度时间',
  PRIMARY KEY (`id`)
) ENGINE=InnoDB DEFAULT CHARSET=utf8mb4;

CREATE TABLE `xxl_job_log` (
  `id` bigint(20) NOT NULL AUTO_INCREMENT,
  `job_group` int(11) NOT NULL COMMENT '执行器主键ID',
  `job_id` int(11) NOT NULL COMMENT '任务,主键ID',
  `executor_address` varchar(255) DEFAULT NULL COMMENT '执行器地址,本次执行的地址',
  `executor_handler` varchar(255) DEFAULT NULL COMMENT '执行器任务handler',
  `executor_param` varchar(512) DEFAULT NULL COMMENT '执行器任务参数',
  `executor_sharding_param` varchar(20) DEFAULT NULL COMMENT '执行器任务分片参数,格式如 1/2',
  `executor_fail_retry_count` int(11) NOT NULL DEFAULT '0' COMMENT '失败重试次数',
  `trigger_time` datetime DEFAULT NULL COMMENT '调度-时间',
  `trigger_code` int(11) NOT NULL COMMENT '调度-结果',
  `trigger_msg` text COMMENT '调度-日志',
  `handle_time` datetime DEFAULT NULL COMMENT '执行-时间',
  `handle_code` int(11) NOT NULL COMMENT '执行-状态',
  `handle_msg` text COMMENT '执行-日志',
  `alarm_status` tinyint(4) NOT NULL DEFAULT '0' COMMENT '告警状态:0-默认、1-无需告警、2-告警成功、3-告警失败',
  PRIMARY KEY (`id`),
  KEY `I_trigger_time` (`trigger_time`),
  KEY `I_handle_code` (`handle_code`)
) ENGINE=InnoDB DEFAULT CHARSET=utf8mb4;

CREATE TABLE `xxl_job_log_report` (
  `id` int(11) NOT NULL AUTO_INCREMENT,
  `trigger_day` datetime DEFAULT NULL COMMENT '调度-时间',
  `running_count` int(11) NOT NULL DEFAULT '0' COMMENT '运行中-日志数量',
  `suc_count` int(11) NOT NULL DEFAULT '0' COMMENT '执行成功-日志数量',
  `fail_count` int(11) NOT NULL DEFAULT '0' COMMENT '执行失败-日志数量',
  `update_time` datetime DEFAULT NULL,
  PRIMARY KEY (`id`),
  UNIQUE KEY `i_trigger_day` (`trigger_day`) USING BTREE
) ENGINE=InnoDB DEFAULT CHARSET=utf8mb4;

CREATE TABLE `xxl_job_logglue` (
  `id` int(11) NOT NULL AUTO_INCREMENT,
  `job_id` int(11) NOT NULL COMMENT '任务,主键ID',
  `glue_type` varchar(50) DEFAULT NULL COMMENT 'GLUE类型',
  `glue_source` mediumtext COMMENT 'GLUE源代码',
  `glue_remark` varchar(128) NOT NULL COMMENT 'GLUE备注',
  `add_time` datetime DEFAULT NULL,
  `update_time` datetime DEFAULT NULL,
  PRIMARY KEY (`id`)
) ENGINE=InnoDB DEFAULT CHARSET=utf8mb4;

CREATE TABLE `xxl_job_registry` (
  `id` int(11) NOT NULL AUTO_INCREMENT,
  `registry_group` varchar(50) NOT NULL,
  `registry_key` varchar(255) NOT NULL,
  `registry_value` varchar(255) NOT NULL,
  `update_time` datetime DEFAULT NULL,
  PRIMARY KEY (`id`),
  KEY `i_g_k_v` (`registry_group`,`registry_key`,`registry_value`)
) ENGINE=InnoDB DEFAULT CHARSET=utf8mb4;

CREATE TABLE `xxl_job_group` (
  `id` int(11) NOT NULL AUTO_INCREMENT,
  `app_name` varchar(64) NOT NULL COMMENT '执行器AppName',
  `title` varchar(12) NOT NULL COMMENT '执行器名称',
  `address_type` tinyint(4) NOT NULL DEFAULT '0' COMMENT '执行器地址类型:0=自动注册、1=手动录入',
  `address_list` text COMMENT '执行器地址列表,多地址逗号分隔',
  `update_time` datetime DEFAULT NULL,
  PRIMARY KEY (`id`)
) ENGINE=InnoDB DEFAULT CHARSET=utf8mb4;

CREATE TABLE `xxl_job_user` (
  `id` int(11) NOT NULL AUTO_INCREMENT,
  `username` varchar(50) NOT NULL COMMENT '账号',
  `password` varchar(50) NOT NULL COMMENT '密码',
  `role` tinyint(4) NOT NULL COMMENT '角色:0-普通用户、1-管理员',
  `permission` varchar(255) DEFAULT NULL COMMENT '权限:执行器ID列表,多个逗号分割',
  PRIMARY KEY (`id`),
  UNIQUE KEY `i_username` (`username`) USING BTREE
) ENGINE=InnoDB DEFAULT CHARSET=utf8mb4;

CREATE TABLE `xxl_job_lock` (
  `lock_name` varchar(50) NOT NULL COMMENT '锁名称',
  PRIMARY KEY (`lock_name`)
) ENGINE=InnoDB DEFAULT CHARSET=utf8mb4;

INSERT INTO `xxl_job_group`(`id`, `app_name`, `title`, `address_type`, `address_list`, `update_time`) VALUES (1, 'xxl-job-executor-sample', '示例执行器', 0, NULL, '2018-11-03 22:21:31' );
INSERT INTO `xxl_job_info`(`id`, `job_group`, `job_desc`, `add_time`, `update_time`, `author`, `alarm_email`, `schedule_type`, `schedule_conf`, `misfire_strategy`, `executor_route_strategy`, `executor_handler`, `executor_param`, `executor_block_strategy`, `executor_timeout`, `executor_fail_retry_count`, `glue_type`, `glue_source`, `glue_remark`, `glue_updatetime`, `child_jobid`) VALUES (1, 1, '测试任务1', '2018-11-03 22:21:31', '2018-11-03 22:21:31', 'XXL', '', 'CRON', '0 0 0 * * ? *', 'DO_NOTHING', 'FIRST', 'demoJobHandler', '', 'SERIAL_EXECUTION', 0, 0, 'BEAN', '', 'GLUE代码初始化', '2018-11-03 22:21:31', '');
INSERT INTO `xxl_job_user`(`id`, `username`, `password`, `role`, `permission`) VALUES (1, 'admin', 'e10adc3949ba59abbe56e057f20f883e', 1, NULL);
INSERT INTO `xxl_job_lock` ( `lock_name`) VALUES ( 'schedule_lock');

commit;
2.2 创建容器并运行
创建一个配置文件:application.properties
### web
server.port=8080
server.servlet.context-path=/xxl-job-admin
### actuator
management.server.servlet.context-path=/actuator
management.health.mail.enabled=false
### resources
spring.mvc.servlet.load-on-startup=0
spring.mvc.static-path-pattern=/static/**
spring.resources.static-locations=classpath:/static/
### freemarker
spring.freemarker.templateLoaderPath=classpath:/templates/
spring.freemarker.suffix=.ftl
spring.freemarker.charset=UTF-8
spring.freemarker.request-context-attribute=request
spring.freemarker.settings.number_format=0.##########
### mybatis
mybatis.mapper-locations=classpath:/mybatis-mapper/*Mapper.xml
#mybatis.type-aliases-package=com.xxl.job.admin.core.model
### xxl-job, datasource
spring.datasource.url=jdbc:mysql://rm-bp169j3q9n43kxauzco.mysql.rds.aliyuncs.com:3306/xxl_job?useUnicode=true&characterEncoding=UTF-8&autoReconnect=true&serverTimezone=Asia/Shanghai
spring.datasource.username=root123
spring.datasource.password=Root_123
spring.datasource.driver-class-name=com.mysql.cj.jdbc.Driver
### datasource-pool
spring.datasource.type=com.zaxxer.hikari.HikariDataSource
spring.datasource.hikari.minimum-idle=10
spring.datasource.hikari.maximum-pool-size=30
spring.datasource.hikari.auto-commit=true
spring.datasource.hikari.idle-timeout=30000
spring.datasource.hikari.pool-name=HikariCP
spring.datasource.hikari.max-lifetime=900000
spring.datasource.hikari.connection-timeout=10000
spring.datasource.hikari.connection-test-query=SELECT 1
spring.datasource.hikari.validation-timeout=1000
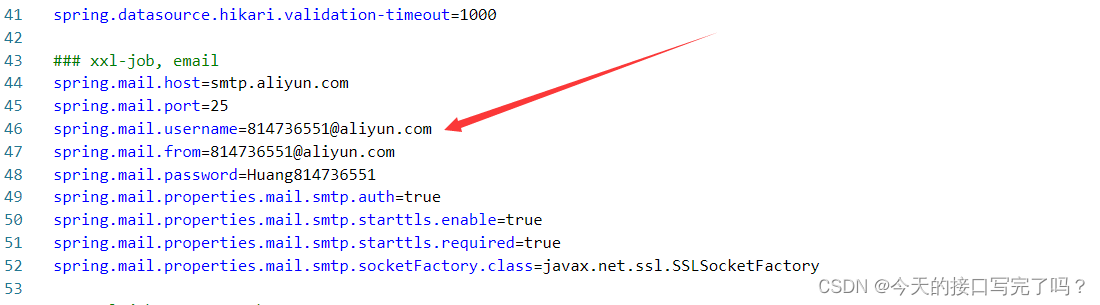
### xxl-job, email
spring.mail.host=smtp.qq.com
spring.mail.port=25
spring.mail.username=xxx@qq.com
spring.mail.from=xxx@qq.com
spring.mail.password=xxx
spring.mail.properties.mail.smtp.auth=true
spring.mail.properties.mail.smtp.starttls.enable=true
spring.mail.properties.mail.smtp.starttls.required=true
spring.mail.properties.mail.smtp.socketFactory.class=javax.net.ssl.SSLSocketFactory
### xxl-job, access token
xxl.job.accessToken=default_token
### xxl-job, i18n (default is zh_CN, and you can choose "zh_CN", "zh_TC" and "en")
xxl.job.i18n=zh_CN
## xxl-job, triggerpool max size
xxl.job.triggerpool.fast.max=200
xxl.job.triggerpool.slow.max=100
### xxl-job, log retention days
xxl.job.logretentiondays=30这里的配置文件需要修改的地方

挂载并运行
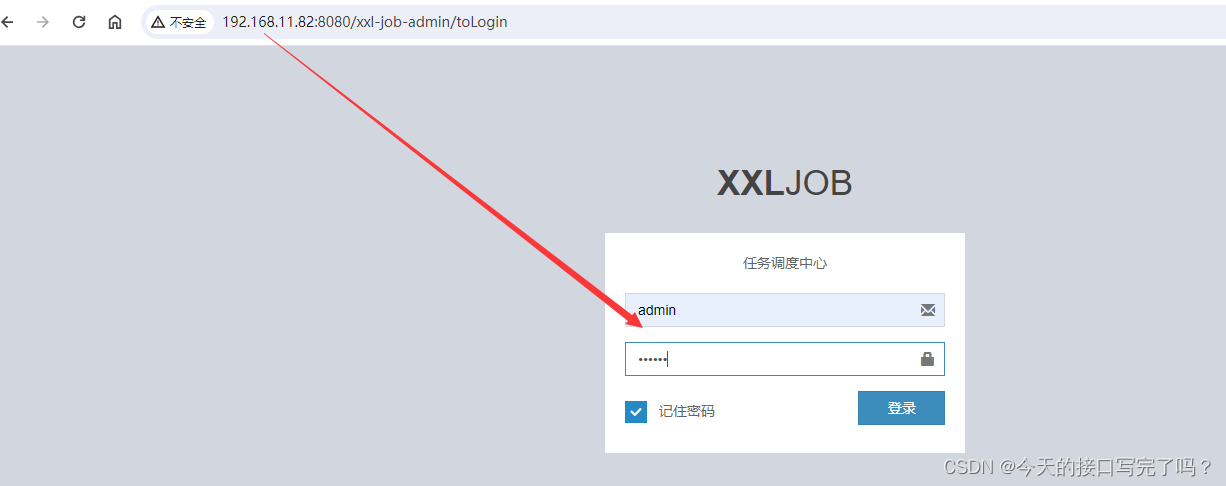
docker run -d -p 8080:8080 --privileged=true -v /opt/xxl-job/application.properties:/config/application.properties -v /opt/xxl-job/logs:/data/applogs --name xxl-job-admin xuxueli/xxl-job-admin:2.4.0成功后访问客户端 :默认账号admin 密码 123456
三、SpringBoot整合xxl-job
3.1 引入依赖
      <dependency>
            <groupId>com.xuxueli</groupId>
            <artifactId>xxl-job-core</artifactId>
            <version>2.4.0</version>
        </dependency>
3.2 配置文件
spring.application.name=springboot_Task
#  Task ????
# ????????????????????????????????????????????????
spring.task.schedule.threadNamePrefix=jingli-
# ???????????????
spring.task.sceduling.pool.size=1
# ??????????????????????????????
# ????
spring.task.execution.thread-name-prefix=worker-
# ???????????8
spring.task.execution.pool.core-size=2
spring.task.execution.pool.max-size=5

# log config
logging.config=classpath:logback.xml


### xxl-job admin address list, such as "http://address" or "http://address01,http://address02"
xxl.job.admin.addresses=http://192.168.11.60:8080/xxl-job-admin

### xxl-job, access token
xxl.job.accessToken=default_token

### xxl-job executor appname
xxl.job.executor.appname=hyc-job-20
### xxl-job executor registry-address: default use address to registry , otherwise use ip:port if address is null
xxl.job.executor.address=
### xxl-job executor server-info
xxl.job.executor.ip=
#xxl.job.executor.port=9999
### xxl-job executor log-path
xxl.job.executor.logpath=/data/applogs/xxl-job/jobhandler
### xxl-job executor log-retention-days
xxl.job.executor.logretentiondays=30
3.3 logback.xml
<?xml version="1.0" encoding="UTF-8"?>
<configuration debug="false" scan="true" scanPeriod="1 seconds">

    <contextName>logback</contextName>
    <property name="log.path" value="/data/applogs/xxl-job/xxl-job-executor-sample-springboot.log"/>

    <appender name="console" class="ch.qos.logback.core.ConsoleAppender">
        <encoder>
            <pattern>%d{HH:mm:ss.SSS} %contextName [%thread] %-5level %logger{36} - %msg%n</pattern>
        </encoder>
    </appender>

    <appender name="file" class="ch.qos.logback.core.rolling.RollingFileAppender">
        <file>${log.path}</file>
        <rollingPolicy class="ch.qos.logback.core.rolling.TimeBasedRollingPolicy">
            <fileNamePattern>${log.path}.%d{yyyy-MM-dd}.zip</fileNamePattern>
        </rollingPolicy>
        <encoder>
            <pattern>%date %level [%thread] %logger{36} [%file : %line] %msg%n
            </pattern>
        </encoder>
    </appender>

    <root level="info">
        <appender-ref ref="console"/>
        <appender-ref ref="file"/>
    </root>

</configuration>
3.4 启动类
package com.by;

import cn.hutool.log.Log;
import lombok.extern.slf4j.Slf4j;
import org.springframework.boot.SpringApplication;
import org.springframework.boot.autoconfigure.SpringBootApplication;
import org.springframework.scheduling.annotation.EnableAsync;
import org.springframework.scheduling.annotation.EnableScheduling;

@SpringBootApplication
// 启用定时任务支持
@EnableScheduling
// 开启异步的注解
@EnableAsync
@Slf4j
public class App {

    public static void main(String[] args) {
        SpringApplication.run(App.class, args);
        log.info("定时任务启动成功");
    }

}
3.5 XxlJobConfig 配置类(必写)
package com.by.xxljob;

import cn.hutool.core.net.NetUtil;
import com.xxl.job.core.executor.impl.XxlJobSpringExecutor;
import org.slf4j.Logger;
import org.slf4j.LoggerFactory;
import org.springframework.beans.factory.annotation.Value;
import org.springframework.context.annotation.Bean;
import org.springframework.context.annotation.Configuration;

/**
 * xxl-job config
 *
 * @author xuxueli 2017-04-28
 */
@Configuration
public class XxlJobConfig {
    private Logger logger = LoggerFactory.getLogger(XxlJobConfig.class);

    @Value("${xxl.job.admin.addresses}")
    private String adminAddresses;

    @Value("${xxl.job.accessToken}")
    private String accessToken;

    @Value("${xxl.job.executor.appname}")
    private String appname;

    @Value("${xxl.job.executor.address}")
    private String address;

    @Value("${xxl.job.executor.ip}")
    private String ip;


    @Value("${xxl.job.executor.logpath}")
    private String logPath;

    @Value("${xxl.job.executor.logretentiondays}")
    private int logRetentionDays;


    @Bean
    public XxlJobSpringExecutor xxlJobExecutor() {
        logger.info(">>>>>>>>>>> xxl-job config init.");
        XxlJobSpringExecutor xxlJobSpringExecutor = new XxlJobSpringExecutor();
        xxlJobSpringExecutor.setAdminAddresses(adminAddresses);
        xxlJobSpringExecutor.setAppname(appname);
        xxlJobSpringExecutor.setAddress(address);
        xxlJobSpringExecutor.setIp(ip);
        /**
         *  1. 通过hutool工具获取一个本机可用的端口
         *   作用:用于分布式避免端口写死(9999)
         */
        int port = NetUtil.getUsableLocalPort();
        xxlJobSpringExecutor.setPort(port);
        xxlJobSpringExecutor.setAccessToken(accessToken);
        xxlJobSpringExecutor.setLogPath(logPath);
        xxlJobSpringExecutor.setLogRetentionDays(logRetentionDays);

        return xxlJobSpringExecutor;
    }

    /**
     * 针对多网卡、容器内部署等情况,可借助 "spring-cloud-commons" 提供的 "InetUtils" 组件灵活定制注册IP;
     *
     *      1、引入依赖:
     *          <dependency>
     *             <groupId>org.springframework.cloud</groupId>
     *             <artifactId>spring-cloud-commons</artifactId>
     *             <version>${version}</version>
     *         </dependency>
     *
     *      2、配置文件,或者容器启动变量
     *          spring.cloud.inetutils.preferred-networks: 'xxx.xxx.xxx.'
     *
     *      3、获取IP
     *          String ip_ = inetUtils.findFirstNonLoopbackHostInfo().getIpAddress();
     */


}
3.6 小demo
package com.by.demo;

import lombok.extern.slf4j.Slf4j;
import org.springframework.scheduling.annotation.Async;
import org.springframework.scheduling.annotation.Scheduled;
import org.springframework.stereotype.Component;

@Component
@Slf4j
public class ScheduledTask {
    /**
     * 上次开始执行时间点之后5秒再执行
     * fixedDelay表示上次执行完毕时间点之后5秒再执行
     * initialDelay表示第一次执行延迟10秒
     */
   // @Scheduled(fixedDelay = 5 * 1000)
    void m1() throws InterruptedException {
        // 中间睡眠8秒
        Thread.sleep(8*1000);
        log.info("hello");
    }
//    @Scheduled(fixedRate = 5 * 1000)
//    @Async
    void m2() throws InterruptedException {
        // 中间睡眠2秒: 不影响还是没5秒执行一次
//        Thread.sleep(2*1000);
        // 中间睡8秒,影响,每8秒执行一次
        Thread.sleep(8*1000);
        log.info("hello");
    }

    /**
     * corn表达式
     * 每四秒执行一次
     * @throws InterruptedException
     */
    // @Scheduled(cron = "0/4 * * * * ?")
    void m3() throws InterruptedException {
        // 中间睡眠8秒
        Thread.sleep(8*1000);
        log.info("hello");
    }
}
3.7 钉钉报警
我们监听rabbitmq 里的所有虚拟主机里的所有队列里的消息数量,如果某个队列的消息数大于5条,启用钉钉报警功能。
package com.by.xxljob;
import cn.hutool.core.util.StrUtil;
import cn.hutool.http.HttpRequest;
import cn.hutool.http.Method;
import cn.hutool.json.JSONArray;
import cn.hutool.json.JSONObject;
import cn.hutool.json.JSONUtil;
import com.xxl.job.core.context.XxlJobHelper;
import com.xxl.job.core.handler.annotation.XxlJob;
import lombok.extern.slf4j.Slf4j;
import org.springframework.stereotype.Service;
import java.util.HashMap;
import java.util.HashSet;
import java.util.Set;
@Service
@Slf4j
public class OrderTask {
/**
* 4、跨平台Http任务
* 参数示例:
* "url: http://www.baidu.com\n" +
* "method: get\n" +
* "data: content\n";
*/
/**
* 超过阈值的消息数量只会触发一次钉钉报警
**/
Set<String> notifiedQueueNames = new HashSet<>();
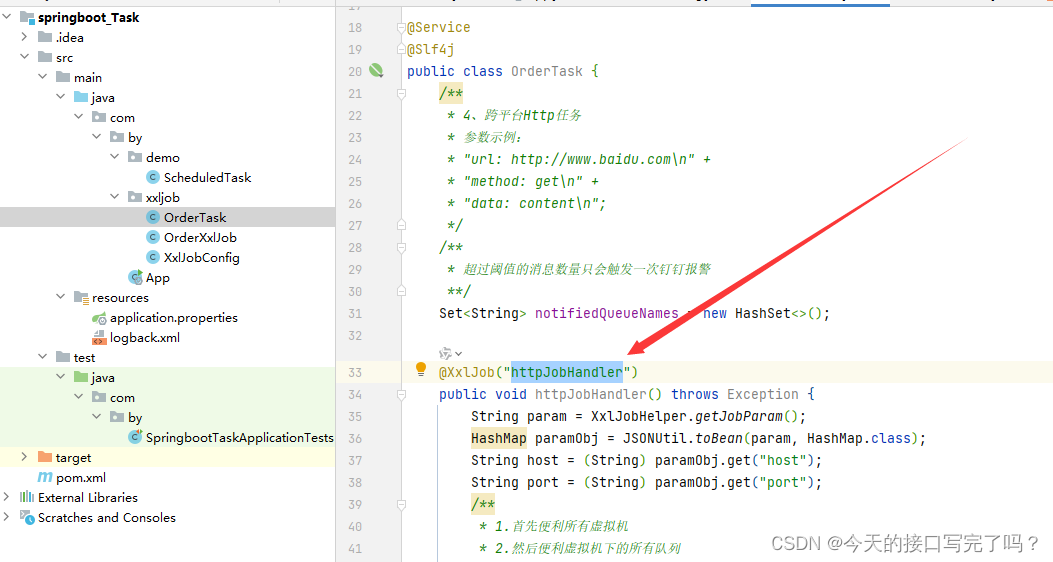
@XxlJob("httpJobHandler")
public void httpJobHandler() throws Exception {
String param = XxlJobHelper.getJobParam();
HashMap paramObj = JSONUtil.toBean(param, HashMap.class);
String host = (String) paramObj.get("host");
String port = (String) paramObj.get("port");
/**
* 1.首先便利所有虚拟机
* 2.然后便利虚拟机下的所有队列
* 3.最后查看哪个消息数>5
**/
// 构造请求URL
// 构造请求URL以获取虚拟主机列表
// 构造请求URL以获取虚拟主机列表
String vhostsUrl = StrUtil.format("http://{}:{}/api/vhosts", host, port);
// 发送GET请求并设置认证信息
String vhostsBody = HttpRequest.of(vhostsUrl)
.method(Method.GET)
.header("Authorization", "Basic Z3Vlc3Q6Z3Vlc3Q=") // 替换成有效的认证信息
.execute()
.body();
// 解析JSON响应得到虚拟主机列表
JSONArray vhostsArray = JSONUtil.parseArray(vhostsBody);
// 遍历虚拟主机
for (Object vhostObj : vhostsArray) {
JSONObject virtualHost = (JSONObject) vhostObj;
String virtualHostName = virtualHost.getStr("name");
// 构造请求URL以获取虚拟主机下的队列列表
String queuesUrl = StrUtil.format("http://{}:{}/api/queues/{}", host, port, virtualHostName);
String queuesBody = HttpRequest.of(queuesUrl)
.method(Method.GET)
.header("Authorization", "Basic Z3Vlc3Q6Z3Vlc3Q=") // 替换成有效的认证信息
.execute()
.body();
// 解析JSON响应得到队列列表
JSONArray queuesArray = JSONUtil.parseArray(queuesBody);
// 遍历队列并打印名称及消息数量
System.out.println("虚拟主机: " + virtualHostName);
for (Object queueObj : queuesArray) {
JSONObject queue = (JSONObject) queueObj;
String queueName = queue.getStr("name");
long messageCount = queue.getLong("messages");
System.out.println("\t队列名称: " + queueName + ", 消息数量: " + messageCount);
if (messageCount >= 5 && !notifiedQueueNames.contains(queueName)) {
/** webtooken值*/
String url1 = "https://oapi.dingtalk.com/robot/send?access_token=cd2172799d13fd73eb8ed983af6bac2fc66940cf5fdb7384ab6d186ff56cfb3e";
// JSONObject代表一个JSON中的键值对象,这个对象以大括号包围,每个键值对使用,隔开,键与值使用
JSONObject msg = new JSONObject();
msg.set("at", new JSONObject().set("isAtAll", true));
msg.set("msgtype", "text");
msg.set("text", new JSONObject().set("content", "rabbitmq消息太多需要您审核" + "需要您审核"));
/** 将json转为字符串*/
String json = JSONUtil.toJsonStr(msg);
String result = HttpRequest.post(url1)
.body(json)
.execute().body();
JSONObject object = JSONUtil.parseObj(result);
log.debug("报警-> 队列{},消息数量:{}", queueName, messageCount);
notifiedQueueNames.add(queueName);
}
}
{
log.debug("正常");
}
}
}
}
四. 开启任务
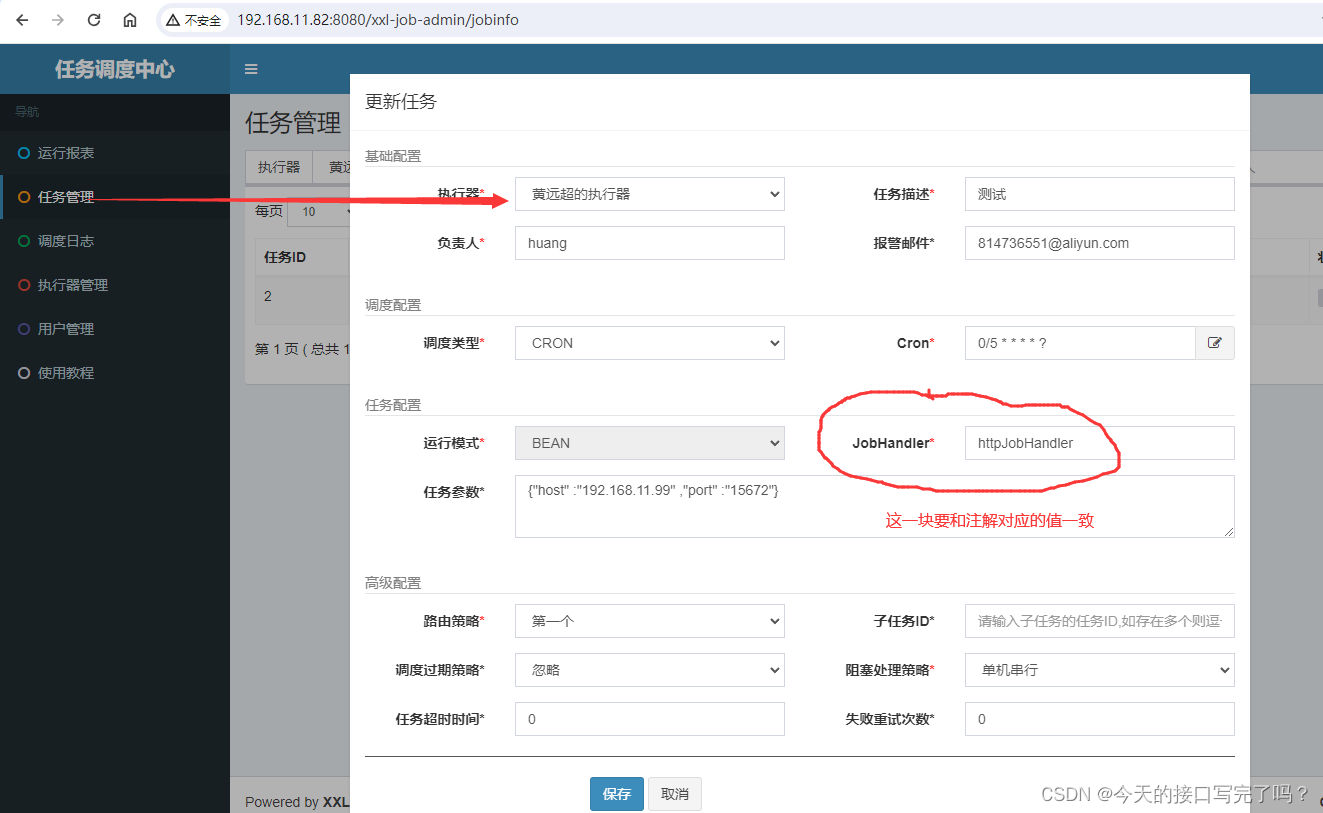
4.1 需要手动新增执行器,就可以看到执行器上线了.
执行器名随意

4.2 新建任务
4.3 查看执行日志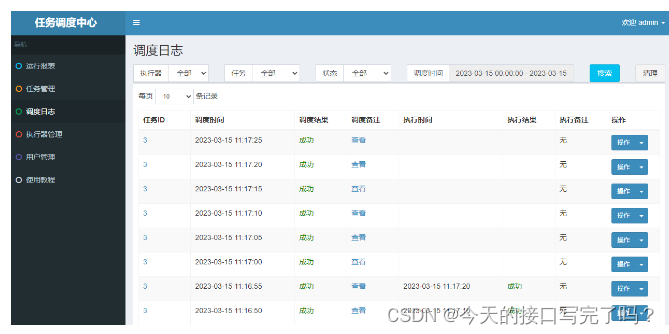
五、源码参考
源代码我已经放到了云效
https://codeup.aliyun.com/62858d45487c500c27f5aab5/huang-SpingBoot-xxl-job.git


 5247
5247

 被折叠的 条评论
为什么被折叠?
被折叠的 条评论
为什么被折叠?
 到【灌水乐园】发言


