


目录
一、首先注册阿里云OSS(新用户免费使用3个月)
二、步骤
2.1 将pdf模板上传到oos

2.2 这里有pdf地址,将读写权限设置为共工读
 三、代码
三、代码
3.1 pom.xml
   <!--导入支持pdf的依赖 -->
        <dependency>
            <groupId>com.itextpdf</groupId>
            <artifactId>itext7-core</artifactId>
            <version>7.2.5</version>
            <type>pom</type>
        </dependency>
 <!--引入阿里云oss依赖 -->
        <dependency>
            <groupId>com.aliyun.oss</groupId>
            <artifactId>aliyun-sdk-oss</artifactId>
            <version>3.10.2</version>
        </dependency>
3.2 配置文件
# 配置阿里云OSS(application.properties)
aliyun.oss.bucketName = hyc-8147
aliyun.oss.endpoint = oss-cn-beijing.aliyuncs.com
aliyun.oss.accessKeyId = LTAI5tE2krid8AXzidDUpn9n
aliyun.oss.accessKeySecret = 2A0Vrvj982nfRPWDVt3lp

# yml版(application.yml)
#aliyun:
#  oss:
#    bucketName: hyc-8147
#    endpoint: oss-cn-beijing.aliyuncs.com
#    accessKeyId: LTAI5tE2krid8AXzidDUpn9n
#    accessKeySecret: 2A0Vrvj982nfRPWDVt3lp
3.3 oss model
package com.by.model;

import lombok.Data;
import org.springframework.boot.context.properties.ConfigurationProperties;
import org.springframework.context.annotation.Configuration;

@Configuration
@ConfigurationProperties(prefix = "aliyun.oss")
@Data
public class AliOssProperties {

    private String endpoint;
    private String accessKeyId;
    private String accessKeySecret;
    private String bucketName;


}
3.4 配置类(不需要修改)
package com.by.util;

import com.aliyun.oss.ClientException;
import com.aliyun.oss.OSS;
import com.aliyun.oss.OSSClientBuilder;
import com.aliyun.oss.OSSException;
import lombok.AllArgsConstructor;
import lombok.Data;
import lombok.extern.slf4j.Slf4j;
import java.io.ByteArrayInputStream;

@Data
@AllArgsConstructor
//固定代码,CV直接使用
public class AliOssUtil {

    private String endpoint;
    private String accessKeyId;
    private String accessKeySecret;
    private String bucketName;

    /**
     * 文件上传
     *
     * @param bytes :传入的文件要转为byte[]
     * @param objectName :表示在oss中存储的文件名字。
     * @return
     */
    public String upload(byte[] bytes, String objectName) {

        // 创建OSSClient实例。
        OSS ossClient = new OSSClientBuilder().build(endpoint, accessKeyId, accessKeySecret);

        try {
            // 创建PutObject请求。
            ossClient.putObject(bucketName, objectName, new ByteArrayInputStream(bytes));
        } catch (OSSException oe) {
            System.out.println("Caught an OSSException, which means your request made it to OSS, "
                    + "but was rejected with an error response for some reason.");
            System.out.println("Error Message:" + oe.getErrorMessage());
            System.out.println("Error Code:" + oe.getErrorCode());
            System.out.println("Request ID:" + oe.getRequestId());
            System.out.println("Host ID:" + oe.getHostId());
        } catch (ClientException ce) {
            System.out.println("Caught an ClientException, which means the client encountered "
                    + "a serious internal problem while trying to communicate with OSS, "
                    + "such as not being able to access the network.");
            System.out.println("Error Message:" + ce.getMessage());
        } finally {
            if (ossClient != null) {
                ossClient.shutdown();
            }
        }

        //文件访问路径规则 https://BucketName.Endpoint/ObjectName
        StringBuilder stringBuilder = new StringBuilder("https://");
        stringBuilder
                .append(bucketName)
                .append(".")
                .append(endpoint)
                .append("/")
                .append(objectName);

        return stringBuilder.toString();
    }
}
3.5 将配置类放入ioc容器
package com.by.config;


import com.by.model.AliOssProperties;
import com.by.util.AliOssUtil;
import org.springframework.boot.autoconfigure.condition.ConditionalOnMissingBean;
import org.springframework.context.annotation.Bean;
import org.springframework.context.annotation.Configuration;
@Configuration
public class OssConfiguration {
    @Bean
    @ConditionalOnMissingBean
    public AliOssUtil getAliOssUtil(AliOssProperties aliOssProperties) {
//        log.info("创建OssUtil");
        AliOssUtil aliOssUtil = new AliOssUtil(
                aliOssProperties.getEndpoint(),
                aliOssProperties.getAccessKeyId(),
                aliOssProperties.getAccessKeySecret(),
                aliOssProperties.getBucketName()
        );
        return aliOssUtil;
    }
}
3.6 controller
package com.by.controller;
import com.by.util.AliOssUtil;
import com.itextpdf.forms.PdfAcroForm;
import com.itextpdf.forms.fields.PdfFormField;
import com.itextpdf.kernel.font.PdfFont;
import com.itextpdf.kernel.font.PdfFontFactory;
import com.itextpdf.kernel.geom.PageSize;
import com.itextpdf.kernel.pdf.PdfDocument;
import com.itextpdf.kernel.pdf.PdfReader;
import com.itextpdf.kernel.pdf.PdfWriter;
import org.slf4j.Logger;
import org.slf4j.LoggerFactory;
import org.springframework.beans.factory.annotation.Autowired;
import org.springframework.http.HttpHeaders;
import org.springframework.http.HttpStatus;
import org.springframework.http.MediaType;
import org.springframework.http.ResponseEntity;
import org.springframework.web.bind.annotation.GetMapping;
import org.springframework.web.bind.annotation.RestController;
import javax.servlet.http.HttpServletResponse;
import java.io.*;
import java.net.URL;
import java.nio.file.Files;
import java.nio.file.Path;
import java.nio.file.StandardCopyOption;
import java.util.HashMap;
import java.util.Map;
import java.util.Optional;
@RestController
public class PdfController {
// 初始化日志记录器,用于记录PDF控制器类的操作日志
private static final Logger logger = LoggerFactory.getLogger(PdfController.class);
@Autowired
private AliOssUtil aliOssUtil;
/**
* 生成填充数据的PDF文件并提供下载。
*
* @param response 用于设置HTTP响应信息的ServletResponse对象。
* @return 返回包含填充后PDF文件内容的响应实体。
* @throws IOException 如果处理PDF文件或下载模板文件时发生IO错误。
*/
@GetMapping("/download")
public ResponseEntity<byte[]> generateFilledPdf(HttpServletResponse response) throws IOException {
// 准备需要填充到PDF的数据
Map<String, String> dataMap = new HashMap<>();
dataMap.put("name", "黄哥");
dataMap.put("tel", "175");
// 从URL下载PDF模板并临时保存到本地
String templateUrl = "https://hyc-8147.oss-cn-beijing.aliyuncs.com/3.pdf";
Path tempTemplateFile = Files.createTempFile("temp_template_", ".pdf");
try (InputStream inputStream = new URL(templateUrl).openStream()) {
Files.copy(inputStream, tempTemplateFile, StandardCopyOption.REPLACE_EXISTING);
} catch (IOException e) {
logger.error("Failed to download and save the PDF template from {}", templateUrl, e);
// 下载模板失败时,返回500错误并提供错误信息
return ResponseEntity.status(HttpStatus.INTERNAL_SERVER_ERROR)
.body("Error downloading PDF template. Please try again later.".getBytes());
}
try {
// 使用填充的数据生成新的PDF文件
byte[] pdfBytes = fillPdfData(tempTemplateFile, dataMap);
// 将生成的PDF文件上传到OSS,并设置下载文件名
String downloadFileName = System.currentTimeMillis() + "_filled.pdf";
aliOssUtil.upload(pdfBytes, downloadFileName);
// 设置响应头,提供PDF文件的下载
HttpHeaders headers = new HttpHeaders();
headers.setContentType(MediaType.APPLICATION_PDF);
headers.setContentDispositionFormData("attachment", downloadFileName);
return ResponseEntity.ok().headers(headers).body(pdfBytes);
} finally {
// 清理临时文件
Files.deleteIfExists(tempTemplateFile);
}
}
/**
* 根据提供的数据映射,填充PDF表单并返回填充后的PDF数据。
*
* @param sourcePdf 表单源PDF文件的路径。
* @param dataMap 需要填充到PDF表单的数据映射,键为表单字段名称,值为填充的文本。
* @return 填充后的PDF数据的字节数组。
* @throws IOException 如果读取或处理PDF文件时发生错误。
*/
private byte[] fillPdfData(Path sourcePdf, Map<String, String> dataMap) throws IOException {
// 使用try-with-resources语句确保资源正确关闭
try (InputStream fileInputStream = Files.newInputStream(sourcePdf);
PdfReader pdfReader = new PdfReader(fileInputStream);
ByteArrayOutputStream outputStream = new ByteArrayOutputStream()) {
// 初始化PDF文档并设置页面大小
PdfDocument pdf = new PdfDocument(pdfReader, new PdfWriter(outputStream));
pdf.setDefaultPageSize(PageSize.A4);
// 获取PDF表单并填充数据
PdfAcroForm form = PdfAcroForm.getAcroForm(pdf, true);
Map<String, PdfFormField> fields = form.getFormFields();
// 设置表单字段使用的字体
PdfFont currentFont = PdfFontFactory.createFont("STSong-Light", "UniGB-UCS2-H", PdfFontFactory.EmbeddingStrategy.PREFER_NOT_EMBEDDED);
// 填充表单字段
dataMap.forEach((key, value) -> {
Optional.ofNullable(fields.get(key))
.ifPresent(formField -> formField.setFont(currentFont).setValue(value));
});
// 将表单字段合并到PDF文档中,防止编辑
form.flattenFields();
// 关闭PDF文档并返回填充后的PDF数据
pdf.close();
return outputStream.toByteArray();
} catch (Exception e) {
logger.error("Error filling PDF data: {}", e.getMessage());
// 抛出IOException,封装原始异常
throw new IOException("Failed to fill PDF data due to an internal error.", e);
}
}
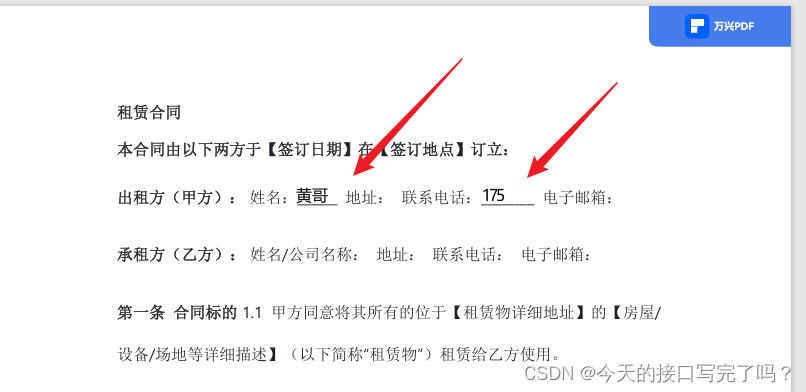
}四、结果


 五、源代码参考
源代码我已经放入了云效
https://codeup.aliyun.com/62858d45487c500c27f5aab5/huang-spring-boot-pdf.git


 2495
2495


 被折叠的 条评论
为什么被折叠?
被折叠的 条评论
为什么被折叠?
 到【灌水乐园】发言


