


目录
什么是 Spring MVC
Spring Web MVC 是基于 Servlet API 构建的原始 Web 框架,从⼀开始就包含在 Spring 框架中。它的正式名称“Spring Web MVC”来⾃其源模块的名称(Spring-webmvc),但它通常被称为“Spring
MVC”。
从上述定义我们可以得出两个关键信息:
1.
Spring MVC 是⼀个 Web 框架。
2.
Spring MVC 是基于 Servlet API 构建的。
然⽽要真正的理解什么是 Spring MVC?我们⾸先要搞清楚什么是 MVC?
MVC 定义
MVC 是
Model View Controller 的缩写,它是软件⼯程中的⼀种软件架构模式,它把软件系统分
为模型、视图和控制器三个基本部分。
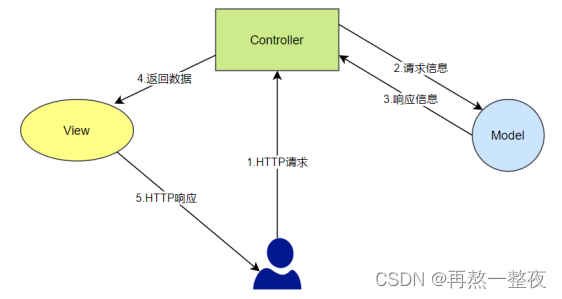
- Model(模型)是应⽤程序中⽤于处理应⽤程序数据逻辑的部分。通常模型对象负责在数据 库中存取数据。
- View(视图)是应⽤程序中处理数据显示的部分。通常视图是依据模型数据创建的。
- Controller(控制器)是应⽤程序中处理⽤户交互的部分。通常控制器负责从视图读取数据,控制⽤户输⼊,并向模型发送数据。
MVC 和 Spring MVC 的关系
MVC 是⼀种思想,⽽ Spring MVC 是对 MVC 思想的具体实现。
总结来说,Spring MVC 是⼀个实现了 MVC 模式,并继承了 Servlet API 的 Web 框架。既然是 Web框架,那么当⽤户在浏览器中输⼊了 url 之后,我们的 Spring MVC 项⽬就可以感知到⽤户的请求
现在绝⼤部分的 Java 项⽬都是基于 Spring(或 Spring Boot)的,⽽ Spring 的核⼼就是 Spring
MVC。也就是说 Spring MVC 是 Spring 框架的核⼼模块,⽽ Spring Boot 是 Spring 的脚⼿架,因此我们可以推断出,现在市⾯上绝⼤部分的 Java 项⽬约等于 Spring MVC 项⽬。
Spring MVC 创建和连接
Spring MVC 项⽬创建和 Spring Boot 创建项⽬相同(Spring MVC 使⽤ Spring Boot 的⽅式创建),在创建的时候选择 Spring Web 就相当于创建了 Spring MVC 的项⽬。
在 Spring MVC 中使⽤ @RequestMapping 来实现 URL 路由映射,也就是浏览器连接程序的⽤。接下来要实现的功能是访问地址:
http://localhost:8080/user/hi
,能打印“hello,spring mvc”信息。
接下来,创建⼀个 UserController 类,实现⽤户到 Spring 程序的互联互通,具体实现代码如下:
import org.springframework.stereotype.Controller;
import org.springframework.web.bind.annotation.RequestMapping;
import org.springframework.web.bind.annotation.ResponseBody;
@Controller // 让 spring 框架启动时,加载
@ResponseBody // 返回⾮⻚⾯数据
@RequestMapping("/user") // 路由器规则注册
public class UserController {
    // 路由器规则注册
    @RequestMapping("/hi")
    public String sayHi(){
        return "<h1>Hi,Spring MVC.</h1>";
    }
}
这样实现之后,当访问地址:
http://localhost:8080/user/hi
时就能打印“hello,spring mvc”的信息
了。
@RequestMapping 注解介绍
@RequestMapping 是 Spring Web 应⽤程序中最常被⽤到的注解之⼀,它是⽤来注册接⼝的路
由映射的。
路由映射:所谓的路由映射指的是,当⽤户访问⼀个 url 时,将⽤户的请求对应到程序中某个类的某个⽅法的过程就叫路由映射。
@RequestMapping 基础使⽤:
import com.example.demo.model.Person;
import org.springframework.stereotype.Controller;
import org.springframework.web.bind.annotation.RequestMapping;
@Controller
@RequestMapping("/p")
public class PersonController {
    @RequestMapping("/index")
    public Object index(Person person){
        // 获取参数
        System.out.println(person.getName() +":"+
                person.getPassword());
        // 执⾏业务...
        return "/index.html";
    }
}
@RequestMapping 即可修饰类,也可以修饰⽅法,当修饰类和⽅法时,访问的地址是类 + ⽅
法。
@RequestMapping 也可以直接修饰⽅法,代码实现如下:
import org.springframework.stereotype.Controller;
import org.springframework.web.bind.annotation.RequestMapping;
import org.springframework.web.bind.annotation.ResponseBody;
@Controller
@ResponseBody // 定义返回的数据格式为⾮视图(text/html)
public class UserController {
    @RequestMapping("/hi")
    public String sayHi(){
        return "<h1>Hi,Spring MVC.</h1>";
    }
}
指定 GET/POST ⽅法类型
我们可以显示的指定 @RequestMapping 来接收 POST 的情况,如下所示:
import org.springframework.stereotype.Controller;
import org.springframework.web.bind.annotation.RequestMapping;
import org.springframework.web.bind.annotation.RequestMethod;
import org.springframework.web.bind.annotation.ResponseBody;
@Controller
@ResponseBody // 定义返回的数据格式为⾮⻚⾯
public class UserController {
    @RequestMapping(value = "/hi",method= RequestMethod.POST)
    public String sayHi(){
        return "<h1>Hi,Spring MVC.</h1>";
    }
}
@GetMapping 和@ PostMapping
get 请求的 3 种写法:
// 写法1
@RequestMapping("/index")
// 写法2
@RequestMapping(value = "/index",method = RequestMethod.GET)
// 写法3
@GetMapping("/index")
post 请求的 2 种写法:
// 写法1
@RequestMapping(value = "/index",method = RequestMethod.POST)
// 写法2
@PostMapping("/index")
获取参数
传递单个参数
在 Spring MVC 中可以直接⽤⽅法中的参数来实现传参,⽐如以下代码:
    @RequestMapping("/m1")
    public Object method_1(String name){
        System.out.println("参数 name:"+name);
        return "/index.html";
    }
传递对象
并且 Spring MVC 可以⾃动实现参数对象的赋值,⽐如 Person 对象:
import lombok.Data;
@Data
public class Person {
    private int id;
    private String name;
    private String password;
}
传递对象代码实现:
    @RequestMapping("/m2")
    public Object method_2(Person p){
        System.out.println("对象中的 name:"+p.getName());
        System.out.println("对象中的 password:"+p.getPassword());
        return "/index.html";
    }
表单参数传递/传递多个参数(⾮对象)
    @RequestMapping("/m3")
    public Object method_3(String name, String pwd) {
        System.out.println("name 参数:" + name);
        System.out.println("pwd 参数:" + pwd);
        return "/index.html";
    }
后端参数重命名(后端参数映射)
    @RequestMapping("/m4")
    public Object method_4(@RequestParam("time") String createtime) {
        System.out.println("时间:" + createtime);
        return "/index.html";
    }
⾮必传参数设置
    @RequestMapping("/m4")
    public Object method_4(@RequestParam(value = "time", required = false) Stri
                                   ng createtime) {
        System.out.println("时间:" + createtime);
        return "/index.html";
    }
@RequestBody 接收JSON对象
后端接收代码:
    @RequestMapping(value = "/m5", method = RequestMethod.POST)
    public Object method_5(@RequestBody Person person) {
        System.out.println("Person:" + person);
        return "redirect:/index.html";
    }
获取URL中参数@PathVariable
    @PostMapping("/m6/{name}/{password}")
    public Object method_6(@PathVariable String name, @PathVariable String password) {
        System.out.println("name:" + name);
        System.out.println("password:" + password);
        return "redirect:/index.html";
    }
上传⽂件@RequestPart
    @RequestMapping("/param9")
    public String param9(String name, @RequestPart("myfile") MultipartFile file) throws IOException {
        // 获取⽂件后缀名
        String fileName = file.getOriginalFilename().substring(file.getOriginalFilename().lastIndexOf("."));
        // ⽂件保存地址
        String filePath = ClassUtils.getDefaultClassLoader().getResource("stat ic").getPath() +
                "/" + UUID.randomUUID() + fileName;
        // 保存⽂件
        file.transferTo(new File(filePath));
        return filePath + " 上传成功.";
    }
获取Cookie/Session/header
简洁的获取 Cookie—@CookieValue
@RequestMapping("/cookie")
@ResponseBody
public String cookie(@CookieValue("bite") String bite) {
 return "cookie:" + bite;
}
简洁获取 Header—@RequestHeader
@RequestMapping("/header")
@ResponseBody
public String header(@RequestHeader("User-Agent") String userAgent) {
 return "userAgent:"+userAgent;
}
Session获取
@RequestMapping("/sess2")
@ResponseBody
public String sess2(@SessionAttribute(value = "username",required = false)
String username) {
 return "username:"+username;
}
返回数据
返回静态⻚⾯
先在static文件夹下创建前端⻚⾯ index.html
创建控制器 controller:
import com.example.demo.model.Person;
import org.springframework.stereotype.Controller;
import org.springframework.web.bind.annotation.RequestMapping;
@Controller
@RequestMapping("/p")
public class PersonController {
 @RequestMapping("/index")
 public Object index(){
 // 执⾏业务...
 // 返回view -> index.html
 return "/index.html";
 }
}
返回 text/html
@RequestMapping("/m7")
@ResponseBody
public String method_7() {
 return "<h1>Hello,HTML~</h1>";
}
返回 JSON 对象
@RequestMapping("/m8")
@ResponseBody
public HashMap<String, String> method_8() {
 HashMap<String, String> map = new HashMap<>();
 map.put("Java", "Java Value");
 map.put("MySQL", "MySQL Value");
 map.put("Redis", "Redis Value");
 return map;
}
请求转发或请求重定向
forward 是请求转发;
redirect:请求重定向。
// 请求重定向
@RequestMapping("/index")
public String index(){
 return "redirect:/index.html";
}
// 请求转发
@RequestMapping("/index2")
public String index2(){
 return "forward:/index.html";
}
forward 和 redirect 具体区别如下:
1.
请求重定向(redirect)将请求重新定位到资源;请求转发(forward)服务器端转发。
2.
请求重定向地址发⽣变化,请求转发地址不发⽣变化。
3.
请求重定向与直接访问新地址效果⼀直,不存在原来的外部资源不能访问;请求转发服务器端转发有可能造成原外部资源不能访问。


 8万+
8万+


 被折叠的 条评论
为什么被折叠?
被折叠的 条评论
为什么被折叠?
 到【灌水乐园】发言


