


文章目录
微信小程序基础语法
官方文档:https://developers.weixin.qq.com/miniprogram/dev/framework/
事件 bindtap data-xxx
-
bindtap<button class="bt" data-myName="ghp" bindtap="clickButton">按钮</button>- data-xxx事件节点(xxx是节点名称),ghp是事件节点数据
- bindtap用于绑定事件,clickButton是事件名
 clickButton:function(event){
    // 获取事件节点数据
    console.log(event)
    console.log(event.currentTarget.dataset.myname)
 }
注意:事件节点名称统一是小写,即使使用大写,经过解析也会变成小写,比如上面我们定义的时间节点是myName,经过解析后变成了myname,可以通过
console.log(eventt)打印事件查看
数据绑定
在data中定义数据,然后就能够实现绑定(简直和Vue一摸一样)
示例
每次点击触发事件,count都自增1,count实现双向数据绑定
index.wxml
<view class="container">
   <buttonbindtap="clickButton">按钮</button>
   {{count}}
</view>
index.js
  data: {
      // 这里就是用来定义绑定数据
    count:1
  },
  clickButton:function(event){
    console.log("事件触发了")
    // 数据自增
    this.setData({
      count: this.data.count+1
    })
  }
页面跳转 (redirectTo、tabBar)
-
redirectToindex.wxml
<button bindtap="clickButton">按钮</button>index.js
clickButton:function(event){ console.log("事件触发了") // 页面重定向 wx.redirectTo({ url: '/pages/index/index', }) }注意:要保障app.json的pages中有定义
pages/index/index
-
tabBar也可以使用
tabBar实现,只是说redirectTo需要通过事件触发
引用wxss
在wxcss文件中通过@import"./xxx"引入

引用JS
-
编写模块 common.js
-
暴露模块
module.exports.sayHello=sayHello -
引入模块
const com = require('../demo03-moudle/common') -
调用模块
   clickBt2(){
     com.sayHello("ghp")
   }
具体如下图所示:


wx:for、wx:if
-
wx:for<!--index.wxml--> <view class="container"> <view wx:for="{{array}}" wx:for-index="index" wx:for-item="key" > 当前索引{{index}} ---当前索引对应的元素{{key}} </view> </view>// pages/demo04-data-bind/index.js const app = getApp() Page({ /** * 页面的初始数据 */ data: { array:[1,2,3,4,5,6,7,8,9] } })
-
wx:if<!--index.wxml--> <view class="container"> <view wx:for="{{array}}" wx:for-index="index" wx:for-item="value" wx:key="value"> <view wx:if="{{index%2==0}}"> <!-- 只展示索引为偶数的元素 --> 当前索引{{index}} ---当前索引对应的元素{{value}} </view> </view>
注意:如不提供
wx:key,会报一个warning, 如果明确知道该列表是静态,或者不必关注其顺序,可以选择忽略
知识拓展:
wx:ifvshidden因为
wx:if之中的模板也可能包含数据绑定,所以当wx:if的条件值切换时,框架有一个局部渲染的过程,因为它会确保条件块在切换时销毁或重新渲染。同时
wx:if也是惰性的,如果在初始渲染条件为false,框架什么也不做,在条件第一次变成真的时候才开始局部渲染。相比之下,
hidden就简单的多,组件始终会被渲染,只是简单的控制显示与隐藏。一般来说,
wx:if有更高的切换消耗而hidden有更高的初始渲染消耗。因此,如果需要频繁切换的情景下,用hidden更好,如果在运行时条件不大可能改变则wx:if较好。
wx:key、switch
实现点击一个按钮,让switch自增
注意:不加wx:key

index.js:
// pages/demo05-wxkey/index.js
Page({

  /**
   * 页面的初始数据
   */
  data: {
    arr:[
      {
        id:0,
        content:'a'
      },
      {
        id:1,
        content:'b'
      },
      {
        id:2,
        content:'c'
      }
    ]
  },
  addSwitch(){
    const id = this.data.arr.length + 1
    console.log(id)
    const ascii = this.data.arr[id-2].content.charCodeAt()
    console.log(ascii)
    const content = String.fromCharCode(ascii+1)
    console.log(content)
    const obj = {
      id: id,
      content: content
    }
    this.data.arr = [obj].concat(this.data.arr)
    /*
    push方法会把数组原原本本的输出
    concat方法会把数组解析之后再输出
    */
    // this.data.arr.push(obj)
    this.setData({
      arr: this.data.arr
    })
  }
})
index.wxml:
<!--pages/demo05-wxkey/index.wxml-->
<view>
<switch wx:for="{{arr}}" wx:for-index="index" wx:for-item="obj" wx:key="index">
索引--{{index}} 值--{{obj.content}}
</switch>

<button bindtap="addSwitch"> Add Switch </button>
</view>
引用template
使用template引用其它模块的模板

其他模块的模板:
<template name="data">
    <view>年龄:{{name}}</view>
    <view>年龄:{{age}}</view>
</template>
当前模块:
js:
    arr:[
      {
        name:'张三',
        age:16
      },
      {
        name:'李四',
        age:17
      }
    ]
wxml:
<import src="../demo05-wxkey/index"></import>

<view  wx:for="{{arr}}" wx:for-index="index" wx:for-item="obj" wx:key="index">
    <template is="data" data="{{name:obj.name, age:obj.age}}"/>
</view>
引用wxs

data.wxs:
// 定义一个变量
var stu = {
  name:'张三',
  age:18
}

// 暴露当前模块中的变量
module.exports={
  obj:stu
}
mod.wxs:
// 导入其它模块
var data = require('./data.wxs')

// 定义一个函数
var sayHello = function(arg) {
  console.log("Hello",arg)
  return arg;
}
// 暴露当前模块中的变量和函数
module.exports = {
  param: data.obj,
  fun: sayHello
};
index.wxml:
<wxs src="./mod.wxs" module="mod" />
<view>
<!-- 调用模块中的函数和变量 -->
   {{mod.fun(mod.param.name)}}
 </view>
111
 <view>
 <!-- 调用模块中的变量 -->
   {{mod.param.age}}
 </view>

引用index.wxml
include 可以将目标文件除了 <template/> <wxs/> 外的整个代码引入
<include src="./header"></include>

<include src="../demo07-wxs/index"></include>

<include src="./footer"></include>
可以看到本模块中的footer.wxml和header.wxml都引入成功,而demo02-wxs中的页面<wxs>没有引入成功


flex布局
-
flex-direction:设置成员的排列方向,它有以下几个取值- row 代表成员横向排列
- column 代表成员纵向排列
- row-reverse 代表横向排列,但成员反转显示
- column 代表成员纵向排列,但成员反转显示
-
flex-wrap: 设置成员的换行规则,它有以下几个取值- nowrap 代表不换行(随你容器成员的width设置多大或者多小,都不会换行)
- wrap 代表换行(容器里的成员宽度超过屏幕宽度会换行)
- wrap-reverse 代表反向进行换行
-
justify-content:设置成员的对齐方式,它有以下几个取值- flex-start 代表左对齐
- flex-end 代表右对齐
- center 居中对齐
- space-between 等比例均分(含留白部分,就是与屏幕边框有白色距离)
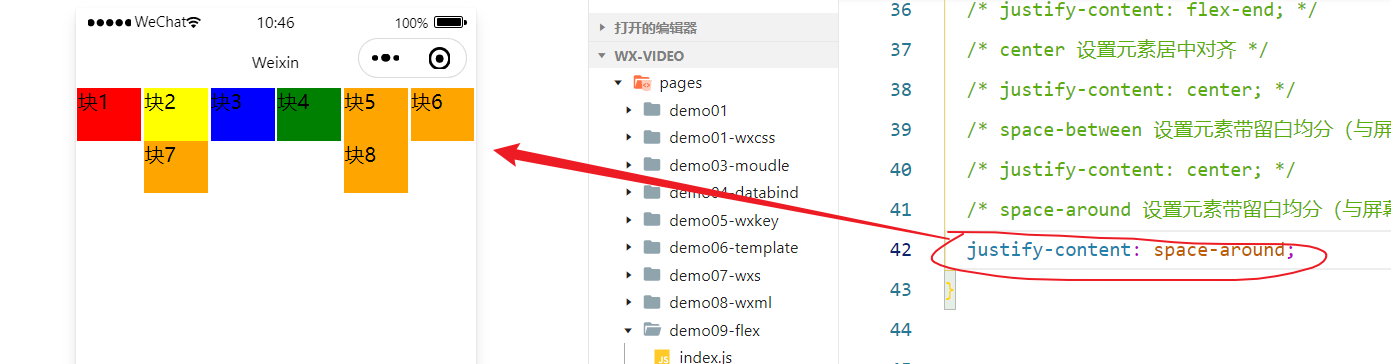
- space-around 等比例均分(不含留白部分,就是与屏幕边框无白色距离)
flex-direction
index.wxml:
<!--pages/demo09-flex/index.wxml-->
<view class="flext-direction">
<!-- 为了区分每个块,所以给他们都设置点宽,高,定义class属性为size -->
<!-- 为了从肉眼看上去有区别,都给设置个背景颜色 -->
    <view class="size a">块1</view>
    <view class="size b">块2</view>
    <view class="size c">块3</view>
    <view class="size d">块4</view>
    <view class="size e">块5</view>
    <view class="size e">块6</view>
    <view class="size e">块7</view>
    <view class="size e">块8</view>
</view>
index.wxss:
/* 演示flext-direction属性*/
.flext-direction{
  /* 把class属性为flextest的元素开启flex布局 */
  display: flex;
  /* row 从左到右进行排列(默认) */
  /* flex-direction: row; */
  /* row-reverse 从右到左进行排列 */
  /* flex-direction: row-reverse; */
  /* column 从上到下进行排列 */
  /* flex-direction: column; */
    /* column 从下到上进行排列 */
  /* flex-direction: column-reverse; */
}

/* 给flex盒子里面的每个元素都设置一个宽高 */
.size{
  width: 120rpx;
  height: 100rpx;
}
.a{
  background-color: red;
}
.b{
  background-color: yellow;
}
.c{
  background-color: blue;
}
.d{
  background-color: green;
}
.e{
  background-color: orange;
}


flex-wrap
index.wxml和上面的一摸一样
index.wxss:
/* 演示flext-wrap属性*/
.flext-wrap{
  /* 把class属性为flextest的元素开启flex布局 */
  display: flex;
  /* nowrap 设置容器里面的成员不换行,即使成员的宽度超过了屏幕宽度(默认) */
  /* flex-wrap: nowrap; */
    /* wrap 当容器里成员的宽度超过屏幕宽度时会换行,而且随着宽度数值变换,换行效果也会有变化 */
  /* flex-wrap: wrap; */
    /* wrap-reverse 逆向换行 */
  /* flex-wrap: wrap-reverse; */
}


justify-content
index.wxml和上面的一摸一样
index.wxss:


 331
331


 被折叠的 条评论
为什么被折叠?
被折叠的 条评论
为什么被折叠?
 到【灌水乐园】发言


