


前言:前面涉及C++11的知识点我们补充讲解过,现在这篇博客我们正式讲解C++11。
我尽量活成我想成为的模样,而不是某些人口中的‘他’。
我们每个人都在跟自己的业力对抗,都想努力变好,可是这个世界本身就是矛盾的。
愿吾之愿力能护持汝生生世世,不被世俗沉沦,看破诸法实相
C++11简介
统一的列表初始化
{}初始化
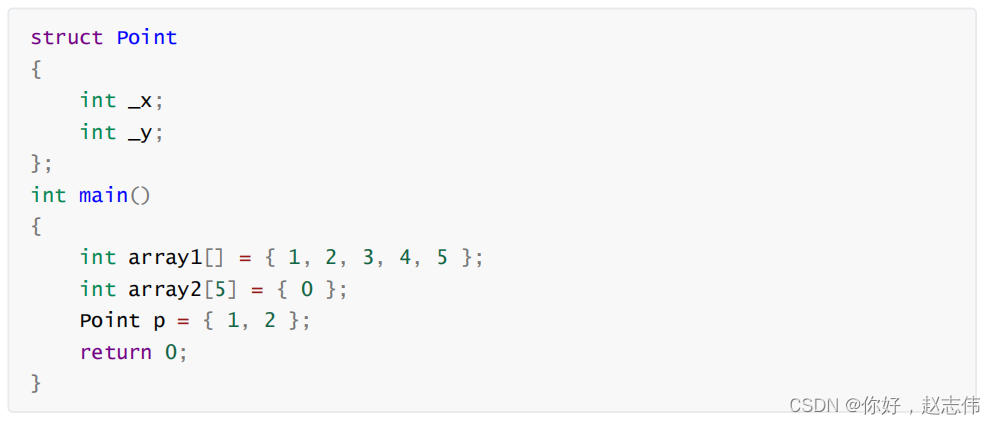
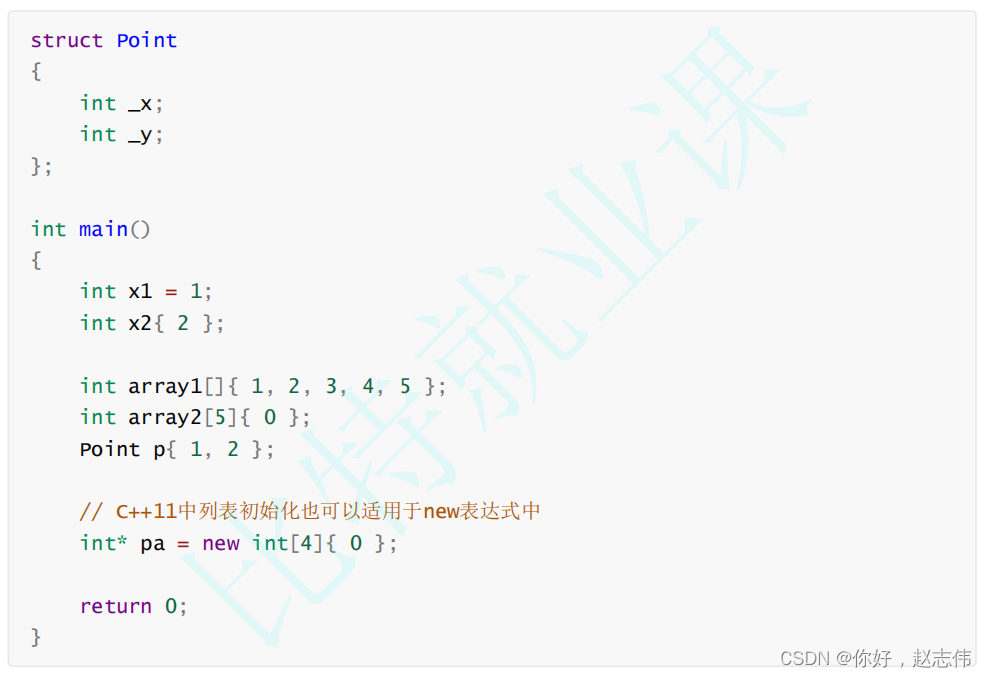
创建对象时也可以使用列表初始化方式调用构造函数初始化
class Date
{
public:
 Date(int year, int month, int day)
 :_year(year)
 ,_month(month)
 ,_day(day)
 {
 cout << "Date(int year, int month, int day)" << endl;
 }
private:
 int _year;
 int _month;
 int _day;
};
int main()
{
 Date d1(2022, 1, 1); // old style
 // C++11支持的列表初始化,这里会调用构造函数初始化
 Date d2{ 2022, 1, 2 };
 Date d3 = { 2022, 1, 3 };
//这里先生成一个初始化的临时对象,然后拷贝构造给对象
 return 0;
}
单参数列表初始化可省略列表
class A
{
public:
	//explicit A(int x, int y)   explicit可以防止隐式类型转换,使列表初始化失效
	A(int x, int y)
		:_x(x)
		,_y(y)
	{}

	A(int x)
		:_x(x)
		,_y(x)
	{}
private:
	int _x;
	int _y;
};

int main()
{

A aa1 = 1;
A aa2={1};

  return 0;
}
std::initializer_list


int main()
{
 vector<int> v = { 1,2,3,4 };
 list<int> lt = { 1,2 };
 // 1.这里{"sort", "排序"}会先初始化构造一个pair对象
 // 2.initializer_list<pair>的构造
 map<string, string> dict = { {"sort", "排序"}, {"insert", "插入"} };
// 使用大括号对容器赋值
v = {10, 20, 30};
 return 0;
}namespace bit
{
template<class T>
class vector {
public:
typedef T* iterator;
vector(initializer_list<T> l)
{
_start = new T[l.size()];
_finish = _start + l.size();
_endofstorage = _start + l.size();
iterator vit = _start;
typename initializer_list<T>::iterator lit = l.begin();
while (lit != l.end())
{
*vit++ = *lit++;
}
//for (auto e : l)
// *vit++ = e;
}
vector<T>& operator=(initializer_list<T> l) {
vector<T> tmp(l);
std::swap(_start, tmp._start);
std::swap(_finish, tmp._finish);
std::swap(_endofstorage, tmp._endofstorage);
return *this;
}
private:
iterator _start;
iterator _finish;
iterator _endofstorage;
};
}声明
auto
decltype
template<class T>
class B
{
public:
	T* New(int n)
	{
		return new T[n];
	}
};


auto func1()
{
	list<int> lt;
	auto ret = lt.begin();

	return ret;
}

int main()
{
	list<int>::iterator it1;

		// typeid推出时一个单纯的字符串
				cout << typeid(it1).name() << endl;
			//	// 不能用来定义对象
			//	//typeid(it1).name() it2;

				// 可以用来定义对象
				decltype(it1) it2;
				cout << typeid(it2).name() << endl;

				auto it3 = it1;
				cout << typeid(it3).name() << endl;

				auto ret3 = func1();
				B<decltype(ret3)> bb1;


				B<decltype(it3)> bb2;
				//B<std::list<int>::iterator> bb2;
				// auto和decltype有些地方增加代码读起来难度

				return 0;

}
nullptr
范围for循环
在前文我们已经具体讲解了,这里我们补充一点
int main()
{
	map<string, string> dict2 = { {"sort", "排序"}, {"insert", "插入"} };
	for (auto& [x,y] : dict2)
	{
		cout << x << ":" << y << endl;
		//x += '1';
		y += '2';
	}

	for (auto [x, y] : dict2)
	{
		cout << x << ":" << y << endl;
	}

	pair<string, string> kv1 = { "sort", "排序" };
	auto [x, y] = kv1;

	return 0;
}
智能指针
STL中一些变化
http://www.cplusplus.com/reference/vector/vector/emplace_back/
http://www.cplusplus.com/reference/vector/vector/push_back/
http://www.cplusplus.com/reference/map/map/insert/
http://www.cplusplus.com/reference/map/map/emplace/
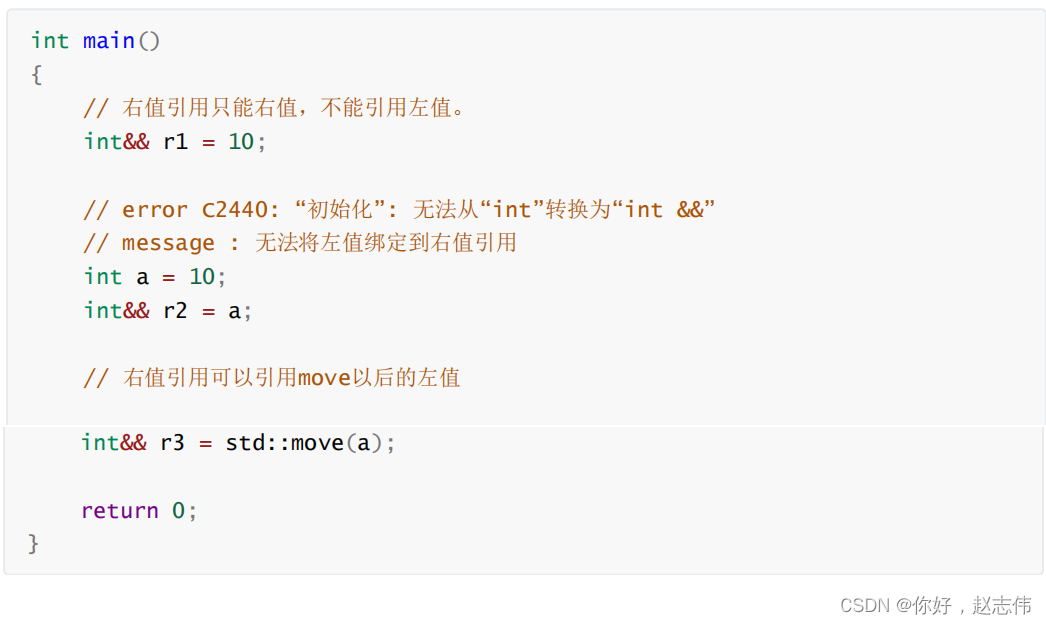
右值引用和移动语义
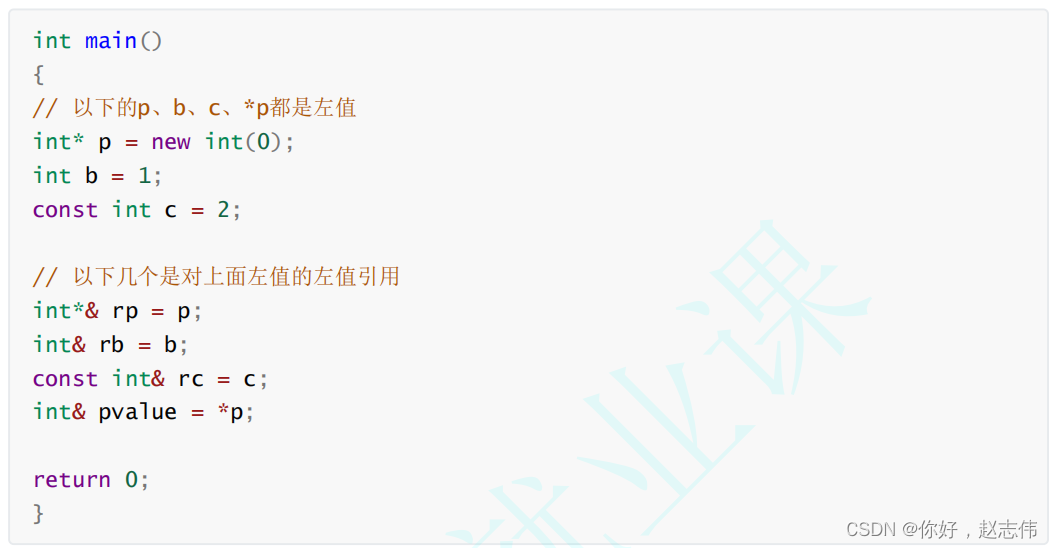
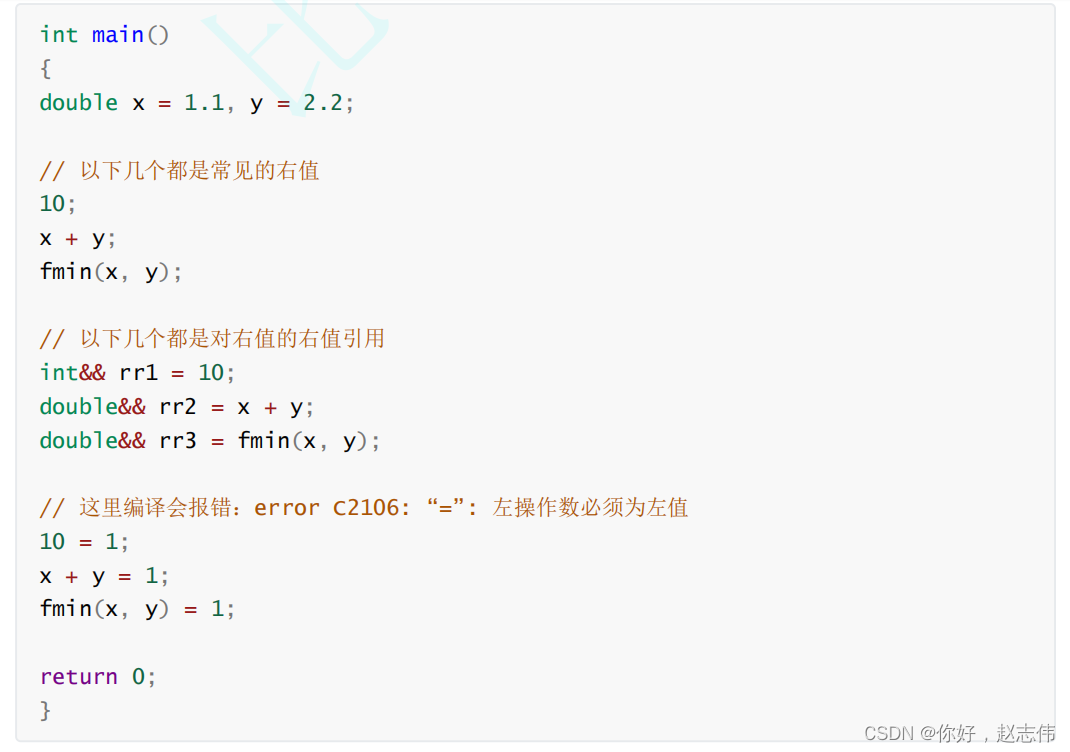
我的总结:
左值:可以取地址的
右值:不可以取地址的,分为内置类型字面常量,匿名对象/变量,临时对象/变量
左值和右值都存在地址,只是左值能取地址,而右值不能取地址
右值分为纯右值(字面常量)和将亡值(匿名对象/变量,临时对象/变量)
个人猜测:右值引用引用字面常量时,会生成临时变量/对象
int&& p=10;// int b=10; int&& p= b; b是临时变量
class A
{
public:
A(int a1, int a2)
:_a1(a1)
, _a2(a2)
{}private:
int _a1;
int _a2;
};A&& p = { 1,2 };// A b(1,2); A&& p= b; b是临时对象
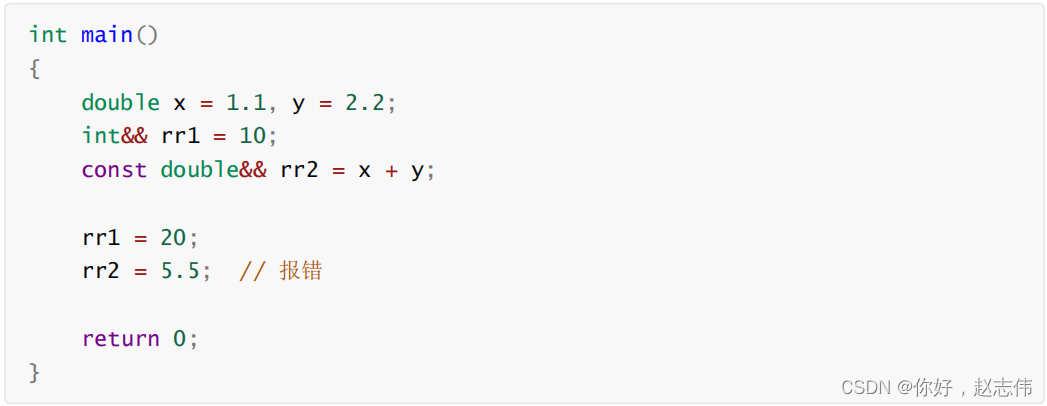
左值引用与右值引用比较
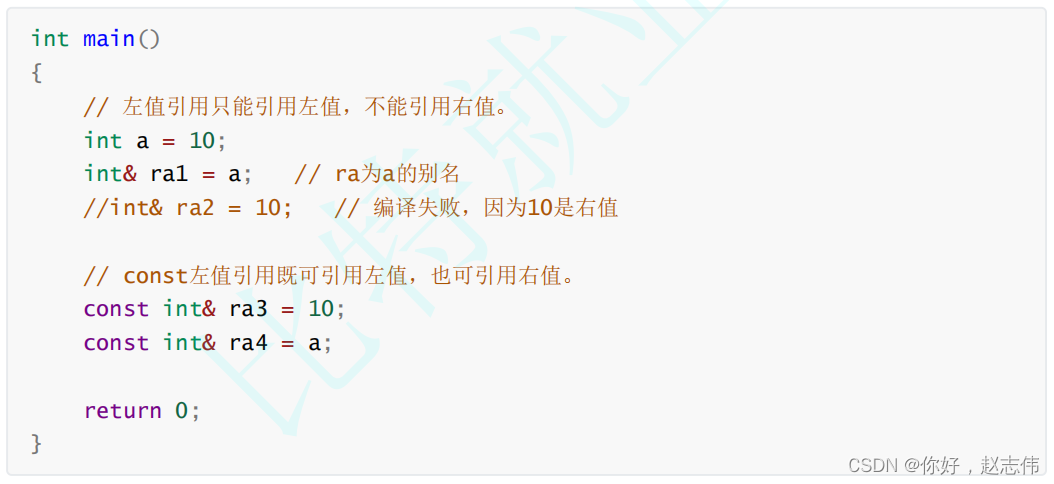
个人猜测:const int& ra3 =10;// int b=10;const int& ra3 = b;
个人猜测:move()是将左值变成右值的临时变量。
右值引用使用场景和意义
namespace bit
{
class string
{
public:
typedef char* iterator;
iterator begin()
{
return _str;
}
iterator end()
{
return _str + _size;
}
string(const char* str = "")
:_size(strlen(str))
, _capacity(_size)
{
cout << "string(char* str) -- 构造" << endl;
_str = new char[_capacity + 1];
strcpy(_str, str);
}
// s1.swap(s2)
void swap(string& ss)
{
::swap(_str, ss._str);
::swap(_size, ss._size);
::swap(_capacity, ss._capacity);
}
// 拷贝构造
// 左值
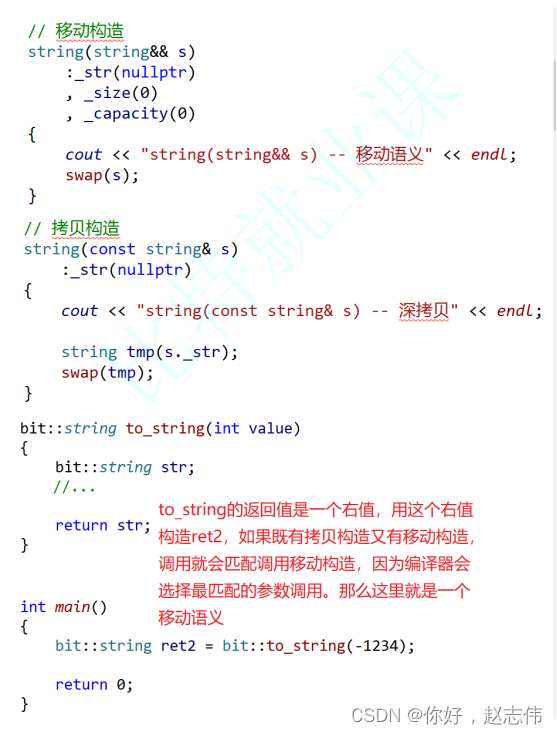
string(const string& s)
{
cout << "string(const string& s) -- 深拷贝" << endl;
_str = new char[s._capacity + 1];
strcpy(_str, s._str);
_size = s._size;
_capacity = s._capacity;
}
// 移动构造 -- 移动将亡值对象的资源
// 右值(将亡值)
string(string&& s)
{
cout << "string(string&& s) -- 移动构造" << endl;
swap(s);
}
// 赋值重载
// s3 = 左值
string& operator=(const string& s)
{
cout << "string& operator=(string s) -- 深拷贝" << endl;
char* tmp = new char[s._capacity + 1];
strcpy(tmp, s._str);
delete[] _str;
_str = tmp;
_size = s._size;
_capacity = s._capacity;
return *this;
}
// s3 = 将亡值
string& operator=(string&& s)
{
cout << "string(string&& s) -- 移动赋值" << endl;
swap(s);
return *this;
}
~string()
{
delete[] _str;
_str = nullptr;
}
char& operator[](size_t pos)
{
assert(pos < _size);
return _str[pos];
}
void reserve(size_t n)
{
if (n > _capacity)
{
char* tmp = new char[n + 1];
strcpy(tmp, _str);
delete[] _str;
_str = tmp;
_capacity = n;
}
}
void push_back(char ch)
{
if (_size >= _capacity)
{
size_t newcapacity = _capacity == 0 ? 4 : _capacity * 2;
reserve(newcapacity);
}
_str[_size] = ch;
++_size;
_str[_size] = '\0';
}
//string operator+=(char ch)
string& operator+=(char ch)
{
push_back(ch);
return *this;
}
const char* c_str() const
{
return _str;
}
private:
char* _str = nullptr;
size_t _size = 0;
size_t _capacity = 0; // 不包含最后做标识的\0
};
bit::string to_string(int value)
{
bool flag = true;
if (value < 0)
{
flag = false;
value = 0 - value;
}
bit::string str;
while (value > 0)
{
int x = value % 10;
value /= 10;
str += ('0' + x);
}
if (flag == false)
{
str += '-';
}
std::reverse(str.begin(), str.end());
// return move(str);
return str;
}
}左值引用的短板
namespace bit
{
bit::string to_string(int value)
{
bool flag = true;
if (value < 0)
{
flag = false;
value = 0 - value;
}
bit::string str;
while (value > 0)
{
int x = value % 10;
value /= 10;
str += ('0' + x);
}
if (flag == false)
{
str += '-';
}
std::reverse(str.begin(), str.end());
return str;
}
}
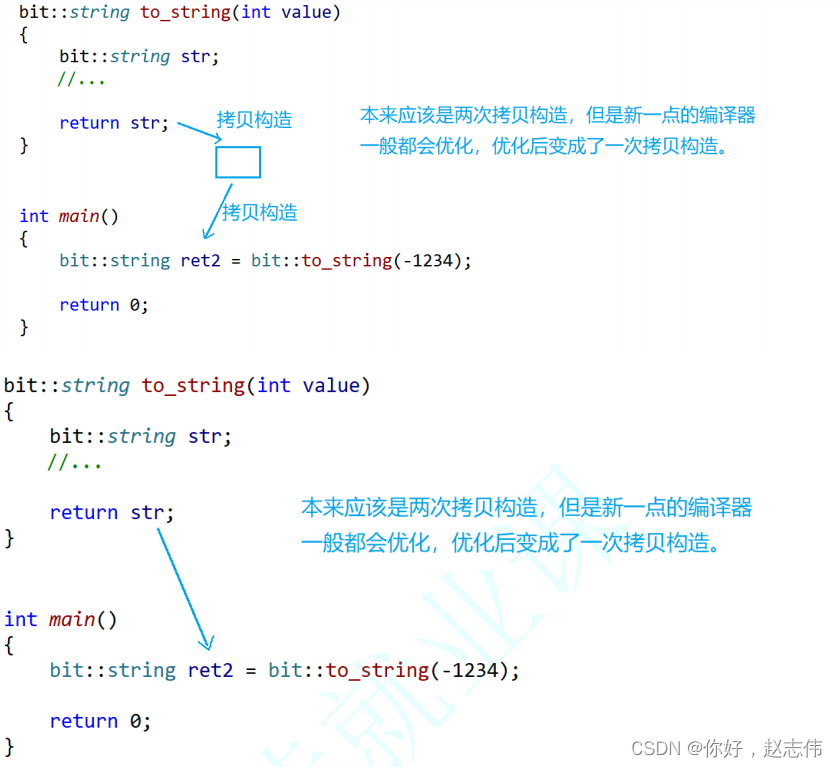
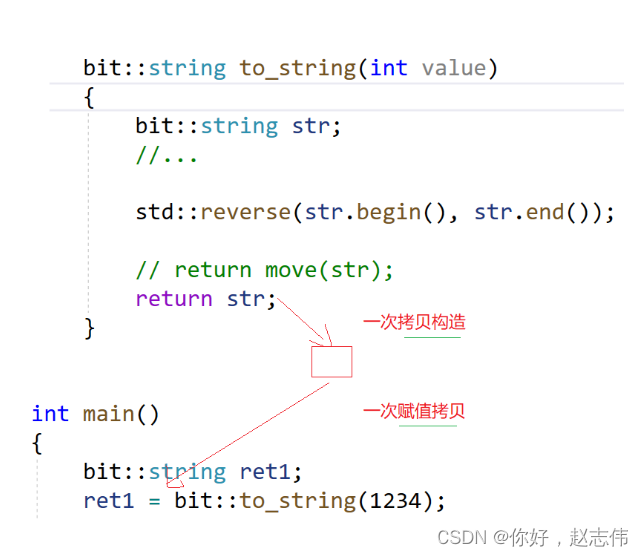
int main()
{
// 在bit::string to_string(int value)函数中可以看到,这里
// 只能使用传值返回,传值返回会导致至少1次拷贝构造(如果是一些旧一点的编译器可能是两次拷贝构造)。
bit::string ret1 = bit::to_string(1234);
bit::string ret2 = bit::to_string(-1234);
return 0;
}

或者这样
右值引用和移动语义解上述问题
// 移动构造
string(string&& s)
 :_str(nullptr)
 ,_size(0)
 ,_capacity(0)
{
 cout << "string(string&& s) -- 移动语义" << endl;
 swap(s);
}
int main()
{
 bit::string ret2 = bit::to_string(-1234);
 return 0;
}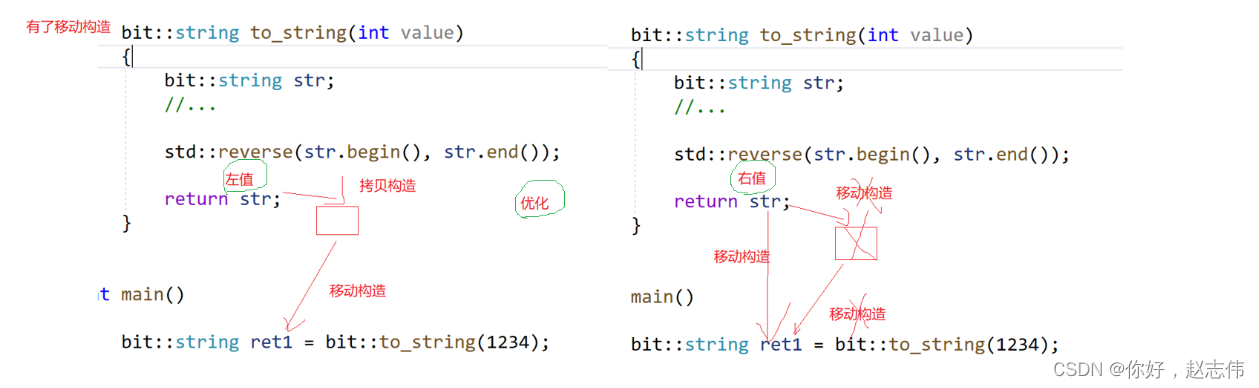
这里直接将左值str当成右值去用,编译器默认加了个move(str);
// 移动赋值
string& operator=(string&& s)
{
cout << "string& operator=(string&& s) -- 移动语义" << endl;
swap(s);
return *this;
}
int main()
{
 bit::string ret1;
 ret1 = bit::to_string(1234);
 return 0;
}
// 运行结果:
// string(string&& s) -- 移动语义
// string& operator=(string&& s) -- 移动语义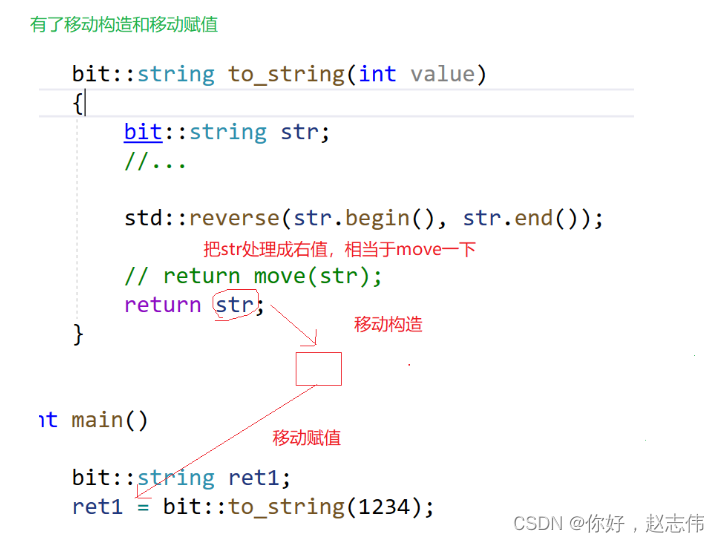
http://www.cplusplus.com/reference/string/string/string/
http://www.cplusplus.com/reference/vector/vector/vector/
右值引用本身是左值
int main()
{
	std::string s3("22222222222");
	// 左值引用
	std::string& s4 = s3;
	cout << &s4 << endl;

	// 右值引用
	std::string&& s1 = std::string("111111111");
	// s1是左值(右值引用本身是左值)
	cout << &s1 << endl;
	//cout << &std::string("111111111") << endl;

	std::string& s5 = s1;

	std::string&& s6 = std::string("111111111111111111111111111111111111111");
	std::string& s7 = s6;

	return 0;
}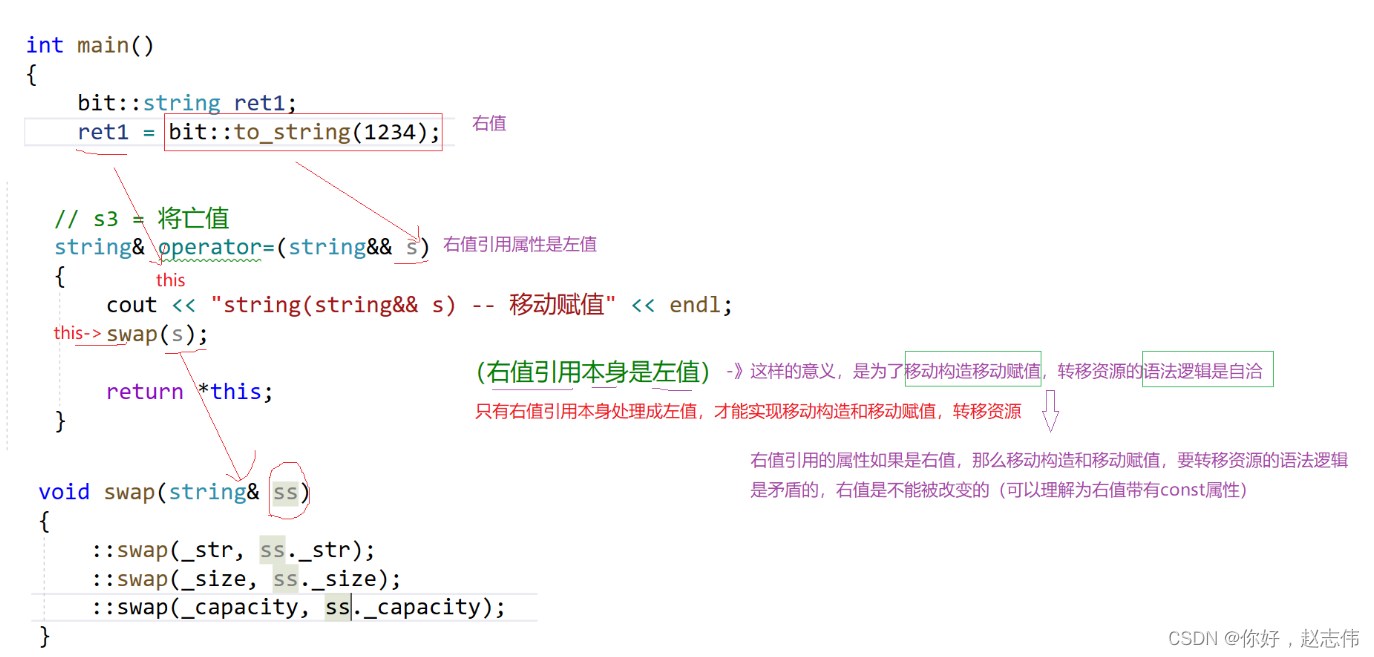
右值引用本身是左值,只有左值才能取地址,这样才能使用右值的资源
右值引用引用左值及其一些更深入的使用场景分析
template<class _Ty>
inline typename remove_reference<_Ty>::type&& move(_Ty&& _Arg) _NOEXCEPT
{
// forward _Arg as movable
 return ((typename remove_reference<_Ty>::type&&)_Arg);
}
int main()
{
 bit::string s1("hello world");
 // 这里s1是左值,调用的是拷贝构造
 bit::string s2(s1);
 // 这里我们把s1 move处理以后, 会被当成右值,调用移动构造
 // 但是这里要注意,一般是不要这样用的,因为我们会发现s1的
 // 资源被转移给了s3,s1被置空了。
 bit::string s3(std::move(s1));
 return 0;
}
http://www.cplusplus.com/reference/list/list/push_back/
http://www.cplusplus.com/reference/vector/vector/push_back/
void push_back (value_type&& val);
int main()
{
 list<bit::string> lt;
 bit::string s1("1111");
// 这里调用的是拷贝构造
 lt.push_back(s1);
// 下面调用都是移动构造
 lt.push_back("2222");
 lt.push_back(std::move(s1));
 return 0;
}
运行结果:
// string(const string& s) -- 深拷贝
// string(string&& s) -- 移动语义
// string(string&& s) -- 移动语义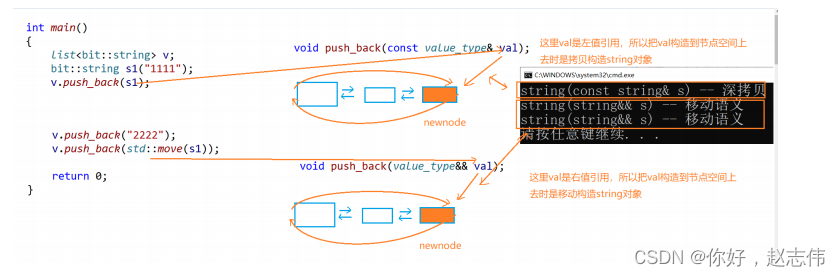
完美转发
void Fun(int &x){ cout << "左值引用" << endl; }
void Fun(const int &x){ cout << "const 左值引用" << endl; }
void Fun(int &&x){ cout << "右值引用" << endl; }
void Fun(const int &&x){ cout << "const 右值引用" << endl; }

// 模板中的&&不代表右值引用,而是万能引用,其既能接收左值又能接收右值。
// 模板的万能引用只是提供了能够接收同时接收左值引用和右值引用的能力,
// 但是引用类型的唯一作用就是限制了接收的类型,后续使用中都退化成了左值,
// 我们希望能够在传递过程中保持它的左值或者右值的属性, 就需要用我们下面学习的完美转发
template<typename T>
void PerfectForward(T&& t)
{
 Fun(t);
}
int main()
{
 PerfectForward(10);           // 左值
 int a;
 PerfectForward(a);            // 左值
 PerfectForward(std::move(a)); // 左值
 const int b = 8;
 PerfectForward(b);      // const 左值
 PerfectForward(std::move(b)); // const 左值
 return 0;
}
std::forward 完美转发在传参的过程中保留对象原生类型属性
void Fun(int &x){ cout << "左值引用" << endl; }
void Fun(const int &x){ cout << "const 左值引用" << endl; }
void Fun(int &&x){ cout << "右值引用" << endl; }
void Fun(const int &&x){ cout << "const 右值引用" << endl; }
// std::forward<T>(t)在传参的过程中保持了t的原生类型属性。
template<typename T>
void PerfectForward(T&& t)
{
 Fun(std::forward<T>(t));
}
int main()
{
 PerfectForward(10);           // 右值
 int a;
 PerfectForward(a);            // 左值
 PerfectForward(std::move(a)); // 右值
 const int b = 8;
 PerfectForward(b);      // const 左值
 PerfectForward(std::move(b)); // const 右值
 return 0;
}
类似下面这种效果:
void Fun(int& x) { cout << "左值引用" << endl; }
void Fun(const int& x) { cout << "const 左值引用" << endl; }

void Fun(int&& x) { cout << "右值引用" << endl; }
void Fun(const int&& x) { cout << "const 右值引用" << endl; }


template<typename T>
void PerfectForward(T&& t)
{
	//Fun((T&&)t);
	Fun(forward<T>(t));
}

void PerfectForward(int&& t)
{
	Fun((int&&)t);
}

void PerfectForward(int& t)
{
	Fun((int&)t);
}

void PerfectForward(const int&& t)
{
	Fun((const int&&)t);
}

void PerfectForward(const int& t)
{
	Fun((const int&)t);
}template<class T>
struct ListNode
{
ListNode* _next = nullptr;
ListNode* _prev = nullptr;
T _data;
};
template<class T>
class List
{
typedef ListNode<T> Node;
public:
List()
{
_head = new Node;
_head->_next = _head;
_head->_prev = _head;
}
void PushBack(T&& x)
{
//Insert(_head, x);
Insert(_head, std::forward<T>(x));
}
void PushFront(T&& x)
{
//Insert(_head->_next, x);
Insert(_head->_next, std::forward<T>(x));
}
void Insert(Node* pos, T&& x)
{
Node* prev = pos->_prev;
Node* newnode = new Node;
newnode->_data = std::forward<T>(x); // 关键位置
// prev newnode pos
prev->_next = newnode;
newnode->_prev = prev;
newnode->_next = pos;
pos->_prev = newnode;
}
void Insert(Node* pos, const T& x)
{
Node* prev = pos->_prev;
Node* newnode = new Node;
newnode->_data = x; // 关键位置
// prev newnode pos
prev->_next = newnode;
newnode->_prev = prev;
newnode->_next = pos;
pos->_prev = newnode;
}
private:
Node* _head;
};
int main()
{
List<bit::string> lt;
lt.PushBack("1111");
lt.PushFront("2222");
return 0;
}lambda表达式
#include <algorithm>
#include <functional>
int main()
{
int array[] = {4,1,8,5,3,7,0,9,2,6};
// 默认按照小于比较,排出来结果是升序
std::sort(array, array+sizeof(array)/sizeof(array[0]));
// 如果需要降序,需要改变元素的比较规则
std::sort(array, array + sizeof(array) / sizeof(array[0]), greater<int>());
return 0;
}struct Goods
{
string _name; // 名字
double _price; // 价格
int _evaluate; // 评价
Goods(const char* str, double price, int evaluate)
:_name(str)
, _price(price)
, _evaluate(evaluate)
{}
};
struct ComparePriceLess
{
bool operator()(const Goods& gl, const Goods& gr)
{
return gl._price < gr._price;
}
};
struct ComparePriceGreater
{
bool operator()(const Goods& gl, const Goods& gr)
{
return gl._price > gr._price;
}
};
int main()
{
vector<Goods> v = { { "苹果", 2.1, 5 }, { "香蕉", 3, 4 }, { "橙子", 2.2,
3 }, { "菠萝", 1.5, 4 } };
sort(v.begin(), v.end(), ComparePriceLess());
sort(v.begin(), v.end(), ComparePriceGreater());
}lambda表达式
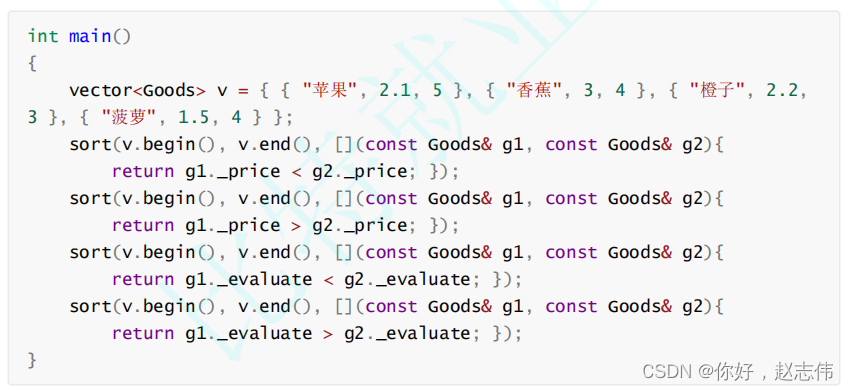
int main()
{
	vector<Goods> v = { { "苹果", 2.1, 5 }, { "香蕉", 3, 4 }, { "橙子", 2.2,3 }, { "菠萝", 1.5, 4 } };

	sort(v.begin(), v.end(), ComparePriceLess());
	sort(v.begin(), v.end(), ComparePriceGreater());


	auto priceLess = [](const Goods& g1, const Goods& g2)
	{
		return g1._price < g2._price;
	};
	sort(v.begin(), v.end(), priceLess);

	cout << typeid(priceLess).name() << endl;

	sort(v.begin(), v.end(), [](const Goods& g1, const Goods& g2)
 		{
			return g1._price > g2._price;
		});

	sort(v.begin(), v.end(), [](const Goods& g1, const Goods& g2)
		{
			return g1._evaluate < g2._evaluate;
		});

	sort(v.begin(), v.end(), [](const Goods& g1, const Goods& g2)
		{
			return g1._evaluate > g2._evaluate;
		});
  	return 0;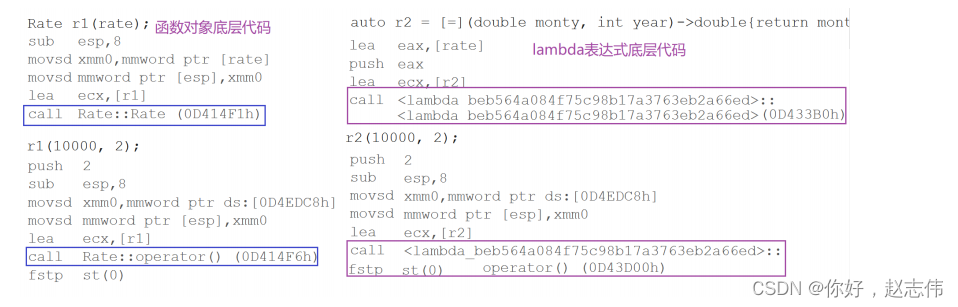
}[capture-list] (parameters) mutable -> return-type { statement }
- [capture-list] : 捕捉列表,该列表总是出现在lambda函数的开始位置,编译器根据[]来判断接下来的代码是否为lambda函数,捕捉列表能够捕捉上下文中的变量供lambda函数使用。
- (parameters):参数列表。与普通函数的参数列表一致,如果不需要参数传递,则可以连同()一起省略
- mutable:默认情况下,lambda函数总是一个const函数,mutable可以取消其常量性。使用该修饰符时,参数列表不可省略(即使参数为空)。
- ->returntype:返回值类型。用追踪返回类型形式声明函数的返回值类型,没有返回值时此部分可省略。返回值类型明确情况下,也可省略,由编译器对返回类型进行推导。
- {statement}:函数体。在该函数体内,除了可以使用其参数外,还可以使用所有捕获到的变量。
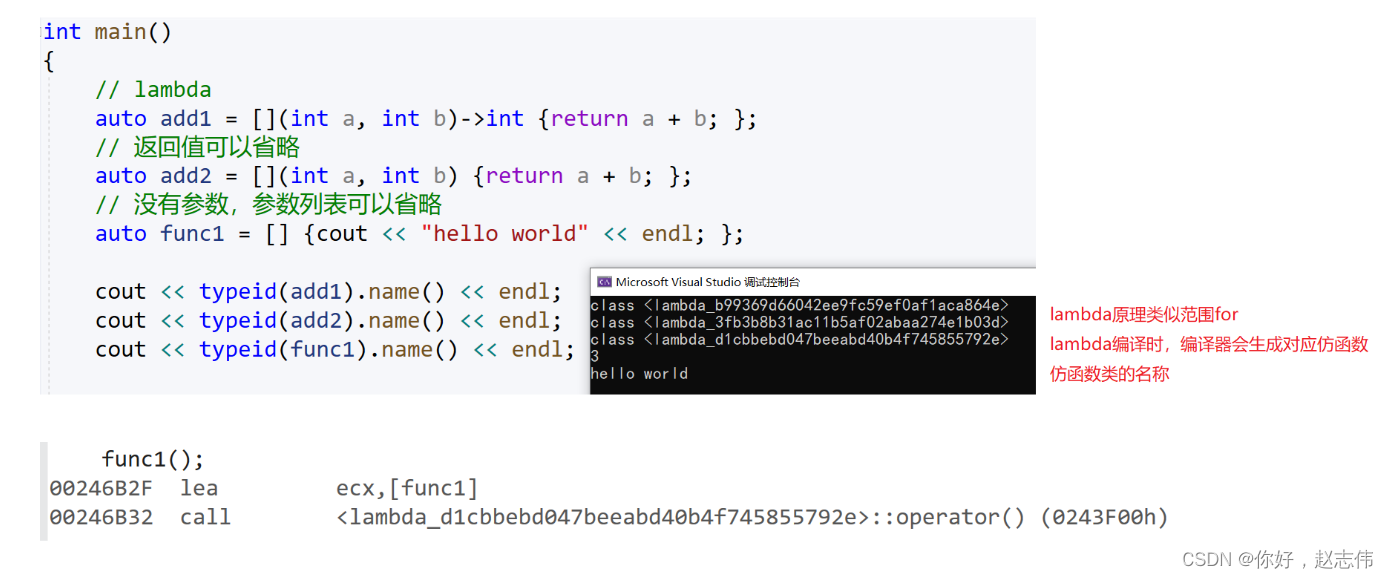
int main()
{
	// lambda
	auto add1 = [](int a, int b)->int {return a + b; };
	// 返回值可以省略
	auto add2 = [](int a, int b) {return a + b; };
	// 没有参数,参数列表可以省略
	auto func1 = [] {cout << "hello world" << endl; };

	cout << typeid(add1).name() << endl;
	cout << typeid(add2).name() << endl;
	cout << typeid(func1).name() << endl;

	cout << add1(1, 2) << endl;
	func1();

	return 0;
}
注意:a. 父作用域指包含 lambda 函数的语句块b. 语法上捕捉列表可由多个捕捉项组成,并以逗号分割 。比如: [=, &a, &b] :以引用传递的方式捕捉变量 a 和 b ,值传递方式捕捉其他所有变量[& , a, this] :值传递方式捕捉变量 a 和 this ,引用方式捕捉其他变量c. 捕捉列表不允许变量重复传递,否则就会导致编译错误 。比如: [=, a] : = 已经以值传递方式捕捉了所有变量,捕捉 a 重复d. 在块作用域以外的 lambda 函数捕捉列表必须为空 。e. 在块作用域中的 lambda 函数仅能捕捉父作用域中局部变量,捕捉任何非此作用域或者非局部变量都会导致编译报错。f. lambda 表达式之间不能相互赋值 ,即使看起来类型相同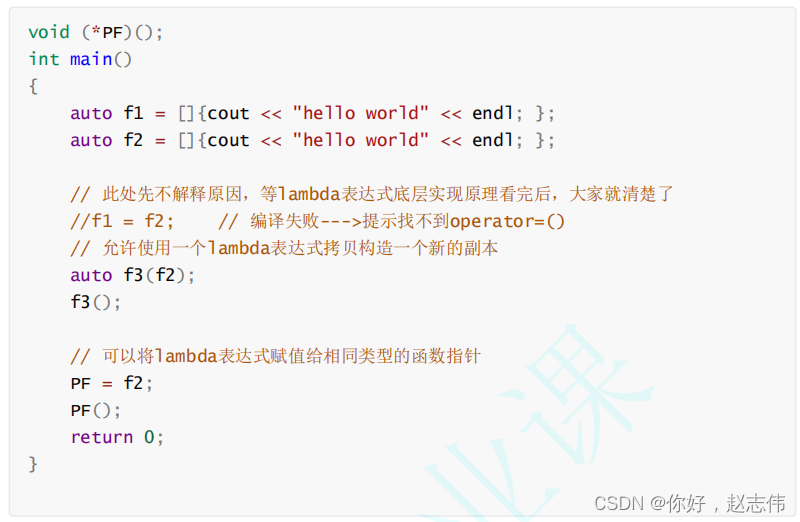
[var]:表示值传递方式捕捉变量var,加mutable才能修改捕捉变量,外面不修改
 //捕捉a b对象给lambda
	// mutable可以修改传值捕捉对象(日常一般不需要)
	// 因为a b是拷贝过来,虽然修改也不改变外面的a b
	auto swap2 = [a, b]() mutable
	{
		int tmp = a;
		a = b;
		b = tmp;
};[&var]:表示引用传递捕捉变量var,外值一定改变
 引用方式捕捉
	auto swap3 = [&a, &b]()
	{
		int tmp = a;
		a = b;
		b = tmp;
	};
同理
int* pa = &a, * pb = &b;

	auto swap4 = [pa, pb]()
	{
		int tmp = *pa;
		*pa = *pb;
		*pb = tmp;
};[=]:表示值传递方式捕获所有父作用域中的变量(包括this)
int a = 1, b = 2, c = 3, d = 4, e = 5;
	// 传值捕捉所有对象
	auto func1 = [=]()
	{
		return a + b + c * d;
};[&]:表示引用传递捕捉所有父作用域中的变量(包括this)
 //传引用捕捉所有对象
	auto func2 = [&]()
	{
		a++;
		b++;
		c++;
		d++;
		e++;
	};
混合捕捉
// 混合捕捉,传引用捕捉所有对象,但是d和e传值捕捉
	auto func3 = [&, d, e]()
	{
		a++;
		b++;
		c++;
		//d++;
		//e++;
	};
//a b传引用捕捉,d和e传值捕捉
auto func4 = [&a, &b, d, e]() mutable
{
a++;
b++;
d++;
e++;
};新的类功能
默认提供的只支持浅拷贝,实现其中一个代表实现深拷贝,所以就不提供默认。
强制生成默认函数的关键字default:
class Person
{
public:
	Person(const char* name = "张三", int age = 18)
		:_name(name)
		, _age(age)
	{}

	// 强制生成
	Person(const Person& p) = default;
	Person& operator=(const Person & p) = default;
	Person(Person&& p) = default;
	Person& operator=(Person&& p) = default;

	~Person()
	{}
private:
	bit::string _name;
	int _age;
};

int main()
{
	Person s1;
	Person s2 = s1; // 默认拷贝构造

	Person s3 = std::move(s1); // 默认移动构造

	Person s4;
	s4 = std::move(s2); // 默认移动赋值

	return 0;
}禁止生成默认函数的关键字delete:
// 这个类只能在堆上生成对象
class HeapOnly
{
public:
	static HeapOnly* CreateObj()
	{
		return new HeapOnly;
	}

	// C++11
	HeapOnly(const HeapOnly&) = delete;

	// C++98 私有+只声明不实现
private:
	HeapOnly(const HeapOnly&);

	HeapOnly()
	{}

	int _a = 1;
};

int main()
{
	//HeapOnly ho1;
	//HeapOnly* p1 = new HeapOnly;
	HeapOnly* p2 = HeapOnly::CreateObj();

	// 不能被拷贝,才能禁止
	//HeapOnly obj(*p2);

	return 0;
}继承和多态中的final与override关键字
可变参数模板

// C printf 只能打印内置类型
// C++打印任意类型对象的可变参数函数呢
template <class ...Args>
void Cpp_Printf(Args... args)
{
	// 计算参数包的数据个数
	cout << sizeof...(args) << endl;
}

int main()
{
	Cpp_Printf(1);//1
	Cpp_Printf(1, 'A');//2
	Cpp_Printf(1, 'A', std::string("sort"));//3

	return 0;
}// 编译时,参数推到递归
void _Cpp_Printf()
{
cout << endl;
}
template <class T, class ...Args>
void _Cpp_Printf(const T& val, Args... args)
{
cout << val << endl;
_Cpp_Printf(args...);
}
template <class ...Args>
void Cpp_Printf(Args... args)
{
_Cpp_Printf(args...);
}
int main()
{
Cpp_Printf(1.1);
Cpp_Printf(1.1, 'x');
Cpp_Printf(1, 'A', std::string("sort"));
return 0;
}template <class T>
int PrintArg(T t)
{
cout << t << " ";
return 0;
}
template <class ...Args>
void Cpp_Printf(Args... args)
{
// 编译时推导,args...参数有几个值,PrintArg就调用几次,就有几个返回值,arr就开多大
int arr[] = { PrintArg(args)... };
cout << endl;
}
//void Cpp_Printf(int x, char y, std::string z)
//{
// int arr[] = { PrintArg(x),PrintArg(y),PrintArg(z) };
// cout << endl;
//}
int main()
{
Cpp_Printf(1.1);
Cpp_Printf(1.1, 'x');
Cpp_Printf(1, 'A', std::string("sort"));
return 0;
}http://www.cplusplus.com/reference/vector/vector/emplace_back/
http://www.cplusplus.com/reference/list/list/emplace_back/

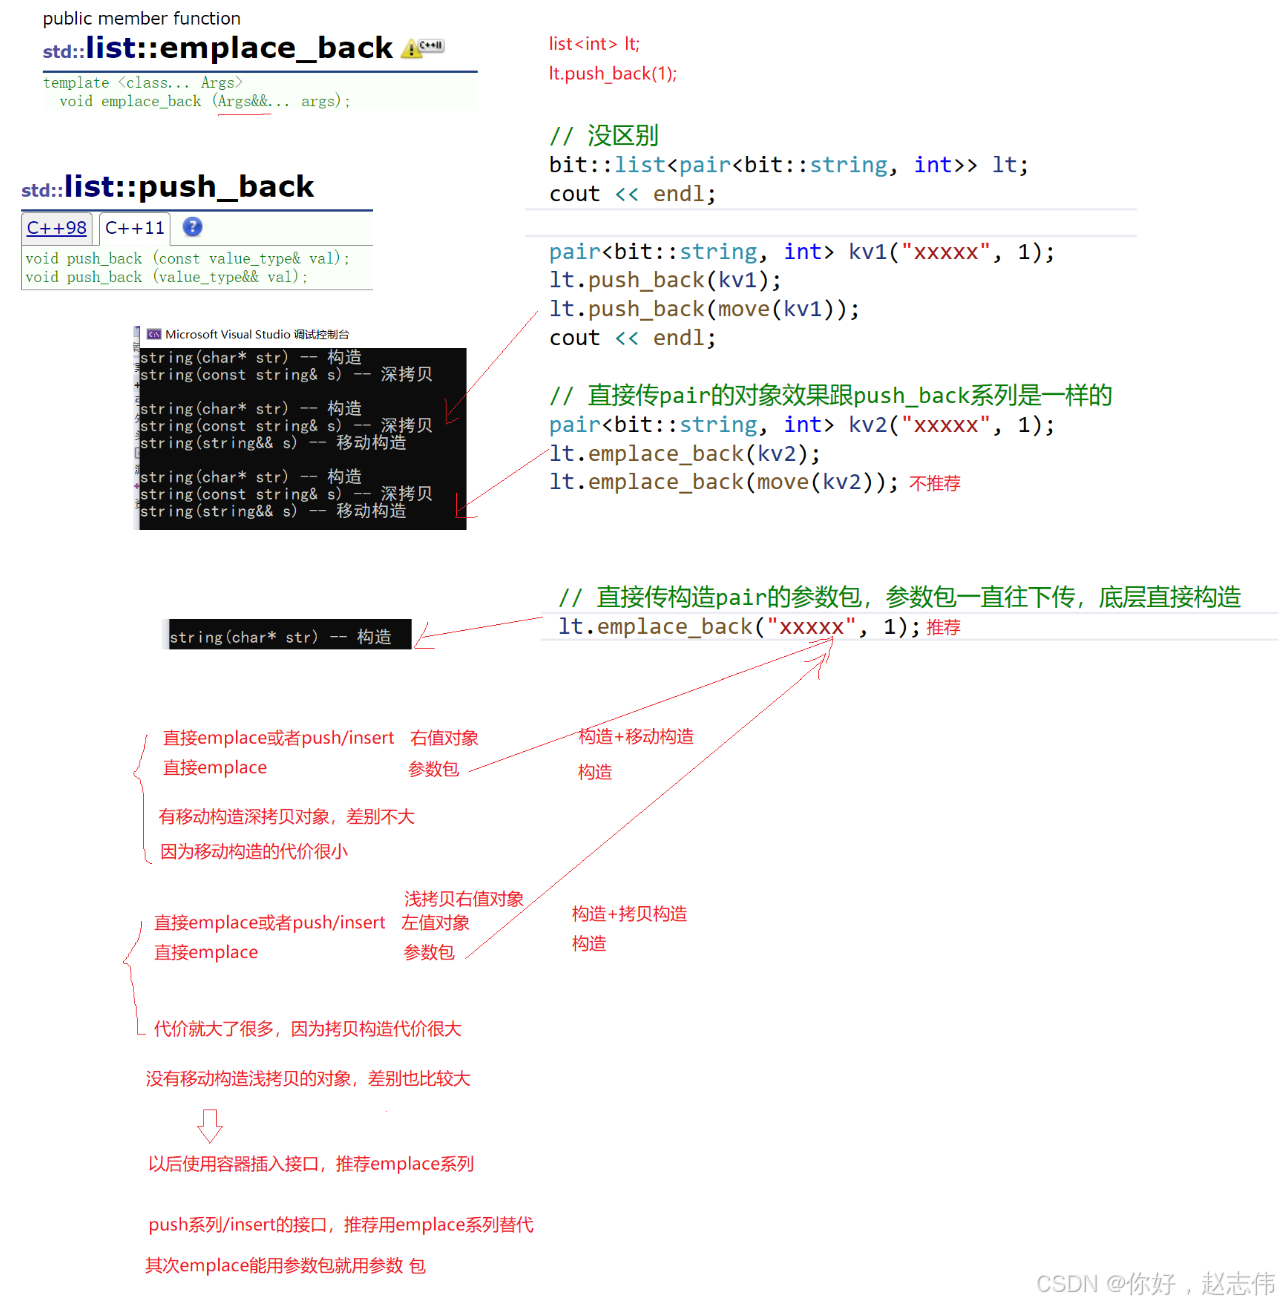
    // 没区别
	bit::list<pair<bit::string, int>> lt;

	pair<bit::string, int> kv1("xxxxx", 1);//构造
	//lt.push_back(kv1);//深拷贝
	lt.push_back(move(kv1));//移动构造

	cout << endl;

	// 直接传pair的对象效果跟push_back系列是一样的
	pair<bit::string, int> kv2("xxxxx", 1);//构造
	lt.emplace_back(kv2);//深拷贝
	lt.emplace_back(move(kv2));//移动构造

	// 直接传构造pair的参数包,参数包一直往下传,底层直接构造
	lt.emplace_back("xxxxx", 1);//构造
List单链表模拟加入emplace_back初始化
namespace bit
{
template<class T>
struct ListNode
{
ListNode<T>* _next;
ListNode<T>* _prev;
T _data;
ListNode(const T& x = T())
:_next(nullptr)
,_prev(nullptr)
,_data(x)
{}
ListNode(T&& x)
:_next(nullptr)
, _prev(nullptr)
, _data(forward<T>(x))
{}
template <class... Args>
ListNode(Args&&... args)
:_next(nullptr)
, _prev(nullptr)
, _data(forward<Args>(args)...)
{}
/*ListNode(const char* str, int val)
: _next(nullptr)
, _prev(nullptr)
, _data(str, val)
{}*/
};
// typedef ListIterator<T, T&, T*> iterator;
// typedef ListIterator<T, const T&, const T*> const_iterator;
template<class T, class Ref, class Ptr>
struct ListIterator
{
typedef ListNode<T> Node;
typedef ListIterator<T, Ref, Ptr> Self;
Node* _node;
ListIterator(Node* node)
:_node(node)
{}
// *it
//T& operator*()
Ref operator*()
{
return _node->_data;
}
// it->
//T* operator->()
Ptr operator->()
{
return &_node->_data;
}
// ++it
Self& operator++()
{
_node = _node->_next;
return *this;
}
Self operator++(int)
{
Self tmp(*this);
_node = _node->_next;
return tmp;
}
Self& operator--()
{
_node = _node->_prev;
return *this;
}
Self operator--(int)
{
Self tmp(*this);
_node = _node->_prev;
return tmp;
}
bool operator!=(const Self& it)
{
return _node != it._node;
}
bool operator==(const Self& it)
{
return _node == it._node;
}
};
//template<class T>
//struct ListConstIterator
//{
// typedef ListNode<T> Node;
// typedef ListConstIterator<T> Self;
// Node* _node;
// ListConstIterator(Node* node)
// :_node(node)
// {}
// // *it
// const T& operator*()
// {
// return _node->_data;
// }
// // it->
// const T* operator->()
// {
// return &_node->_data;
// }
// // ++it
// Self& operator++()
// {
// _node = _node->_next;
// return *this;
// }
// Self operator++(int)
// {
// Self tmp(*this);
// _node = _node->_next;
// return tmp;
// }
// Self& operator--()
// {
// _node = _node->_prev;
// return *this;
// }
// Self operator--(int)
// {
// Self tmp(*this);
// _node = _node->_prev;
// return tmp;
// }
// bool operator!=(const Self& it)
// {
// return _node != it._node;
// }
// bool operator==(const Self& it)
// {
// return _node == it._node;
// }
//};
template<class T>
class list
{
typedef ListNode<T> Node;
public:
//typedef ListIterator<T> iterator;
//typedef ListConstIterator<T> const_iterator;
typedef ListIterator<T, T&, T*> iterator;
typedef ListIterator<T, const T&, const T*> const_iterator;
iterator begin()
{
return _head->_next;
}
iterator end()
{
return _head;
}
// const迭代器,需要是迭代器不能修改,还是迭代器指向的内容?
// 迭代器指向的内容不能修改!const iterator不是我们需要const迭代器
// T* const p1
// const T* p2
const_iterator begin() const
{
return _head->_next;
}
const_iterator end() const
{
return _head;
}
void empty_init()
{
_head = new Node;
_head->_next = _head;
_head->_prev = _head;
_size = 0;
}
list()
{
empty_init();
}
list(initializer_list<T> il)
{
empty_init();
for (auto& e : il)
{
push_back(e);
}
}
// lt2(lt1)
list(const list<T>& lt)
{
empty_init();
for (auto& e : lt)
{
push_back(e);
}
}
// 需要析构,一般就需要自己写深拷贝
// 不需要析构,一般就不需要自己写深拷贝,默认浅拷贝就可以
void swap(list<T>& lt)
{
std::swap(_head, lt._head);
std::swap(_size, lt._size);
}
// lt1 = lt3
list<T>& operator=(list<T> lt)
{
swap(lt);
return *this;
}
void clear()
{
iterator it = begin();
while (it != end())
{
it = erase(it);
}
}
~list()
{
clear();
delete _head;
_head = nullptr;
}
/*void push_back(const T& x)
{
Node* newnode = new Node(x);
Node* tail = _head->_prev;
tail->_next = newnode;
newnode->_prev = tail;
newnode->_next = _head;
_head->_prev = newnode;
}*/
void push_back(const T& x)
{
insert(end(), x);
}
void push_back(T&& x)
{
insert(end(), forward<T>(x));
}
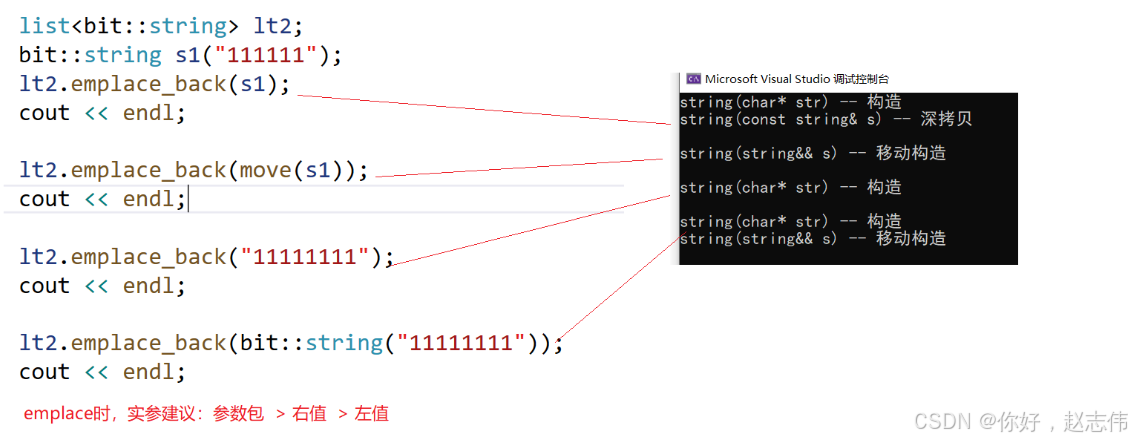
template <class... Args>
void emplace_back(Args&&... args)
{
emplace(end(), forward<Args>(args)...);
}
/*void emplace_back(const char* str, int val)
{
emplace(end(), str, val);
}*/
void push_front(const T& x)
{
insert(begin(), x);
}
void pop_back()
{
erase(--end());
}
void pop_front()
{
erase(begin());
}
void insert(iterator pos, const T& val)
{
Node* cur = pos._node;
Node* newnode = new Node(val);
Node* prev = cur->_prev;
// prev newnode cur;
prev->_next = newnode;
newnode->_prev = prev;
newnode->_next = cur;
cur->_prev = newnode;
_size++;
}
void insert(iterator pos, T&& val)
{
Node* cur = pos._node;
Node* newnode = new Node(forward<T>(val));
Node* prev = cur->_prev;
// prev newnode cur;
prev->_next = newnode;
newnode->_prev = prev;
newnode->_next = cur;
cur->_prev = newnode;
_size++;
}
template <class... Args>
void emplace(iterator pos, Args&&... args)
{
Node* cur = pos._node;
Node* newnode = new Node(forward<Args>(args)...);
Node* prev = cur->_prev;
// prev newnode cur;
prev->_next = newnode;
newnode->_prev = prev;
newnode->_next = cur;
cur->_prev = newnode;
_size++;
}
//void emplace(iterator pos, const char* str, int val)
//{
// Node* cur = pos._node;
// Node* newnode = new Node(str, val);
// Node* prev = cur->_prev;
// //...
//}
iterator erase(iterator pos)
{
Node* cur = pos._node;
Node* prev = cur->_prev;
Node* next = cur->_next;
prev->_next = next;
next->_prev = prev;
delete cur;
_size--;
return iterator(next);
}
size_t size() const
{
return _size;
}
bool empty()
{
return _size == 0;
}
private:
Node* _head;
size_t _size;
};emplace参数包性能分析
包装器
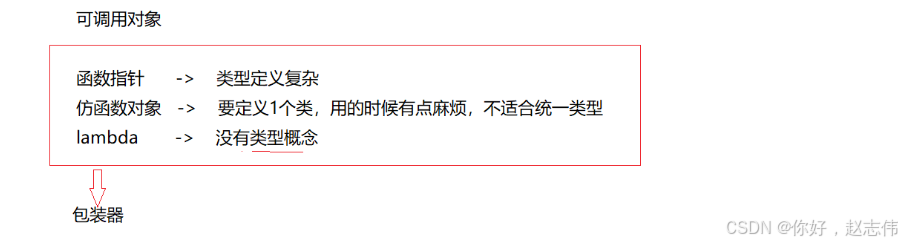
ret = func(x);
// 上面func可能是什么呢?那么func可能是函数名?函数指针?函数对象(仿函数对象)?也有可能
//是lamber表达式对象?所以这些都是可调用的类型!如此丰富的类型,可能会导致模板的效率低下!
//为什么呢?我们继续往下看
template<class F, class T>
T useF(F f, T x)
{
 static int count = 0;
 cout << "count:" << ++count << endl;
 cout << "count:" << &count << endl;
 return f(x);
}


double f(double i)
{
 return i / 2;
}
struct Functor
{
 double operator()(double d)
 {
 return d / 3;
 }
};
int main()
{
 // 函数名
 cout << useF(f, 11.11) << endl;
 // 函数对象
 cout << useF(Functor(), 11.11) << endl;
 // lamber表达式
 cout << useF([](double d)->double{ return d/4; }, 11.11) << endl;
 return 0;
}
#include<functional>


int f(int a, int b)
{
	return a + b;
}

struct Functor
{
public:
	int operator() (int a, int b)
	{
		return a + b;
	}
};

// 不是定义可调用对象,包装可调用对象
int main()
{
	function<int(int, int)> fc1;

    // 函数名(函数指针)
	//function<int(int, int)> fc2(f);
	function<int(int, int)> fc2 = f;
    cout << fc2(1, 2) << endl;
    //底层:cout << fc2.operator()(1, 2) << endl;

    // 函数对象
	function<int(int, int)> fc3 = Functor();
    cout << fc3(1, 2) << endl;

    // lamber表达式
	function<int(int, int)> fc4 = [](int x, int y) {return x + y;};
    cout << fc4(1, 2) << endl;


	return 0;
}
类函数成员包装
// 包装成员函数指针
class Plus
{
public:
	static int plusi(int a, int b)
	{
		return a + b;
	}

	double plusd(double a, double b)
	{
		return a + b;
	}
};

int main()
{
	// 成员函数的函数指针  &类型::函数名
	function<int(int, int)> fc1 = &Plus::plusi;
	cout << fc1(1, 2) << endl;

	function<double(Plus*, double, double)> fc2 = &Plus::plusd;
	Plus plus;
	cout << fc2(&plus, 1.1, 2.2) << endl;

	function<double(Plus, double, double)> fc3 = &Plus::plusd;
	cout << fc3(Plus(), 1.1, 2.2) << endl;

	return 0;
}
补充解释:隐藏的this指针变量实际上并不是确定的,传对象就是对象类型接收。
应用场景
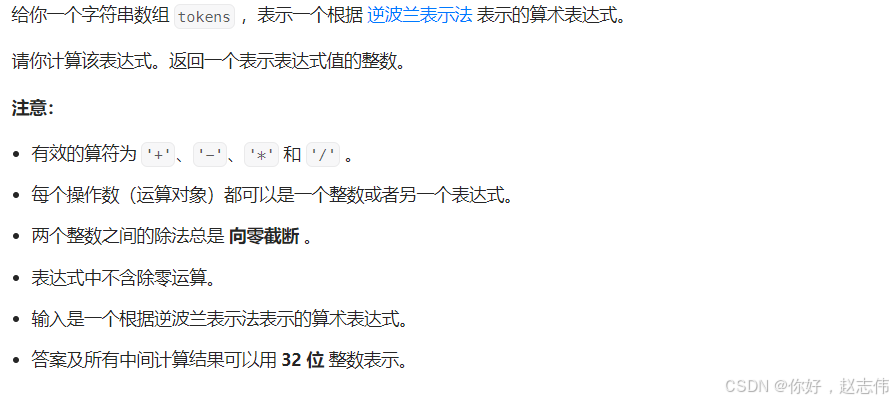
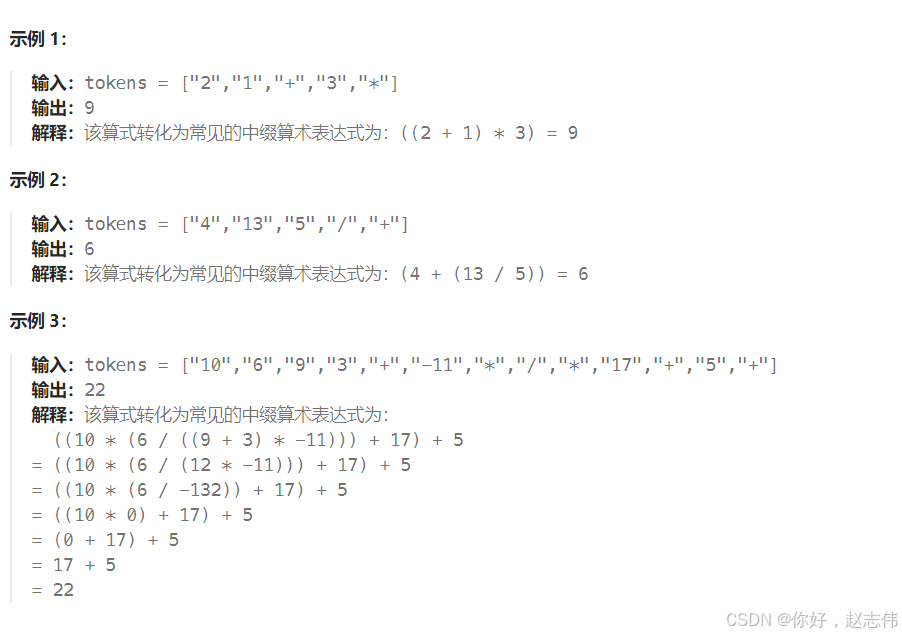
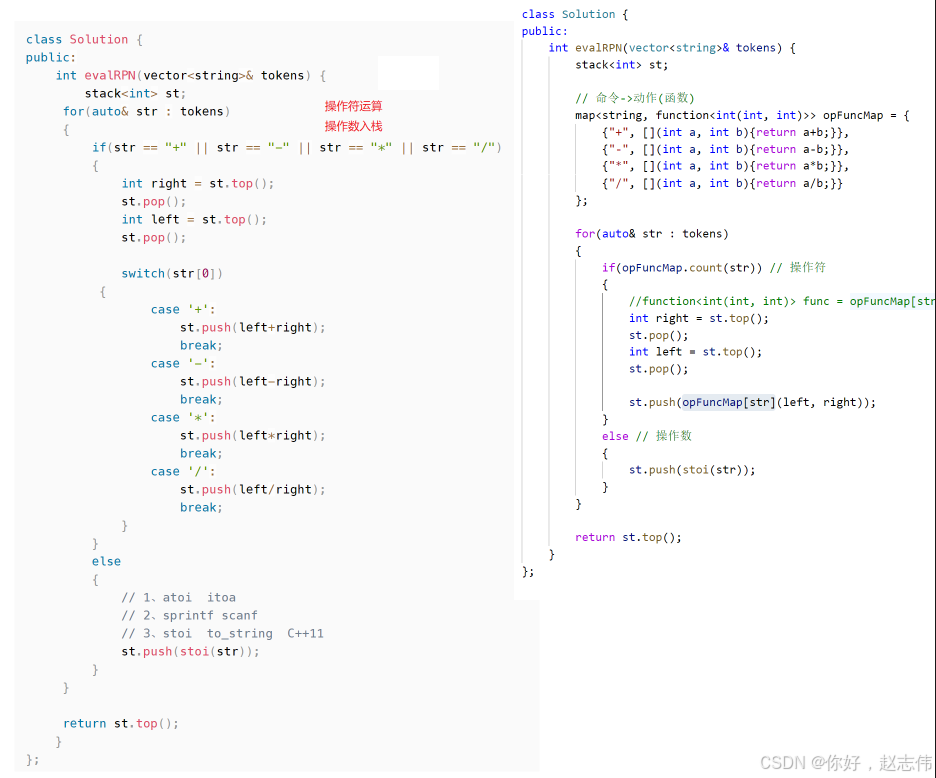
逆波兰表达式
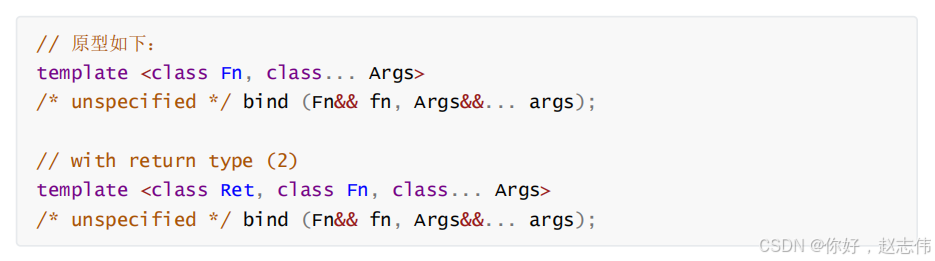
bind
#include <functional>
int Plus(int a, int b)
{
 return a + b;
}

class Sub
{
public:
	Sub(int x)
		:_x(x)
	{}

	int sub(int a, int b)
	{
		return (a - b)*_x;
	}

private:
	int _x;
};

int main()
{

// 绑定函数
    auto f2 = bind(Sub, placeholders::_1, placeholders::_2);
	cout << f2(10, 5) << endl;
//function<int(int, int)> f1 = bind(Sub, placeholders::_1, placeholders::_2);

// 绑定成员函数
    auto f3 = bind(&Sub::sub, placeholders::_1, placeholders::_2, placeholders::_3);
//function<int(int, int)>
    cout << f3(Sub(1), 10, 5) << endl;
    Sub sub(1);
	cout << f3(&sub, 10, 5) << endl;


// 绑定,调整参数个数,参数调换顺序
    auto f4 = bind(&Sub::sub, Sub(1), placeholders::_1, placeholders::_2);
	cout << f4(10, 5) << endl;

    auto f5 = bind(&Sub::sub, &sub, placeholders::_2, placeholders::_1);
	cout << f5(10, 5) << endl;

  return 0;
}
线程库
thread类的简单介绍


#include <thread>
int main()
{
 std::thread t1;
 cout << t1.get_id() << endl;
 return 0;
}// vs下查看
typedef struct
{ /* thread identifier for Win32 */
void *_Hnd; /* Win32 HANDLE */
unsigned int _Id;
} _Thrd_imp_t;- 函数指针
- lambda表达式
- 函数对象
#include <iostream>
using namespace std;
#include <thread>
void ThreadFunc(int a)
{
 cout << "Thread1" << a << endl;
}
class TF
{
public:
 void operator()()
 {
 cout << "Thread3" << endl;
 }
};
int main()
{
    // 线程函数为函数指针
 thread t1(ThreadFunc, 10);

    // 线程函数为lambda表达式
 thread t2([]{cout << "Thread2" << endl; });

    // 线程函数为函数对象
    TF tf;
 thread t3(tf);

 t1.join();
 t2.join();
 t3.join();
 cout << "Main thread!" << endl;
 return 0;
}- 采用无参构造函数构造的线程对象
- 线程对象的状态已经转移给其他线程对象
- 线程已经调用join或者detach结束
线程函数参数
#include <thread>
void ThreadFunc1(int& x)
{
 x += 10;
}
void ThreadFunc2(int* x)
{
 *x += 10;
}
int main()
{
 int a = 10;
 // 在线程函数中对a修改,不会影响外部实参,因为:线程函数参数虽然是引用方式,但其实际
//引用的是线程栈中的拷贝
 thread t1(ThreadFunc1, a);
 t1.join();
 cout << a << endl;
 // 如果想要通过形参改变外部实参时,必须借助std::ref()函数
 thread t2(ThreadFunc1, std::ref(a);
 t2.join();
 cout << a << endl;
 // 地址的拷贝
 thread t3(ThreadFunc2, &a);
 t3.join();
 cout << a << endl;
 return 0;
}用lambda可以不用ref()
void Print(int n, int& rx, mutex& rmtx)
{
	rmtx.lock();

	for (int i = 0; i < n; i++)
	{
		// t1 t2
		++rx;
	}

	rmtx.unlock();
}

int main()
{
	int x = 0;
	mutex mtx;
	thread t1(Print, 1000000, ref(x), ref(mtx));
	thread t2(Print, 2000000, ref(x), ref(mtx));

	t1.join();
	t2.join();

	cout << x << endl;

	return 0;
}
int main()
{
int x = 0;
mutex mtx;
auto func = [&](int n) {
mtx.lock();
for (size_t i = 0; i < n; i++)
{
++x;
}
mtx.unlock();
};
thread t1(func, 10000);
thread t2(func, 20000);
t1.join();
t2.join();
cout << x << endl;
return 0;
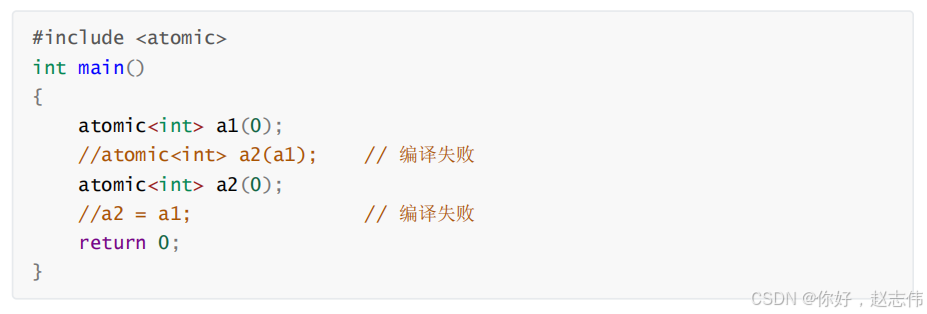
}原子性操作库(atomic)
#include <iostream>
using namespace std;
#include <thread>
#include <mutex>
std::mutex m;
unsigned long sum = 0L;
void fun(size_t num)
{
 for (size_t i = 0; i < num; ++i)
 {
 m.lock();
 sum++;
 m.unlock();
 }
}
int main()
{
 cout << "Before joining,sum = " << sum << std::endl;
 thread t1(fun, 10000000);
 thread t2(fun, 10000000);
 t1.join();
 t2.join();
 cout << "After joining,sum = " << sum << std::endl;
 return 0;
}
#include <iostream>
using namespace std;
#include <thread>
#include <atomic>
atomic_long sum{ 0 };
void fun(size_t num)
{
 for (size_t i = 0; i < num; ++i)
 sum ++;   // 原子操作
}
int main()
{
 cout << "Before joining, sum = " << sum << std::endl;
 thread t1(fun, 1000000);
 thread t2(fun, 1000000);
 t1.join();
 t2.join();

 cout << "After joining, sum = " << sum << std::endl;
 return 0;
}
#include <iostream>
using namespace std;
#include <thread>
#include <mutex>
#include <atomic>

int main()
{

    vector<thread> vthd;
	int n;
	cin >> n;
	vthd.resize(n);
   atomic<int> x = 0;
   //atomic<int> x{ 0 };

    mutex mtx;
	auto func = [&](int n) {
		//mtx.lock();
		// 局部域
		{
			//LockGuard lock(mtx);

			//lock_guard<mutex> lock(mtx);
			for (size_t i = 0; i < n; i++)
			{
				++x;
			}
			//mtx.unlock();
		}

		/*for (size_t i = 0; i < n; i++)
		{
			cout << i << endl;
		}*/
	};

	for (auto& thd : vthd)
	{
		// 移动赋值
		thd = thread(func, 100000);
	}

	for (auto& thd : vthd)
	{
		thd.join();
	}
	cout << x << endl;
	printf("%d\n", x.load());

   return 0;
}lock_guard与unique_lock
#include <iostream>
using namespace std;
#include <thread>
#include <mutex>
int number = 0;
mutex g_lock;
int ThreadProc1()
{
 for (int i = 0; i < 100; i++)
 {
 g_lock.lock();
 ++number;
 cout << "thread 1 :" << number << endl;
 g_lock.unlock();
 }
 return 0;
}
int ThreadProc2()
{
 for (int i = 0; i < 100; i++)
 {
 g_lock.lock();
 --number;
 cout << "thread 2 :" << number << endl;
 g_lock.unlock();
 }
 return 0;
}

int main()
{
 thread t1(ThreadProc1);
 thread t2(ThreadProc2);
 t1.join();
 t2.join();
 cout << "number:" << number << endl;
 system("pause");
 return 0;
}class LockGuard
{
public:
LockGuard(mutex& mtx)
:_mtx(mtx)
{
_mtx.lock();
}
~LockGuard()
{
_mtx.unlock();
}
private:
mutex& _mtx;
};#include <thread>
#include <mutex>
int main()
{
vector<thread> vthd;
int n;
cin >> n;
vthd.resize(n);
int x = 0;
mutex mtx;
auto func = [&](int n) {
//mtx.lock();
// 局部域
{
//LockGuard lock(mtx);
lock_guard<mutex> lock(mtx);
for (size_t i = 0; i < n; i++)
{
++x;
}
//mtx.unlock();
}
/*for (size_t i = 0; i < n; i++)
{
cout << i << endl;
}*/
};
for (auto& thd : vthd)
{
// 移动赋值
thd = thread(func, 100000);
}
for (auto& thd : vthd)
{
thd.join();
}
cout << x << endl;
printf("%d\n", x.load());
return 0;
}mutex的种类
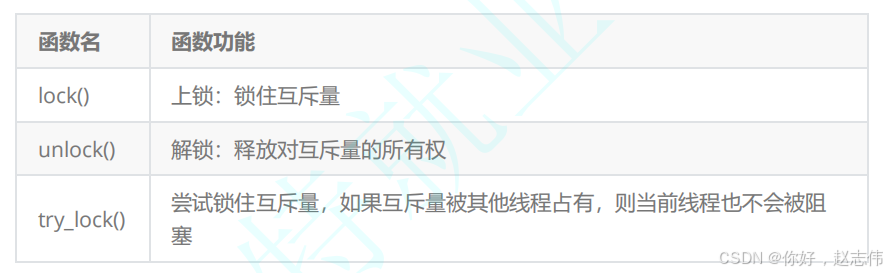
- 如果该互斥量当前没有被锁住,则调用线程将该互斥量锁住,直到调用 unlock之前,
- 该线程一直拥有该锁
- 如果当前互斥量被其他线程锁住,则当前的调用线程被阻塞住
- 如果当前互斥量被当前调用线程锁住,则会产生死锁(deadlock)
- 如果当前互斥量没有被其他线程占有,则该线程锁住互斥量,直到该线程调用 unlock
- 释放互斥量
- 如果当前互斥量被其他线程锁住,则当前调用线程返回 false,而并不会被阻塞掉
- 如果当前互斥量被当前调用线程锁住,则会产生死锁(deadlock)
- ry_lock_for()
- try_lock_until()
template<class _Mutex>
class lock_guard
{
public:
// 在构造lock_gard时,_Mtx还没有被上锁
 explicit lock_guard(_Mutex& _Mtx)
 : _MyMutex(_Mtx)
 {
 _MyMutex.lock();
 }
// 在构造lock_gard时,_Mtx已经被上锁,此处不需要再上锁
lock_guard(_Mutex& _Mtx, adopt_lock_t)
 : _MyMutex(_Mtx)
 {}
 ~lock_guard() _NOEXCEPT
 {
 _MyMutex.unlock();
 }
 lock_guard(const lock_guard&) = delete;
 lock_guard& operator=(const lock_guard&) = delete;
private:
 _Mutex& _MyMutex;
};与lock_guard不同的是,unique_lock更加的灵活,提供了更多的成员函数:
- 上锁/解锁操作:lock、try_lock、try_lock_for、try_lock_until和unlock
- 修改操作:移动赋值、交换(swap:与另一个unique_lock对象互换所管理的互斥量所有权)、释放(release:返回它所管理的互斥量对象的指针,并释放所有权)
- 获取属性:owns_lock(返回当前对象是否上了锁)、operator bool()(与owns_lock()的功能相同)、mutex(返回当前unique_lock所管理的互斥量的指针)。
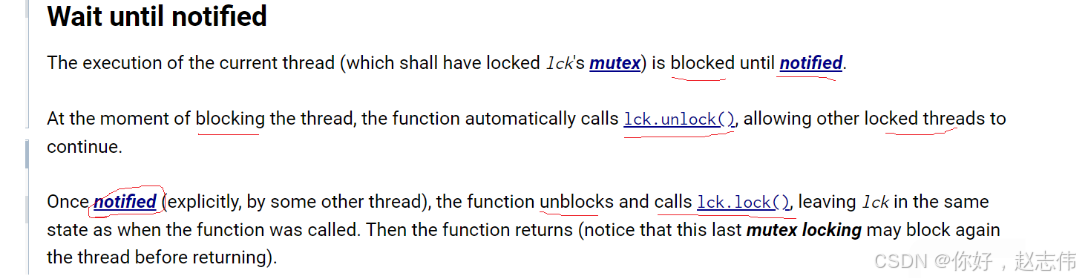
条件变量

#include <iostream>
using namespace std;
#include <thread>
#include <mutex>
#include <condition_variable>

int main()
{
	std::mutex mtx;
	condition_variable c;
	int n = 100;
	bool flag = true;

	thread t2([&]() {
		int j = 1;
		while (j < n)
		{
			unique_lock<mutex> lock(mtx);

			// 只要flag == true t2一直阻塞'
			// 只要flag == false t2不会阻塞
			while (flag)
				c.wait(lock);

			cout << j << endl;
			j += 2; // 奇数
			flag = true;

			c.notify_one();
		}
		});


	this_thread::sleep_for(std::chrono::milliseconds(1000));


	// 第一个打印的是t1打印0
	thread t1([&]() {
		int i = 0;
		while (i < n)
		{
			unique_lock<mutex> lock(mtx);
			// flag == false t1一直阻塞
			// flag == true t1不会阻塞
			while (!flag)
			{
				c.wait(lock);
			}

			cout << i << endl;

			flag = false;
			i += 2; // 偶数

			c.notify_one();
		}
	});


	t1.join();
	t2.join();

	return 0;
}
其他例子:
#include <iostream>           // std::cout
#include <thread>             // std::thread
#include <mutex>              // std::mutex, std::unique_lock
#include <condition_variable> // std::condition_variable

std::mutex mtx;
std::condition_variable cv;
bool ready = false;

void print_id(int id) {
	std::unique_lock<std::mutex> lck(mtx);
	while (!ready)
		cv.wait(lck);

	std::cout << "thread " << id << '\n';
}

void go() {
	std::unique_lock<std::mutex> lck(mtx);
	ready = true;
	cv.notify_all();
}

int main()
{
	std::thread threads[10];

	// spawn 10 threads:
	for (int i = 0; i < 10; ++i)
		threads[i] = std::thread(print_id, i);

	std::cout << "10 threads ready to race...\n";

	this_thread::sleep_for(std::chrono::milliseconds(100));

	go();                       // go!

	for (auto& th : threads)
		th.join();

	return 0;
}


 2957
2957

 被折叠的 条评论
为什么被折叠?
被折叠的 条评论
为什么被折叠?
 到【灌水乐园】发言


