


目录
2.在HbuilderX中搭建一个vue-cli项目(标准的前端项目)
本篇文章基于Vue(前端框架)
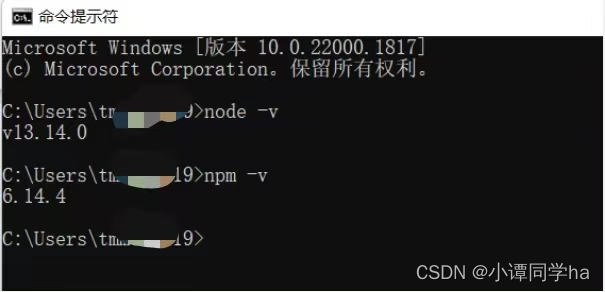
1.安装Node.js运行环境
在cmd中输入两个命令:
-
node -v
-
npm -v
-
如下图所示:环境就已经自动配置好了。
2.在HbuilderX中搭建一个vue-cli项目(标准的前端项目)

vue-cli项目结构介绍

-
单页面项目架构
整个页面只有一个html,用来被vue对象绑定<div id="app">其中提出一个组件的概念Hello.vue,只需在index.html中切换不同的组件即可。整个项目中始终只用创建一个vue对象,这样做一些全局设置就非常的简单,只需为唯一的一个vue对象设置

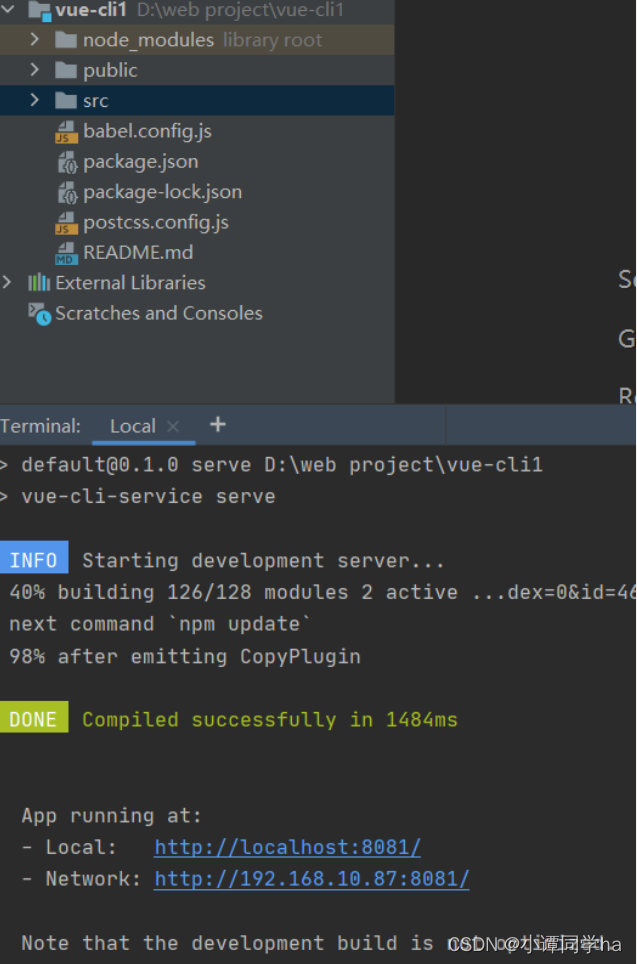
3.创建成功后,在命令行窗口启动前端项目
-
窗口:终端

-
命令:npm run serve
-
启动成功后,出现访问地址:http://localhost:8080/
-
命令行输入:ctrl+c 终止服务
*终端无法打开的解决办法:
1.右键项目—> 外部命令 —>npm run serve
2.安装内置终端插件
-
工具—> 插件安装—> 点击内置终端安装即可
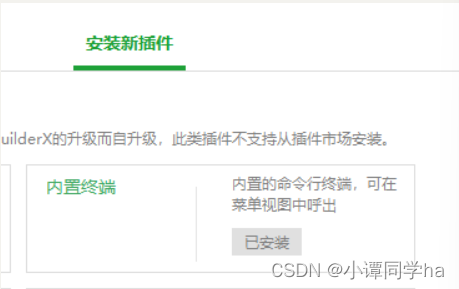
3.在命令行输入:npm run serve
4.将项目导入到idea中
导入idea的操作流程:
-
1.选择idea中Open or Import
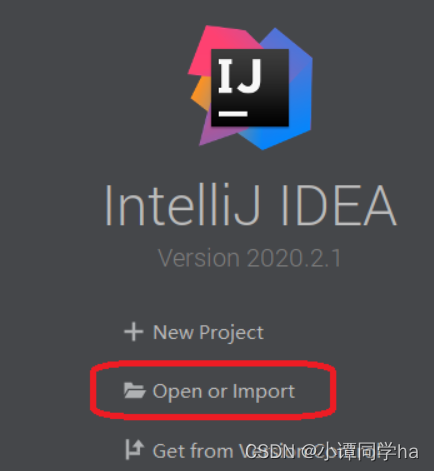
-
2.将文件所在目录导入即可
在idea命令行输入启动项目的命令:npm run serve
-
4.组件路由
组件模板
<!-- 一个.vue文件是一个组件,可以理解为一个页面,但是和页面不同
内容都写在一个template标签中,
template标签必须有一个根标签
-->
<template>
<div>
{{msg}}
</div>
</template>
<script>
export default{
data(){
return{
msg:欢迎登录
},
methods:{
}
}
}
</script>
<style>
</style>1.安装
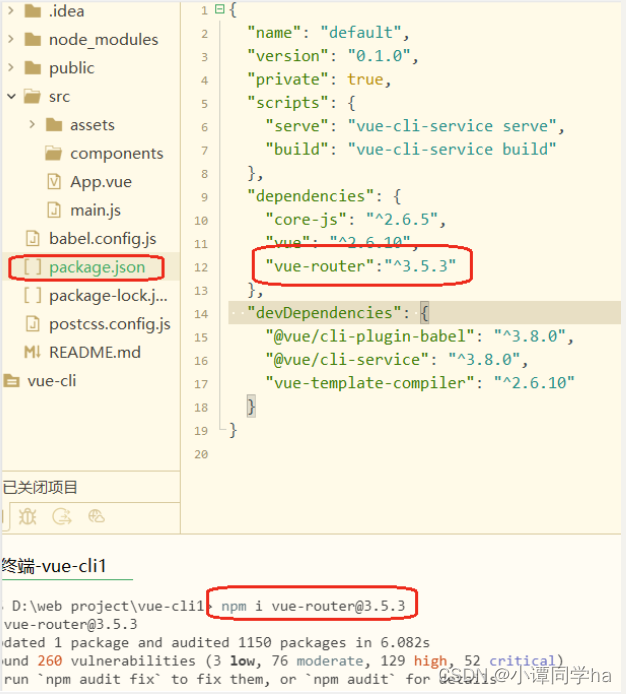
vue router 是 Vue.js 官方路由管理器,是一个插件包,用npm安装。
-
打开命令行工具,进入项目,输入命令:
npm i vue-router@3.5.3
-
输入命令后,在package.json中会出现"vue-router":"^3.5.3",则安装成功。
-
2.创建路由的配置文件
搭建步骤:
-
创建router目录
在src中创建index.js文件,在其中配置路由:
import Vue from 'vue'; import router from 'vue-router'; /* 导入路由*/ /* 导入组件 */ import Login from "../Login.vue"; import Main from "../Main.vue"; Vue.use(router); /* 定义组件路由 */ var rout = new router({ routes: [ { path: '/login', //为组件定义定制 name: 'Login', component: Login }, { path:"/main", component:Main }, ] }); //导出路由对象 export default rout;
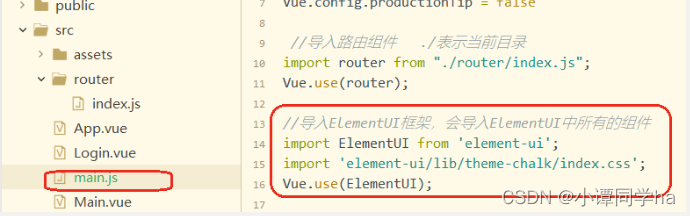
3.在main.js中配置路由
//main.js是项目核心配置文件 //导入vue.js import Vue from 'vue' //导入一个默认的组件 import App from './App.vue' Vue.config.productionTip = false //导入路由组件 ./表示当前目录 import router from "./router/index.js"; Vue.use(router); //导入ElementUI框架,会导入ElementUI中所有的组件 import ElementUI from 'element-ui'; import 'element-ui/lib/theme-chalk/index.css'; Vue.use(ElementUI); //创建项目中唯一的一个vue对象 new Vue({ render: h => h(App), //默认将app.vue组件加载到唯一的index.html中的<div id="app">div上面, router, }).$mount('#app')
-
显示组件
在App.vue的<div>中添加<router-view>代码
<template>
  <div id="app">
      <!-- router-view就是用来显示不同组件的,就向一个画布-->
      <router-view></router-view>
  </div>
</template>
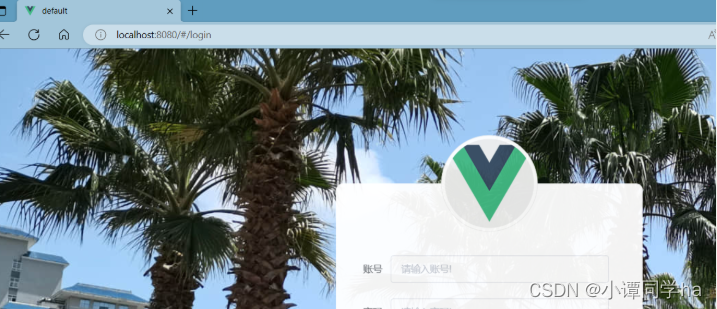
4.使用
1.重新启动项目,输入命令:npm run serve

2.在地址后直接输入组件路由地址,如:login
5.前端项目打包
-
命令:npm run build
打包后的内容放在一个dist目录中,只暴露一个index.html ,其余的被压缩处理

ElementUI
是一个前端UI框架,封装许多写好的ui组件,如:表单布局、布局组件、表格组件...
支持vue.js的语法
使用:
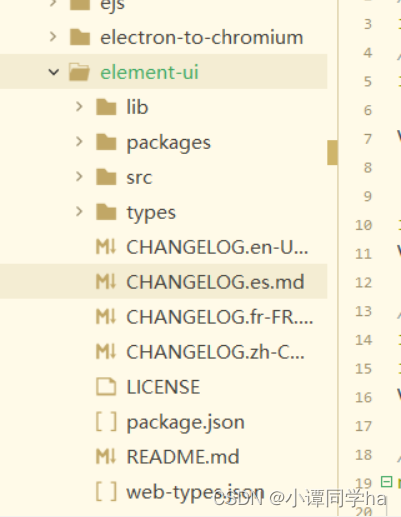
1.安装:
在命令行输入: npm i element-ui -S
成功后在node_modules会出现element-ui目录
-
2.在main.js中配置
import ElementUI from 'element-ui';
import 'element-ui/lib/theme-chalk/index.css';
Vue.use(ElementUI);
-
ElementUI中用到的组件:
表单组件
文本输入框组件
密码输入框组件
按钮组件
图表组件
container容器组件
菜单组件
消息框组件
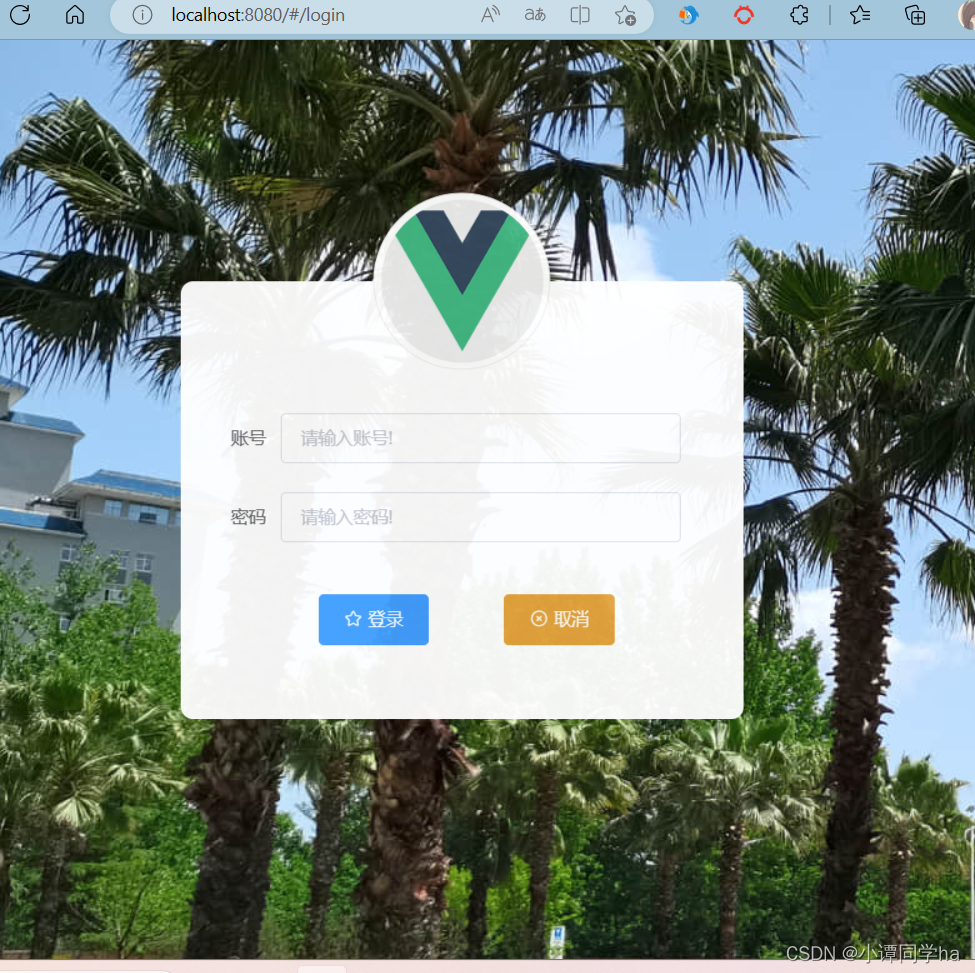
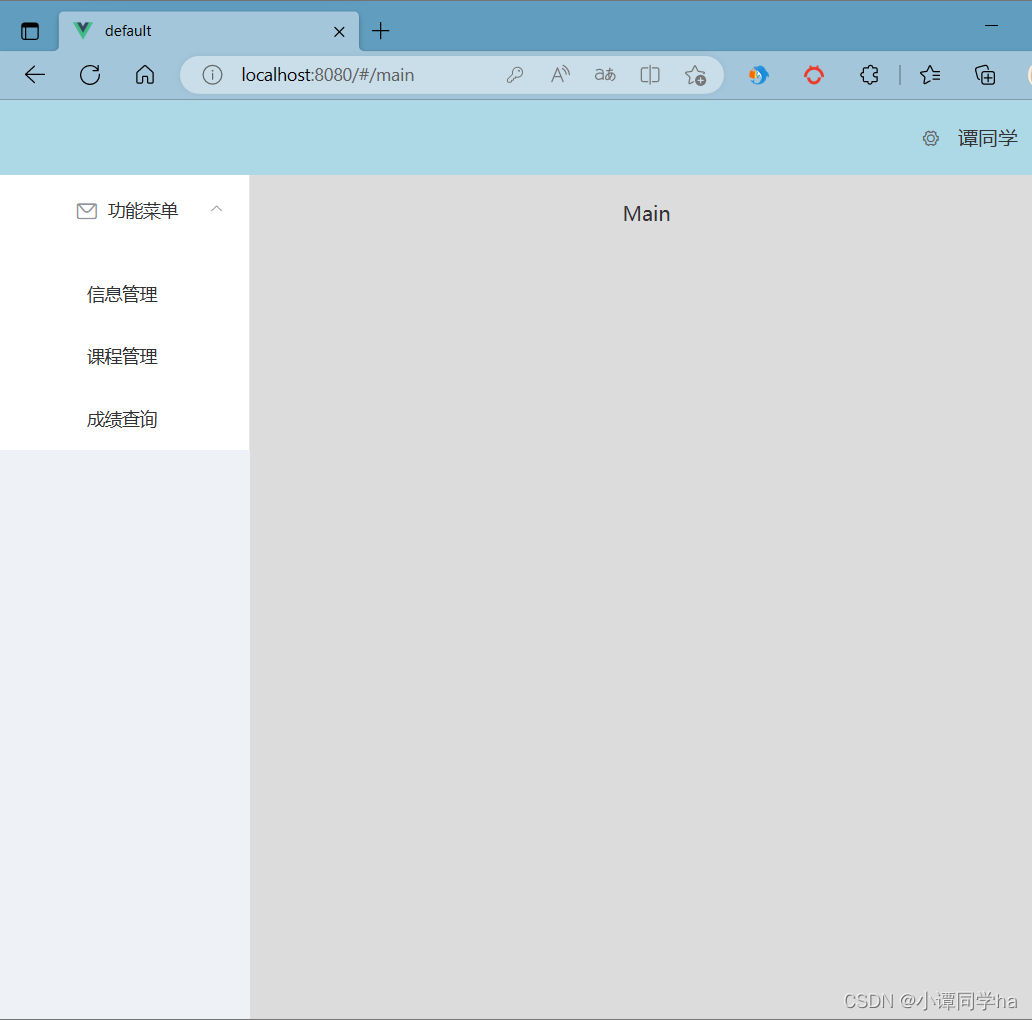
测试:
切换到login页面
输入后切换到main页面
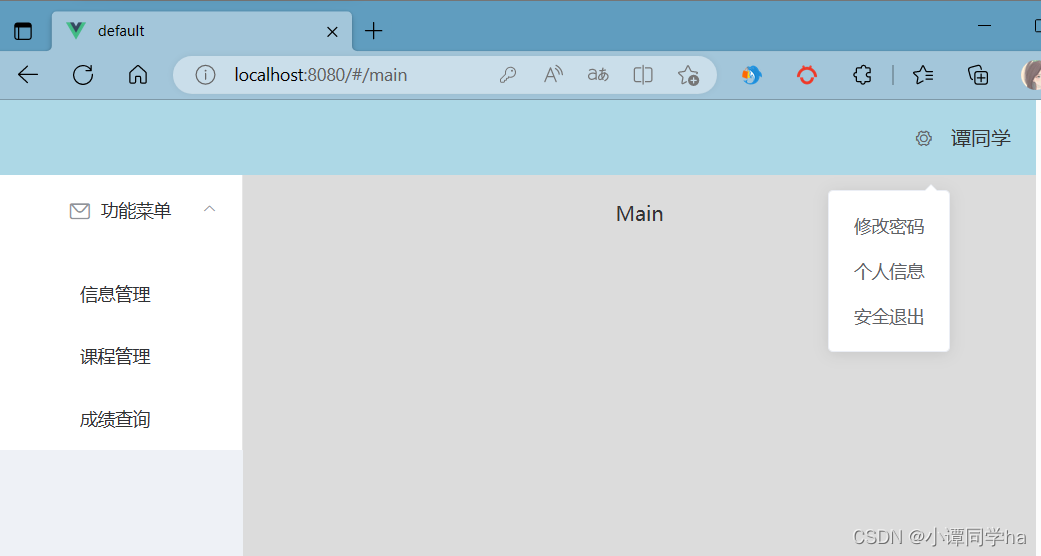
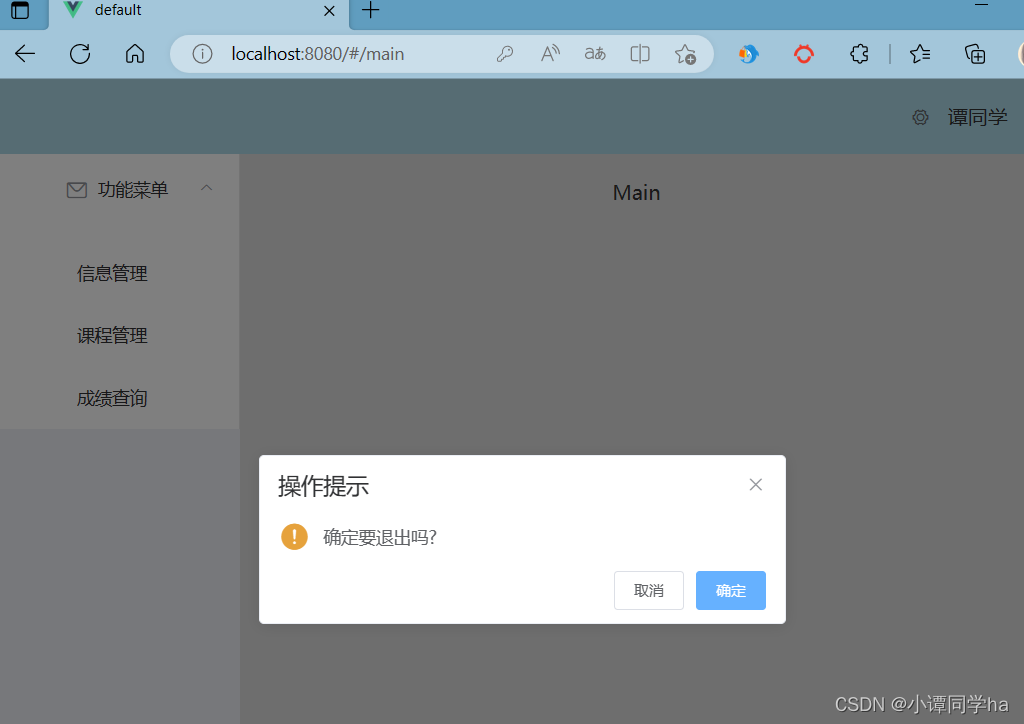
点击安全退出
点击确定,切回到login页面

代码:
Login.vue
<!-- 一个.vue文件是一个组件,可以理解为一个页面,但是和页面不同
  内容都写在一个template标签中,
  template标签有且只有一个根标签
-->
<template>
	 <div class="login_container">
	     <!-- 登录盒子-->
	     <div class="login_box">
	          <!-- 头像盒子-->
	          <div class="img_box">
	                <img src="./assets/logo.png" />
	          </div>

				<div style="padding-top: 105px;padding-right: 50px;">
					<el-form ref="form" :model="form" rules="rules" label-width="80px">
					  <el-form-item label="账号" prop="account">
					    <el-input v-model="form.account" placeholder="请输入账号!"></el-input>
					  </el-form-item>
					  <el-form-item label="密码" prop="password">
					    <el-input v-model="form.password" placeholder="请输入密码!" show-password></el-input>
					   </el-form-item>
					  <el-form-item>
					    <el-button type="primary" icon="el-icon-star-off" @click="login('form')" style="margin-left:30px;">登录</el-button>
					    <el-button  type="warning" icon="el-icon-circle-close" style="margin-left:60px; margin-top: 20px; ">取消</el-button>
					  </el-form-item>
					</el-form>
				</div>
	     </div>
	  </div>
</template>

<script>
/* 导出组件,并为组件定义数据,函数,生命周期函数 */
export default{
	 data(){
		return{
			form: {
			  account: '',
			  passwrod: ''
			},

			rules: {
			  account: [
				{ required: true, message: '请输入账号!', trigger: 'blur' },
				{ min: 5, max: 10, message: '长度在 5 到 10 个字符', trigger: 'blur' }
			  ],
			  password: [
				{ required: true, message: '请输入密码!', trigger: 'blur' },
				{ min: 5, max: 10, message: '长度在 5 到 10 个字符', trigger: 'blur' }
			  ],
			},
		};
	 },
	 methods:{
		login(formName){
			  /* 在此把前端登录表单中的数据向后java后端发送  this.form
			  如果发送成功,在此向用户提示,并跳转到登录成功的组件 */
			this.$refs[formName].validate((valid) => {
			    if(valid) {
			  		alert("登录成功");
			  		//跳转到其他页面
			  		this.$router.push("/main");
			    }
				else{
					console.log('error submit!!');
			        return false;
				}
			});
		}
	}
}
</script>

<style>
  .login_container{
    height: 100vh;
    margin: 0px;
    padding: 0px;
	background-image: url(assets/bg.jpg);
  }

    .login_box{
      width: 450px;
      height: 350px;
      background-color: #fff;
      border-radius: 10px;
      position: absolute;
      left: 50%;
      top: 50%;
      transform: translate(-50%,-50%);
	  opacity: 0.95;
    }

    .img_box{
       width: 130px;
       height: 130px;
       position: absolute;
       left: 50%;
       transform: translate(-50%,-50%);
       background-color: #fff;
       border-radius: 50%;
       padding: 5px;
       border: 1px solid #eee;
    }

    .img_box img{
         width: 100%;
         height: 100%;
         border-radius: 50%;
         background-color: #eee;
     }
</style>
main.vue
<template>
	<div>
		<el-container>
			<!-- 顶部 -->
			<el-header>
				<el-dropdown>
					<i class="el-icon-setting" style="margin-right: 15px"></i>
					<el-dropdown-menu slot="dropdown">
					<el-dropdown-item>修改密码</el-dropdown-item>
			        <el-dropdown-item>个人信息</el-dropdown-item>
			        <el-dropdown-item><span @click="logOut()">安全退出</span></el-dropdown-item>
					</el-dropdown-menu>
			    </el-dropdown>
			    <span>谭同学</span>
			</el-header>
			<el-container>
				<!-- 左侧菜单 -->
				<el-aside width="200px" style="background-color: rgb(238, 241, 246)">
					<el-menu :default-openeds="['1']">
					      <el-submenu index="1">
					        <template slot="title"><i class="el-icon-message"></i>功能菜单</template>
					        <el-menu-item-group>
					          <el-menu-item index="1-1">信息管理</el-menu-item>
					          <el-menu-item index="1-2">课程管理</el-menu-item>
							  <el-menu-item index="1-3">成绩查询</el-menu-item>
					        </el-menu-item-group>
					      </el-submenu>
					    </el-menu>
				</el-aside>
				<!-- 右侧操作区间 -->
				<el-main>Main</el-main>
			</el-container>
		</el-container>
	</div>
</template>

<script>
	export default{
		  data(){
			  return{

			  }
		  },
		  methods:{
			  logOut(){
				  this.$confirm('确定要退出吗?', '操作提示', {
				            confirmButtonText: '确定',
				            cancelButtonText: '取消',
				            type: 'warning'
				          }).then(() => {
							  this.$router.push("/login")
				          });
			  }
		  }
	}
</script>

<style>
	.el-header{
	   background-color: lightblue;
	   color: #333;
	   text-align: right;
	   line-height: 60px;
	 }

	 .el-aside {
	   background-color: #D3DCE6;
	   color: #333;
	   text-align: center;
	   height: 100vh;
	 }

	 .el-main {
	   background-color: gainsboro;
	   color: #333;
	   text-align: center;
	   height: 100vh;
	 }
</style>


 902
902

 被折叠的 条评论
为什么被折叠?
被折叠的 条评论
为什么被折叠?
 到【灌水乐园】发言


