


实现效果
productDetail
目录
2. 商品列表 用 $router 传递参数(商品列表可以参考之前的s-shop项目——用Vant-ui实现商品列表的展示功能-CSDN博客)
布局:使用到了element-ui中的 Container 布局容器
1.使用$router传参,实现点击商品跳转到商品详情页
第一步是实现了,点击商品进入商品详情页。并在详情页的控制台打印了当前商品的信息
实现效果
productDetail01
实现代码
1. 定义productDetail路由
需要传递商品的id值
	{
		path: '/productDetail/:id',
		component: () => import('./pages/productDetail.vue'),
	},
2. 商品列表 用 $router 传递参数(商品列表可以参考之前的s-shop项目——用Vant-ui实现商品列表的展示功能-CSDN博客)
              <van-grid-item v-for="(i,inx) in productList" :key="inx">
                <!--       用@click绑定一个点击事件实现,当点击该商品图片时向 /productDetail的路由中添加该商品的id          -->
                <van-image :src="`http://127.0.0.1:8081/api`+ i.mainImage"
                           @click="$router.push(`/productDetail/${i.id}`)"/>
                <p style="margin-top: 5px">{{ i.name }}</p>
                <p style="color: orange;margin-top: 2px">¥ {{ i.price }}</p>
              </van-grid-item>
3. 在商品详情页用$route 接收传递过来的参数
<template>
<div>
</div>
</template>
<script>
export default {
name: "productDetail",
data(){
return{
id:0,
}
},
mounted() {
this.getProductDetail()
},
methods:{
getProductDetail(){
var that = this
//用$route接收传递过来的id值,没有$router没有使用path时,传递的参数会存在 params中
//在使用path后params会被忽略,这种情况可以使用querry
that.id = this.$route.params.id
this.axios.get(`/api/product/${that.id}`).then(function (response){
console.log(response.data)
})
console.log(that.id)
}
}
}
</script>
<style scoped>
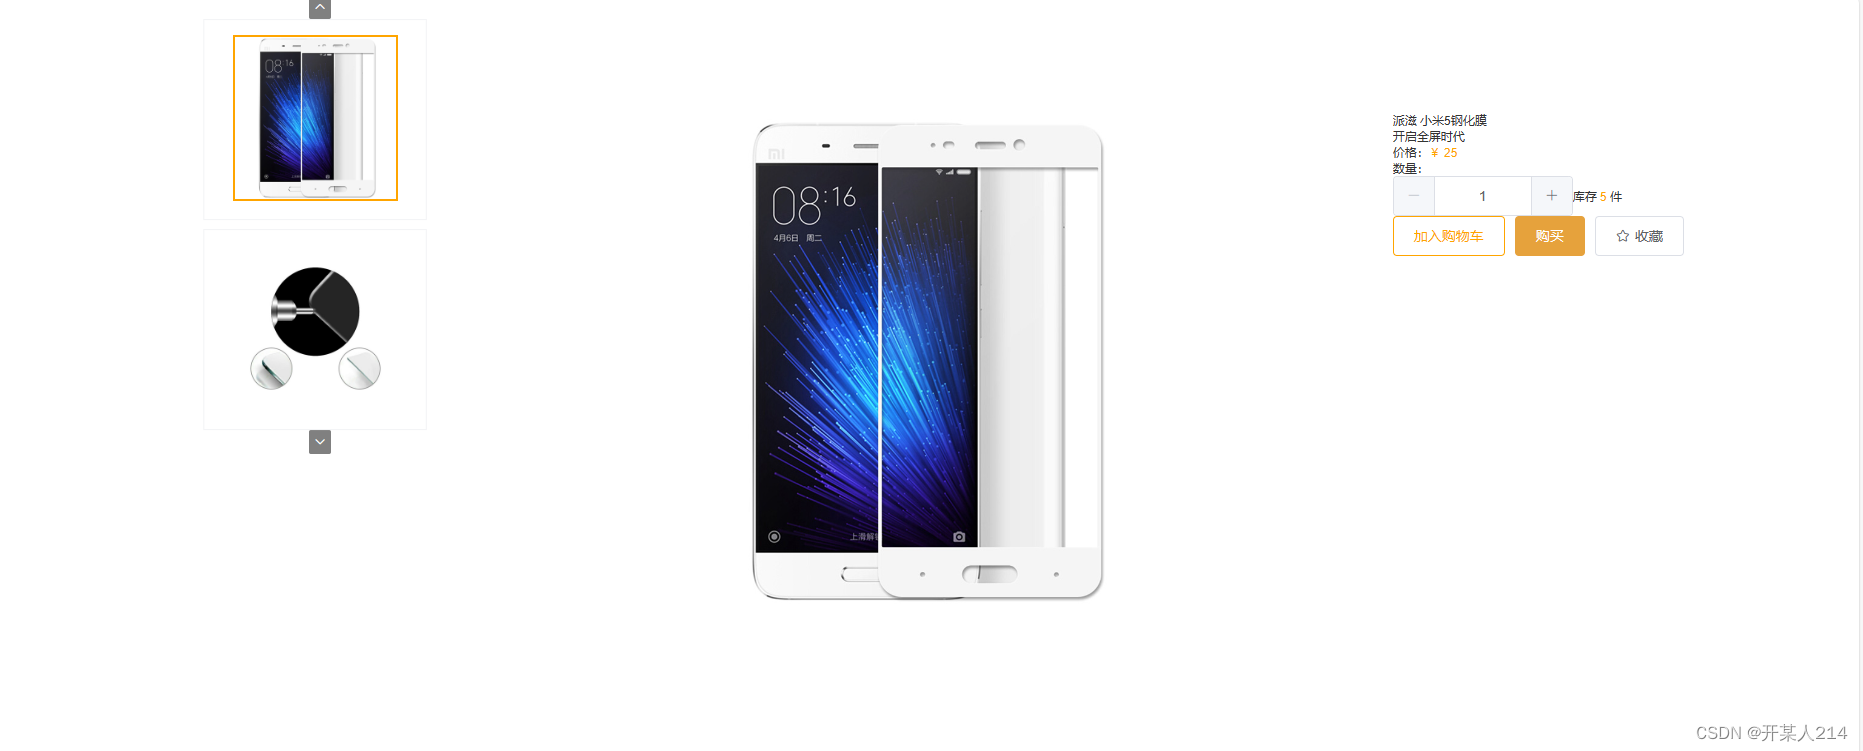
</style>2.实现详情页
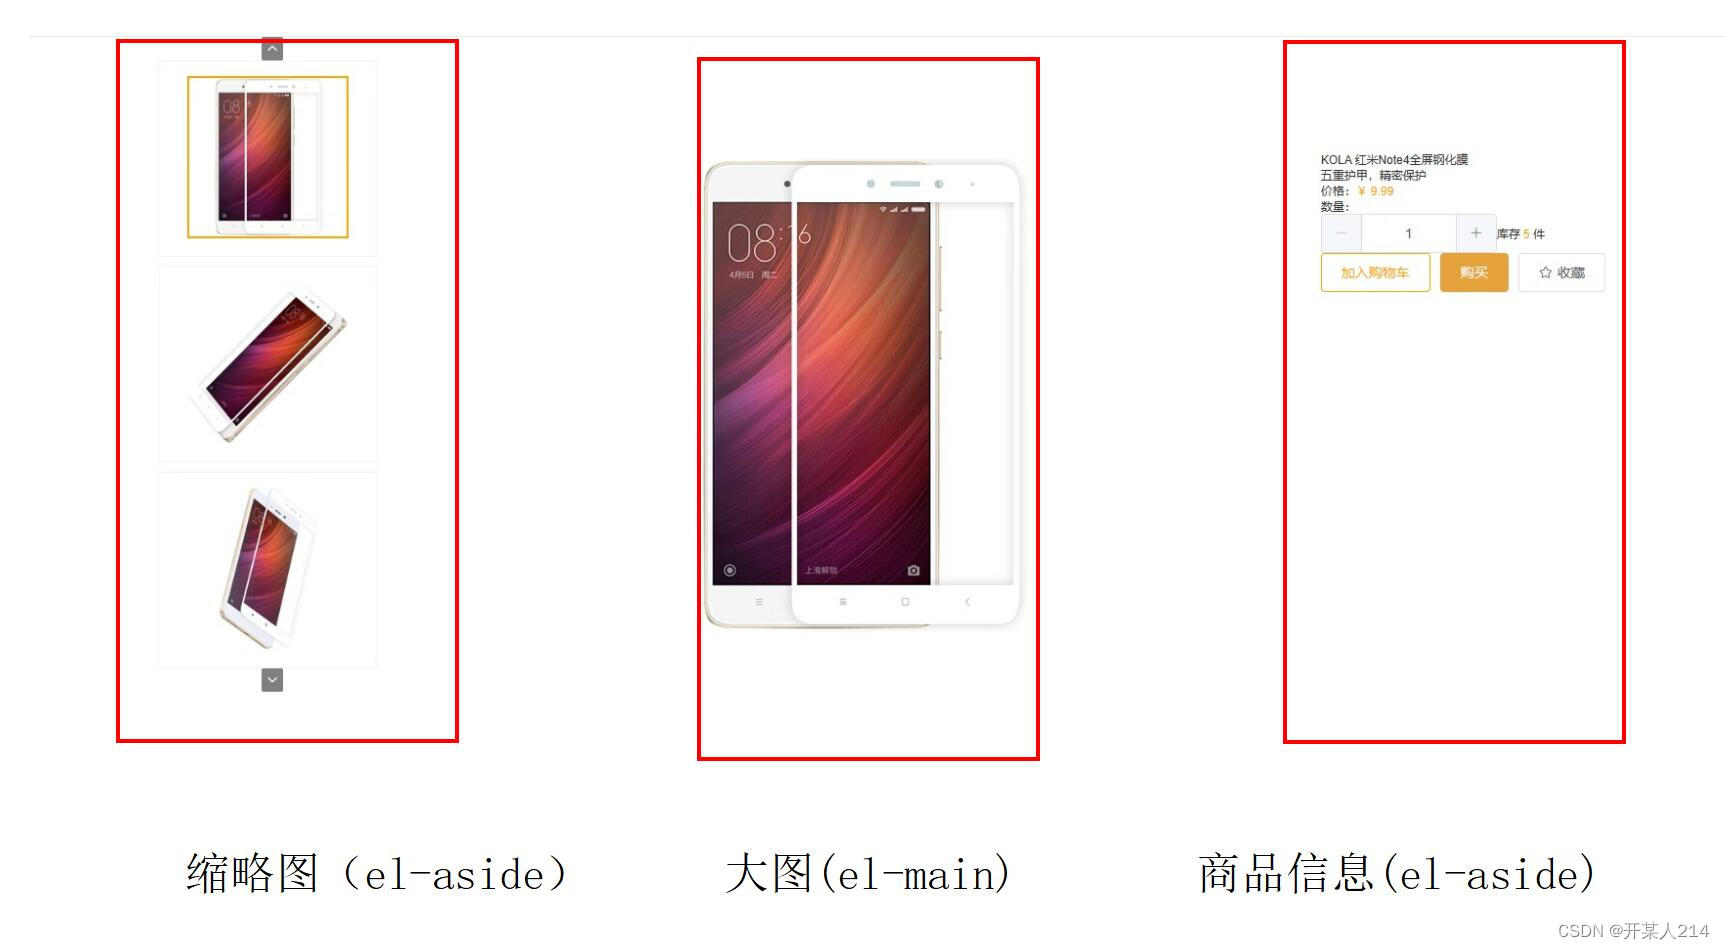
布局:使用到了element-ui中的 Container 布局容器
主要分为三个部分(三个盒子 调为行内元素)
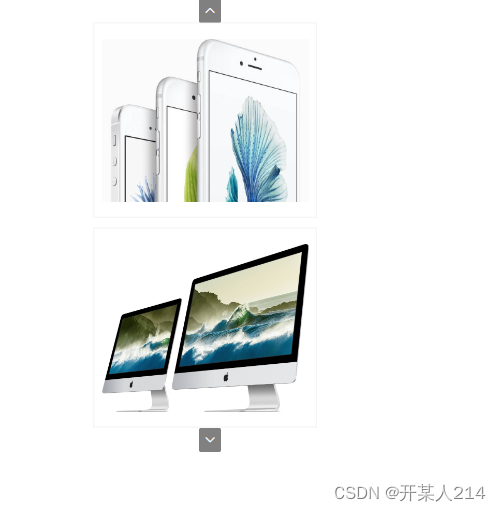
缩略图:
实现效果
productDetail02
主要步骤
1. 使用到了 vant-ui 的宫格 使用:column-num="1",自定义列数为1
2. 在宫格内容前后分别放上一个 图标按钮 (vant-ui)
3.用axiso调用后端接口,将全部图片取出放入 iamges ,并在取出数据时给给每张图片附上一个id
    getProductDetail() {
      var that = this
      //用$route接收传递过来的id值,没有$router没有使用path时,传递的参数会存在 params中
      //在使用path后params会被忽略,这种情况可以使用querry
      that.id = this.$route.params.id
      this.axios.get(`/api/product/${that.id}`).then(function (response) {
        that.productDetail = response.data
        // console.log(that.productDetail)
        //将所有图片都放在 image 对象中
        that.imageList = response.data.subImages.split(",");
        for (let i = 0; i < that.imageList.length; i++) {
          //每张图片赋值一个id = 索引号
          let obj = {id: i, url: that.imageList[i]}
          that.images.push(obj)
        }
        // console.log(that.images)
      })
    }
4.用v-for 将图片渲染到宫格中,并将每张图片的id值赋值给 activeId(用于判断当前在那一张图片)
            <van-grid-item v-for="(i,inx) in images" :key="inx">
              <!--      得到每个缩略图的id        -->
              <div class="thumbnail" @click="getId(i)">
                <van-image :src="`http://127.0.0.1:8081/api`+ i.url" />
              </div>
            </van-grid-item>
getId(id)代码
    //获取对应缩略图的id值
    getId(i) {
      var that = this
      that.activeId = i.id
    },
5.实现 橘色边框(点击动态绑定样式)
橘色边框CSS代码
.thumbnailActive{
  border: 2px solid orange;
}
判断是否显示橘色边框
  //  改变样式
    currentClass(inx) {
      var that = this
      // 当div的索引号等于 当前图片的id 时,显示橘色边框 否则不显示
      return [that.activeId == inx ? 'thumbnailActive' : ''];
    }
点击上一张的 图标按钮 (判断是否在第一张)
    //  上一张
    preImage() {
      var that = this
      // console.log("activeId   " + that.activeId)
      // console.log(that.id)
      //判断是否是第一张,如果是第一张返回最后一张图
      if (that.activeId == 0) {
        return that.activeId = that.images.length - 1
      } else {
        return that.activeId -= 1
      }
      // that.currentClass(that.activeId)
      // console.log(that.images.length)
    },
点击下一张的 图标按钮 (判断是否在最后一张)
    //  下一张
    nextImage() {
      var that = this
      //判断是否是最后一张图,如果是最后一张图返回第一张图
      if (that.activeId == that.images.length - 1) {
        return that.activeId = 0
      } else {
        return that.activeId += 1
      }
      // console.log(that.activeId)
    },
给缩略图绑定方法
      <el-aside width="25%" id="thumbnail">
        <div>
          <van-grid :border="true" :column-num="1" :gutter="10" style="width: 50%">
            <!--      上一张      -->
            <van-button icon="arrow-up" type="primary" color="grey" size="mini" style="margin-left: 45%;"
                        @click="preImage()"/>

            <van-grid-item v-for="(i,inx) in images" :key="inx">
              <!--      得到每个缩略图的id        -->
              <div class="thumbnail" @click="getId(i)">
                <van-image :src="`http://127.0.0.1:8081/api`+ i.url"  :class="currentClass(inx)"/>
              </div>
            </van-grid-item>

            <!--     下一张       -->
            <van-button icon="arrow-down" type="primary" color="grey" size="mini" style="margin-left: 45%"
                        @click="nextImage()"/>
          </van-grid>
        </div>
      </el-aside>
大图:
实现效果
productDetail03
代码
根据返回的activeId 在images中 取对应的图片
      <el-main>
        <div id="slider">
          <van-image :src="`http://127.0.0.1:8081/api`+ images[activeId].url" width="100%" style="margin-top: auto"/>
        </div>
      </el-main>
商品信息:
根据自己需要的信息 将数据取出 渲染到野蛮上即可
      <el-aside width="25%" style="float: right">
        <div id="mes">
          <p>{{ productDetail.name }}</p>
          <p>{{ productDetail.subTitle }}</p>
          <p>价格:<span style="color:orange">¥ {{ productDetail.price }}</span></p>
          <p>数量:</p>
          <div>
            <el-input-number v-model="num1" @change="handleChange" :min="1"
                             :max="productDetail.stock"></el-input-number>
            <span>库存 <span style="color: orange">{{ productDetail.stock }}</span> 件</span>
          </div>
          <div>
            <el-button style="color: orange;border: 1px solid orange">加入购物车</el-button>
            <el-button type="warning">购买</el-button>
            <el-button icon="el-icon-star-off">收藏</el-button>
          </div>
        </div>
      </el-aside>
总代码:
<template>
  <div>
    <el-container>
      <el-aside width="25%" id="thumbnail">
        <div>
          <van-grid :border="true" :column-num="1" :gutter="10" style="width: 50%">
            <!--      上一张      -->
            <van-button icon="arrow-up" type="primary" color="grey" size="mini" style="margin-left: 45%;"
                        @click="preImage()"/>

            <van-grid-item v-for="(i,inx) in images" :key="inx">
              <!--      得到每个缩略图的id        -->
              <div class="thumbnail" @click="getId(i)">
                <van-image :src="`http://127.0.0.1:8081/api`+ i.url"  :class="currentClass(inx)"/>
              </div>
            </van-grid-item>

            <!--     下一张       -->
            <van-button icon="arrow-down" type="primary" color="grey" size="mini" style="margin-left: 45%"
                        @click="nextImage()"/>
          </van-grid>
        </div>
      </el-aside>

      <el-main>
        <div id="slider">
          <van-image :src="`http://127.0.0.1:8081/api`+ images[activeId].url" width="100%" style="margin-top: auto"/>
        </div>
      </el-main>

      <el-aside width="25%" style="float: right">
        <div id="mes">
          <p>{{ productDetail.name }}</p>
          <p>{{ productDetail.subTitle }}</p>
          <p>价格:<span style="color:orange">¥ {{ productDetail.price }}</span></p>
          <p>数量:</p>
          <div>
            <el-input-number v-model="num1" @change="handleChange" :min="1"
                             :max="productDetail.stock"></el-input-number>
            <span>库存 <span style="color: orange">{{ productDetail.stock }}</span> 件</span>
          </div>
          <div>
            <el-button style="color: orange;border: 1px solid orange">加入购物车</el-button>
            <el-button type="warning">购买</el-button>
            <el-button icon="el-icon-star-off">收藏</el-button>
          </div>
        </div>
      </el-aside>
    </el-container>

  </div>
</template>

<script>
export default {
  name: "productDetail",
  data() {
    return {
      activeId: 0,
      //商品id
      id: 0,
      productDetail: [],
      imageList: [],
      images: [],
      num1: 1,
    }
  },
  mounted() {
    this.getProductDetail()
  },
  methods: {
    handleChange(value) {
      console.log(value);
    },
    getProductDetail() {
      var that = this
      //用$route接收传递过来的id值,没有$router没有使用path时,传递的参数会存在 params中
      //在使用path后params会被忽略,这种情况可以使用querry
      that.id = this.$route.params.id
      this.axios.get(`/api/product/${that.id}`).then(function (response) {
        that.productDetail = response.data
        // console.log(that.productDetail)
        //将所有图片都放在 image 对象中
        that.imageList = response.data.subImages.split(",");
        for (let i = 0; i < that.imageList.length; i++) {
          //每张图片赋值一个id = 索引号
          let obj = {id: i, url: that.imageList[i]}
          that.images.push(obj)
        }
        // console.log(that.images)
      })
    },

    //获取对应缩略图的id值
    getId(i) {
      var that = this
      that.activeId = i.id
    },

    //  上一张
    preImage() {
      var that = this
      // console.log("activeId   " + that.activeId)
      // console.log(that.id)
      //判断是否是第一张,如果是第一张返回最后一张图
      if (that.activeId == 0) {
        return that.activeId = that.images.length - 1
      } else {
        return that.activeId -= 1
      }

      // that.currentClass(that.activeId)
      // console.log(that.images.length)
    },

    //  下一张
    nextImage() {
      var that = this
      //判断是否是最后一张图,如果是最后一张图返回第一张图
      if (that.activeId == that.images.length - 1) {
        return that.activeId = 0
      } else {
        return that.activeId += 1
      }
      // console.log(that.activeId)
    },

  //  改变样式
    currentClass(inx) {
      var that = this
      return [that.activeId == inx ? 'thumbnailActive' : ''];
    }

  }
}
</script>

<style scoped>
#thumbnail {
  display: inline-block;
  margin-left: 200px;
  width: 25%;
  /*margin-top: 20%;*/
}

#slider {
  display: inline-block;
  width: 70%;
  margin-top: 15%;
}

#mes {
  margin-top: 25%;
}

.thumbnail {
  /*border: 2px solid orange;*/
  width: 80%;
}
.thumbnailActive{
  border: 2px solid orange;
}
</style>


 2035
2035


 被折叠的 条评论
为什么被折叠?
被折叠的 条评论
为什么被折叠?
 到【灌水乐园】发言


