


目录
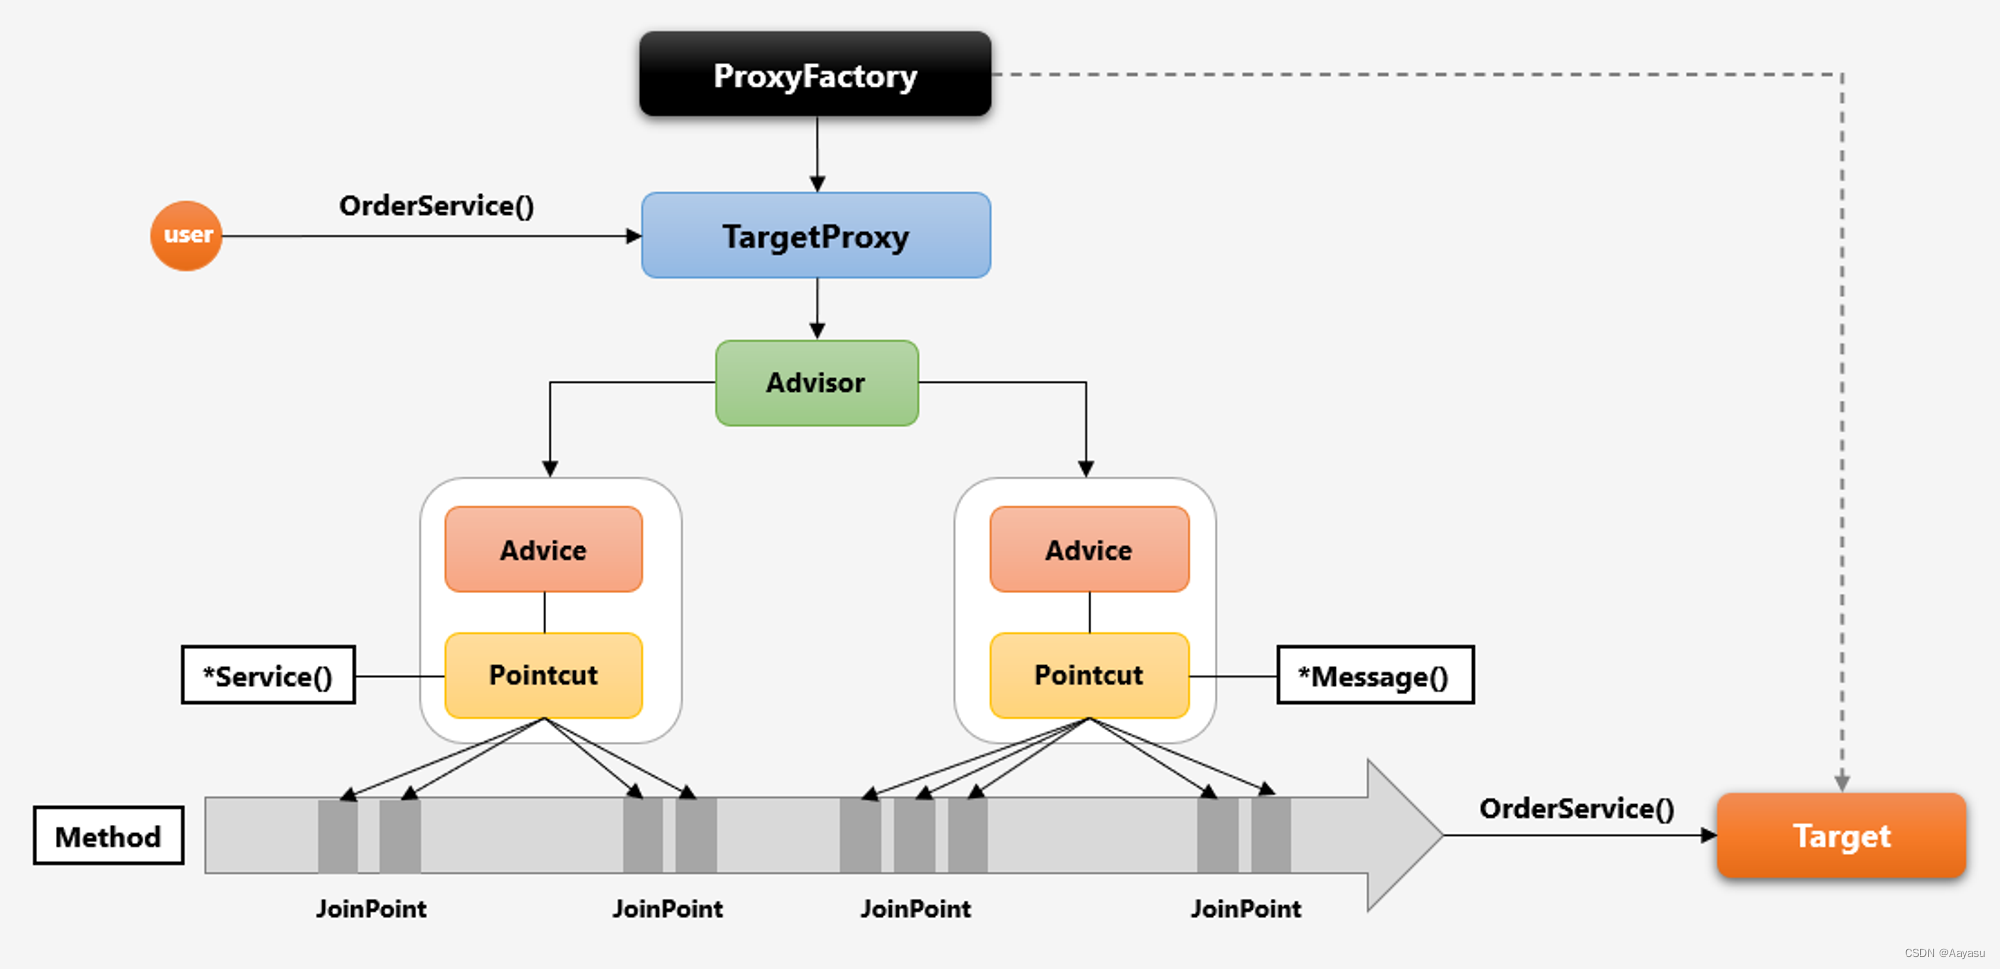
面向切片,在某些方法的执行之前或者执行之后进行操作,也就是代理。通过AOP可以保证我们在原有业务不变的情况下进行某些操作。比如我们在A方法执行之后想要再输出一些信息,那我们就要更改A方法的实现逻辑,这样就破坏了A原有的逻辑,此时我们就可以使用AOP的思想,在A之后输出一些信息并且不改变A方法的实现,这就是代理,并且我们还可以不用去担心是否有一些A方法不回去打印信息,只要配置了,就会进行打印信息的操作。
1.XML配置文件实现AOP
resources下创建的application配置文件,输入以下代码
<?xml version="1.0" encoding="UTF-8"?>
<beans xmlns="http://www.springframework.org/schema/beans"
       xmlns:xsi="http://www.w3.org/2001/XMLSchema-instance"
       xmlns:aop="http://www.springframework.org/schema/aop"
       xsi:schemaLocation="http://www.springframework.org/schema/beans http://www.springframework.org/schema/beans/spring-beans.xsd
       http://www.springframework.org/schema/aop http://www.springframework.org/schema/aop/spring-aop.xsd">
</beans>
导入依赖
<dependency>
    <groupId>org.springframework</groupId>
    <artifactId>spring-aspects</artifactId>
    <version>6.0.10</version>
</dependency>
public class Student {
public void method(){
System.out.println("Student类method方法。");
}
}public class StudentAop {
public void beforeMethod(){
System.out.println("StudentAop类:Student类方法执行前。");
}
public void afterMethod(){
System.out.println("StudentAop类:Student类方法执行后。");
}
}
<?xml version="1.0" encoding="UTF-8"?>
<beans xmlns="http://www.springframework.org/schema/beans"
       xmlns:xsi="http://www.w3.org/2001/XMLSchema-instance"
       xmlns:aop="http://www.springframework.org/schema/aop"
       xsi:schemaLocation="http://www.springframework.org/schema/beans http://www.springframework.org/schema/beans/spring-beans.xsd
       http://www.springframework.org/schema/aop http://www.springframework.org/schema/aop/spring-aop.xsd">
    <bean name="student" class="org.example.entity.Student"/>
    <bean name="studentAop" class="org.example.entity.StudentAop"/>
</beans>
接下来我们要用XML配置来实现aop,我们现在想要在Student类的method方法调用之前调用一次StudentAop类的beforeMethod方法,之后调用一次afterMethod,所有的配置都在config对中
<aop:config>
</aop:config>
在config中使用pointcut配置切点,id就是切入点的名称,expression中有很多的配置,这里我们使用execution,填写格式是 修饰符 包名.类名.方法名称(方法参数),这里我们把切点配置在Student的method法中上
<aop:config>
        <aop:pointcut id="method" expression="execution(* org.example.entity.Student.method())"/>
    </aop:config>
然后就是使用aspect配置增强方法所在的类,ref指定所在类的name
<aop:config>
        <aop:pointcut id="method" expression="execution(* org.example.entity.Student.method())"/>
        <aop:aspect ref="studentAop">
        </aop:aspect>
    </aop:config>
最后配置最强方法,我们这里使用before配置方法执行之前的,使用after配置方法执行之后的,method就是指定增强方法,pointcut-ref就是指定执行的切点,这里填入我们刚刚配置的切点method,到这里我们就完美的配置好了AOP
<aop:config>
        <aop:pointcut id="method" expression="execution(* org.example.entity.Student.method())"/>
        <aop:aspect ref="studentAop">
            <aop:before method="beforeMethod" pointcut-ref="method"/>
            <aop:after method="afterMethod" pointcut-ref="method"/>
        </aop:aspect>
    </aop:config>
最后我们在Main类中执行一下method方法
public class Main {
    public static void main(String[] args) {
        ApplicationContext context = new ClassPathXmlApplicationContext("application.xml");
        Student student = (Student) context.getBean(Student.class);
        student.method();
    }
}
执行结果:
StudentAop类:Student类方法执行前。
Student类method方法。
StudentAop类:Student类方法执行后。
有时我们想要拿一些方法的参数,比如我们修改一下method方法,我们传入一些参数
public class Student {
    public void method(String str){
        System.out.println("Student类method方法。");
    }
}
同时修改一下切点配置,其他都不需要改变
<aop:pointcut id="method" expression="execution(* org.example.entity.Student.method(String))"/>这时候我们可以为增强发方法加入JoinPoint来获取参数,获得的是参数列表,这里只有一个参数,我们获得下标为0也就是第一个参数
public class StudentAop {
    public void beforeMethod(JoinPoint joinPoint){
        System.out.println("StudentAop类:Student类方法执行前的"+joinPoint.getArgs()[0]);
    }
    public void afterMethod(JoinPoint joinPoint){
        System.out.println("StudentAop类:Student类方法执行后的"+joinPoint.getArgs()[0]);
    }
}
执行一下method方法
public class Main {
    public static void main(String[] args) {
        ApplicationContext context = new ClassPathXmlApplicationContext("application.xml");
        Student student = context.getBean(Student.class);
        student.method("小爱");
    }
}
接下来我们再看一下另一种实现方式,我们使用around来实现,首先我们在StudentAop类中增加around方法,proceed相当于执行Student类中的method方法,我们就可以自己决定什么时候执行method,比如方法中我们想在方法执行前输出一下,在执行后输出一下,我们就可以在proceed前后输出
public Object aroundMethod(ProceedingJoinPoint proceedingJoinPoint) throws Throwable {
        System.out.println("StudentAop类:Student类方法执行前的"+proceedingJoinPoint.getArgs()[0]);
        proceedingJoinPoint.proceed();
        System.out.println("StudentAop类:Student类方法执行后的"+proceedingJoinPoint.getArgs()[0]);
        return proceedingJoinPoint.getArgs()[0];
    }
修改一下config配置
<aop:config>
        <aop:pointcut id="method" expression="execution(* org.example.entity.Student.method(String))"/>
        <aop:aspect ref="studentAop">
            <aop:around method="aroundMethod" pointcut-ref="method"/>
        </aop:aspect>
    </aop:config>
执行一下:
public class Main {
    public static void main(String[] args) {
        ApplicationContext context = new ClassPathXmlApplicationContext("application.xml");
        Student student = context.getBean(Student.class);
        student.method("小爱");
    }
}
执行结果:
StudentAop类:Student类方法执行前的小爱
Student类method方法。
StudentAop类:Student类方法执行后的小爱
2.接口实现AOP
我们在StudentAop类中实现MethodBeforeAdvice接口,重写before方法
public class StudentAop implements MethodBeforeAdvice {
    @Override
    public void before(Method method, Object[] args, Object target) throws Throwable {
        System.out.println("StudentAop类:Student类方法执行前");
    }
}
在xml文件中,将之前的aspect改为advisor配置,advice-ref就是配置我们的增强方法在哪个类里面,pointcut-ref指定切点的位置
<aop:config>
        <aop:pointcut id="method" expression="execution(* org.example.entity.Student.method())"/>
        <aop:advisor advice-ref="studentAop" pointcut-ref="method"/>
</aop:config>
执行一下:
public class Main {
    public static void main(String[] args) {
        ApplicationContext context = new ClassPathXmlApplicationContext("application.xml");
        Student student = context.getBean(Student.class);
        student.method();
    }
}
执行结果:
StudentAop类:Student类方法执行前
当然有before的接口,也有after的接口以及around的接口,分别是AfterReturningAdvice, MethodInterceptor,实现对应方法即可,这里不再演示。
3.注解实现AOP
首先,删掉配置文件(有注解了谁还用xml啊?doge)
添加配置类并且添加@EnableAspectJAutoProxy@ComponentScan("org.example.entity") @Configuration注解,ComponentScan就是告诉Spring在哪个包的类会注册Bean
@EnableAspectJAutoProxy
@ComponentScan("org.example.entity")
@Configuration
public class MainConfiguration {
}
然后给Student和StudentAop类添加@Component注解自动注册Bean
@Componentpublic class Student { public void Method(){ System.out.println("Student类"); }}给StudentAop@Aspect注解相当于指定增强方法所在位置,直接在StudentAop的方法中添加@Before注解指定在哪个切点处即可
@Aspect
@Component
public class StudentAop{

    @Before("execution(* org.example.entity.Student.method())")
    public void beforeMethod(){
        System.out.println("StudentAop类:Student方法之前");
    }
}
执行方法:
@Aspect
@Component
public class StudentAop{

    @Before("execution(* org.example.entity.Student.method())")
    public void beforeMethod(){
        System.out.println("StudentAop类:Student方法之前");
    }
}
执行结果:
StudentAop类:Student方法之前
Student类
同样也可以为它加入JoinPoint参数来获得切入点的信息
@Aspect
@Component
public class StudentAop{

    @Before("execution(* org.example.entity.Student.method(String))")
    public void beforeMethod(JoinPoint joinPoint){
        System.out.println("StudentAop类:Student方法之前"+joinPoint.getArgs()[0]);
    }
}
@Component
public class Student {
public void method(String str){
System.out.println("Student类");
}
}执行结果:
StudentAop类:Student方法之前小爱
Student类
当然还有其他Around,AfterReturning等注解,这里不再演示,实现方式都相似。
学习参考:
如有错误,欢迎纠正。


 349
349

 被折叠的 条评论
为什么被折叠?
被折叠的 条评论
为什么被折叠?
 到【灌水乐园】发言


