


目录
一、克隆 ChatGLM-6B 源码到本地
(1)下载压缩包到本地
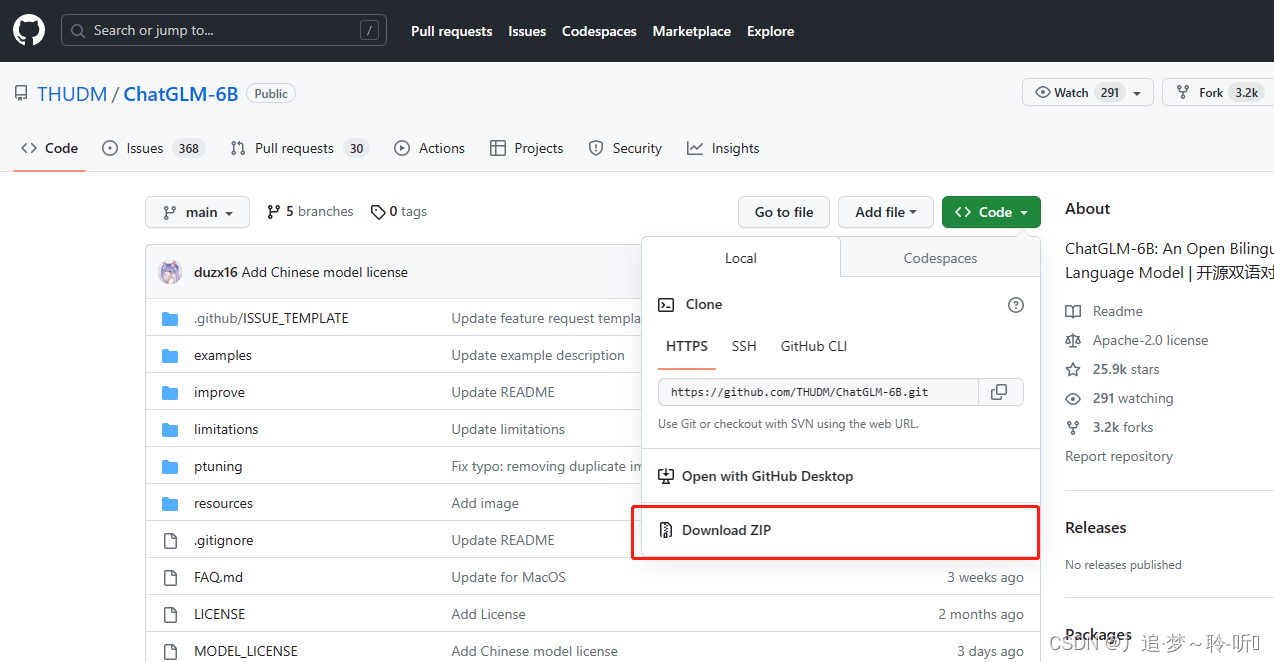
(2)Git 克隆
git clone https://github.com/THUDM/ChatGLM-6B.git二、下载数据集ADGEN 数据集
数据集下载地址:
# Google Drive:
https://drive.google.com/file/d/13_vf0xRTQsyneRKdD1bZIr93vBGOczrk/viewTsinghua
# Cloud:
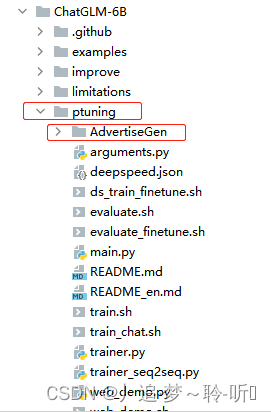
https://cloud.tsinghua.edu.cn/f/b3f119a008264b1cabd1/?dl=1 下载处理好的 ADGEN 数据集,将解压后的AdvertiseGen目录放到本目录下(也就是放在\ChatGLM-6B\ptuning文件夹下)。
三、代码修改
(1)配置文件修改(ChatGLM-6B文件夹下的requirements.txt),删除torch>=1.10(kaggle自带相对应的cuda版本),并添加 rouge_chinese nltk jieba datasets 这几个依赖包。

处理后的文件

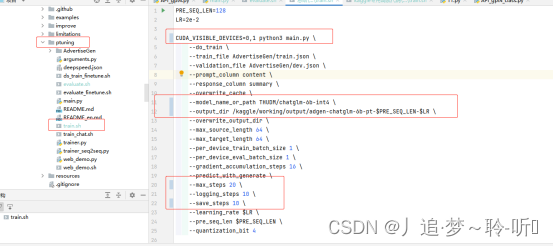
(2) 切换到ChatGLM-6B\ptuning目录下,修改训练的配置文件train.sh。需要修改的参数有:
2.1 CUDA_VISIBLE_DEVICES=0修改为CUDA_VISIBLE_DEVICES=0,1
因为我们用的kaggle的T4*2单机双卡训练,这里把CUDA_VISIBLE_DEVICES可用的GPU设置为2张。
注意:目前不知道什么原因,用kaggle的P100进行单卡训练时,出现以下报错(RuntimeError: CUDA error: no kernel image is available for execution on the device),可能是GPU版本问题,切换为T4*2双卡下训练就不会报错了。
2.2 --model_name_or_path参数:THUDM/chatglm-6b修改为THUDM/chatglm-6b-int4。
原因很简单,显存有限,只能使用-int4量化的版本来训练,总的参数也有30亿多了。
2.3 --output_dir参数output/adgen-chatglm-6b-pt-$PRE_SEQ_LEN-$LR修改为/kaggle/working/output/adgen-chatglm-6b-pt-$PRE_SEQ_LEN-$LR
2.4 (可选)--max_steps,--logging_steps,--save_steps,为了演示方便,这里把这几个参数设置小一点。
最终的文件设置如下:
代码如下:
PRE_SEQ_LEN=128
LR=2e-2
CUDA_VISIBLE_DEVICES=0,1 python3 main.py \
--do_train \
--train_file AdvertiseGen/train.json \
--validation_file AdvertiseGen/dev.json \
--prompt_column content \
--response_column summary \
--overwrite_cache \
--model_name_or_path THUDM/chatglm-6b-int4 \
--output_dir /kaggle/working/output/adgen-chatglm-6b-pt-$PRE_SEQ_LEN-$LR \
--overwrite_output_dir \
--max_source_length 64 \
--max_target_length 64 \
--per_device_train_batch_size 1 \
--per_device_eval_batch_size 1 \
--gradient_accumulation_steps 16 \
--predict_with_generate \
--max_steps 20 \
--logging_steps 10 \
--save_steps 10 \
--learning_rate $LR \
--pre_seq_len $PRE_SEQ_LEN \
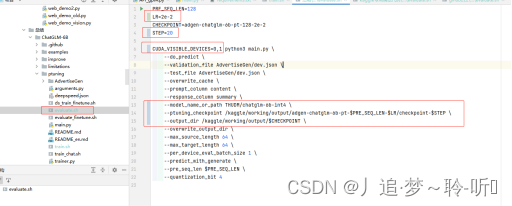
--quantization_bit 4(3)修改测试的配置文件evaluate.sh。
代码如下:
PRE_SEQ_LEN=128
LR=2e-2
CHECKPOINT=adgen-chatglm-6b-pt-128-2e-2
STEP=20

CUDA_VISIBLE_DEVICES=0,1 python3 main.py \
    --do_predict \
    --validation_file AdvertiseGen/dev.json \
    --test_file AdvertiseGen/dev.json \
    --overwrite_cache \
    --prompt_column content \
    --response_column summary \
    --model_name_or_path THUDM/chatglm-6b-int4 \
    --ptuning_checkpoint /kaggle/working/output/adgen-chatglm-6b-pt-$PRE_SEQ_LEN-$LR/checkpoint-$STEP \
    --output_dir /kaggle/working/output/$CHECKPOINT \
    --overwrite_output_dir \
    --max_source_length 64 \
    --max_target_length 64 \
    --per_device_eval_batch_size 1 \
    --predict_with_generate \
    --pre_seq_len $PRE_SEQ_LEN \
    --quantization_bit 4
四、Kaggle代码运行
代码如下:
pip install -r /kaggle/input/datas-chat-glm-xiaolvs/ChatGLM-6B/requirements.txt
# 修改工作路劲
import os, sys

path = "/kaggle/input/datas-chat-glm-xiaolvs/ChatGLM-6B/ptuning"

# 查看当前工作目录
retval = os.getcwd()
print("当前工作目录为 %s" % retval)

# 修改当前工作目录
os.chdir( path )

# 查看修改后的工作目录
retval = os.getcwd()

print("目录修改成功 %s" % retval)
# 关闭 wandb ,不然训练是会报错。
!wandb off# 训练
! bash train.sh# 测试
! evaluate.sh运行过程如图:

!!成功跑通!!
代码在kaggle上已经公开,可以直接拷贝下来自己去运行试试。
 https://www.kaggle.com/lvcuiyan/chatglm-6b-pt-xiaolv
五、最后将模型加载到本地用CPU进行效果测试
这里使用本地CPU进行推理。
# !/usr/bin/env python
# -*-coding:utf-8 -*-

"""
# File       : pre.py
# Time       :2023/5/26 16:53
# Author     :小吕同学
"""
import torch
from transformers import AutoConfig, AutoModel, AutoTokenizer

# 原始模型的路径:THUDM/chatglm-6b-int4,本地文件路径也可。
model_path = r"THUDM/chatglm-6b-int4"
# 经过微调后保存的模型,这里选择最后一个模型 output\adgen-chatglm-6b-pt-128-2e-2\checkpoint-20\pytorch_model.bin
prefix_state_dict = r"\output\adgen-chatglm-6b-pt-128-2e-2\checkpoint-20\pytorch_model.bin"
# 载入Tokenizer
tokenizer = AutoTokenizer.from_pretrained(model_path, trust_remote_code=True)
config = AutoConfig.from_pretrained(model_path, trust_remote_code=True, pre_seq_len=128)
model = AutoModel.from_pretrained(model_path, config=config, trust_remote_code=True)


# ------------ vvvv 测试原本模型可以注释掉 vvvvv ------------
# prefix_state_dict = torch.load(prefix_state_dict,map_location=torch.device('cpu'))
# new_prefix_state_dict = {}
# for k, v in prefix_state_dict.items():
#     if k.startswith("transformer.prefix_encoder."):
#         new_prefix_state_dict[k[len("transformer.prefix_encoder."):]] = v
# model.transformer.prefix_encoder.load_state_dict(new_prefix_state_dict)
# ------------ ^^^^^^^^^^^^^^^^^^^^^  ------------

# 模型量化
model = model.quantize(4)
model = model.float()
model.transformer.prefix_encoder.float()
model = model.eval()
print('模型总的参数:', sum(p.numel() for p in model.parameters()))

"""
通过设置top_p=0.01, temperature=0.01,来控制模型输出的模型,数值越小,模型越准确。
"""
response, history = model.chat(tokenizer, "类型#上衣*材质#牛仔布*颜色#白色*风格#简约*图案#刺绣*衣样式#外套*衣款式#破洞", history=[],do_sample=True, top_p=0.01, temperature=0.01)
print(response)
print(history)

# 原始数据
# {"content": "类型#上衣*材质#牛仔布*颜色#白色*风格#简约*图案#刺绣*衣样式#外套*衣款式#破洞",
# "summary": "简约而不简单的牛仔外套,白色的衣身十分百搭。衣身多处有做旧破洞设计,打破单调乏味,增加一丝造型看点。衣身后背处有趣味刺绣装饰,丰富层次感,彰显别样时尚。"}

# 没微调前的模型输出
# [('类型#上衣*材质#牛仔布*颜色#白色*风格#简约*图案#刺绣*衣样式#外套*衣款式#破洞', '类型:\n\n上衣材质:牛仔布\n颜色:白色\n风格:简约\n图案:刺绣\n衣款式:外套\n\n破洞')]

# 微调后模型的输出
# {"labels": "<image_-100> 简约而不简单的牛仔外套,白色的衣身十分百搭。衣身多处有做旧破洞设计,打破单调乏味,增加一丝造型看点。衣身后背处有趣味刺绣装饰,丰富层次感,彰显别样时尚。",
# "predict": "小清新风格的牛仔外套,简约又无味,轻松搭配牛仔裤,搭配高跟鞋,完美诠释了甜美小清新的气息。拼接关系的刺绣元素,凸显美感,破洞的设计,播放出时尚感,可爱甜美,可爱本人了。"}
代码地址:
openi:
 https://openi.pcl.ac.cn/xiaolv/chatglm_kaggle.git
参考链接:
ChatGLM-6B源码![]() https://github.com/THUDM/ChatGLM-6B
https://github.com/THUDM/ChatGLM-6B
官方微调代码![]() https://github.com/THUDM/ChatGLM-6B/blob/main/ptuning/README.md
https://github.com/THUDM/ChatGLM-6B/blob/main/ptuning/README.md


 2万+
2万+


 被折叠的 条评论
为什么被折叠?
被折叠的 条评论
为什么被折叠?
 到【灌水乐园】发言


