


目录
1.7.2.AuthenticationEntryPoint
1.SpringSecurity之授权
1.1.授权介绍
Spring Security 中的授权分为两种类型:
-
基于角色的授权:以用户所属角色为基础进行授权,如管理员、普通用户等,通过为用户分配角色来控制其对资源的访问权限。
-
基于资源的授权:以资源为基础进行授权,如 URL、方法等,通过定义资源所需的权限,来控制对该资源的访问权限。
Spring Security 提供了多种实现授权的机制,最常用的是使用基于注解的方式,建立起访问资源和权限之间的映射关系。
其中最常用的两个注解是 @Secured 和 @PreAuthorize。@Secured 注解是更早的注解,基于角色的授权比较适用,@PreAuthorize 基于 SpEL 表达式的方式,可灵活定义所需的权限,通常用于基于资源的授权。
1.2.修改User配置角色和权限
定义SQL语句,根据用户ID查询角色和角色对应的权限。
-
根据用户ID查询出用户对应的角色信息。
SELECT
    r.rolename
FROM
    sys_user u,sys_user_role ur,sys_role r
where
    u.id=ur.userid and ur.roleid=r.roleid and u.id=#{userid}
-
根据用户ID查询出角色对应的权限信息。
select
    m.url
from
    sys_user u,sys_user_role ur,sys_role r,sys_role_module rm,sys_module m
where
    u.id=ur.userid and ur.roleid=r.roleid and
    r.roleid=rm.roleid and rm.moduleid=m.id and
    u.id=#{userid} and url is not null
修改User实体类,添加角色和权限集合,并完成角色和权限的数据填充。
@Getter
@Setter
@TableName("sys_user")
public class User implements Serializable, UserDetails {
...
/**
* 角色列表
*/
@TableField(exist = false)
private List<String> roles;
/**
* 权限列表
*/
@TableField(exist = false)
private List<String> permissions;
/**
* 用户权限集合
* @return
*/
@Override
public Collection<? extends GrantedAuthority> getAuthorities() {
List<GrantedAuthority> lst=new ArrayList<>();
//添加角色权限
roles.forEach(role ->{lst.add(new SimpleGrantedAuthority(role)); });
//添加权限列表
permissions.forEach(permission ->{ lst.add(new SimpleGrantedAuthority(permission)); });
return lst;
}
...
}
1.3.修改loadUserByUsername方法
@Service
public class UserServiceImpl extends ServiceImpl<UserMapper, User>
implements UserService,UserDetailsService {
@Autowired
private RoleMapper roleMapper;
@Autowired
private RoleModuleMapper roleModuleMapper;
@Override
public UserDetails loadUserByUsername(String username) throws UsernameNotFoundException {
//根据用户名查询数据库中用户信息
User user = this.getOne(new QueryWrapper<User>().eq("username", username));
//判断用户是否存在
if(Objects.isNull(user))
throw new UsernameNotFoundException("用户不存在");
//权限校验TODO,后续讲解
List<String> roles = roleMapper.queryRolesByUid(user.getId());
List<String> permission = roleModuleMapper.queryRoleModuleByUid(user.getId());
user.setRoles(roles);
user.setPermissions(permission);
return user;
}
}
1.4.修改SpringSecurity配置类
当我们想要开启spring方法级安全时,只需要在任何 @Configuration实例上使用@EnableGlobalMethodSecurity 注解就能达到此目的。同时这个注解为我们提供了prePostEnabled 、securedEnabled 和 jsr250Enabled 三种不同的机制来实现同一种功能。
修改WebSecurityConfig配置类,开启基于方法的安全认证机制,也就是说在web层的controller启用注解机制的安全确认。
@Configuration
@EnableWebSecurity
@EnableGlobalMethodSecurity(prePostEnabled = true)
public class WebSecurityConfig {
    ...
}
@EnableGlobalMethodSecurity是Spring Security提供的一个注解,用于启用方法级别的安全性。它可以在任何@Configuration类上使用,以启用Spring Security的方法级别的安全性功能。它接受一个或多个参数,用于指定要使用的安全注解类型和其他选项。以下是一些常用的参数:
-
prePostEnabled:如果设置为true,则启用@PreAuthorize和@PostAuthorize注解。默认值为false。 -
securedEnabled:如果设置为true,则启用@Secured注解。默认值为false。 -
jsr250Enabled:如果设置为true,则启用@RolesAllowed注解。默认值为false。 -
proxyTargetClass:如果设置为true,则使用CGLIB代理而不是标准的JDK动态代理。默认值为false。
使用@EnableGlobalMethodSecurity注解后,可以在应用程序中使用Spring Security提供的各种注解来保护方法,例如@Secured、@PreAuthorize、@PostAuthorize和@RolesAllowed。这些注解允许您在方法级别上定义安全规则,以控制哪些用户可以访问哪些方法。
注解介绍:
| 注解 | 说明 |
|---|---|
@PreAuthorize | 用于在方法执行之前对访问进行权限验证 |
@PostAuthorize | 用于在方法执行之后对返回结果进行权限验证 |
@Secured | 用于在方法执行之前对访问进行权限验证 |
@RolesAllowed | 是Java标准的注解之一,用于在方法执行之前对访问进行权限验证 |
1.5.控制Controller层接口权限
@RestController
@RequestMapping("/user")
public class UserController {
@Autowired
private RoleService roleService;
@Autowired
private ModuleService moduleService;
@RequestMapping("/userLogin")
public String userLogin(User user){
return "login";
}
@PreAuthorize("hasAuthority('order:manager:list')")
@GetMapping("/queryRoles")
public JsonResponseBody<List<Role>> queryRoles(){
List<Role> list = roleService.list();
return new JsonResponseBody<>(list);
}
@PreAuthorize("hasAuthority('book:manager:list')")
@GetMapping("/queryModules")
public JsonResponseBody<List<Module>> queryModules(){
List<Module> list = moduleService.list();
return new JsonResponseBody<>(list);
}
@PreAuthorize("hasAuthority('管理员')")
@GetMapping("/queryTest")
public JsonResponseBody<?> queryTest(){
return new JsonResponseBody<>("你好,我是管理员!");
}
}
1.6.启动测试
配置完毕之后,重新启动项目。分别使用两个不同的用户(admin和zs)登录进行权限测试。
注意:
admin具备所有权限;zs只具备部分权限。
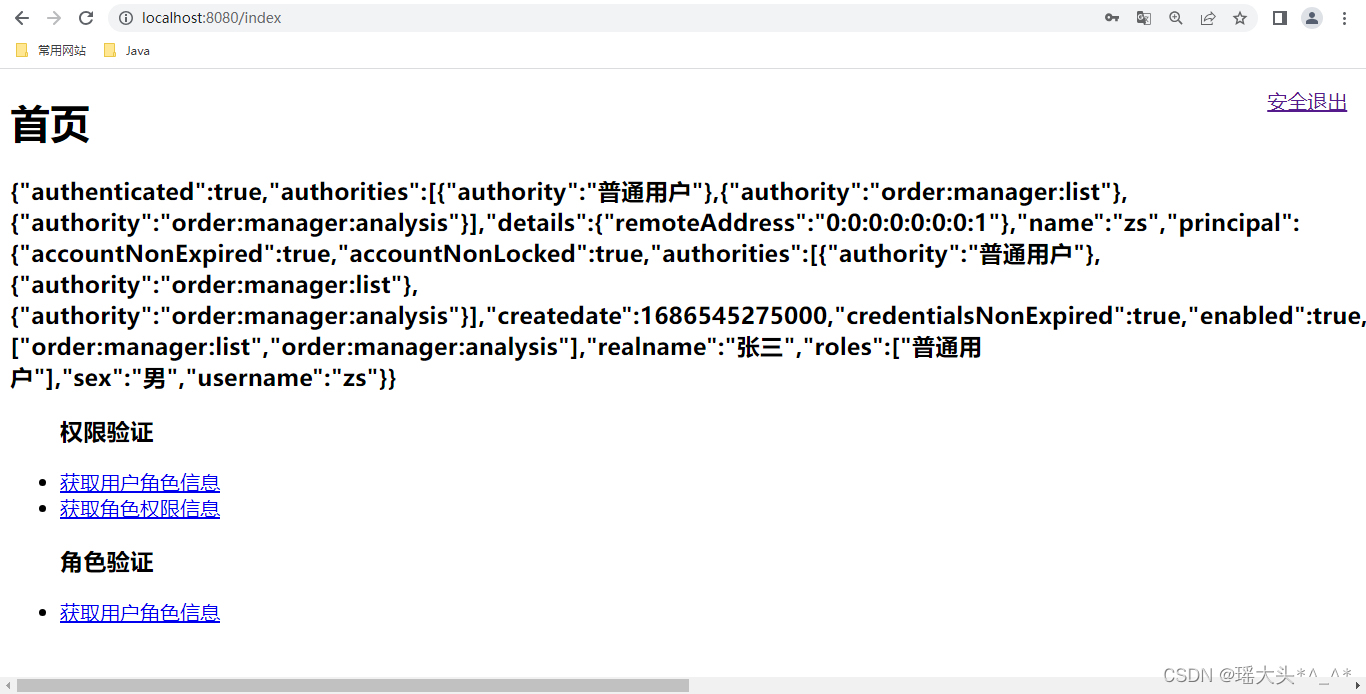
当通过zs用户登录成功之后,点击权限和角色验证进行权限测试。
-
点击获取用户角色信息,可以成功显示数据:
-

-
点击获取角色权限信息,提示403错误:(也就是无权限提示)
-
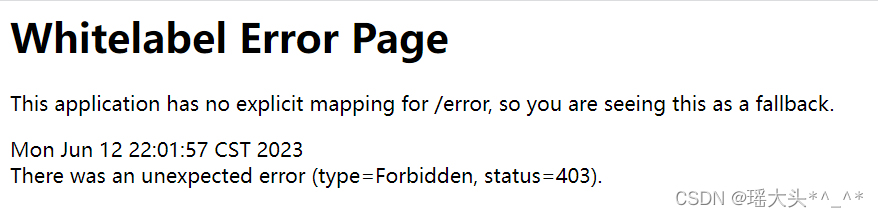
噢耶,权限验证成功,只是空白错误页面显示有点。。。
1.7.异常处理
1.7.1.AccessDeniedHandler
AccessDeniedHandler是Spring Security提供的一个接口,用于处理访问被拒绝的情况。当用户尝试访问受保护资源但没有足够的权限时,Spring Security会调用AccessDeniedHandler来处理这种情况。
AccessDeniedHandler接口只有一个方法handle(),该方法接收HttpServletRequest、HttpServletResponse和AccessDeniedException三个参数。在handle()方法中,可以自定义响应的内容,例如返回一个自定义的错误页面或JSON响应。
创建AccessDeniedHandlerImpl类并实现AccessDeniedHandler接口,实现自定义的JSON响应。例如:
@Component
public class AccessDeniedHandlerImpl implements AccessDeniedHandler {
    @Override
    public void handle(HttpServletRequest request, HttpServletResponse response, AccessDeniedException accessDeniedException) throws IOException, ServletException {
        int code = 500;
        response.setStatus(200);
        response.setContentType("application/json;charset=UTF-8");
        String msg = "权限不足,无法访问系统资源";
        Map<String, Object> result = new HashMap<>();
        result.put("msg", msg);
        result.put("code", code);
        String s = new ObjectMapper().writeValueAsString(result);
        response.getWriter().println(s);
    }
}
然后,将自定义的accessDeniedHandler注入到Spring Security的配置中:
@Autowired
private AccessDeniedHandlerImpl accessDeniedHandler;
@Bean
public SecurityFilterChain securityFilterChain(HttpSecurity http) throws Exception {
return
http
// ...
.exceptionHandling()
.accessDeniedHandler(accessDeniedHandler)
// ...
}
这样,当访问被拒绝时,Spring Security就会调用自定义AccessDeniedHandler来处理。
1.7.2.AuthenticationEntryPoint
AuthenticationEntryPoint是Spring Security中的一个接口,用于定义如何处理未经身份验证的请求。当用户尝试访问需要身份验证的资源但未进行身份验证时,AuthenticationEntryPoint将被调用。
在这个接口中,可以自定义如何处理这些未经身份验证的请求,例如重定向到登录页面或返回错误消息。需要注意的是,AuthenticationEntryPoint只处理未经身份验证的请求,已经进行身份验证但权限不足的请求则需要使用AccessDeniedHandler来处理。
创建AuthenticationEntryPointImpl类并实现AuthenticationEntryPoint接口,实现自定义的JSON响应。例如:
@Component
public class AuthenticationEntryPointImpl implements AuthenticationEntryPoint {
    @Override
    public void commence(HttpServletRequest request, HttpServletResponse response, AuthenticationException authException) throws IOException, ServletException {
        response.setStatus(200);
        int code = 500;
        String msg = "认证失败,无法访问系统资源";
        response.setContentType("application/json;charset=UTF-8");
        Map<String, Object> result = new HashMap<>();
        result.put("msg", msg);
        result.put("code", code);
        String s = new ObjectMapper().writeValueAsString(result);
        response.getWriter().println(s);
    }
}
然后,将自定义的authenticationEntryPoint注入到Spring Security的配置中:
@Autowired
private AuthenticationEntryPointImpl authenticationEntryPoint;
@Bean
public SecurityFilterChain securityFilterChain(HttpSecurity http) throws Exception {
return
http
// ...
.exceptionHandling()
.authenticationEntryPoint(authenticationEntryPoint)
// ...
}
这样,当认证失败时,Spring Security就会调用自定义AuthenticationEntryPoint来处理。


 3666
3666


 被折叠的 条评论
为什么被折叠?
被折叠的 条评论
为什么被折叠?
 到【灌水乐园】发言


