


目录
前言
本文参考黑马移动开发技术(HarmonyOS)的实战案例:健康生活案例,记录自己在做这个案例时遇到的问题,和想要分享的要点。
因为我们前面都是用的假数据来呈现效果,接下来我们将分析饮食记录的数据模型,从而基于数据模型提供真实的数据进而完成页面渲染,同时实现饮食记录的持久化保存。
一、分析记录项数据模型
我们对比发现记录项和饮食记录项可以发现它们的类型基本一致,因此可以设计成一样的数据模型。不同的是运动少了几项营养相关的类型,因此这部分可以当做可选项。

它们的数据模型如下:第一个是记录项的类别(饮食或运动),第二个是记录项的具体信息。这里我们将两个文件都放入model目录中中(model定义数据的操作接口。viewModel中定义页面所需要的数据模型。)
/**
 * 记录项类型
 */
export default class ItemCategory{
  /**
   * 类型id
   */
  id: number
  /**
   * 类型名称
   */
  name: ResourceStr

  constructor(id: number, name: ResourceStr) {
    this.id = id
    this.name = name
  }
}
import ItemCategory from '../viewmodel/ItemCategory'

/**
 * 食物类型的枚举
 */
enum FoodCategoryEnum{
  /**
   * 主食
   */
  STAPLE,
  /**
   * 蔬果
   */
  FRUIT,
  /**
   * 肉蛋奶
   */
  MEAT,
  /**
   * 坚果
   */
  NUT,
  /**
   * 其它
   */
  OTHER,
}

/**
 * 食物类型数组
 */
let FoodCategories = [
  new ItemCategory(0, $r('app.string.staple')),
  new ItemCategory(1, $r('app.string.fruit')),
  new ItemCategory(2, $r('app.string.meat')),
  new ItemCategory(3, $r('app.string.nut')),
  new ItemCategory(4, $r('app.string.other_type')),
]

/**
 * 运动类型枚举
 */
enum WorkoutCategoryEnum {
  /**
   * 走路
   */
  WALKING,
  /**
   * 跑步
   */
  RUNNING,
  /**
   * 骑行
   */
  RIDING,
  /**
   * 跳操
   */
  AEROBICS,
  /**
   * 游泳
   */
  SWIMMING,
  /**
   * 打球
   */
  BALLGAME,
  /**
   * 力量训练
   */
  STRENGTH
}

/**
 * 运动类型数组
 */
let WorkoutCategories = [
  new ItemCategory(0, $r('app.string.walking_type')),
  new ItemCategory(1, $r('app.string.running')),
  new ItemCategory(2, $r('app.string.riding')),
  new ItemCategory(3, $r('app.string.aerobics')),
  new ItemCategory(4, $r('app.string.swimming')),
  new ItemCategory(5, $r('app.string.ballgame')),
  new ItemCategory(6, $r('app.string.strength')),
]

export {FoodCategories , WorkoutCategories , FoodCategoryEnum, WorkoutCategoryEnum}
注意:这里我们可以看到枚举项没有赋值,因此它们的值默认是[0,1,2,3...],刚好与下面的记录类型数组下标对应,并且记录名也是对应的。因此我们以后不必记忆每个数组的下标,通过枚举就可以获得对应的食物或运动。
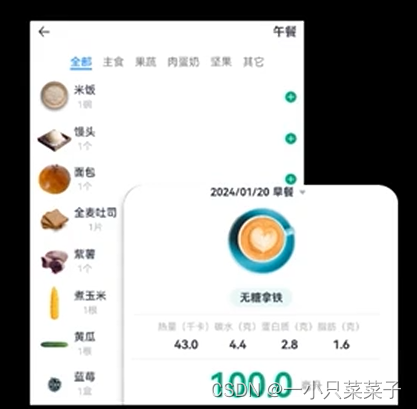
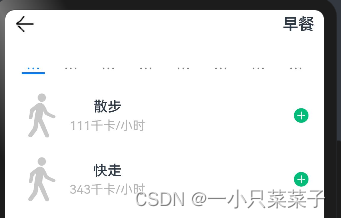
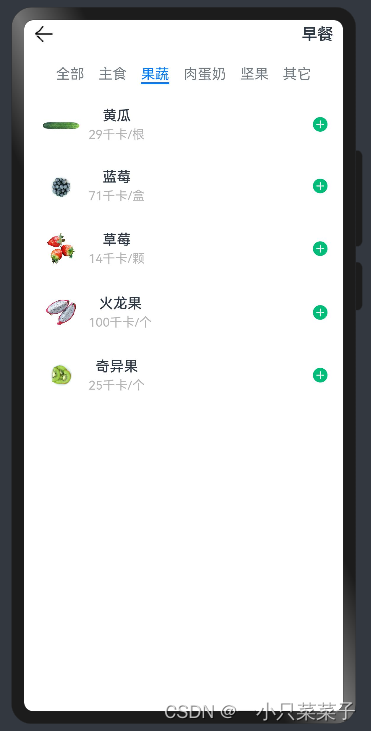
二、为饮食记录列表ItemList添加真数据
前面我们在实现的时候是固定TabContent和TabBar,但是我们注意到这里的TabBar只能动态生成而不能写死,因为这个@Builder将来要同时展示食物和运动,如果写死就既有食物又有运动了。所以应该用Foreach动态获得并渲染数据。
2.1 tabbar是“全部”
“全部”需要显示食物或是运动的全部记录项,需要判断用户点击的是什么类型,如果是食物则返回食物数组,否则返回运动数组。
 list(isFood: boolean = true): RecordItem[]{
    return isFood ? foods : workouts
  }
2.2 tabbar是“分组”
这里我们就不可以直接返回总的数组,而是需要对数据做处理,将数组中的不同元素放到对应的分组中,然后将这个分组返回。
我们分析可知这个Foreach遍历的数组既要包含tabbar信息,也要包含列表信息,包含多种信息所以我们使用对象封装。
GroupInfo数据类型如下所示:
import ItemCategory from './ItemCategory'
import RecordItem from './RecordItem'
export default class GroupInfo{
  /**
   * 分组类型
   */
  type: ItemCategory
  /**
   * 组内数据集合
   */
  items: RecordItem[]

  /**
   * 组内记录的总热量
   */
  calorie: number = 0

  constructor(type: ItemCategory, items: RecordItem[]) {
    this.type = type
    this.items = items
  }
}
有了数据类型后,我们就可以遍历食物或运动的数组,根据数组中每个元素的类别,将其放入对应类型的数组中。这样我们就获得了分组后的数组。
  listItemGroupByCategory(isFood: boolean = true){
    // 1.判断要处理的是食物还是运动
    let categories = isFood ? FoodCategories : WorkoutCategories
    let items = isFood ? foods: workouts
    // 2.创建空的分组
    let groups = categories.map(itemCategory => new GroupInfo(itemCategory, []))
    // 3.遍历记录项列表,将食物添加到对应的分组
    //这里枚举值和食物类型数组下标对应,所以可以直接匹配
    items.forEach(item => groups[item.categoryId].items.push(item))
    // 4.返回结果
    return groups
  }
注意:这里使用了map映射:遍历前面每一个元素,将其转化为另一个元素。这里是将ItemCategory变成GroupInfo
2.3 完善ItemList
在ItemList中我们Foreach循环遍历获得的分组后的数组,将之前代码中的固定值替换成数组中的元素,实现数据由假到真的转变。
import { CommonConstants } from '../../common/constants/CommonConstants'
import ItemModel from '../../model/ItemModel'
import GroupInfo from '../../viewmodel/GroupInfo'
import RecordItem from '../../viewmodel/RecordItem'
@Component
export struct ItemList {

  showPanel:(item:RecordItem)=>void
  @State isFood:boolean = true

  build() {
    Tabs(){
      TabContent(){
        this.TabContentBuilder(ItemModel.list(this.isFood))
      }
      .tabBar('全部')

      ForEach(ItemModel.listItemGroupByCategory(this.isFood),(group:GroupInfo)=>{
          TabContent(){
            this.TabContentBuilder(group.items)
          }
          .tabBar(group.type.name)

      })


    }
    .width(CommonConstants.THOUSANDTH_940)
    .height('100%')
    .barMode(BarMode.Scrollable)

  }

  @Builder TabContentBuilder(items: RecordItem[]){
    List({space:CommonConstants.SPACE_10}){
      ForEach(items, (item:RecordItem) => {
        ListItem(){
          Row({space: CommonConstants.SPACE_6}){
            Image(item.image).width(50)
            Column({space: CommonConstants.SPACE_4}){
              Text(item.name).fontWeight(CommonConstants.FONT_WEIGHT_500)
              Text(`${item.calorie}千卡/${item.unit}`).fontSize(14).fontColor($r('app.color.light_gray'))
            }
            Blank()
            Image($r('app.media.ic_public_add_norm_filled'))
              .width(18)
              .fillColor($r('app.color.primary_color'))
          }
          .width('100%')
          .padding(CommonConstants.SPACE_6)
        }.onClick(()=>this.showPanel(item))
      })
    }
    .width('100%')
    .height('100%')
  }

}
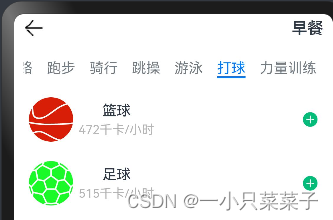
这里有一个小问题:前者没有显示完全是因为Tab有个BarMode属性默认是fixed(所有tabbar平分导致文字显示不全),修改成scrollble就可以滑动显示了
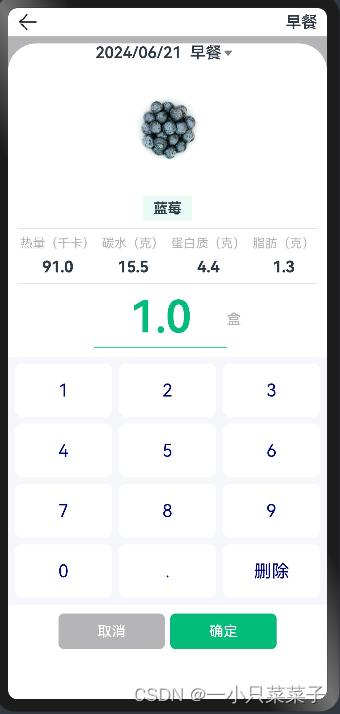
2.4 完善ItemCard
在前面我们点击记录列表后弹出的的ItemCard都是固定的关于吐司的信息,所以我们要想方法将点击的记录项的信息传递到ItemCard组件中,然后将该记录项的信息进行渲染。
在用户点击ItemList后会调用父亲ItemIndex的onPanelShow函数,我们在这个过程中将被点击的Item作为参数传递给父亲,然后在父亲中保存Item。接着为ItemList的儿子ItemCard传递Item这个参数,这样ItemCard就获得了点击项的具体信息,从而根据信息完成渲染。
import router from '@ohos.router'
import { CommonConstants } from '../common/constants/CommonConstants'
import { ItemCard } from '../view/Item/ItemCard'
import { ItemList } from '../view/Item/ItemList'
import { ItemPanelHeader } from '../view/Item/ItemPanelHeader'
import { NumberKeyboard } from '../view/Item/NumberKeyboard'
import RecordItem from '../viewmodel/RecordItem'
@Entry
@Component
struct ItemIndex {
  @State showPanel:boolean = false
  @State amount:number=1
  @State value:string='' //记录用户的输入
  @State item:RecordItem =null //用Link来传值(因为是对象类型)

  //调用父组件onPanelShow函数的的时候,将点击的Item保存下来。
  onPanelShow(item:RecordItem) {
    //用户刚进入要初始化
    this.amount=1
    this.value=''
    this.item=item
    this.showPanel = true
  }

  build() {
    Column(){
      //1.头部导航栏
      this.Header()
      //2.列表

      //绑定this后,子组件调用的就是父亲的该函数
      ItemList({showPanel:this.onPanelShow.bind(this)})
      .layoutWeight(1)

      //3.底部面板
      Panel(this.showPanel){
        //3.1顶部日期
        ItemPanelHeader()

        //3.2记录项卡片

        //因为这里Item初始化为0(即每点击ItemLIst的时候),这样渲染可能会报错

        if(this.item){
          ItemCard({amount:this.amount,item:$item})
        }

        //3.3数字键盘
        NumberKeyboard({amount:$amount,value:$value})

        //3.4按钮
        Row({space:CommonConstants.SPACE_6}){
          Button('取消')
            .width(120)
            .backgroundColor($r('app.color.light_gray'))
            .type(ButtonType.Normal)
            .borderRadius(6)
            .onClick(()=>this.showPanel=false)

          Button('确定')
            .width(120)
            .backgroundColor($r('app.color.primary_color'))
            .type(ButtonType.Normal)
            .borderRadius(6)
            .onClick(()=>this.showPanel=false)

        }
        .margin({top:10})
      }
      .mode(PanelMode.Full)
      .dragBar(false)
      .backgroundColor(Color.White)
      .backgroundMask($r('app.color.light_gray'))
    }
    .width('100%')
    .height('100%')
  }

  @Builder Header(){
    Row(){
      Image($r('app.media.ic_public_back'))
        .width(24)
        .onClick(()=>router.back())
      Blank()
      Text('早餐').fontSize(18).fontWeight(CommonConstants.FONT_WEIGHT_600)
    }
    .width(CommonConstants.THOUSANDTH_940)
    .height(32)
  }
}
import { CommonConstants } from '../../common/constants/CommonConstants'
import RecordItem from '../../viewmodel/RecordItem'
@Component
export struct ItemCard {
  @Prop amount:number
  @Link item:RecordItem
  build() {
    Column({space:CommonConstants.SPACE_8}){
      //1.图片
      Image(this.item.image).width(150)
      //2.名称
      Row(){
        Text(this.item.name).fontWeight(CommonConstants.FONT_WEIGHT_700)

      }
      .backgroundColor($r('app.color.lightest_primary_color'))
      .padding({top:5,bottom:5,left:12,right:12})
      Divider().width(CommonConstants.THOUSANDTH_940).opacity(0.6)
      //3,营养素
      Row({space:CommonConstants.SPACE_8}){
        this.NutrientInfo('热量(千卡)',this.item.calorie)

        if(this.item.id<10000){
          this.NutrientInfo('碳水(克)',this.item.carbon)
          this.NutrientInfo('蛋白质(克)',this.item.protein)
          this.NutrientInfo('脂肪(克)',this.item.fat)
        }

      }
      Divider().width(CommonConstants.THOUSANDTH_940).opacity(0.6)
      //4.数量
       Row(){
         Column({space:CommonConstants.SPACE_4}){
           Text(this.amount.toFixed(1))
             .fontSize(50).fontColor($r('app.color.primary_color'))
             .fontWeight(CommonConstants.FONT_WEIGHT_600)
           Divider().color($r('app.color.primary_color'))
         }
         .width(150)
         Text(this.item.unit)
           .fontColor($r('app.color.light_gray'))
           .fontWeight(CommonConstants.FONT_WEIGHT_600)
       }


    }
  }

  @Builder NutrientInfo(label:string, value:number){
    Column({space:CommonConstants.SPACE_8}){
      Text(label).fontSize(14).fontColor($r('app.color.light_gray'))
      Text((value*this.amount).toFixed(1)).fontSize(18).fontWeight(CommonConstants.FONT_WEIGHT_700)
    }
  }
}
注意:这里Item的传递是使用Link装饰器,因为它是个对象类型。
三、分析饮食记录的数据模型
我们分析饮食记录的UI图可以得知,饮食记录是有类别的(早餐、午餐...),饮食记录要根据类别进行分组。因此我们设计的数据模型如下所示:

3.1 数据模型代码:
饮食记录类型:
export default class RecordType{
  /**
   * 类型id
   */
  id: number
  /**
   * 类型名称
   */
  name: ResourceStr
  /**
   * 类型图标
   */
  icon: ResourceStr
  /**
   * 类型推荐最小卡路里
   */
  min: number
  /**
   * 类型推荐最大卡路里
   */
  max: number

  constructor(id: number, name: ResourceStr, icon: ResourceStr, min: number = 0, max: number = 0) {
    this.id = id
    this.name = name
    this.icon = icon
    this.min = min
    this.max = max
  }
}
饮食记录本身:
import RecordItem from './RecordItem'

/**
 * 饮食记录的页面数据模型
 */
export default class RecordVO {
  /**
   * 记录id
   */
  id: number
  /**
   * 饮食记录类型
   */
  typeId: number

  /**
   * 卡路里总数
   */
  calorie: number

  /**
   * 记录中的食物或运动信息
   */
  recordItem: RecordItem

  /**
   * 食物数量或运动时长,如果是运动信息则无
   */
  amount: number = 0
}
注意:在饮食记录中(RecordVO)我们之前已经定义了记录食物或运动信息的数据模型,因此这里直接引用recordItem: RecordItem就好,不必重复定义。
3.2 定义饮食记录的接口
数据模型定义完成后我们在model目录中给两种数据模型提供模型数据。这里重点说一下RecordModel:因为用户可以对记录增删改查所以我们要去定义这些接口,并且由于我们可以根据日期去做查询,查找某一天记录,所以还要实现数据持久化(这里我们使用关系数据库)
3.2.1 数据库的增删改查
import common from '@ohos.app.ability.common';
import relationalStore from '@ohos.data.relationalStore';
import { ColumnInfo, ColumnType } from '../bean/ColumnInfo';
import Logger from './Logger';

const DB_FILENAME: string = 'HeiMaHealthy.db'

class DbUtil {
  rdbStore: relationalStore.RdbStore

  initDB(context: common.UIAbilityContext): Promise<void> {
    let config: relationalStore.StoreConfig = {
      name: DB_FILENAME,
      securityLevel: relationalStore.SecurityLevel.S1
    }
    return new Promise<void>((resolve, reject) => {
      relationalStore.getRdbStore(context, config)
        .then(rdbStore => {
          this.rdbStore = rdbStore
          Logger.debug('rdbStore 初始化完成!')
          resolve()
        })
        .catch(reason => {
          Logger.debug('rdbStore 初始化异常', JSON.stringify(reason))
          reject(reason)
        })
    })
  }

  createTable(createSQL: string): Promise<void> {
    return new Promise((resolve, reject) => {
      this.rdbStore.executeSql(createSQL)
        .then(() => {
          Logger.debug('创建表成功', createSQL)
          resolve()
        })
        .catch(err => {
          Logger.error('创建表失败,' + err.message, JSON.stringify(err))
          reject(err)
        })
    })
  }

  insert(tableName: string, obj: any, columns: ColumnInfo[]): Promise<number> {
    return new Promise((resolve, reject) => {
      // 1.构建新增数据
      let value = this.buildValueBucket(obj, columns)
      // 2.新增
      this.rdbStore.insert(tableName, value, (err, id) => {
        if (err) {
          Logger.error('新增失败!', JSON.stringify(err))
          reject(err)
        } else {
          Logger.debug('新增成功!新增id:', id.toString())
          resolve(id)
        }
      })
    })
  }

  delete(predicates: relationalStore.RdbPredicates): Promise<number> {
    return new Promise((resolve, reject) => {
      this.rdbStore.delete(predicates, (err, rows) => {
        if (err) {
          Logger.error('删除失败!', JSON.stringify(err))
          reject(err)
        } else {
          Logger.debug('删除成功!删除行数:', rows.toString())
          resolve(rows)
        }
      })
    })
  }

  queryForList<T>(predicates: relationalStore.RdbPredicates, columns: ColumnInfo[]): Promise<T[]> {
    return new Promise((resolve, reject) => {
      this.rdbStore.query(predicates, columns.map(info => info.columnName), (err, result) => {
        if (err) {
          Logger.error('查询失败!', JSON.stringify(err))
          reject(err)
        } else {
          Logger.debug('查询成功!查询行数:', result.rowCount.toString())
          resolve(this.parseResultSet(result, columns))
        }
      })
    })
  }

  parseResultSet<T> (result: relationalStore.ResultSet, columns: ColumnInfo[]): T[] {
    // 1.声明最终返回的结果
    let arr = []
    // 2.判断是否有结果
    if (result.rowCount <= 0) {
      return arr
    }
    // 3.处理结果
    while (!result.isAtLastRow) {
      // 3.1.去下一行
      result.goToNextRow()
      // 3.2.解析这行数据,转为对象
      let obj = {}
      columns.forEach(info => {
        let val = null
        switch (info.type) {
          case ColumnType.LONG:
            val = result.getLong(result.getColumnIndex(info.columnName))
            break
          case ColumnType.DOUBLE:
            val = result.getDouble(result.getColumnIndex(info.columnName))
            break
          case ColumnType.STRING:
            val = result.getString(result.getColumnIndex(info.columnName))
            break
          case ColumnType.BLOB:
            val = result.getBlob(result.getColumnIndex(info.columnName))
            break
        }
        obj[info.name] = val
      })
      // 3.3.将对象填入结果数组
      arr.push(obj)
      Logger.debug('查询到数据:', JSON.stringify(obj))
    }
    return arr
  }

  buildValueBucket(obj: any, columns: ColumnInfo[]): relationalStore.ValuesBucket {
    let value = {}
    columns.forEach(info => {
      let val = obj[info.name]
      if (typeof val !== 'undefined') {
        value[info.columnName] = val
      }
    })
    return value
  }
}


let dbUtil: DbUtil = new DbUtil();

export default dbUtil as DbUtil
注意:在这一部分由于对象的键名与数据库的字段名不一致,所以我们使用了columnsInfo[ ]数组来做名字的映射,columnsInfo有对象键名,数据库字段名,同时也要包含字段类型(解析resultset结果集的时候会用到)
3.2.2 实现RecordModel接口
定义好数据库通用的工具类后,我们就可以利用工具类来进行数据的增删改查了。
/**
 * 数据库建表语句
 */
import relationalStore from '@ohos.data.relationalStore'
import { ColumnInfo, ColumnType } from '../common/bean/ColumnInfo'
import RecordPO from '../common/bean/RecordPO'
import DbUtil from '../common/utils/DbUtil'
const CREATE_TABLE_SQL: string = `
 CREATE TABLE IF NOT EXISTS record (
   id INTEGER PRIMARY KEY AUTOINCREMENT,
   type_id INTEGER NOT NULL,
   item_id INTEGER NOT NULL,
   amount DOUBLE NOT NULL,
   create_time INTEGER NOT NULL
 )
 `

const COLUMNS: ColumnInfo[] = [
  {name: 'id', columnName: 'id', type: ColumnType.LONG},
  {name: 'typeId', columnName: 'type_id', type: ColumnType.LONG},
  {name: 'itemId', columnName: 'item_id', type: ColumnType.LONG},
  {name: 'amount', columnName: 'amount', type: ColumnType.DOUBLE},
  {name: 'createTime', columnName: 'create_time', type: ColumnType.LONG}
]

const TABLE_NAME = 'record'
const ID_COLUMN = 'id'
const DATE_COLUMN = 'create_time'

class RecordModel {
  getCreateTableSql(): string {
    return CREATE_TABLE_SQL
  }

  insert(record: RecordPO): Promise<number>{
    return DbUtil.insert(TABLE_NAME, record, COLUMNS)
  }

  deleteById(id: number): Promise<number>{
    // 1.删除条件
    let predicates = new relationalStore.RdbPredicates(TABLE_NAME)
    predicates.equalTo(ID_COLUMN, id)
    // 2.删除
    return DbUtil.delete(predicates)
  }

  listByDate(date: number): Promise<RecordPO[]>{
    // 1.查询条件
    let predicates = new relationalStore.RdbPredicates(TABLE_NAME)
    predicates.equalTo(DATE_COLUMN, date)
    // 2.查询
    return DbUtil.queryForList(predicates, COLUMNS)
  }
}

let recordModel = new RecordModel()

export default recordModel as RecordModel
三、UI效果展示
总结
以上就是今天的内容,本文实现了由假数据到真数据的转变,通过点击对应的记录项可以渲染出对应ItemCard的信息,同时今天还实现了数据库的增删改查操作。


 626
626

 被折叠的 条评论
为什么被折叠?
被折叠的 条评论
为什么被折叠?
 到【灌水乐园】发言


