


最近在学习cordova,cordova本身提供一些插件,但是有时并不能满足工作的需要,有些插件需要自己来写。最近我需要一个从本地图库选择带二维码的图片并识别的插件,在网上找了好多例子,不是版本太旧就是顺序写的不清楚,我摸索着鼓捣了两天终于弄好了,现在来给大家分享一下,希望可以帮到你们!如果需要实现别的功能,思路和步骤是一样的,大家可以参考一下。
接下来我们一步一步的开始啦!(在这里默认大家已经安装好了node和cordova,注意node必须为最新版本)
cordova应用
创建一个cordova应用
cordova create hello com.test.hello HelloWorld添加Android平台
cordova platform add android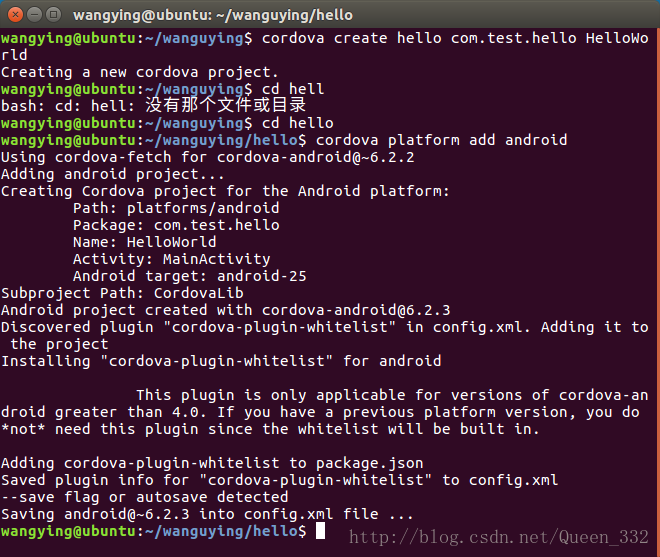
在Android Studio中引入项目
在Android Studio中选择的路径为hello/platforms/android
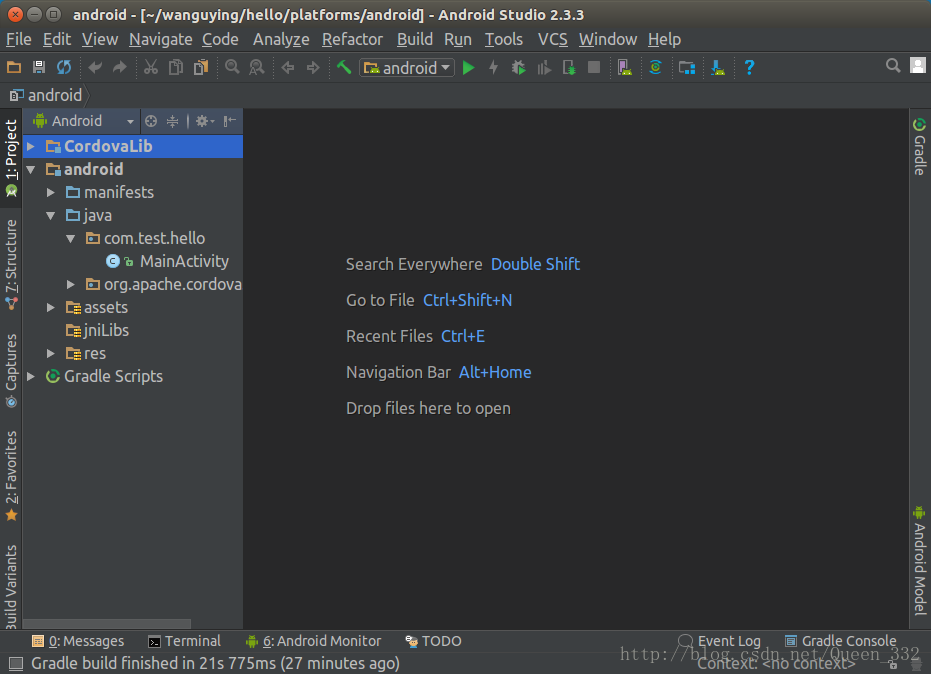
ok,我们的项目已经创建完成,接下来我们来创建插件
自定义插件
pluman的安装
npm install -g plugman创建插件
plugman create --name CoolPlugin --plugin_id coolPlugin --plugin_version 0.0.1 name: 插件名字,plugin_id: 插件的id,plugin_version: 插件的版本
如果需要对插件添加一下更详细的信息,大家可以百度下,网上都有。
创建好的插件目录为:src,www(CoolPlugin.js),plugin.xml
我们再来在插件目录下添加Android平台和package.json文件(如果不添加package.json文件,项目在引用插件时会报错)
plugman platform add --platform_name android
sudo plugman createpackagejson .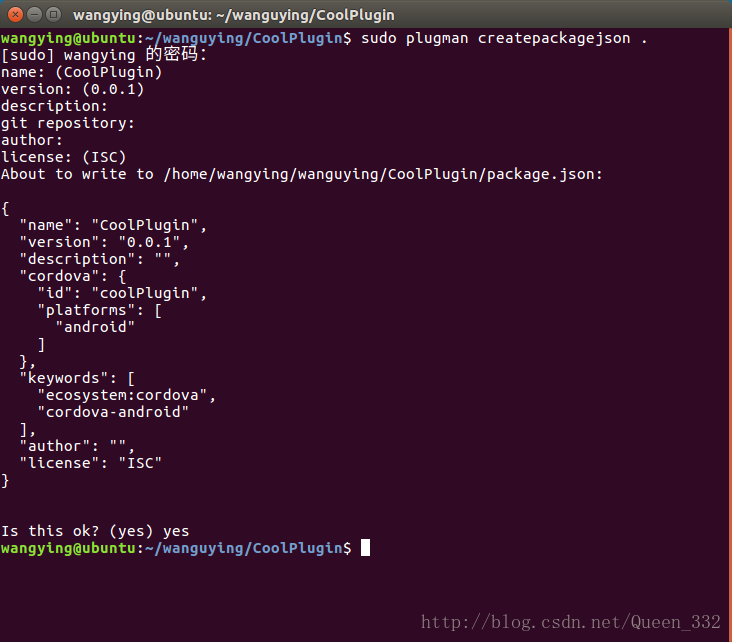
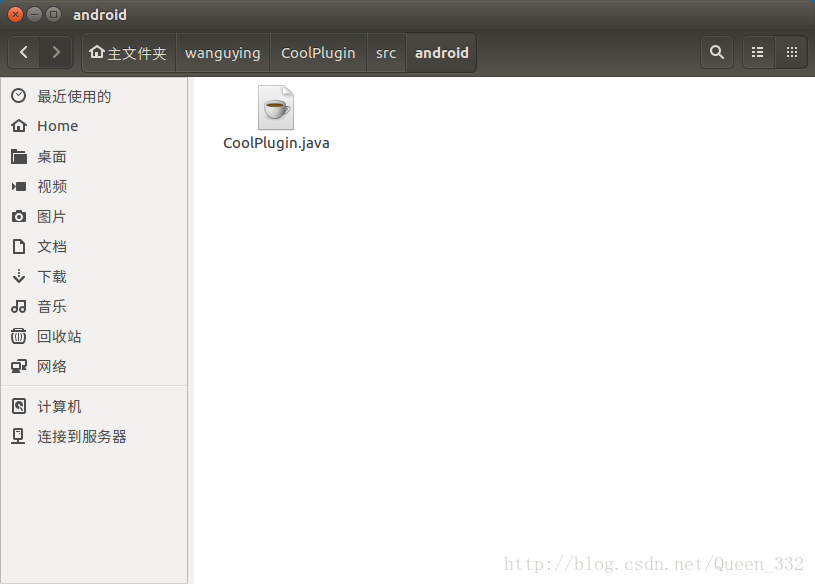
这时在插件目录下会多一个package.json文件,在src文件夹下会多出一个android文件夹,android文件夹下有一个CoolPlugin.java
ok,项目也有了,插件也准备好了,接下来我们把插件添加到我们的项目里
添加插件
我们在项目路径下来添加插件,注意添加的插件路径,
cordova plugin add ~/wanguying/CoolPlugin添加完成后,我们看Android Studio,在src目录下显示我们刚刚添加的插件
(小乌龙:大家src目录下的是com.test.hello我的是com.example.hello,大家不用太在意,因为我误删了之前的项目,又新建了一个忘了改包名了,这个不影响!不用管就行!哈哈哈)
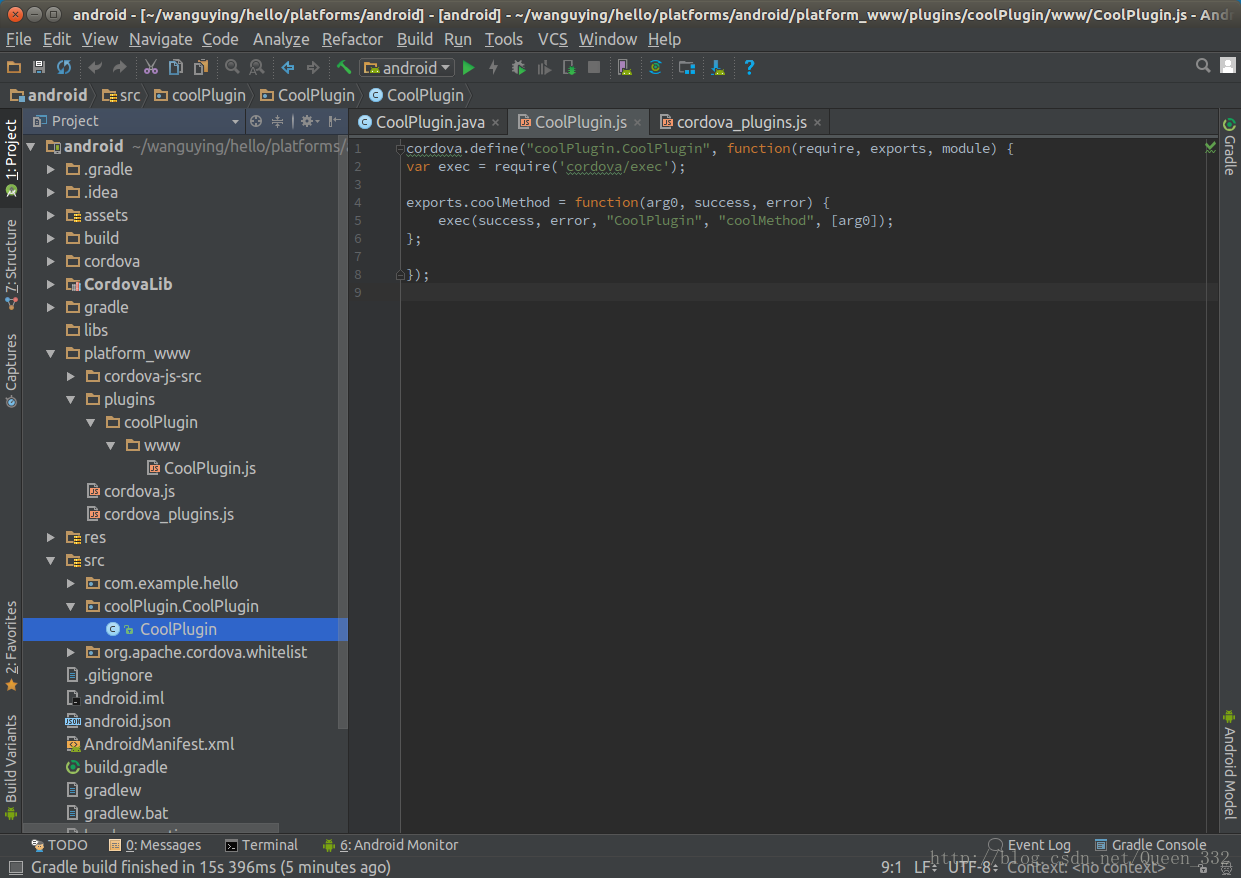
继续,首先我们来看platform_www目录下CoolPlugin.js文件
cordova.define("coolPlugin.CoolPlugin", function(require, exports, module) {
var exec = require('cordova/exec');

exports.coolMethod = function(arg0, success, error) {
    exec(success, error, "CoolPlugin", "coolMethod", [arg0]);
};

});
,我们再打开src目录下CoolPlugin.java文件,这个文件可能会报错,应该是包名的问题,这个不用管,我们根据这两个文件来学习下
package coolPlugin;

import android.widget.Toast;

import org.apache.cordova.CordovaPlugin;
import org.apache.cordova.CallbackContext;

import org.json.JSONArray;
import org.json.JSONException;
import org.json.JSONObject;

/**
 * This class echoes a string called from JavaScript.
 */
public class CoolPlugin extends CordovaPlugin {

    @Override
    public boolean execute(String action, JSONArray args, CallbackContext callbackContext) throws JSONException {
        if (action.equals("coolMethod")) {
            String message = args.getString(0);
            Toast.makeText(cordova.getActivity(), message, Toast.LENGTH_SHORT).show();
            this.coolMethod(message, callbackContext);
            return true;
        }
        return false;
    }

    private void coolMethod(String message, CallbackContext callbackContext) {
        if (message != null && message.length() > 0) {
            callbackContext.success(message);
        } else {
            callbackContext.error("Expected one non-empty string argument.");
        }
    }
}
js文件的第一行是插件的id,剩下的是他固定的写法,其中exec方法中”CoolPlugin”, “coolMethod”这个参数,就是java文件的类名和方法名,在java文件中args就是html界面传过来的参数,我们在用toast方法来显示出来。
现在我们就来写html界面,继续Android Studio,打开assets/www目录下的index.html,我们来写一个按钮,当我们点击按钮的时候,我们来调用Android代码。在index.html这个界面我简化了一下,代码如下
<!DOCTYPE html>
<html>
<head>
    <meta name="format-detection" content="telephone=no">
    <meta name="msapplication-tap-highlight" content="no">
    <link rel="stylesheet" type="text/css" href="css/index.css">
    <title>Hello World</title>
</head>
<body>
<button onclick="btnClick()">btnClick</button>
<script type="text/javascript" src="js/jquery-3.2.1.js"></script>
<script type="text/javascript" src="cordova.js"></script>
<script type="text/javascript" src="js/index.js"></script>
<script type="text/javascript">
</script>
</body>
</html>
在上述代码中,我添加了一个jquery文件,如果不加,点击按钮可能会没反应,jQuery下载地址https://code.jquery.com/jquery-3.2.1.js
下载完成后直接添加到和index.js同目录下就ok了。
在index.js中,我们来写一下,按钮的点击事件
  function btnClick(){
//   cordova.plugins.CoolPlugin.coolMethod(function (successMsg) {
//            alert("successMsg:" + successMsg);
//
//        }, function (errorMsg) {
//            alert("errorMsg:" + errorMsg);
//        }, "CoolPlugin", "coolMethod", ["success"]);

    cordova.exec(function (successMsg) {
          alert("successMsg:" + successMsg);

      }, function (errorMsg) {
          alert("errorMsg:" + errorMsg);
      }, "CoolPlugin", "coolMethod", ["success"]);
}
上述代码写在app.initialize();这句话的下面就可以了。
这个里面我写了两个方法,我注释的那个有点问题,还没有解决,大家可以尝试这解决一下,下边那个是可以用的。
现在就可以在Android Studio中直接运行了,当我们点击按钮的时候,会有一个success的对话框和提示框,这就说明成功了!
上述只是自定义插件的一个简单小例子,接下来我们来实现从本地图库选择带二维码的图片并识别,其实主要是修改我们的CoolPlugin.java代码。
实现从本地选择带二维码的图片并识别
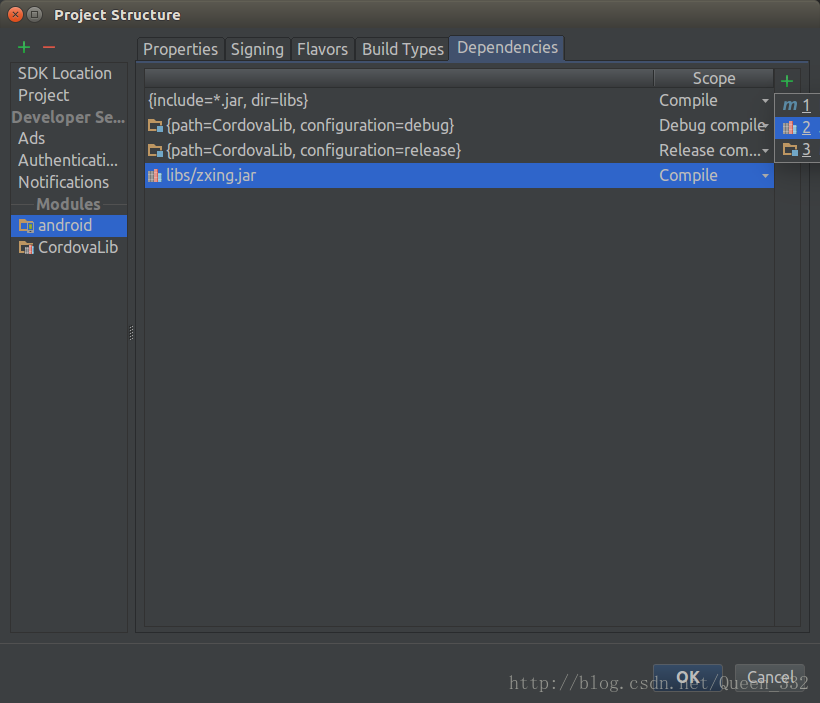
下载zxing.jar http://download.csdn.net/download/queen_332/9968925
大家也可以从网上自己搜。下载后放到libs目录下,Ctrl+Shift+Alt+S 弹出窗口,把我们的文件添加进来就ok了
下面就是我修改后的java文件
public class CoolPlugin extends CordovaPlugin {
    private CallbackContext mCallbackContext;
    private int RESULT_LOAD_IMAGE = 1;
    private String photo_path = null;
    private String recode = null;


    @Override
    public boolean execute(String action, JSONArray args, CallbackContext callbackContext) throws JSONException {
        this.mCallbackContext = callbackContext;
        if ("toast".equals(action)) {
            getPic();

            return true;
        }
        mCallbackContext.error("error");
        return false;
    }

    /**
     * 从本地图库选图片
     */
    private void getPic() {
        Intent innerIntent = new Intent(); // "android.intent.action.GET_CONTENT"
        if (Build.VERSION.SDK_INT < 19) {
            innerIntent.setAction(Intent.ACTION_GET_CONTENT);
        } else {
            // innerIntent.setAction(Intent.ACTION_OPEN_DOCUMENT);  这个方法报 图片地址 空指针;使用下面的方法
            innerIntent.setAction(Intent.ACTION_PICK);
        }

        innerIntent.setType("image/*");

        Intent wrapperIntent = Intent.createChooser(innerIntent, "选择二维码图片");

        cordova.startActivityForResult(this, wrapperIntent, RESULT_LOAD_IMAGE);

    }

    @Override
    public void onActivityResult(int requestCode, int resultCode, Intent data) {
        super.onActivityResult(requestCode, resultCode, data);
        if (requestCode == RESULT_LOAD_IMAGE) {
            if (resultCode == RESULT_OK) {

                String[] proj = {MediaStore.Images.Media.DATA};
                // 获取选中图片的路径
                final Cursor cursor = cordova.getActivity().getContentResolver().query(data.getData(),
                        proj, null, null, null);

                if (cursor.moveToFirst()) {
                    int column_index = cursor
                            .getColumnIndexOrThrow(MediaStore.Images.Media.DATA);
                    photo_path = cursor.getString(column_index);

                    if (photo_path == null) {
                        photo_path = Utils.getPath(cordova.getActivity(),
                                data.getData());

                    }

                }

                cursor.close();
                cordova.getThreadPool().execute(new Runnable() {
                    public void run() {

                        Result result = Utils.scanningImage(photo_path);
                        // String result = decode(photo_path);
                        if (result == null) {
                            Looper.prepare();
                            Toast.makeText(cordova.getActivity(), "图片格式有误", Toast.LENGTH_SHORT)
                                    .show();
                            Looper.loop();
                        } else {
                            // 数据返回
                            recode = Utils.recode(result.toString());

                        }
                        mCallbackContext.success(recode);
                    }
                });

            }

        }

    }

}
然后在我们的CoolPlugin.java的同一目录下新建两个文件Utils和RGBLuminanceSource文件如图
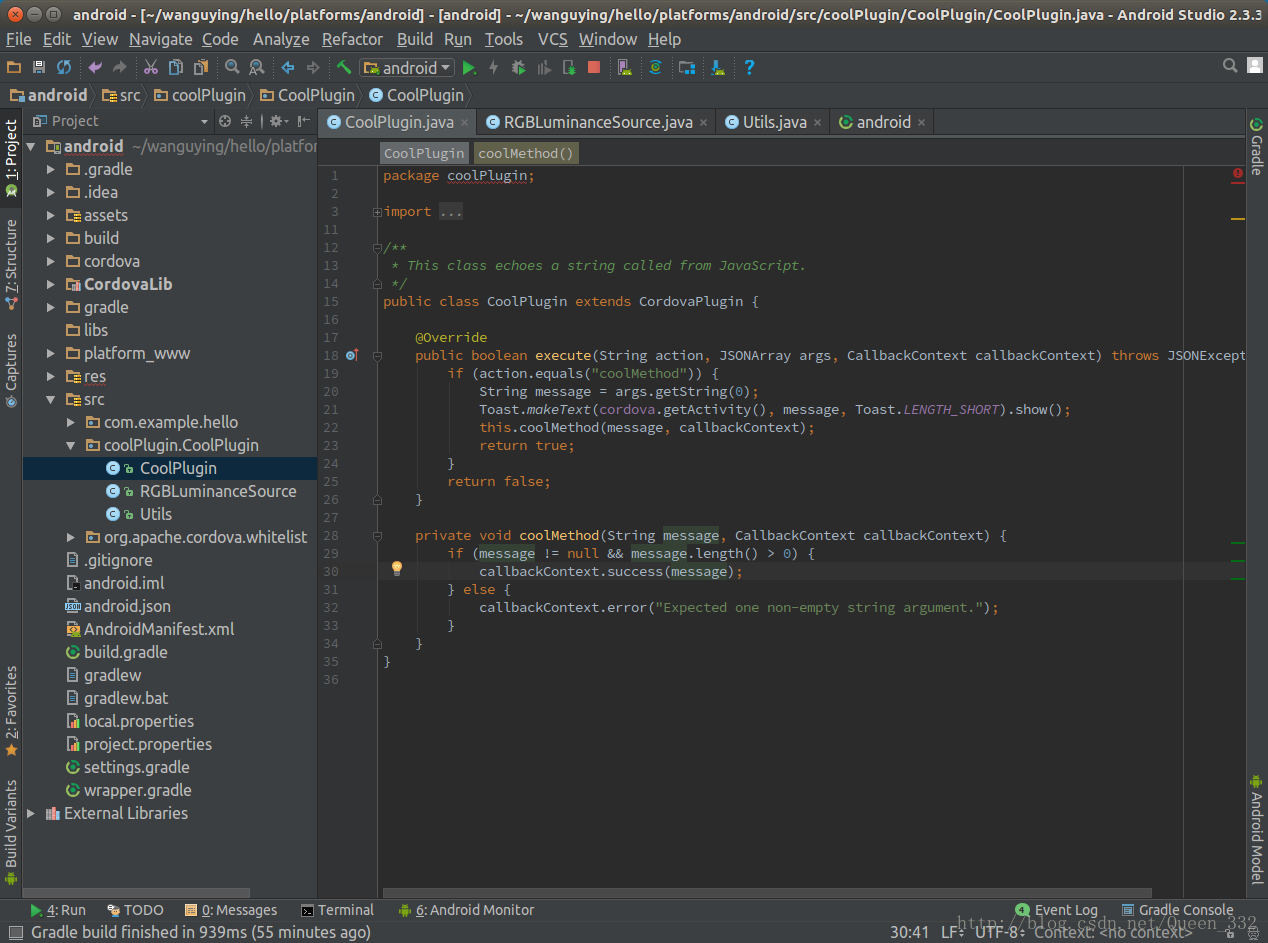
代码如下
package coolPlugin;

import android.graphics.Bitmap;
import android.graphics.BitmapFactory;

import com.google.zxing.LuminanceSource;

import java.io.FileNotFoundException;

/**
 * Created by wangying on 17-9-7.
 */

public class RGBLuminanceSource  extends LuminanceSource {
    private final byte[] luminances;

    public RGBLuminanceSource(String path) throws FileNotFoundException {
        this(loadBitmap(path));
    }

    public RGBLuminanceSource(Bitmap bitmap) {
        super(bitmap.getWidth(), bitmap.getHeight());
        int width = bitmap.getWidth();
        int height = bitmap.getHeight();
        int[] pixels = new int[width * height];
        bitmap.getPixels(pixels, 0, width, 0, 0, width, height);
        // In order to measure pure decoding speed, we convert the entire image
        // to a greyscale array
        // up front, which is the same as the Y channel of the
        // YUVLuminanceSource in the real app.
        luminances = new byte[width * height];
        for (int y = 0; y < height; y++) {
            int offset = y * width;
            for (int x = 0; x < width; x++) {
                int pixel = pixels[offset + x];
                int r = (pixel >> 16) & 0xff;
                int g = (pixel >> 8) & 0xff;
                int b = pixel & 0xff;
                if (r == g && g == b) {
                    // Image is already greyscale, so pick any channel.
                    luminances[offset + x] = (byte) r;
                } else {
                    // Calculate luminance cheaply, favoring green.
                    luminances[offset + x] = (byte) ((r + g + g + b) >> 2);
                }
            }
        }
    }

    @Override
    public byte[] getRow(int y, byte[] row) {
        if (y < 0 || y >= getHeight()) {
            throw new IllegalArgumentException(
                    "Requested row is outside the image: " + y);
        }
        int width = getWidth();
        if (row == null || row.length < width) {
            row = new byte[width];
        }
        System.arraycopy(luminances, y * width, row, 0, width);
        return row;
    }

    // Since this class does not support cropping, the underlying byte array
    // already contains
    // exactly what the caller is asking for, so give it to them without a copy.
    @Override
    public byte[] getMatrix() {
        return luminances;
    }

    private static Bitmap loadBitmap(String path) throws FileNotFoundException {
        Bitmap bitmap = BitmapFactory.decodeFile(path);
        if (bitmap == null) {
            throw new FileNotFoundException("Couldn't open " + path);
        }
        return bitmap;
    }
}
package coolPlugin;
import android.annotation.TargetApi;
import android.content.ContentUris;
import android.content.Context;
import android.database.Cursor;
import android.graphics.Bitmap;
import android.graphics.BitmapFactory;
import android.net.Uri;
import android.os.Build;
import android.os.Environment;
import android.provider.DocumentsContract;
import android.provider.MediaStore;
import android.text.TextUtils;
import android.util.Log;
import com.google.zxing.BinaryBitmap;
import com.google.zxing.ChecksumException;
import com.google.zxing.DecodeHintType;
import com.google.zxing.FormatException;
import com.google.zxing.LuminanceSource;
import com.google.zxing.MultiFormatReader;
import com.google.zxing.NotFoundException;
import com.google.zxing.PlanarYUVLuminanceSource;
import com.google.zxing.Result;
import com.google.zxing.common.HybridBinarizer;
import com.google.zxing.qrcode.QRCodeReader;
import java.io.UnsupportedEncodingException;
import java.nio.charset.Charset;
import java.util.Hashtable;
/**
* Created by wangying on 17-9-7.
*/
public class Utils {
public static Bitmap scanBitmap = null;
// public static final boolean isChineseCharacter(String chineseStr) {
// char[] charArray = chineseStr.toCharArray();
// for (int i = 0; i < charArray.length; i++) {
// // 是否是Unicode编码,除了"�"这个字符.这个字符要另外处理
// if ((charArray[i] >= '\u0000' && charArray[i] < '\uFFFD')
// || ((charArray[i] > '\uFFFD' && charArray[i] < '\uFFFF'))) {
// continue;
// } else {
// return false;
// }
// }
// return true;
// }
/**
* Get a file path from a Uri. This will get the the path for Storage Access
* Framework Documents, as well as the _data field for the MediaStore and
* other file-based ContentProviders.
*
* @param context The context.
* @param uri The Uri to query.
* @author paulburke
*/
@TargetApi(19)
public static String getPath(final Context context, final Uri uri) {
final boolean isKitKat = Build.VERSION.SDK_INT >= Build.VERSION_CODES.KITKAT;
// DocumentProvider
if (isKitKat && DocumentsContract.isDocumentUri(context, uri)) {
// ExternalStorageProvider
if (isExternalStorageDocument(uri)) {
final String docId = DocumentsContract.getDocumentId(uri);
final String[] split = docId.split(":");
final String type = split[0];
if ("primary".equalsIgnoreCase(type)) {
return Environment.getExternalStorageDirectory() + "/"
+ split[1];
}
// TODO handle non-primary volumes
}
// DownloadsProvider
else if (isDownloadsDocument(uri)) {
final String id = DocumentsContract.getDocumentId(uri);
final Uri contentUri = ContentUris.withAppendedId(
Uri.parse("content://downloads/public_downloads"),
Long.valueOf(id));
return getDataColumn(context, contentUri, null, null);
}
// MediaProvider
else if (isMediaDocument(uri)) {
final String docId = DocumentsContract.getDocumentId(uri);
final String[] split = docId.split(":");
final String type = split[0];
Uri contentUri = null;
if ("image".equals(type)) {
contentUri = MediaStore.Images.Media.EXTERNAL_CONTENT_URI;
} else if ("video".equals(type)) {
contentUri = MediaStore.Video.Media.EXTERNAL_CONTENT_URI;
} else if ("audio".equals(type)) {
contentUri = MediaStore.Audio.Media.EXTERNAL_CONTENT_URI;
}
final String selection = "_id=?";
final String[] selectionArgs = new String[]{split[1]};
return getDataColumn(context, contentUri, selection,
selectionArgs);
}
}
// MediaStore (and general)
else if ("content".equalsIgnoreCase(uri.getScheme())) {
return getDataColumn(context, uri, null, null);
}
// File
else if ("file".equalsIgnoreCase(uri.getScheme())) {
return uri.getPath();
}
return null;
}
/**
* Get the value of the data column for this Uri. This is useful for
* MediaStore Uris, and other file-based ContentProviders.
*
* @param context The context.
* @param uri The Uri to query.
* @param selection (Optional) Filter used in the query.
* @param selectionArgs (Optional) Selection arguments used in the query.
* @return The value of the _data column, which is typically a file path.
*/
public static String getDataColumn(Context context, Uri uri,
String selection, String[] selectionArgs) {
Cursor cursor = null;
final String column = "_data";
final String[] projection = {column};
try {
cursor = context.getContentResolver().query(uri, projection,
selection, selectionArgs, null);
if (cursor != null && cursor.moveToFirst()) {
final int column_index = cursor.getColumnIndexOrThrow(column);
return cursor.getString(column_index);
}
} finally {
if (cursor != null)
cursor.close();
}
return null;
}
/**
* @param uri The Uri to check.
* @return Whether the Uri authority is ExternalStorageProvider.
*/
public static boolean isExternalStorageDocument(Uri uri) {
return "com.android.externalstorage.documents".equals(uri
.getAuthority());
}
/**
* @param uri The Uri to check.
* @return Whether the Uri authority is DownloadsProvider.
*/
public static boolean isDownloadsDocument(Uri uri) {
return "com.android.providers.downloads.documents".equals(uri
.getAuthority());
}
/**
* @param uri The Uri to check.
* @return Whether the Uri authority is MediaProvider.
*/
public static boolean isMediaDocument(Uri uri) {
return "com.android.providers.media.documents".equals(uri
.getAuthority());
}
/**
* //TODO: TAOTAO 将bitmap由RGB转换为YUV //TOOD: 研究中
*
* @param bitmap 转换的图形
* @return YUV数据
*/
public static byte[] rgb2YUV(Bitmap bitmap) {
// 该方法来自QQ空间
int width = bitmap.getWidth();
int height = bitmap.getHeight();
int[] pixels = new int[width * height];
bitmap.getPixels(pixels, 0, width, 0, 0, width, height);
int len = width * height;
byte[] yuv = new byte[len * 3 / 2];
int y, u, v;
for (int i = 0; i < height; i++) {
for (int j = 0; j < width; j++) {
int rgb = pixels[i * width + j] & 0x00FFFFFF;
int r = rgb & 0xFF;
int g = (rgb >> 8) & 0xFF;
int b = (rgb >> 16) & 0xFF;
y = ((66 * r + 129 * g + 25 * b + 128) >> 8) + 16;
u = ((-38 * r - 74 * g + 112 * b + 128) >> 8) + 128;
v = ((112 * r - 94 * g - 18 * b + 128) >> 8) + 128;
y = y < 16 ? 16 : (y > 255 ? 255 : y);
u = u < 0 ? 0 : (u > 255 ? 255 : u);
v = v < 0 ? 0 : (v > 255 ? 255 : v);
yuv[i * width + j] = (byte) y;
// yuv[len + (i >> 1) * width + (j & ~1) + 0] = (byte) u;
// yuv[len + (i >> 1) * width + (j & ~1) + 1] = (byte) v;
}
}
return yuv;
}
/**
* 中文乱码
* <p>
* 暂时解决大部分的中文乱码 但是还有部分的乱码无法解决 .
* <p>
* 如果您有好的解决方式 请联系 2221673069@qq.com
* <p>
* 我会很乐意向您请教 谢谢您
*
* @return
*/
public static String recode(String str) {
String formart = "";
try {
boolean ISO = Charset.forName("ISO-8859-1").newEncoder()
.canEncode(str);
if (ISO) {
formart = new String(str.getBytes("ISO-8859-1"), "GB2312");
Log.i("1234 ISO8859-1", formart);
} else {
formart = str;
Log.i("1234 stringExtra", str);
}
} catch (UnsupportedEncodingException e) {
// TODO Auto-generated catch block
e.printStackTrace();
}
return formart;
}
// TODO: 解析部分图片
public static Result scanningImage(String path) {
if (TextUtils.isEmpty(path)) {
return null;
}
// DecodeHintType 和EncodeHintType
Hashtable<DecodeHintType, String> hints = new Hashtable<DecodeHintType, String>();
hints.put(DecodeHintType.CHARACTER_SET, "utf-8"); // 设置二维码内容的编码
BitmapFactory.Options options = new BitmapFactory.Options();
options.inJustDecodeBounds = true; // 先获取原大小
scanBitmap = BitmapFactory.decodeFile(path, options);
options.inJustDecodeBounds = false; // 获取新的大小
int sampleSize = (int) (options.outHeight / (float) 200);
if (sampleSize <= 0)
sampleSize = 1;
options.inSampleSize = sampleSize;
scanBitmap = BitmapFactory.decodeFile(path, options);
// --------------测试的解析方法---PlanarYUVLuminanceSource-这几行代码对project没作功----------
LuminanceSource source1 = new PlanarYUVLuminanceSource(
Utils.rgb2YUV(scanBitmap), scanBitmap.getWidth(),
scanBitmap.getHeight(), 0, 0, scanBitmap.getWidth(),
scanBitmap.getHeight(), false);
BinaryBitmap binaryBitmap = new BinaryBitmap(new HybridBinarizer(
source1));
MultiFormatReader reader1 = new MultiFormatReader();
Result result1;
try {
result1 = reader1.decode(binaryBitmap);
String content = result1.getText();
Log.i("123content", content);
} catch (NotFoundException e1) {
// TODO Auto-generated catch block
e1.printStackTrace();
}
// ----------------------------
coolPlugin.RGBLuminanceSource source = new coolPlugin.RGBLuminanceSource(scanBitmap);
BinaryBitmap bitmap1 = new BinaryBitmap(new HybridBinarizer(source));
QRCodeReader reader = new QRCodeReader();
try {
try {
try {
return reader.decode(bitmap1, hints);
} catch (FormatException e) {
e.printStackTrace();
}
} catch (ChecksumException e) {
e.printStackTrace();
}
} catch (NotFoundException e) {
e.printStackTrace();
}
return null;
}
}修改index.js文件
  function btnClick(){
    cordova.exec(function (successMsg) {
          alert("successMsg:" + successMsg);

      }, function (errorMsg) {
          alert("errorMsg:" + errorMsg);
      }, "CoolPlugin", "coolMethod", []);
}
ok,再运行就是选图片,识别二维码了!
后期会把源码分享给大家,因为我是刚刚接触,有的地方可能说的不够仔细,如果有错误的地方,请指正,多谢!


 5549
5549


 被折叠的 条评论
为什么被折叠?
被折叠的 条评论
为什么被折叠?
 到【灌水乐园】发言


