


Quagga 路由软件学习(by quqi99)
作者:张华 发表于:2013-07-07
版权声明:可以任意转载,转载时请务必以超链接形式标明文章原始出处和作者信息及本版权声明
http://blog.csdn.net/quqi99 )
Quagga是一个开源的基于Zebra实现了RIP, OSPF, BGP的动态路由软件。它提供的CLI命令和Cisco IOS类似。
1 安装
再下载源码,解压后执行下列命令:
sudo yum install readline-devel #打开vty功能需要readline包
./configure --enable-vtysh --enable-user=root --enable-group=root –enable-vty-group=root --sysconfdir=/etc/quagga –libdir=/lib
make && sudo make install
如果不是用root用户,如使用quagga用户,则还需要:
sudo useradd -r -d /usr/local/sbin -s /sbin/nologin quagga
sudo mkdir /var/run/quagga
sudo chown quagga /var/run/quagga
sudo chgrp quagga /var/run/quagga
它有下列进程,根据需要启动:
zebra: 路由接口声明和静态路由
bgpd: 支持BGP
ospfd: 支持OSPF
ospf6d: 支持IPv6 OSPF
ripd: 支持RIP v2
ripngd: 支持RIP IPv6
2 配置并启动Zemba软路由
创建配置文件: sudo mv /etc/guagga/zebra.conf.sample /etc/guagga/zebra.conf
在/etc/hosts文件中添加一条记录:192.168.99.100 Router
运行命令sudo zemba -d启动zemba服务.
上面sudo zemba -d命令只是将我们的“路由器”(软路由)运行起来了(也就是转发那块),但是它还无法正常工作,现在还要给它配置路由表。路由表可以手工配置,也可以运行动态路由协议,vk rip, ospf实现自动配置。
我们先看看如何手工配置路由,即运行“telnet localhost 2601”命令进行类似ciso IOS的配置路由配置界面。
Router> en
#进入特权模式
Password:
Router# config t
Router(config)#
access-list Add an access list entry
banner Set banner string
debug Debugging functions (see also 'undebug')
enable Modify enable password parameters
end End current mode and change to enable mode.
exit Exit current mode and down to previous mode
help Description of the interactive help system
hostname Set system's network name
interface Select an interface to configure
ip IP information
ipv6 IPv6 information
line Configure a terminal line
list Print command list
log Logging control
no Negate a command or set its defaults
password Assign the terminal connection password
quit Exit current mode and down to previous mode
route-map Create route-map or enter route-map command mode
router-id Manually set the router-id
service Set up miscellaneous service
show Show running system information
table Configure target kernel routing table
write Write running configuration to memory, network, or terminal
#给接口配置IP地址:
Router(config)# interface eth0
Router(config-if)# ip address 192.168.2.1/24
配置一个路由器的常用方法:
Router(config)# hostname R1
R1(config)# int em1
R1(config-if)# ip address 172.18.186.107/23
R1(config-if)# no shutdown
R1(config-if)# exit
3 开启RIP/OSPF内部动态路由协议
sudo mv /etc/guagga/ripd.conf.sample /etc/guagga/ripd.conf
sudo ripd -d
例子:三台虚机,一台做路由,两台做客户端
路由器所在的Linux分别有两个网卡,eth0:192.168.1.1和eth1:192.168.10.1。
客户端A 所在网段为192.168.1.0/24,IP为192.168.1.2。
客户端B所在网段为192.168.10.0/24,IP为192.168.10.2。
在路由器的虚机上安装guagga,并开启zebma及rip两个协议,这时候是可以从192.168.1.2 ping 通 192.168.10.2的。
查看RIP路由表:
ripd> router rip
OSPF也是一个内部动态路由协议,它是基于状态的,一个路由器上知道全自治区域的所有路由信息。而RIP是基于最短路径的,只能有一个最短的路由。
sudo mv /etc/guagga/ospfd.conf.sample /etc/guagga/ospfd.conf
sudo ospfd -d
ospf的手工配置界面是:telnet 0 2604
指定在172.18.186.0/23和192.168.3.0/24两个网络之间使用rip协议
ripd> en
ripd# conf t
ripd(config)# router rip
ripd(config-router)# network 172.18.186.0/23
ripd(config-router)# network 192.168.3.0/24
ripd(config-router)# end
ripd#
如果OSPF,则应该指定哪些网络位于同一个区域,因为它是面向状态的内部路由协议:
network 172.18.186.0/23 area 0
network 192.168.3.0/24 area 0
3 开启BGP外部动态路由协议
sudo mv /etc/guagga/bgpd.conf.sample /etc/guagga/bgpd.conf
sudo bgpd -d
手工配置界面是:telnet 0 2605
例子:
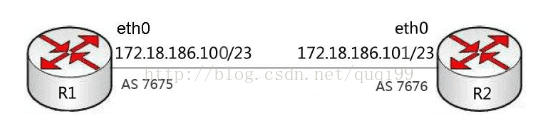 下面只显示R1的Zebra配置过程,R2请自行配置:
Router> en
Password:
R1# conf t
R1(config)# hostname r1
r1(config)# int em1
r1(config-if)# ip address 172.18.186.100/23
下面只显示R1的BGP配置过程,R2请自行配置:
[hua@laptop nova]$ telnet 0 2605
Trying 0.0.0.0...
Connected to 0.
Escape character is '^]'.
Hello, this is Quagga (version 0.99.22).
Copyright 1996-2005 Kunihiro Ishiguro, et al.
User Access Verification
Password:
bgpd> en
bgpd# conf t
bgpd(config)# hostname r1_bgpd
#指定自治系统号7675(自治系统号是一个16bit的数字,从1-65535,其中64512-65535保留为私有)
r1_bgpd(config)# router bgp 7675
r1_bgpd(config-router)# network 172.18.186.0/23
r1_bgpd(config-router)# neighbor 172.18.186.101 remote-as 7676
r1_bgpd(config-router)# exit
r1_bgpd(config)# exit
r1_bgpd# sh ip bgp neighbors
r1_bgpd# show ip bgp
BGP table version is 0, local router ID is 0.0.0.0
Status codes: s suppressed, d damped, h history, * valid, > best, i - internal,
r RIB-failure, S Stale, R Removed
Origin codes: i - IGP, e - EGP, ? - incomplete
Network Next Hop Metric LocPrf Weight Path
*> 172.18.186.0/23 0.0.0.0 0 32768 i
Total number of prefixes 1
r1_bgpd#
Total number of prefixes 1
开启debug功能,将日记保存到/tmp/bgpd.log文件中。
r1_bgpd# debug bgp events
BGP events debugging is on
r1_bgpd# debug bgp keepalives
BGP keepalives debugging is on
r1_bgpd# debug bgp updates
BGP updates debugging is on
r1_bgpd# conf t
r1_bgpd(config)# log file /tmp/bgpd.log
r1_bgpd(config)# exit
5 路由的获取
Linux下的路由可以通过netlink包编程获取。
下面只显示R1的Zebra配置过程,R2请自行配置:
Router> en
Password:
R1# conf t
R1(config)# hostname r1
r1(config)# int em1
r1(config-if)# ip address 172.18.186.100/23
下面只显示R1的BGP配置过程,R2请自行配置:
[hua@laptop nova]$ telnet 0 2605
Trying 0.0.0.0...
Connected to 0.
Escape character is '^]'.
Hello, this is Quagga (version 0.99.22).
Copyright 1996-2005 Kunihiro Ishiguro, et al.
User Access Verification
Password:
bgpd> en
bgpd# conf t
bgpd(config)# hostname r1_bgpd
#指定自治系统号7675(自治系统号是一个16bit的数字,从1-65535,其中64512-65535保留为私有)
r1_bgpd(config)# router bgp 7675
r1_bgpd(config-router)# network 172.18.186.0/23
r1_bgpd(config-router)# neighbor 172.18.186.101 remote-as 7676
r1_bgpd(config-router)# exit
r1_bgpd(config)# exit
r1_bgpd# sh ip bgp neighbors
r1_bgpd# show ip bgp
BGP table version is 0, local router ID is 0.0.0.0
Status codes: s suppressed, d damped, h history, * valid, > best, i - internal,
r RIB-failure, S Stale, R Removed
Origin codes: i - IGP, e - EGP, ? - incomplete
Network Next Hop Metric LocPrf Weight Path
*> 172.18.186.0/23 0.0.0.0 0 32768 i
Total number of prefixes 1
r1_bgpd#
Total number of prefixes 1
开启debug功能,将日记保存到/tmp/bgpd.log文件中。
r1_bgpd# debug bgp events
BGP events debugging is on
r1_bgpd# debug bgp keepalives
BGP keepalives debugging is on
r1_bgpd# debug bgp updates
BGP updates debugging is on
r1_bgpd# conf t
r1_bgpd(config)# log file /tmp/bgpd.log
r1_bgpd(config)# exit
5 路由的获取
Linux下的路由可以通过netlink包编程获取。
Quagga不直接使用底层的路由表或者硬件转发表,它自己维护的路由表是RIB表,包含除主机路由以外的所有路由(因为主机路由是通过ARP学到的,而ARP是OS底层实现的)。RIB表包括直连路由,静态路由,动态路由。而OS维护的表是转发表,即FIB表,Quagga负责维护RIB与FIB间的同步,也负责各种路由协议的路由表与RIB间的同步;Quagga提供了几种方式与内核通信,类UNIX系统下的常见方式ioctl, sysctl, proc, netlink都有支持。RIB表是radix树结构,而FIB表是hash table结构。radix是一个二叉树,如下图所示:
该radix二叉树用结构休route_table表示,
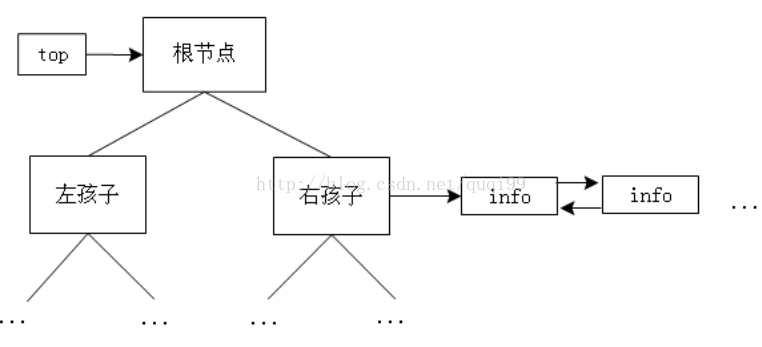 根节点用结构体route_node表示,包括四个成员,表示前缀的prefix结构体,左孩子、右孩子和表示下一路的info指针,info可以是下一跳的接口,或者IP,也可以是黑洞,分别对应着三种路由目标的类型:IFNAME, GATEWAY, BLACKHOLE。
一点体会:
设想两个异地的openstack云通过quagga进行动态路由学习互访的话:
1, 首先需要ISP给数据中心分配一个BGP号(向CNNIC申请自治域号)
2,数据中心内部用OSPF,数据中心(内网ip)和ISP(外网ip)之间走BGP协议, 所有浮动ip地址需重分发到BGP路由里【实验9.11.2】 配置BGP和NAT一起使用【IEEEnjoy.L.ZH】 http://blog.csdn.net/ieeenjoy/article/details/1558248
3,也需按如下方法在路由器中配置浮动ip池
在路由器上配置一个DNAT地址,这样通过在公网上访问61.135.99.3可以访问到内网地址192.168.10.2
ip nat inside source static 192.168.10.2 61.135.99.3
或许配置一个浮动ip池:
MYNAT 66.122.33.98 66.122.33.126 netmask 255.255.255.224
access-list 10 per 172.16.0.0 0.0.255.255
ip nat inside source list 10 pool MYNAT overload
4, 更具体地详见下面列出的参考资料
6 Reference
1, Quagga使用及实验说明:http://wenku.baidu.com/view/59dc823d0912a216147929b9.html
2, EBGP和IBGP的一篇好文章, IBGP路由的水平分割 http://shenrq.blog.51cto.com/25801/154285
3, 实验9.11.2 配置BGP和NAT一起使用, http://blog.csdn.net/ieeenjoy/article/details/1558248
4, 配置静态地址转换------发布公司内网网站到互联网上 http://blog.csdn.net/zhengzizhi/article/details/17013473
5, Setting Up Network With ISP WAN and Public IP Block subnets running NAT, http://www.dslreports.com/faq/15918
6, Cisco 2811 PPPOE+NAT 配置实例, http://iflaugh.blog.51cto.com/846701/172556
7, Neutron/DynamicRouting/TestingDynamicRouting https://wiki.openstack.org/wiki/Neutron/DynamicRouting/TestingDynamicRouting


 1万+
1万+

 被折叠的 条评论
为什么被折叠?
被折叠的 条评论
为什么被折叠?
 到【灌水乐园】发言


